Thingiverse

Pegboard Interior Spacer Bracket by tirelessirony
by Thingiverse
Last crawled date: 3 years, 1 month ago
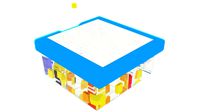
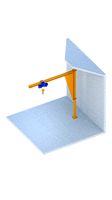
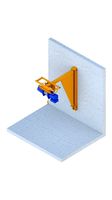
Pegboard Interior Spacer Bracket
A remix of a Bracket originally designed rawkstar320 and remixed by 3dhype. After using their Perimeter bracket I saw some sag and bending across the large board I wanted to use. So I remixed it again. Between the three brackets I installed a very stable 2'x4' Pegboard for my print room. Fun and satisfying project that'll keep future ones organized.
This is designed to be used with these other two things:
Rawkstar320 Corner Brackets: https://www.thingiverse.com/thing:989780
3dhype Center (Perimeter) Brackets: https://www.thingiverse.com/thing:2497525
To install this project I used the following tools:
3D Printer
Phillips Head Screwdriver
Power Drill
3/16" Drill Bit
Measuring Tape
Pencil
And the following Supplies:
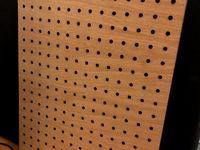
1x Pegboard, 2'x4' (Boards available at hardware stores)
4x Corner Brackets
6x Center Brackets
2x Interior Brackets
12x Ribbed Plastic Anchors for Drywall and Screw (#4 - 6 x 7/8 in)
20x Flat Head Phillips Screws (#4 x 3/8 in)
Super Glue or Other Adhesive
After gathering supplies, measure your locations twice before carefully marking where to drill your holes and insert your plastic anchors for the Perimeter Brackets. Clean and prep the wall and pegboard front surface. Then secure the back portion (flat on both sides) of the Interior Spacer Brackets using Super Glue (or other adhesive) to the BACK of your pegboard. Line up the hole in the spacer with a hole in the pegboard itself - try to ensure as even a spacing as possible (for a single 2'x4' board, I counted from the bottom corners, 12 in and 12 up).
Once that dries and you have installed the perimeter mounting brackets, place your board up on the brackets, ensuring a nice fit. Then, take your pencil and draw dots through the holes you glued the spacers over. Take the board down one last time, drill the holes and set your last two anchors. Put the board up again, place the spacers circular front portion (flat on one side, rounded on the other) over the proper hole. Use the longer #4 screws included (hopefully) w/ your plastic anchors to fasten the front of the bracket to the board and tighten the back up against the plastic anchor.
After you've finished that, simply use the shorter #4 screws to secure the front plates of the perimeter brackets and voila! Pegboard mounted. Now you have plenty of space for all those great 3D printed pegboard hooks and rungs - Cheers!
A remix of a Bracket originally designed rawkstar320 and remixed by 3dhype. After using their Perimeter bracket I saw some sag and bending across the large board I wanted to use. So I remixed it again. Between the three brackets I installed a very stable 2'x4' Pegboard for my print room. Fun and satisfying project that'll keep future ones organized.
This is designed to be used with these other two things:
Rawkstar320 Corner Brackets: https://www.thingiverse.com/thing:989780
3dhype Center (Perimeter) Brackets: https://www.thingiverse.com/thing:2497525
To install this project I used the following tools:
3D Printer
Phillips Head Screwdriver
Power Drill
3/16" Drill Bit
Measuring Tape
Pencil
And the following Supplies:
1x Pegboard, 2'x4' (Boards available at hardware stores)
4x Corner Brackets
6x Center Brackets
2x Interior Brackets
12x Ribbed Plastic Anchors for Drywall and Screw (#4 - 6 x 7/8 in)
20x Flat Head Phillips Screws (#4 x 3/8 in)
Super Glue or Other Adhesive
After gathering supplies, measure your locations twice before carefully marking where to drill your holes and insert your plastic anchors for the Perimeter Brackets. Clean and prep the wall and pegboard front surface. Then secure the back portion (flat on both sides) of the Interior Spacer Brackets using Super Glue (or other adhesive) to the BACK of your pegboard. Line up the hole in the spacer with a hole in the pegboard itself - try to ensure as even a spacing as possible (for a single 2'x4' board, I counted from the bottom corners, 12 in and 12 up).
Once that dries and you have installed the perimeter mounting brackets, place your board up on the brackets, ensuring a nice fit. Then, take your pencil and draw dots through the holes you glued the spacers over. Take the board down one last time, drill the holes and set your last two anchors. Put the board up again, place the spacers circular front portion (flat on one side, rounded on the other) over the proper hole. Use the longer #4 screws included (hopefully) w/ your plastic anchors to fasten the front of the bracket to the board and tighten the back up against the plastic anchor.
After you've finished that, simply use the shorter #4 screws to secure the front plates of the perimeter brackets and voila! Pegboard mounted. Now you have plenty of space for all those great 3D printed pegboard hooks and rungs - Cheers!
Similar models
thingiverse
free

Peg Board Corner Brackets by rawkstar320
...s the board securely. offsets board from wall 5mm.
installing these is a bit tough, feel free to modify the design as needed.
thingiverse
free

Modified Corner Brackets for 6mm thick Peg Board by debarber
...modified for the 6mm that i have. also used 3dhype center brackets already in 6 mm to complete the wallounting in my home office.
thingiverse
free

Bulletin Board Hangers by Simmer65
... them in white pla. the through hole for mounting was sized for a #8 screw. the covers are held on with a #10 self tapping screw.
thingiverse
free

Shelf Bracket by rawkstar320
...f your shelf with depend mostly on your wall anchors. i recommend drilling into a stud or using a 50lb wall anchor.
good luck!
thingiverse
free

Peg Board Corner & Center Brackets
...ip-on pieces, easier to mount with, just slip on the corners and hammer away, then screw the board down with the center brackets.
thingiverse
free

Pegboard Spacer (Imperial Standard)
...le to break off the spacer pin and flip the spacer out of the way so that it only takes up a single hole (where your screw goes).
thingiverse
free

Pegboard center support brackets by 5hp
...upport further inward instead of just at the edge. same screw setup, i recommend 4-40x3/8" button head screws for the cover.
thingiverse
free

Video Doorbell Universal Mount and Security Cover by theprovost
...e bracket and connect your doorbell wires then snap in your doorbell.
very universal. remix to put holes in if yours are uniform.
thingiverse
free

Foam board corner hangers by Kcobbler
...ippy ties, string, or whatever you have.
if you use screws, you can drill out the front hole larger so the screw head is recessed
thingiverse
free

Fightstick Mounting Bracket by ClassyNemesis
...others found it useful for remixing.
the screw holes are intentionally misaligned to match the pre-drilled holes in the framebox.
Tirelessirony
thingiverse
free

Tesla Garage Hanger by tirelessirony
...er for my p85d.
i intend to hang it from the ceiling on a string to help me line-up and park in the same exact spot every time.
thingiverse
free

Simple Residence by tirelessirony
...ple floors with more complex roof structure. (to scale this simple residence is only 1296 sqft - barely larger than a tiny home).
thingiverse
free

Pinecone Pen Holder by tirelessirony
...upports.
printed on an m3d promega using white, m3d abs-r (petg composite).
.2mm layer height
13% infill
sliced using simplify3d.
thingiverse
free

Promega Metrol Probe Slide Mount by tirelessirony
...th improved accuracy and w/o worries over a thin armature breaking off. cheers!
comments, improvements, suggestions most welcome!
Pegboard
turbosquid
free
puzzle pegboard with square and triangle puzzle
... pegboard with square and triangle puzzle for download as max on turbosquid: 3d models for games, architecture, videos. (1634635)
3d_export
$6

Workshop Tools 02 - PBR -
...vise<br>63 base pieces<br>73 prefabs<br>30 textures in 2k<br>10 materials<br>polygon count:<br>30,071<br>workbench: 848<br>pegboard 6<br>toolholder 01: 46<br>toolholder 02: 503<br>toolholder 03: 366<br>toolholder 04: 114<br>trisquare:...
thingiverse
free

Pegboard Box
...pegboard box
thingiverse
this is a box for pegboard
thingiverse
free

Pegboard hook
...pegboard hook
thingiverse
pegboard hook
thingiverse
free

pegboard hook
...pegboard hook
thingiverse
pegboard hook
thingiverse
free

Pegboard hook
...pegboard hook
thingiverse
another pegboard hook.
thingiverse
free

Pegboard Box
...pegboard box
thingiverse
pegboard box that uses standard 1" l pegboard hooks spaced at 2.925" (74.30mm) apart.
thingiverse
free

Pegboard by baberone
...rone
thingiverse
remix of pegstr - pegboard wizard project by mgx to fit my needs.
my pegboard is getting nicely organised now !
thingiverse
free
Customizable pegboard
...customizable pegboard
thingiverse
customizable pegboard for laser cutting. specify desired size and offsets.
thingiverse
free

printable pegboard
...printable pegboard
thingiverse
smaller printable pegboard, can fit into creality ender 3
Spacer
turbosquid
$55
Spacer
... available on turbo squid, the world's leading provider of digital 3d models for visualization, films, television, and games.
turbosquid
$60

grendizer & double spacer
... available on turbo squid, the world's leading provider of digital 3d models for visualization, films, television, and games.
3d_export
$5
Hex Spacers M3 Male-Female
... spacers m3 male-female
3dexport
hex spacers m3 male-female with length from 5mm to 60mm for printed circuit boards. step files.
3d_export
$5
industrial lift - spacer crane
...crane<br>- 500 kg<br>- render 3ds max 2020 and corona renderer.<br>- formats: max 2020, max 2017, obj, fbx, stp
3d_export
$5

spacer hanging light
...lampshades: any total number of lamps: 6 polys: 18 546 verts: 19 045 https://imperiumloft.ru/lyustry-175/ev_a048924-eurosvet.html
turbosquid
$5
Industrial lift Spacer crane Renaissance construction
...naissance construction for download as max, max, fbx, and obj on turbosquid: 3d models for games, architecture, videos. (1571898)
3d_export
$7

industrial lift - spacer crane renaissance construction
...ction<br>- 750 kg<br>- render 3ds max 2020 and corona renderer.<br>- formats: max 2020, max 2017, obj, fbx, stp
3d_export
$10

Spacer Sliding Wardrobe 1200 Hanger
...painter available for all software<br>ue4. ue5. blender. maya. 3d max. unity. c4d.<br>formats: .obj .gltf .fbx .blend
3d_export
$5
Hockey puck 3D Model
...hockey puck 3d model 3dexport hockey puck spacer washer disk shim hockey puck 3d model gizmo_fbi 28754...
3d_export
$5

Front 30mm Lift Kit for 1996-2004 Nissan Pathfinder and 1997-2003 Infiniti QX4
...terrano r50, regulus 1997-2003 infiniti qx4 - front strut spacer ...
Bracket
archibase_planet
free

Bracket
...bracket
archibase planet
bracket corbel holder
bracket 1 - 3d model (*.gsm+*.3ds) for interior 3d visualization.
archibase_planet
free

Bracket
...bracket
archibase planet
bracket corbel console
bracket 5 - 3d model (*.gsm+*.3ds) for interior 3d visualization.
archibase_planet
free

Bracket
...bracket
archibase planet
corbel holder bracket
bracket 6 - 3d model (*.gsm+*.3ds) for interior 3d visualization.
archibase_planet
free

Bracket
...bracket
archibase planet
bracket corbel console
bracket 8 - 3d model (*.gsm+*.3ds) for interior 3d visualization.
archibase_planet
free

Bracket
...bracket
archibase planet
bracket corbel holder
bracket n280911 - 3d model (*.gsm+*.3ds) for interior 3d visualization.
archibase_planet
free

Bracket
...bracket
archibase planet
holder corbel bracket
bracket 9 - 3d model (*.gsm+*.3ds) for interior 3d visualization.
archibase_planet
free

Bracket
...bracket
archibase planet
corbel holder bracket
bracket 10 - 3d model (*.gsm+*.3ds) for interior 3d visualization.
archibase_planet
free

Bracket
...bracket
archibase planet
corbel console bracket
bracket 11 - 3d model (*.gsm+*.3ds) for interior 3d visualization.
archibase_planet
free

Bracket
...bracket
archibase planet
holder console bracket
bracket 12 - 3d model (*.gsm+*.3ds) for interior 3d visualization.
archibase_planet
free

Bracket
...bracket
archibase planet
bracket corbel holder
bracket 13 - 3d model (*.gsm+*.3ds) for interior 3d visualization.
Interior
3d_export
$300
interior
...interior
3dexport
collection of different interiors for everyone
turbosquid
$100

interior
...turbosquid
royalty free 3d model interior for download as ma on turbosquid: 3d models for games, architecture, videos. (1412278)
turbosquid
$100
Interior
...turbosquid
royalty free 3d model interior for download as ma on turbosquid: 3d models for games, architecture, videos. (1412272)
turbosquid
$100

Interior
...urbosquid
royalty free 3d model interior for download as max on turbosquid: 3d models for games, architecture, videos. (1622862)
turbosquid
$100

Interior
...urbosquid
royalty free 3d model interior for download as max on turbosquid: 3d models for games, architecture, videos. (1622855)
turbosquid
$100

Interior
...urbosquid
royalty free 3d model interior for download as max on turbosquid: 3d models for games, architecture, videos. (1527698)
turbosquid
$100

Interior
...urbosquid
royalty free 3d model interior for download as max on turbosquid: 3d models for games, architecture, videos. (1415819)
turbosquid
$100

Interior
...urbosquid
royalty free 3d model interior for download as max on turbosquid: 3d models for games, architecture, videos. (1413021)
turbosquid
free

Interior
...urbosquid
royalty free 3d model interior for download as max on turbosquid: 3d models for games, architecture, videos. (1645324)
3d_export
free

interior
...reated. use this interior design for your successful projects.<br>createt in 3ds max 2021! rendered in corona renderer 5.2!