Thingiverse
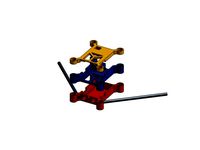
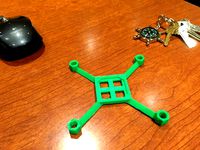
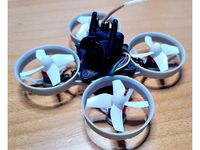
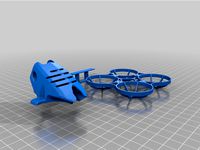
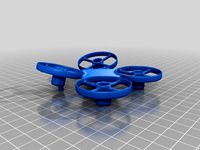
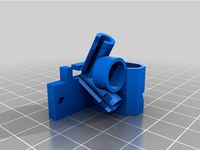
PawxSpec Whoop | microquad racing fpv drone frame by Pawx
by Thingiverse
Last crawled date: 3 years ago
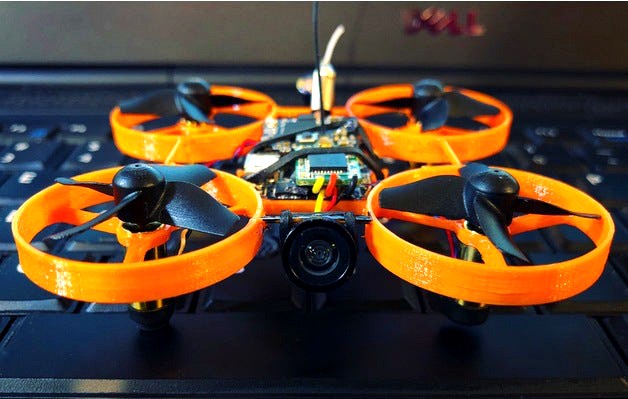
*Hard to find the FC now. Such a shame because it was light, 2.2grams had OSD and could handle 8mm motors (I used 6mm)
ATTENTION:
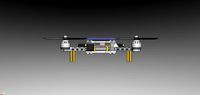
comment about your favorite ultra light weight whoop FC! And if enough people comment, I’ll remodel this.... The FC I used was a “JHF3 V1.0” with USB port on side. See pictures for how it looked. 20mmX28.75mm and weighs 2.2g. Hard to beat but hard to find :(
(These are not "affiliate" links, just shortened)
FC: http://bit.ly/2LPpdwO
Motors: http://bit.ly/2S7v1mq
Props: http://bit.ly/2NEP48G
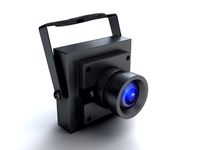
FPV Cam: http://bit.ly/2NCEWgM
VTX (I dont use included Camera): http://bit.ly/2MKdmSb
Rx (rssi on chanel 8): http://bit.ly/2Ca8GQO
Battery: http://bit.ly/2LNWswP
UV resin fastener: https://amzn.to/2XH2R2S
Rubber bands: https://amzn.to/2PVbunw
Ticky Tape: https://amzn.to/2PrsY9Y
Heat Shrink (for motor protection): https://amzn.to/2C8mds7
Polycarbonate FDM material (Orange): http://bit.ly/2NajMcJ
Update:
New Motors (OMFG, so good): http://bit.ly/2OmmpFS
TIPS to building/printing my quad at my specification:
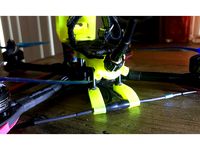
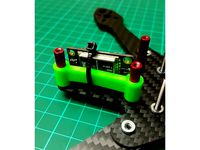
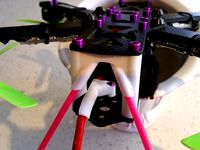
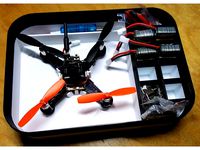
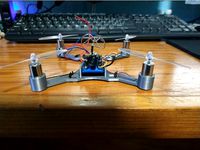
->Fasten FC with UV resin in parts list above: rigidity of the quad comes from the fastened FC at the corners using the UV resin as shown in the picture. Out of the hundreds of crashes I've had, I have never damaged the FC because I used it to increase rigidity. ...It is easy to remove the FC too for when you need to swap frames.)
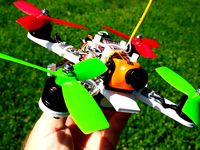
->Designed for 6MM brushed motors:
Newbeedrone GOLD motors are the best. Powerful and last a long time. Depending on your printer accuracy, you may need to file the holes in the frame for the motors to fit. Just don't file too much, the motors are meant to be pressed fit into those holes - no glue or UV resin needed. I have never had an issue with motors coming off, just make sure they are snugged. Also, I shorten and solder the motor wires to the FC to save every gram. You don't have to do the same but you are welcomed to do so if you want it exactly to my specification.
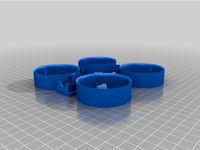
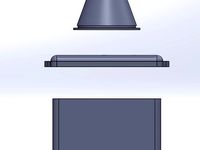
Yes, it's really slim... Want durability? Print it in Polycarbonate - I designed it around the use of PC :)
PLA may be too brittle for this frame.. try PETG or ABS. PC is the best though. and PETG is a bit brittle but not as much as PLA. I'm going to try PCTPE, i will let you guys know how that goes.
Follow me on Instagram:https://www.instagram.com/pawx_fpv/
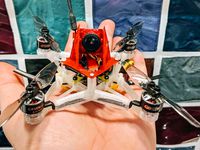
->FPV Camera / VTX: I do not use the included fpv camera of the TX01s. i use the one in the link above (1000tvl). i desolder the mic of the camera and trim the wires so that i connect the + and - leads to the same pads as the Rx. I also trim the wires of the VTX and direct solder to the batterly pads. so the only 3 wires you will have coming out of the vtx is the thicker +,- leads to power the VTX and yellow video IN. there is just enough wire for any component to reach its pad. the VTX sits on top of the FC with just enought sticky foam tape in between holding it down. you can use rubber band over the vtx like shown in the pictures.
->RX: the frsky xm is able to provide rssi thorough channel 8 using betaflight. theres lots of youtube vids about this. the receiver also sits on top of the FC with just enought sticky foam tape in between to hold it down. you can also put ruber band so that it keeps the receiver snugged as shown in the pictures.
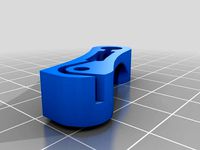
->the short lateral "T" struts that poke out of the FC housing are for the rubberbands. use two bands. one for the underslung battery, another for keeping the VTX and RX snugged (shown in pictures)
->SECRET to making the frame super light: I use Simplify3D. Message me if you would like the factory file. essentially, the middle layers are thinner than the rest by reducing the extrusion multiplier. coast at the end at .2mm distance. i print at .2mm height using a .4 mm nozzle (.48 mm width).
Extrusion mutilplier (separate Simplify3D processes)
Layer 1: 1 (100%)
Layers 2 to 10: .75 (75%)
Layers 11 to 17 .62 (62%)
Layers 18 to end .73 (73%)
->Polycarbonate is tricky to print with. i use glass bed with lots of ABS slury. Printer is covered and with bed at 90 degC. and fan off. i use the recommended extruder temp by material manufacturer and at 40mm/s.
->to add extra rigidity and durablility to the motor sturts or briding struts connecting the ducts at the perimiters, i sometimes use some of the UV resin at the connection points where stresses are high. when you break it, you'll know what i mean lol
again, you dont have to print it like this, you can print and build your own quad how ever you like. I'm just telling you how I like to print my frame so that its 2.3 grams and strong. :)
ENJOY!!
https://youtu.be/WAymjJQeIkQ
ATTENTION:
comment about your favorite ultra light weight whoop FC! And if enough people comment, I’ll remodel this.... The FC I used was a “JHF3 V1.0” with USB port on side. See pictures for how it looked. 20mmX28.75mm and weighs 2.2g. Hard to beat but hard to find :(
(These are not "affiliate" links, just shortened)
FC: http://bit.ly/2LPpdwO
Motors: http://bit.ly/2S7v1mq
Props: http://bit.ly/2NEP48G
FPV Cam: http://bit.ly/2NCEWgM
VTX (I dont use included Camera): http://bit.ly/2MKdmSb
Rx (rssi on chanel 8): http://bit.ly/2Ca8GQO
Battery: http://bit.ly/2LNWswP
UV resin fastener: https://amzn.to/2XH2R2S
Rubber bands: https://amzn.to/2PVbunw
Ticky Tape: https://amzn.to/2PrsY9Y
Heat Shrink (for motor protection): https://amzn.to/2C8mds7
Polycarbonate FDM material (Orange): http://bit.ly/2NajMcJ
Update:
New Motors (OMFG, so good): http://bit.ly/2OmmpFS
TIPS to building/printing my quad at my specification:
->Fasten FC with UV resin in parts list above: rigidity of the quad comes from the fastened FC at the corners using the UV resin as shown in the picture. Out of the hundreds of crashes I've had, I have never damaged the FC because I used it to increase rigidity. ...It is easy to remove the FC too for when you need to swap frames.)
->Designed for 6MM brushed motors:
Newbeedrone GOLD motors are the best. Powerful and last a long time. Depending on your printer accuracy, you may need to file the holes in the frame for the motors to fit. Just don't file too much, the motors are meant to be pressed fit into those holes - no glue or UV resin needed. I have never had an issue with motors coming off, just make sure they are snugged. Also, I shorten and solder the motor wires to the FC to save every gram. You don't have to do the same but you are welcomed to do so if you want it exactly to my specification.
Yes, it's really slim... Want durability? Print it in Polycarbonate - I designed it around the use of PC :)
PLA may be too brittle for this frame.. try PETG or ABS. PC is the best though. and PETG is a bit brittle but not as much as PLA. I'm going to try PCTPE, i will let you guys know how that goes.
Follow me on Instagram:https://www.instagram.com/pawx_fpv/
->FPV Camera / VTX: I do not use the included fpv camera of the TX01s. i use the one in the link above (1000tvl). i desolder the mic of the camera and trim the wires so that i connect the + and - leads to the same pads as the Rx. I also trim the wires of the VTX and direct solder to the batterly pads. so the only 3 wires you will have coming out of the vtx is the thicker +,- leads to power the VTX and yellow video IN. there is just enough wire for any component to reach its pad. the VTX sits on top of the FC with just enought sticky foam tape in between holding it down. you can use rubber band over the vtx like shown in the pictures.
->RX: the frsky xm is able to provide rssi thorough channel 8 using betaflight. theres lots of youtube vids about this. the receiver also sits on top of the FC with just enought sticky foam tape in between to hold it down. you can also put ruber band so that it keeps the receiver snugged as shown in the pictures.
->the short lateral "T" struts that poke out of the FC housing are for the rubberbands. use two bands. one for the underslung battery, another for keeping the VTX and RX snugged (shown in pictures)
->SECRET to making the frame super light: I use Simplify3D. Message me if you would like the factory file. essentially, the middle layers are thinner than the rest by reducing the extrusion multiplier. coast at the end at .2mm distance. i print at .2mm height using a .4 mm nozzle (.48 mm width).
Extrusion mutilplier (separate Simplify3D processes)
Layer 1: 1 (100%)
Layers 2 to 10: .75 (75%)
Layers 11 to 17 .62 (62%)
Layers 18 to end .73 (73%)
->Polycarbonate is tricky to print with. i use glass bed with lots of ABS slury. Printer is covered and with bed at 90 degC. and fan off. i use the recommended extruder temp by material manufacturer and at 40mm/s.
->to add extra rigidity and durablility to the motor sturts or briding struts connecting the ducts at the perimiters, i sometimes use some of the UV resin at the connection points where stresses are high. when you break it, you'll know what i mean lol
again, you dont have to print it like this, you can print and build your own quad how ever you like. I'm just telling you how I like to print my frame so that its 2.3 grams and strong. :)
ENJOY!!
https://youtu.be/WAymjJQeIkQ
Similar models
thingiverse
free
3D Printed Brushless Whoop by cncmodel
.../bit.ly/2uhcykg
esc https://bit.ly/3dxjdur
16x16 f3 fc https://bit.ly/2y9xqqd
1103 8000kv brushless motors https://bit.ly/39qeagm
thingiverse
free

Frame for FPV Quad by pataliko
...it.ly/3hve9t2)
propellers - 75mm two blade (https://bit.ly/3vpnjxa)
batteries - crazepony 1s 520 mah
gross weight around 60 grams
thingiverse
free
Minimal frame for 65mm props and 8.5mm motors by KevinKuwata
...e the mass to be roughly 11 grams. which is a 40% weight reduction from my other fpv microquad frame. i will update with results.
thingiverse
free
iFlight XL5 VTX/RX mount by kevC9
...ame/nazgul5
i used these antenna tubes for 2.4ghz (not shown in photo)https://www.thingiverse.com/thing:575902
leave a picture!!!
thingiverse
free

AstroX X5 VTx and Rx holder by GenCode
...e rx wires past the vtx if you put the vtx in the tray, or you can simply use the tray for the rx and put the wires out the side.
thingiverse
free
Martian II Radio Stack by carbrf
...t i recommend using real ones, as the printed ones tend to snap easily.
update 06/02/18: updated vtx top so that it sits better.
thingiverse
free
Skele7on POWER!
...u
rx: http://bit.ly/2nbneja
for the canopy take a look at the canopies from this frame: https://www.thingiverse.com/thing:3863561
thingiverse
free
Martian IV - Side VTX Mount by Mirko-FPV
...acer for the other standoff you will find it included.
you can find this frame here:
https://bit.ly/35adydfhttps://bit.ly/3vhl9gk
thingiverse
free
Minimal 3D Printed 4" Brushless Racing Quadcopter by RCFPVFlight
... http://bit.ly/2de1njy
daemon core pdb: http://bit.ly/23xjay3
naze32: http://bit.ly/1sv8odx
3s 850mah lipo: http://bit.ly/1tqjhjm
thingiverse
free
Impulserc alien 5" VTX antenna mount by babar121
...e pressed in nut in the upper frame plate. thus it is only useful if you are not using the rx antenna plate as shown in pictures.

Microquad
thingiverse
free
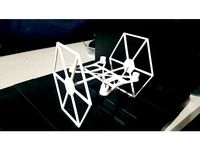
Tie Fighter MicroQuad by Barry_Barrera
...tie fighter microquad by barry_barrera
thingiverse
fly and rnjoy your new tie fighter microquad
thingiverse
free
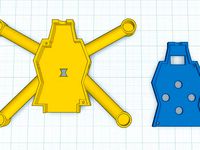
MicroQuad frame by cacer
...microquad frame by cacer
thingiverse
frame for microquadcopter
thingiverse
free
Shadow 95mm Microquad by DwarfStarFPV
...d
follow me on instagram for weekly updates on new microquads @3dprint_rcrt
as always print it, build it, share it and have fun !
thingiverse
free
Foldable Brushed Microquad 7mm Mounts by unclecracker
...ulflindestrom's foldable brushed microquad to fit 7mm motors instead of 8.5mm ones.
i remixed it to fit the hubsan x4 motors.
thingiverse
free
X-Frame85 MicroQuad Box by 4runner
...ilament pla black, 2.85mm
best value filament pla snowwhite, 2.85mm
montage:
quad, charger, props, lipos rein und deckel drauf...
thingiverse
free

Antenna Guard for ulflindestrom's Brushed FPV Microquad by henbach
...p://www.thingiverse.com/thing:1398182) and needed some more protection for my vtx antenna, so i made this little bolt on antenna.
thingiverse
free
Foldable Brushed Microquad Camera Mount by r1b4z01d
...croquad camera mount by r1b4z01d
thingiverse
i added some walls to hold the camera in better. i plan to print this later today.
thingiverse
free
6mm microquad with top plate by VPCTech
...es and lightened up the base plate to compensate the extra weight.
thanks to brod for the perfectly simple starting point.
cheers
thingiverse
free
MicroQuad v0.4 by mduca
...ils coming soon.
parts list
1x hobby king jr-wl-fd02r rev02 main board
4x sourced 7mm motors qr series ladybird - wltoys v939
thingiverse
free
Brushed MicroQuad
...020-10x20mm-coreless-motor-for-90mm-150mm-diy-micro-fpv-rc-quadcopter-frame-p-1106428.html?rmmds=myorder
thank you for reading :)
Whoop
thingiverse
free
whoop by MichaelJFPV
...whoop by michaeljfpv
thingiverse
whoop
thingiverse
free
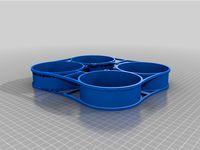
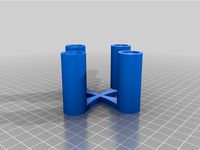
Tiny Whoop holder for 2 whoops by d2000
...tiny whoop holder for 2 whoops by d2000
thingiverse
tiny whoop holder for 2 whoop mini drones and battery
thingiverse
free
Whoop frame by Brassekongo
...whoop frame by brassekongo
thingiverse
a tiny whoop frame
thingiverse
free

Whoop frame by Brassekongo
...whoop frame by brassekongo
thingiverse
my first whoop frame.
thingiverse
free
WHOOPS 4
...
whoops is another
big cinewhoop as addon for hyperlite tooth fairy race frame 4"
first flight https://youtu.be/xm9afwiiass
thingiverse
free
Tiny Whoop 65mm by binaryfpv
...tiny whoop 65mm by binaryfpv
thingiverse
tiny whoop 65mm
thingiverse
free
V-Tail Whoop by Mystereon
...v-tail whoop by mystereon
thingiverse
v-tail whoop .. wip
thingiverse
free
Tiny Whoop Case by 3DRCStore
...tiny whoop case by 3drcstore
thingiverse
tiny whoop case for transport.
thingiverse
free
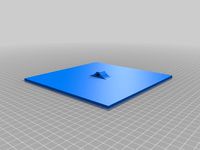
Tiny Whoop Calibration Base
...tiny whoop calibration base
thingiverse
a base usefull to calibrate your tiny whoop
thingiverse
free
Tiny Whoop Gate by Imozeb
...tiny whoop gate by imozeb
thingiverse
custom tiny whoop gate. requires hot glue for assembly.
Fpv
turbosquid
$1

FPV VTX Antenna
...e 3d model fpv vtx antenna for download as obj, fbx, and stl on turbosquid: 3d models for games, architecture, videos. (1230317)
3d_export
$9

Fpv logo 3D Model
...onogram vehicle part of auto transport 3d model logo emblem detailed high quality badge
fpv logo 3d model rmodeler 59628 3dexport
3d_export
$8
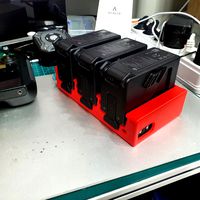
dji fpv battery slot holder
...er for 3 dji fpv batteries. holds perfectly without shaking. need 1 m3 countersunk head bolt. need to print 6 pin, 1 case, 1 cap.
3d_export
$10
fpv camera hd 700tvl
...aterials are logically named<br>the main format is in 3ds max 2009.<br>satisfcation garranteed..<br>thank you !
thingiverse
free
FpV Mount (SOPORTE FPV) by elborjas1987
...fpv mount (soporte fpv) by elborjas1987
thingiverse
this is a fpv mount with the same holes of naza base.
thingiverse
free
fpv by tbutera
...fpv by tbutera
thingiverse
fpv
thingiverse
free
fpv by tbutera
...fpv by tbutera
thingiverse
fpv
thingiverse
free
FPV DRONE ROOSTER DJI FPV PART
...fpv drone rooster dji fpv part
thingiverse
fpv drone rooster dji fpv install part
thingiverse
free
FPV monitor
...tml?rmmds=myorder&cur_warehouse=cn
link for download : https://cults3d.com/fr/mod%c3%a8le-3d/divers/fpv-monitor-ecran-fpv-faf
thingiverse
free
FPV receiver mount for FPV display by petrex
...eceiver mount for fpv display by petrex
thingiverse
aomway receiver mount for field view 777 fpv monitor. with small cable tray.
Drone
3d_export
$12
Drones
...drones
3dexport
drones
3d_export
$5
drone
...drone
3dexport
drone
3d_export
$6

drone
...drone
3dexport
high poly model of dji phantom 4 (drone)
3d_export
$5

drone
...drone
3dexport
drone military flight, sizes are in mm, modeled in fision 360
3d_export
free
drone
...drone
3dexport
drone de uso tactico, creado en blender version 2.79
3d_export
$35
DRONE
...drone
3dexport
turkey drone alpagu kamikaze foldable wing 3ds max 2019,2020,2021,2022 vray 5.00 rendered
3d_ocean
$29

Drone
...drone camera drone electronics justtomas military parrot plane robot sci-fi spy toy vehicle
drone by justtomas .c4d r16 .obj .3ds
turbosquid
$6

Drone
...rone
turbosquid
royalty free 3d model drone for download as on turbosquid: 3d models for games, architecture, videos. (1347051)
turbosquid
free

Drone
...drone
turbosquid
free 3d model drone for download as blend on turbosquid: 3d models for games, architecture, videos. (1688993)
turbosquid
$69
Drone
...e
turbosquid
royalty free 3d model drone for download as max on turbosquid: 3d models for games, architecture, videos. (1232508)
Racing
3ddd
$1
race
...race
3ddd
мотоцикл
race
turbosquid
$15
Racing
...d
royalty free 3d model racing for download as obj and blend on turbosquid: 3d models for games, architecture, videos. (1474846)
3d_export
$5

racing car
...racing car
3dexport
racing car
3d_export
$5
racing helmet
...racing helmet
3dexport
helmet 3d model for motocross or racing cars
3d_export
$5

racing car
...racing car
3dexport
low poly classical racing car model
3d_ocean
$29
racing car
...cing car rim seat speed sport sport car tyre
detailed 3d model of racing car. all materials are included. model is ready for use.
3d_ocean
$29

racing car
... rim seat speed spoiler sport sport car tire
detailed 3d model of racing car. all materials are included. model is ready for use.
3d_ocean
$15

Race Car
...race car
3docean
a very detailed and realistic 3d model of a race car, which was created with polygons.
3ddd
$1
Turbo Racing
... машинка
игрушечная гоночная дорога "turbo racing". почувствуй себя настоящим гонщиком.
3d_export
$100

start race motocross
...start race motocross
3dexport
start race motocross
Frame
archibase_planet
free

Frame
...frame
archibase planet
frame photo frame
frame n190813 - 3d model (*.gsm+*.3ds) for interior 3d visualization.
archibase_planet
free

Frame
...frame
archibase planet
frame photo frame
frame n071113 - 3d model (*.gsm+*.3ds) for interior 3d visualization.
3ddd
$1

Frame
...frame
3ddd
frame
3ddd
free

Frame
...frame
3ddd
frame
archibase_planet
free

Frame
...frame
archibase planet
frame mirror frame ornament
frame n260113 - 3d model (*.gsm+*.3ds) for interior 3d visualization.
archibase_planet
free

Frame
...frame
archibase planet
frame photo frame
frame photo n190813 - 3d model (*.gsm+*.3ds) for interior 3d visualization.
archibase_planet
free

Frame
...frame
archibase planet
frame window window frame
frame 1 - 3d model (*.gsm+*.3ds) for interior 3d visualization.
archibase_planet
free

Frame
...frame
archibase planet
frame window frame window
frame 3 - 3d model (*.gsm+*.3ds) for interior 3d visualization.
archibase_planet
free

Frame
...frame
archibase planet
frame wall frame decoration
frame 1 - 3d model (*.gsm+*.3ds) for interior 3d visualization.
archibase_planet
free

Frame
...frame
archibase planet
frame window window frame
frame 2 - 3d model (*.gsm+*.3ds) for interior 3d visualization.