Thingiverse
Paste Extruder Stepper Motor Printing Head by Ioan
by Thingiverse
Last crawled date: 2 years, 11 months ago
This is a screw driven peristaltic Paste Extruder. It is still experimental, so before you decide to build it please check the following videos to see it in action:
extruding polymer blend (hair gel):http://www.youtube.com/watch?v=1XWYLSRCcq8
extruding viscous chocolate glazing:http://www.youtube.com/watch?v=qIFkw5RNXqQ
extruding polymer blend at 16mm/sec, 0.5 mm nozzle, 250 micron layer:http://www.youtube.com/watch?v=axAP0btw4Lk
Some pictures of the printing head: https://picasaweb.google.com/ioan.festeu/ReprapPasteExtruder?authuser=0&authkey=Gv1sRgCJnau7ew38qs7AE&feat=directlink
You will find a 3D pdf file attached so you can easily inspect the pump.
Also I have attached a dxf file for the laser cutted acrylic mounting plate for Rapman 3D printers. Sorry... for Makerbots and Mendels you will have to find your solution :)
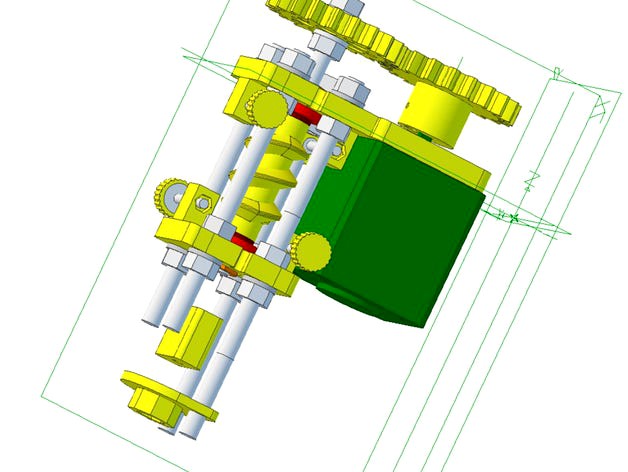
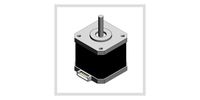
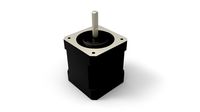
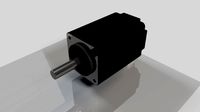
CAD drawing picture shows in yellow the printable parts. The rest of parts are stock M6 threaded rods, nuts and washers and two inexpensive 606 bearings. The stepper motor is a NEMA17.
For the tubing and pumping elements I used two sets of cheap perfusion kits. The pumping elements (shown in creamy colour) are elastic latex tubes you will find in the kit. Idealy you may use standard peristaltic pump tubes.
The reason I am using two elastic tubes (dual chanel) is because peristaltic pumps suffer from the so called "pulsing". That is, when the screw leaves the tubing the corresponding void (where the tube was pinched) will suck back a little bit the pumped fluid at the outlet hence pulsing. But using two chanels arranged in anti-phase pulsing is reduced to almost zero.
Total parts cost (except the stepper motor) is less than 10 Euros.
I will come back later with a complete parts list and instructions.
NOTICE: I didn't uploaded yet the "pressing pads" (two small parts that press the elastic tube over the screw shaft) because I need to make some minor changes, but don't worry I will post them asap. UPDATED
P.S. If somebody needs the early CAD files let me know. I will gladly send it to you so you can adapt to your machine. I am working in Alibre Design PE and I can't save in other common formats so you must find a way to make the conversion.
P.S. 2 I have uploaded the file "pressing pad". You may want to put some rubbery material between the pad and elastic tube to be sure the screw shaft will completely close the pumping tube but not strangulate it. Otherwise the pump will loose the pressure.
Also I have updated the 3D pdf file.
I have attached a picture of the "perfusion set". Don't know the exact terminology in English, sorry. Some sets also have a Luerlock part connecting the needle and the latex tube. My Luerlock file supports that part. Obviously you can use any kind of support that fits you better.
UPDATE 1: watch my third video (I have listed above).
I will upload asap a new screw rotor design. I am not very happy with the current one since it seems it have some bugs: it creates some extra pressure when the rotor leaves the tube hence altering the low pulsation feature.
UPDATE 2: I have uploaded a new screw rotor design (Screw Rotor New.stl). Screw pitch was decreased from 12mm to 10mm so motor rpm will increase just a little bit. It should perform better than the previous one. Will come back with my own results.
UPDATE 3: Uploaded the file Screw_Rotor_New_Support.stl. Unfortunately this file must be printed with support (soluble PVA, PLA?). However this rotor leaves a smaller footprint on the elastic tubes hence less dead volume (less suck back). Still working for the perfect match to bring pulsation close to zero.
UPDATE 4: Check my photo album: https://picasaweb.google.com/lh/photo/oN2Z_e3g6u7eHZYbbXj2nQ?feat=directlink
It is printed using the part "Screw Rotor New.stl". Pulsation is so small I think is a good print. Just a little bit of adjustment is needed. The trick is to find the perfect match when the helicoid is fading (leaving the contact with the elastic tube)such as the dead volume arising is compensated by the incoming volume of the same chanel. Meantime the other chanel is pumping normaly. And so on. For the perfectionists I promise I will fix this to make it even better. Meantime I am preparing new .stl files for the final version. I need to clean up the bugs in some of the parts (there are plenty) and may be to make the pump smaller and with less nuts and bolts.
UPDATE 6
About the cheap latex tubes: very short lifetime, losing elasticity. So, go proffesional peristaltic tubing. The pressure will be perhaps around 0,7 bar with those tubing. Now I am waiting for the tubes to be delivered (2-3 weeks). Meantime I will try to cast my own tubing from RTV silicone. Keep you updated.
extruding polymer blend (hair gel):http://www.youtube.com/watch?v=1XWYLSRCcq8
extruding viscous chocolate glazing:http://www.youtube.com/watch?v=qIFkw5RNXqQ
extruding polymer blend at 16mm/sec, 0.5 mm nozzle, 250 micron layer:http://www.youtube.com/watch?v=axAP0btw4Lk
Some pictures of the printing head: https://picasaweb.google.com/ioan.festeu/ReprapPasteExtruder?authuser=0&authkey=Gv1sRgCJnau7ew38qs7AE&feat=directlink
You will find a 3D pdf file attached so you can easily inspect the pump.
Also I have attached a dxf file for the laser cutted acrylic mounting plate for Rapman 3D printers. Sorry... for Makerbots and Mendels you will have to find your solution :)
CAD drawing picture shows in yellow the printable parts. The rest of parts are stock M6 threaded rods, nuts and washers and two inexpensive 606 bearings. The stepper motor is a NEMA17.
For the tubing and pumping elements I used two sets of cheap perfusion kits. The pumping elements (shown in creamy colour) are elastic latex tubes you will find in the kit. Idealy you may use standard peristaltic pump tubes.
The reason I am using two elastic tubes (dual chanel) is because peristaltic pumps suffer from the so called "pulsing". That is, when the screw leaves the tubing the corresponding void (where the tube was pinched) will suck back a little bit the pumped fluid at the outlet hence pulsing. But using two chanels arranged in anti-phase pulsing is reduced to almost zero.
Total parts cost (except the stepper motor) is less than 10 Euros.
I will come back later with a complete parts list and instructions.
NOTICE: I didn't uploaded yet the "pressing pads" (two small parts that press the elastic tube over the screw shaft) because I need to make some minor changes, but don't worry I will post them asap. UPDATED
P.S. If somebody needs the early CAD files let me know. I will gladly send it to you so you can adapt to your machine. I am working in Alibre Design PE and I can't save in other common formats so you must find a way to make the conversion.
P.S. 2 I have uploaded the file "pressing pad". You may want to put some rubbery material between the pad and elastic tube to be sure the screw shaft will completely close the pumping tube but not strangulate it. Otherwise the pump will loose the pressure.
Also I have updated the 3D pdf file.
I have attached a picture of the "perfusion set". Don't know the exact terminology in English, sorry. Some sets also have a Luerlock part connecting the needle and the latex tube. My Luerlock file supports that part. Obviously you can use any kind of support that fits you better.
UPDATE 1: watch my third video (I have listed above).
I will upload asap a new screw rotor design. I am not very happy with the current one since it seems it have some bugs: it creates some extra pressure when the rotor leaves the tube hence altering the low pulsation feature.
UPDATE 2: I have uploaded a new screw rotor design (Screw Rotor New.stl). Screw pitch was decreased from 12mm to 10mm so motor rpm will increase just a little bit. It should perform better than the previous one. Will come back with my own results.
UPDATE 3: Uploaded the file Screw_Rotor_New_Support.stl. Unfortunately this file must be printed with support (soluble PVA, PLA?). However this rotor leaves a smaller footprint on the elastic tubes hence less dead volume (less suck back). Still working for the perfect match to bring pulsation close to zero.
UPDATE 4: Check my photo album: https://picasaweb.google.com/lh/photo/oN2Z_e3g6u7eHZYbbXj2nQ?feat=directlink
It is printed using the part "Screw Rotor New.stl". Pulsation is so small I think is a good print. Just a little bit of adjustment is needed. The trick is to find the perfect match when the helicoid is fading (leaving the contact with the elastic tube)such as the dead volume arising is compensated by the incoming volume of the same chanel. Meantime the other chanel is pumping normaly. And so on. For the perfectionists I promise I will fix this to make it even better. Meantime I am preparing new .stl files for the final version. I need to clean up the bugs in some of the parts (there are plenty) and may be to make the pump smaller and with less nuts and bolts.
UPDATE 6
About the cheap latex tubes: very short lifetime, losing elasticity. So, go proffesional peristaltic tubing. The pressure will be perhaps around 0,7 bar with those tubing. Now I am waiting for the tubes to be delivered (2-3 weeks). Meantime I will try to cast my own tubing from RTV silicone. Keep you updated.
Similar models
grabcad
free

Peristaltic Pump
...of "peristaltic pump part 3." now your peristaltic pump has a cool clear lid and some cool looking metal bolts. nice.
thingiverse
free

Micro Peristaltic Pump by neoaikon
...the best choice.
included is also a 2.25" version for use with 1/4" tubing. this version is suitable for .4mm nozzles.
thingiverse
free

Servo Driven Pump by
...pping. on industrial pumps i have seen they have rigid fittings, and the tube inside the pump is different from the tube outside.
grabcad
free

Peristaltic pump multiple rotors synchronized for AIRBUS
...peristaltic pump multiple rotors synchronized for airbus
grabcad
peristaltic pump with three synchronized rotors
thingiverse
free

Peristaltic Pump 5/16 inch tubing Nema 17
...the criticism to fuel my rage mo rage mo better" me in the comments and suggest anything you will need me to design for yee.
thingiverse
free

Peristaltic Paste Extruder by jonny
...l work but don't know for sure.
i'm designer for shapeways here: https://www.shapeways.com/designer/jonathanmarch/hire-me
grabcad
free

Oil pump
...so the inner rotor is not drawn for the same reason.
when i have to disassemble the oil pump for some reason, i wil update this.
thingiverse
free

Small peristaltic pump for 28BYJ-48 stepper motor. by jsvorc
...
i was looking for some peristaltic pump with larger diameter. i check thingyverse and found only small pumps so i designed mine.
thingiverse
free

NEMA 17 Planetary Peristaltic by jpoles1
...hex nut
2x m3x8mm screw
2x m3x12mm screw
1x m3x20mm screw
assembly:https://youtu.be/yoxqnr08qai
demo:https://youtu.be/xacaiiekafa
thingiverse
free

Peristaltic Pump by piuLAB
...r "hydroponic l.i.s.a." (http://www.thingiverse.com/thing:414271) but it is possible to adapt it for any other machine.
Ioan
sketchfab
$11

Alexandru Ioan Cuza
... and of state structures. 20 march 1820 – 15 may 1873) - alexandru ioan cuza - buy royalty free 3d model by 21 design (@21design)
thingiverse
free

Chocolate pump by Ioan
... have an nema 17 stepper motor atached.
an option is to laser cut in plexiglass the entire pump body making it food contact safe.
sketchfab
$10

John Hunyadi (ro: Ioan/Iancu de Hunedoara)
...n polygons. - john hunyadi (ro: ioan/iancu de hunedoara) - buy royalty free 3d model by luthonium - virtual heritage (@luthonium)
thingiverse
free

Chocolate Cooler by Ioan
...:http://www.exeter.ac.uk/news/research/title_145191_en.htmlhttp://blog.exair.com/2011/11/01/refrigerated-air-from-compressed-air/
sketchfab
$5

Alexandru Odobescu
...alexandru odobescu sketchfab alexandru ioan odobescu 1834 – 1895) was a romanian author, archaeologist...
unity_asset_store
$10

The Stonehenge Monument
...your workflow with the the stonehenge monument asset from ioan stan. find this & other historic options on the...
unity_asset_store
$10

Dead Forest
...elevate your workflow with the dead forest asset from ioan stan. find this & other environments options on the...
unity_asset_store
free

Breakfast Free
...elevate your workflow with the breakfast free asset from ioan stan. find this & other props options on the...
unity_asset_store
free

Old Radio
...elevate your workflow with the old radio asset from ioan stan. find this & other props options on the...
unity_asset_store
$25

Realistic Interiors Vol1
...your workflow with the realistic interiors vol1 asset from ioan stan. find this & other interior options on the...
Paste
archibase_planet
free

Paste
...paste
archibase planet
tooth-paste tube of toothpaste
tooth paste - 3d model for interior 3d visualization.
archibase_planet
free

Paste
...hibase planet
marmite food spread paste food spread
paste marmite n181114 - 3d model (*.gsm+*.3ds) for interior 3d visualization.
3d_ocean
$4

tooth paste
...tooth paste
3docean
amouth brushing teeth helty teeth tooth tooth paste
3d model tooth paste
archive3d
free

Paste 3D Model
...
archive3d
tooth-paste tube of toothpaste
tooth paste - 3d model for interior 3d visualization.
turbosquid
$8

Tooth Paste
...y free 3d model tooth paste for download as max, obj, and fbx on turbosquid: 3d models for games, architecture, videos. (1197923)
turbosquid
$10

Tooth paste
... available on turbo squid, the world's leading provider of digital 3d models for visualization, films, television, and games.
3d_export
$5

Paste 3D Model
...paste 3d model
3dexport
paste 3d model soumyap 38900 3dexport
archive3d
free

Paste 3D Model
...paste food spread
paste marmite n181114 - 3d model (*.gsm+*.3ds) for interior 3d visualization.
cg_studio
$33

Pasted chandelier3d model
...e lamp ceiling
.3ds .obj .max .fbx - pasted chandelier 3d model, royalty free license available, instant download after purchase.
3d_export
$37

Pasted chandelier 3D Model
...realistic ceiling light fixture crystal max 3ds vray fbx materials detailed
pasted chandelier 3d model 3dfurniture 35000 3dexport
Stepper
turbosquid
$85

Stepper
... available on turbo squid, the world's leading provider of digital 3d models for visualization, films, television, and games.
3d_ocean
$22

Mini Stepper
...gymnastic indoor legs machine mini silver sport stepper trainer workout
3d model of silver and black mini stepper with a counter.
turbosquid
$3

stepper deluxe
...osquid
royalty free 3d model stepper deluxe for download as on turbosquid: 3d models for games, architecture, videos. (1284335)
turbosquid
$5
Fitness Stepper
... available on turbo squid, the world's leading provider of digital 3d models for visualization, films, television, and games.
turbosquid
$1

stepper motor driver
...stepper motor driver for download as , fbx, dae, obj, and stl on turbosquid: 3d models for games, architecture, videos. (1688860)
turbosquid
$1

Stepper motor driver
... model stepper motor driver for download as obj, stl, and ige on turbosquid: 3d models for games, architecture, videos. (1577811)
3d_export
$5
Stepper motor Nema17 17HS4401
...stepper motor nema17 17hs4401
3dexport
turbosquid
$1

Nema 17 Stepper motor
... available on turbo squid, the world's leading provider of digital 3d models for visualization, films, television, and games.
turbosquid
$1
Nema 17 Stepper Motor 59Nm
... available on turbo squid, the world's leading provider of digital 3d models for visualization, films, television, and games.
turbosquid
$3
Simple model of Nema 8 stepper motor
...del of nema 8 stepper motor for download as ipt, obj, and stl on turbosquid: 3d models for games, architecture, videos. (1543132)
Extruder
3ddd
$1

Extruded Chair
...extruded chair
3ddd
extruded , tom dixon
inspired by tom dixon extruded chair
turbosquid
$2

3D Printer Extruder
...d
royalty free 3d model 3d printer extruder for download as on turbosquid: 3d models for games, architecture, videos. (1537359)
turbosquid
$1

Zombie extruded text
...oyalty free 3d model zombie extruded text for download as obj on turbosquid: 3d models for games, architecture, videos. (1322198)
turbosquid
$4

Extruder conical screw
...el extruder conical screw for download as sldpr, ige, and stl on turbosquid: 3d models for games, architecture, videos. (1524433)
turbosquid
$50

3d PRINTER - Extruder
... available on turbo squid, the world's leading provider of digital 3d models for visualization, films, television, and games.
3d_export
$5

world earth extrude map
...world earth extrude map
3dexport
3ddd
$1

Simply Elegant Extruded Tree Coffee Table Design
...ble by link studios. the silhouette of a tree is visible at one angle, extruded from the surface to create the support structure.
3d_export
$13
extruded table
...ed to give you the highest possible quality for up to 4k renders. there is no post-production used on any of the renders you see.
3d_export
$13
extruded chair
...for high-quality render results. no extra plugins are required for this model. lights and cameras are not included in the scenes.
3d_export
$13
extruded table 2
...for high-quality render results. no extra plugins are required for this model. lights and cameras are not included in the scenes.
Motor
archibase_planet
free

Motor
...base planet
motor motor engine engine electric motor
motor wagner n250213 - 3d model (*.gsm+*.3ds) for interior 3d visualization.
archibase_planet
free

Motor
...motor
archibase planet
motor motor engine engine
motor n151112 - 3d model (*.gsm+*.3ds) for interior 3d visualization.
archibase_planet
free

Motor
...motor
archibase planet
motor motor engine engine
motor n150615 - 3d model (*.gsm+*.3ds+*.max) for interior 3d visualization.
turbosquid
$15

Motor
...otor
turbosquid
royalty free 3d model motor for download as on turbosquid: 3d models for games, architecture, videos. (1639404)
3d_ocean
$5

Electric motor
...electric motor
3docean
car electric engine industry motor phase train vehicle
an electric motor enjoy!
3d_ocean
$18

Electric Motor
...electric motor
3docean
electric motor engine machine mover parts
3d model electric motor for hoist crane
turbosquid
$29

Motor
... available on turbo squid, the world's leading provider of digital 3d models for visualization, films, television, and games.
turbosquid
$5

Motor
... available on turbo squid, the world's leading provider of digital 3d models for visualization, films, television, and games.
3d_export
$5

electric motor
...electric motor
3dexport
electric motor use for industrial purposes
3d_export
$5

servo motor
...tor
3dexport
it's a simple part of servo motor 0.75kw for used in machines assembly to show specified motor in own project.
Head
3d_export
$5
head
...head
3dexport
simulated female head.
3d_ocean
$5

Deer Head
...deer head
3docean
deer head
simple model of deer head with neck.
cg_studio
$25

Marble Head - Head A3d model
... - head a3d model
cgstudio
.ma - marble head - head a 3d model, royalty free license available, instant download after purchase.
turbosquid
$5
Head
...ad
turbosquid
royalty free 3d model head for download as max on turbosquid: 3d models for games, architecture, videos. (1230068)
turbosquid
free

The Head
...urbosquid
royalty free 3d model the head for download as max on turbosquid: 3d models for games, architecture, videos. (1386205)
turbosquid
free

Head
...
turbosquid
royalty free 3d model head for download as blend on turbosquid: 3d models for games, architecture, videos. (1276899)
3d_export
$10

bull head
...bull head
3dexport
bull head
3d_export
$5
girl head
...girl head
3dexport
head girl
3d_export
$5
Tigger-head
...tigger-head
3dexport
tigger-head
3d_export
$5

head on a spear
...head on a spear
3dexport
head on a spear
Printing
design_connected
$27

...print
designconnected
moroso print computer generated 3d model. designed by wanders, marcel.
3ddd
free

Eichholtz Prints
...- eichholtz print central station i
13 - eichholtz print central station ii
14 - eichholtz print marisa
15 - eichholtz print tish
3ddd
$1

Eichholtz Prints
...print abstract - set of 2
10 - eichholtz print orange abstract
11 - eichholtz print buddha right
12 - eichholtz print buddha left
turbosquid
$1

... available on turbo squid, the world's leading provider of digital 3d models for visualization, films, television, and games.
3ddd
free

Eichholtz Prints
...of 4
2 - print dunbar 2 set of 4
3 - print guadeloupe 1 set of 4
4 - print guadeloupe 2 set of 4
5 - print giles
6 - print trett
3ddd
$1

Eichholtz Prints
...nt tutti frutti
3 - eichholtz prints watson - set of 2
4 - eichholtz prints antique nautilus - set of 2
5 - eichholtz print tiara
3d_export
$5

Monster for printing
...monster for printing
3dexport
monster 3d model printing
3ddd
free

printed rug
...printed rug
3ddd
ковер
very creative printed rug
3ddd
free

Eichholtz Prints
...иал: бумага
габариты (вхш): 72 x 62 см
описание: print sweetmeat - постер в деревянной раме.
3 - prints varsity set of 2
арти
3ddd
free

Art Print Posters
...art print posters
3ddd
прованс
art print posters by patrician prints