Thingiverse

Paslode 18650 battery upgrade by TheFrugalBerry
by Thingiverse
Last crawled date: 3 years, 4 months ago
Caution This battery upgrade does not have a BMS (Battery Management System) as part of the build (which could cause battery danger including fire). A BMS could easily be added with modification but was not necessary in my application. Also, this battery design is capable of 8.5v DC which is above the rating of the manufacturers Ni-MH battery of 6v nominal with a full charge voltage of 7v. It works fine in my Paslode nailer but that doesn't mean it could not cause harm to your nailer. Lastly, this battery cannot be charged in the existing charger. Without the BMS each of the 18650 cells need to be removed and charged in a separate 18650 charger. I created this project as a solution to my problem, and made it available to anyone else to use as they see fit.
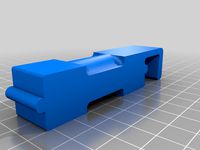
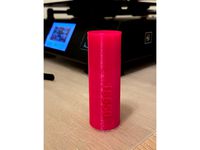
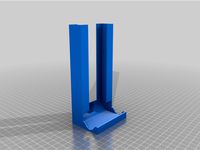
I have an old Paslode nailer with batteries that would not hold a charge (even brand new off the shelf of the big box stores). I was charging the battery a few hours before I needed it, and it would be dead a few hours after I was done even with the batter unplugged from the nailer. Paslode has not created a direct Li-ion replacement for these batteries, but rather went with a brand new design witch required purchase of a new nailer. My solution is this project. I designed the shell in tinkercad (don't laugh) and after many revisions came up with a shell that looks and acts just like the original battery only using Li-ion 18650 cells. The new battery works great in the nailer!!
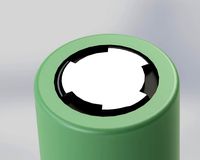
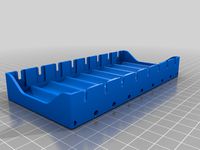
This is a simple series circuit. Screw heads on the sides of the battery shell are used as the battery contacts. Nuts on the back of the screws tie into ring terminals that connect the wires to the battery cell terminals. AA Battery terminals were purchased from Amazon for under $7 for 30 pairs. Wires were soldered to these terminals. Once the 18650 batteries are placed and the shell is closed the upgraded battery is ready to go! I printed in PLA with full support. Hole sizes are small and will need to be drilled out for the screws you have on hand.
I have an old Paslode nailer with batteries that would not hold a charge (even brand new off the shelf of the big box stores). I was charging the battery a few hours before I needed it, and it would be dead a few hours after I was done even with the batter unplugged from the nailer. Paslode has not created a direct Li-ion replacement for these batteries, but rather went with a brand new design witch required purchase of a new nailer. My solution is this project. I designed the shell in tinkercad (don't laugh) and after many revisions came up with a shell that looks and acts just like the original battery only using Li-ion 18650 cells. The new battery works great in the nailer!!
This is a simple series circuit. Screw heads on the sides of the battery shell are used as the battery contacts. Nuts on the back of the screws tie into ring terminals that connect the wires to the battery cell terminals. AA Battery terminals were purchased from Amazon for under $7 for 30 pairs. Wires were soldered to these terminals. Once the 18650 batteries are placed and the shell is closed the upgraded battery is ready to go! I printed in PLA with full support. Hole sizes are small and will need to be drilled out for the screws you have on hand.
Similar models
thingiverse
free

18650 Li-Ion Charger
...rger board (usb-c)
things you need:
charger board with usb-c link
battery terminal link
two self tapping screws 2.5x10
some wires
thingiverse
free

4 cell 18650 battery charger by CheapskateProjects
... terminals to enable variance in battery length.
other required materials:
8mm brass bar
bus wire
wire
charging modules
m3 bolts
thingiverse
free

18650 LI ION CASE for QX7 with BMS (OPTIONAL) by Rhizamax
...e au lithium bms pcm protection pcb board (amazon) (see photo).
you must use a 8v charger, fatshark charger is perfect for this!!
grabcad
free

2S 3A 5A Li-ion Lithium Battery 18650 Charger BMS Protection Board Module 7.4V 8.4V datasheet pdf
....4v 8.4v datasheet pdf
grabcad
2s 3a 5a li-ion lithium battery 18650 charger bms protection board module 7.4v 8.4v datasheet pdf
thingiverse
free

Taranis Q X7 18650 Li-Ion Cell Case by schochk
..., xt60 recomended
to build this you need:
two pieces 18650 li-ion cells
charge plug
jst 2s balance plug
charge wire
balance wire
thingiverse
free

DiA 18650 2S and 4S pack holder covers by DiAleksi
...overs for 18650 li-ion cell holders with power and balance plugs.
i used holders from banggood, soldered wires and balance plugs.
thingiverse
free

Li-Ion Scooba Charger Stand by ImpulsiveJames
...some wires to those and the 12v connector and swapped the charger's alligator clips for a standard 12v plug. pretty simple :)
grabcad
free

18650 Li-ion charging Box
...18650 li-ion charging box
grabcad
18650 li-ion charging box fits patona 1807 charger base
thingiverse
free

battery charger 18650 by caracolgeek
...8650 by caracolgeek
thingiverse
i give you my vision of a 18650 li-ion battery charger, designed for use with the tp 4056 board.
thingiverse
free

Charger 18650 Li-ion Battery by Bolee
...charger 18650 li-ion battery by bolee
thingiverse
battery charger model 18650

Paslode
thingiverse
free

Paslode case clip by rasmund
...verse
i had a broken paslode nail gun case clip (pictured). this replacement fits nicely. printed with support and 100% infill.
thingiverse
free

Paslode Yellow Fuel Cell Adapter by randyrue
...r was apparently available free from paslode for a while but now costs about $8 plus shipping, or $24 from amazon.
here it is...
thingiverse
free

Paslode battery protector by gazbot
...0, im350a, im350ct, im325/80ctq, im50 f18, im65 f16, im65a f16, im65a, im65a f16, ps604n, im250-a, im250-f16, im250s imct, b2054.
thingiverse
free

Paslode Fixing Box and Gas Extender by kenour
...paslode fixing box and gas extender by kenour
thingiverse
a box to hold 32, 50 and 63mm fixings and a couple of fuel cells.
thingiverse
free

Paslode 30 degree nail holster
...the one i use. the other two have an integrated belt loop. i made one that will sit lower than the other depending on preference.
thingiverse
free

Case Clip Replacement for Paslode Nail Gun Case
...verhang is. if the hinge overhang is droopy then the part with not perform well.
the print orientation is as the model is placed.
thingiverse
free

Pasloode Cordless Nail Gun Battery Cap by TheMathemagician
...pasloode cordless nail gun battery cap by themathemagician thingiverse paslode cordless nail gun battery cap. 6...
grabcad
free

PASLODE BRADDER NAIL GUN 3D SCANNED
...paslode bradder nail gun 3d scanned
grabcad
from handheld 3d scanner
18650
3d_export
$10

battery 18650
...battery 18650
3dexport
battery 18650
turbosquid
$10

18650 Li-ion Battery
... available on turbo squid, the world's leading provider of digital 3d models for visualization, films, television, and games.
3d_export
$15

lithium ion 18650 battery
...e up render. - all parts and materials are logically named. other formats ================= - collada (.dae) - autodesk fbx - obj
3d_export
$10
18650 lithium battery
...your software before making a purchase is highly recommend. -in case of problems with the 3d model, do not hesitate to contact me
3d_export
free

solar rechargeable single led flashing light
...light 3dexport unit was design for housing a single 18650 lithium-ion battery and mini solar panel 55mm x 41mm-...
3d_export
$12

Emoji 042 Loudly Crying With Tears
...spec/gloss textures<br>- blend (cycles): metal/roughnes textures<br>geometry:<br>- units: centimeters<br>- polygons: 18650lt;br>- vertex: 18822<br>- triangles: 2<br>- quads: 18648<br>- ngons: 0<br>- vertex...
thingiverse
free
18650
...18650
thingiverse
18650 power supply, vase mode
thingiverse
free
18650 CASE
...18650 case
thingiverse
18650 case!
thingiverse
free
18650 holder
...18650 holder
thingiverse
18650 holder
thingiverse
free
18650 dispenser
...18650 dispenser
thingiverse
18650 dispenser for 10 batteries.
Upgrade
turbosquid
$15

Upgraded Glock
...e 3d model upgraded glock for download as obj, fbx, and blend on turbosquid: 3d models for games, architecture, videos. (1185950)
3ddd
$1

Calligaris / UPGRADE
...calligaris / upgrade
3ddd
calligaris
c материалом
3d_export
free

cz upgrade
...cz upgrade
3dexport
https://www.buymeacoffee.com/mestrezen3d https://linktr.ee/mestrezen3
turbosquid
$80

Custer Tank upgrade
... available on turbo squid, the world's leading provider of digital 3d models for visualization, films, television, and games.
turbosquid
$39

Domestos 1 upgrade
... available on turbo squid, the world's leading provider of digital 3d models for visualization, films, television, and games.
3d_export
$10

Upgraded tea cup
...upgraded tea cup
3dexport
a cup with an unusual design and a unique shape for a more enjoyable tea experience
3d_export
$8

dixy outlander classic style upgraded poplar wood lounge chair
...utlander classic style upgraded poplar wood lounge chair
3dexport
dixy outlander classic style upgraded poplar wood lounge chair
turbosquid
free

AK-12 + Upgrades low-poly 3D model
...ow-poly 3d model for download as fbx, blend, and unitypackage on turbosquid: 3d models for games, architecture, videos. (1501145)
evermotion
$700

Upgrade from V-ray 1.5 to 3.5 for 3ds max
...here is no need to purchase a new dongle - your current dongles will be reprogrammed to carry v-ray 3. evermotion 3d models shop.
evermotion
$300

Upgrade from V-Ray 2.0 to V-ray 3.5 for 3ds Max
... interface (gui) for editing settings on one machine and one render node for rendering on one machine. evermotion 3d models shop.
Battery
3d_ocean
$2

Battery
...battery
3docean
battery electronic
a high quality battery .
3d_export
free
battery
...battery
3dexport
battery
3d_ocean
$5
Battery
...battery
3docean
battery electronics
a classic 6 v battery, high poly with materials
3d_ocean
$3
Batteries
...batteries 3docean aa aaa batteries battery d electronics energy materials power subdivision uv unwrapped aa,...
3d_export
$19
Lead-acid battery storage battery lithium battery
...ttery storage battery lithium battery
3dexport
1.lead-acid battery storage battery lithium battery 2.files include 3dmax obj fbx
3d_ocean
$7
Battery Model
...battery model
3docean
big battery car battery vehicle battery
car battery, big battery, vehicle battery.
3ddd
free
battery energier
...battery energier
3ddd
battery energier , батарейка
battery energier
turbosquid
free
battery
...battery
turbosquid
free 3d model battery for download as obj on turbosquid: 3d models for games, architecture, videos. (1151676)
3d_ocean
$1
Battery Model
...lack minus plus white yellow
this is battery model is about 1000 triangles. turntable preview is smoothed version of the battery.
3d_export
$10
battery 18650
...battery 18650
3dexport
battery 18650