Thingiverse

Parkside X20V Team LED 10W Floodlight / Work Light by jaaanik
by Thingiverse
Last crawled date: 3 years, 1 month ago
Sorry for the incomplete description, but Thingiverse still sucks. Playing with this shitty interface and service is a waste of time.
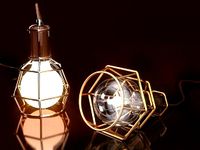
I present the floodlight for the Parkside X20V Team battery from the LIDL store.
The lamps can be used, for example, to illuminate the working space, to illuminate rooms and campsites without access to the mains power supply.
I recommend using this inexpensive lamp, which is available in various variants and has a built-in DC converter, so you can power it directly from the X20V battery:https://www.aliexpress.com/item/32827528992.html
Standard 2Ah battery allows you to use the lamp for about 4-5 hours.
WARNING! X20V batteries have no built-in over-discharge protection, so check the battery voltage and do not discharge below 15V.
This is my project of useful gadgets and portable wireless devices for Parkside X20V batteries. There are:
Mounting brackets for the charger
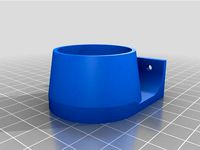
Battery mounting bracket (shelf and wall mount)
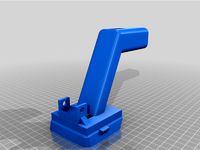
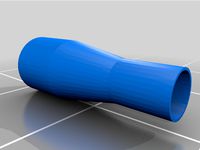
Floodlight / Work Light - LED 10W
Audio amplifier TPA3116 Wuzhi - maximum output power RMS 2x20W/4R, 2x24W/8R
Power supply DPS3005 (max 19.5V/5.1A) - available on Cults3D.com only
Soldering station KSGER T12 OLED - available on Cults3D.com only
STEP files are available so you can modify them to suit your needs.
If you like this project and appreciate my work, you can support me through PayPal.
You need:
10W LED floodlight
2 pieces M3x12 mm screw
2 pieces M3 nut
2 pieces M3 washer
2 pieces long 6.3 mm connectors
The photos should explain everything.
Cut the connectors as shown in the photos and solder the wire connections. Cut the lamp cable to the correct length and strip it.
Push the wires through the holes in the 3D print. Solder the ends of the wire and solder the connectors to the wires.
Put the connectors in place and secure them with CA glue. Screw the lamp holder onto the 3D printed part.
The third photo shows the recommended orientation of the elements when printing.
Walls thickness 1.6 mm (4 shells). Layer height 0.2 mm. Infill 25-30%.
I present the floodlight for the Parkside X20V Team battery from the LIDL store.
The lamps can be used, for example, to illuminate the working space, to illuminate rooms and campsites without access to the mains power supply.
I recommend using this inexpensive lamp, which is available in various variants and has a built-in DC converter, so you can power it directly from the X20V battery:https://www.aliexpress.com/item/32827528992.html
Standard 2Ah battery allows you to use the lamp for about 4-5 hours.
WARNING! X20V batteries have no built-in over-discharge protection, so check the battery voltage and do not discharge below 15V.
This is my project of useful gadgets and portable wireless devices for Parkside X20V batteries. There are:
Mounting brackets for the charger
Battery mounting bracket (shelf and wall mount)
Floodlight / Work Light - LED 10W
Audio amplifier TPA3116 Wuzhi - maximum output power RMS 2x20W/4R, 2x24W/8R
Power supply DPS3005 (max 19.5V/5.1A) - available on Cults3D.com only
Soldering station KSGER T12 OLED - available on Cults3D.com only
STEP files are available so you can modify them to suit your needs.
If you like this project and appreciate my work, you can support me through PayPal.
You need:
10W LED floodlight
2 pieces M3x12 mm screw
2 pieces M3 nut
2 pieces M3 washer
2 pieces long 6.3 mm connectors
The photos should explain everything.
Cut the connectors as shown in the photos and solder the wire connections. Cut the lamp cable to the correct length and strip it.
Push the wires through the holes in the 3D print. Solder the ends of the wire and solder the connectors to the wires.
Put the connectors in place and secure them with CA glue. Screw the lamp holder onto the 3D printed part.
The third photo shows the recommended orientation of the elements when printing.
Walls thickness 1.6 mm (4 shells). Layer height 0.2 mm. Infill 25-30%.
Similar models
thingiverse
free

Parkside X20V Team Wuzhi TPA3116 Portable 2x20W Bluetooth 5.0 Audio Amplifier for Speakers by jaaanik
...the recommended orientation of the elements when printing.
walls thickness 1.6 mm (4 shells). layer height 0.2 mm. infill 25-30%.
thingiverse
free

Parkside X20V Team Shelf / Wall Battery Holder by jaaanik
...the recommended orientation of the elements when printing.
walls thickness 1.6 mm (4 shells). layer height 0.2 mm. infill 25-30%.
thingiverse
free

Parkside X20V Team Charger Wall Mount by jaaanik
...the recommended orientation of the elements when printing.
walls thickness 1.6 mm (4 shells). layer height 0.2 mm. infill 25-30%.
grabcad
free

Adapter Parkside X20V battery to Dedra tools
...adapter parkside x20v battery to dedra tools
grabcad
adapter parkside x20v battery to dedra tools
thingiverse
free

ATX Power supply quick lab connector REMIXED by AlexandreGomes
... in some cases , the holes for the leds must be increased with a drill . do not need much , just enough to hold the led in place.
thingiverse
free

Fake AA AAA battery for using a power supply design in openscad by sigoestudiando
... screws and 2 nuts,
the stl files are designed for m3 for the bottom, and m2 for the top.
simply solder each wire to their nut.
thingiverse
free
Teal 9V, 10W power LED cover by toymulders
...ta scheet to make sure you attach the wires the the wright side)
test the light
does it work?
then you are ready to start flying
thingiverse
free

Illuminated clock by bretthalliday
...v 30 cm led
you will also need some wire, a soldering iron, two small wood screws, sticky tape
12 mm drill
8 mm drill
3 mm drill
thingiverse
free

Extruder LED Strip Holder for Wanhao Duplicator i3 by balassy
...l: this piece is taller, so it will not drop shadow to the nozzle, but it blocks more view. (see the photo with the black piece.)
thingiverse
free

Dual parkside x20v battery adapter by JernejL
...es.
make your own 4ah battery, or even crazyer: combine 2 4ah batteries into one 8ah battery.
posted with permission from glol.
Jaaanik
thingiverse
free

Wall Mount for SIL hybrid - Pump-Action Repeating Bow with Ammo Clips by jaaanik
...wall_hook_cover parts. you also need a steel hook, screw and wall plugs. the vertical distance between the holes should be 28 cm.
thingiverse
free
Parkside X20V Team Charger Wall Mount by jaaanik
...the recommended orientation of the elements when printing.
walls thickness 1.6 mm (4 shells). layer height 0.2 mm. infill 25-30%.
thingiverse
free
Parkside X20V Team Shelf / Wall Battery Holder by jaaanik
...the recommended orientation of the elements when printing.
walls thickness 1.6 mm (4 shells). layer height 0.2 mm. infill 25-30%.
thingiverse
free

Pistol Crossbow Bolt and Fletching by Pythonp90
...sliding legolini from jaaanikhttps://www.thingiverse.com/thing:4210059 i used the print settings jaaanik recommends for the legolini layer height of 0.2 mm...
thingiverse
free
Parkside X20V Team Wuzhi TPA3116 Portable 2x20W Bluetooth 5.0 Audio Amplifier for Speakers by jaaanik
...the recommended orientation of the elements when printing.
walls thickness 1.6 mm (4 shells). layer height 0.2 mm. infill 25-30%.
thingiverse
free

Hotend, Micro Swiss, assembly for Sapphire PLUS by runekc
...is a modified version of the piece made by https://www.thingiverse.com/jaaanik i would love to have the hotend mount made...
thingiverse
free

Sapphire pro led mount by NikNakTak
...niknaktak thingiverse i remixed slightly the design proposed by jaaanik i like the idea, i simply replaced led holder...
thingiverse
free

Crossbow Cobra Adder Original Magazin V1 Fast Refill with 6 Arrows by g1cs2009
...this time. so i want a speed loader and jaaanik design is very nice. at this moment it is...
X20V
thingiverse
free

adattatore parkside x20V a powerbank by SamueleLg
...sfruttare le batterie parkside x20v team come un powerbank utilizzando un comunissimo adattatore da accendi sigari per auto a usb
thingiverse
free
Parkside X20V Arbeitslicht by kay_1971
...es arbeitslichtes, ausgelegt für
https://www.wish.com/product/5df9c24ba0f3b408d6cb620c
und einen standard kippschalter (28*12mm)
thingiverse
free

Parkside PABH adapter x20v team by diegomax
...parkside pabh adapter x20v team by diegomax
thingiverse
adapter for parkside pbah 18 li a1
thingiverse
free
Dual parkside x20v battery adapter by JernejL
...es.
make your own 4ah battery, or even crazyer: combine 2 4ah batteries into one 8ah battery.
posted with permission from glol.
thingiverse
free

Lidl Parkside X20V Team Powerbank USB Adapter by Knuspel
...board
stackable design so that each part is easy to print. the screws are directly screwed into the material. do not overtighten.
thingiverse
free

Parkside x20v battery adapter for 12v lighter socket by GLoL
... 12v !!!
one piece print !!
the drawing was optimize to be printed upwards,no supports needed
(thingverse cant generate previews)
thingiverse
free
Lidl Parkside X20V adapter by misil
...e na kontaktech.
https://cad.onshape.com/documents/d55b391241c770a5e72bf94a/w/43fd5f1289571e1c07fb2d0d/e/631db234c99c9881fcc640d6
thingiverse
free

Parkside X20V to Parkside PDSSA 18 A1 Fixed by Alex2244
... print i need to sanding a lot on the 18v battery part. other than that, the model is very good and a big thanks to andrzejdevil!
thingiverse
free
Parkside X20V Team Charger Wall Mount by jaaanik
...the recommended orientation of the elements when printing.
walls thickness 1.6 mm (4 shells). layer height 0.2 mm. infill 25-30%.
thingiverse
free

Lidl Parkside X20V Team Battery Adapter by Knuspel
... m2 screws (~8mm length) to mount the top plate onto the bottom plate. i used hot glue to hold the cable shoes in place properly.
Parkside
thingiverse
free

PARKSIDE ACCU
...parkside accu
thingiverse
parkside accu
thingiverse
free

Parkside hammer grip
...parkside hammer grip
thingiverse
parkside hammer grip
thingiverse
free
Parkside blade by cecnet
...parkside blade by cecnet
thingiverse
parkside blade.
abs
thingiverse
free

Parkside 12 A1
...parkside 12 a1
thingiverse
parkside 12vhalterung, park 12 a1
thingiverse
free

Parkside 20V mount
...parkside 20v mount
thingiverse
parkside 20v mount, for paralell to wall mount
thingiverse
free
Parkside to SN50T6 by dejx
...parkside to sn50t6 by dejx
thingiverse
parkside vacuum hose to sn50t6 dust cyclone separator adapter
thingiverse
free

Battery PARKSIDE
...battery parkside
thingiverse
housing for lion accu.
thingiverse
free

Parkside organizer separator by hugo_sa
...parkside organizer separator by hugo_sa
thingiverse
separator for parkside organizer.
thingiverse
free
Parkside PFBS12A1 Halter by JMDesigns
...parkside pfbs12a1 halter by jmdesigns
thingiverse
parkside pfbs12a1 halter
thingiverse
free

Parkside multitool wrench by lucibrandus
...parkside multitool wrench by lucibrandus
thingiverse
parkside multitool wrench
Floodlight
turbosquid
$20

Floodlight
... available on turbo squid, the world's leading provider of digital 3d models for visualization, films, television, and games.
3d_ocean
$5

Floodlight
...ts, swimming pools, soccer fields. can be used in: 3d max 2011 3d max 2012 3d max 2014 use for your works. thanks for attention:)
turbosquid
$69

Floodlight PACK
...lty free 3d model floodlight pack for download as max and obj on turbosquid: 3d models for games, architecture, videos. (1496708)
turbosquid
$30

Floodlight RED
...alty free 3d model floodlight red for download as max and obj on turbosquid: 3d models for games, architecture, videos. (1496705)
turbosquid
$30

Floodlight YELLOW
...y free 3d model floodlight yellow for download as max and obj on turbosquid: 3d models for games, architecture, videos. (1496704)
turbosquid
$10

floodlight tower
... available on turbo squid, the world's leading provider of digital 3d models for visualization, films, television, and games.
turbosquid
$10

FloodLight/WorkLight
... available on turbo squid, the world's leading provider of digital 3d models for visualization, films, television, and games.
3d_export
$20

led floodlight
...ted using approximate real world dimensions. thank you for purchasing this model!! click on my username to see more of my models.
turbosquid
$49

SLV OUTDOOR FLOODLIGHTS set
...slv outdoor floodlights set for download as max, obj, and fbx on turbosquid: 3d models for games, architecture, videos. (1223002)
3d_export
$30

stage light Floodlights 3D Model
...t music electric studio set movie filter-frame par lens lamp beam reflector
stage light floodlights 3d model braz 7057 3dexport
10W
3ddd
$1

Lucide Glasfi
...диаметр 80 см, высота 30 см. количество лампочек: 15xg4 10w ...
3ddd
$1

Lucide Glasfi
...диаметр 50 см, высота 68 см. количество лампочек: 14xg4 10w ...
3ddd
$1

EGLO 90737
...775 тип патрона: g4 количество ламп: 15 мощность: 15x 10w цвет: античная/бронза/белый материал: метал...
3ddd
$1

Люстра Orion 446-1555/12 satin
...австрия количество ламп: 12 цоколь: g4 мощность лампы: . 10w высота: 55 см ширина: 30 см длина: 60...
3ddd
free

Aureliano Toso / Salome 30 sospension
...+ темно-синие) арматура: хромированный металл лампы 30 x max 10w ...
3ddd
$1

3967Y-2A,09 LED СВЕТИЛЬНИК АЖУР ОРАНЖЕВЫЙ
...материал - акрил, количество ламп/тип ламп - power led 1*18w+1*10w ...
3ddd
$1
ILFARI. TEARS FROM MOON H34
...balls дизайн: coen munsters описание: 34 x g4 | 10w max. | 12v включительно светильники 4 x led 3.2w...
3d_export
$5

mid century lamp
...bar / restaurant polys: 28 838 verts: 29 464 http://m.sbc-lighting.net/table-lamps-10w100w/mid-century-marble-and-brass-lamp-with-e27.html ...
3ddd
$1

ILFARI. TEARS FROM MOON H22
...balls дизайн: coen munsters описание: 22 x g4 | 10w max. | 12v включительно светильники 3 x led 3.2w...
3ddd
$1

ESTILUZ BUTTON T-3305 / T-3306
...material: aluminium lamp type: t - 3305 - led 10w 3000k 975lm; t - 3306 - led 10w 3000k...
Team
design_connected
$13

Team
...team
designconnected
arper team computer generated 3d model. designed by lievore, alberto.
3ddd
$1
Team 7
...team 7
3ddd
team 7
моделилось с кталога team 7
3ddd
free
team 7
...team 7
3ddd
team 7
стол фабрики team 7.
типы размеров /900,1000/x/1750,2000,2250/x/750/
раздвигается +600 или +1200
3d_export
$99

basketball team
...basketball team
3dexport
basketball team 3d model. rigged. include obj, fbx files.
design_connected
$18

Team - trestle
...team - trestle
designconnected
arper team - trestle computer generated 3d model. designed by lievore, alberto.
3ddd
$1

TEAM 7 Atelier
...team 7 atelier
3ddd
team 7 , стол
производитель team 7
модель atelier
3ddd
$1
Банкетка Flex Team
... , flex team
http://www.abitant.com/products/banketka-flex-team-2014-kilt-pouf
3d_export
$65

mountaineering team
...mountaineering team
3dexport
simple rendering of the scene file
3d_export
$65

Camel team
...camel team
3dexport
simple rendering of the scene file
3ddd
$1

Стол Joha-team - BaumArt
... joha , team
стол от joha-team, под названием baumart
Led
3d_export
$5

led
...led
3dexport
the led is cut with all the parts.
3ddd
$1

Monacor / PARL56DMX / LED-320RGBW / LED-345RGBW / LED-300RGB
... прожектор
http://www.monacor.dk/
parl56dmx
led-320rgbw
led-345rgbw
led-300rgb
turbosquid
$10

LED
...led
turbosquid
free 3d model led for download as blend on turbosquid: 3d models for games, architecture, videos. (1691856)
3d_export
$5

led lamp
...led lamp
3dexport
led lamp, brightness animation
3ddd
free

leds-c4
...leds-c4
3ddd
leds-c4
современный торшер
3ddd
free

leds-c4
...leds-c4
3ddd
leds-c4
настольный лампа
turbosquid
$19

LED
... available on turbo squid, the world's leading provider of digital 3d models for visualization, films, television, and games.
turbosquid
$12

Led
... available on turbo squid, the world's leading provider of digital 3d models for visualization, films, television, and games.
turbosquid
free

LED
... available on turbo squid, the world's leading provider of digital 3d models for visualization, films, television, and games.
turbosquid
free

LED
... available on turbo squid, the world's leading provider of digital 3d models for visualization, films, television, and games.
Work
3d_export
$5
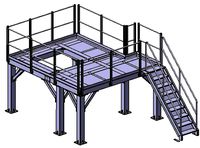
WORKING PLATFORM
...working platform
3dexport
working platform 4000x3000x1500mm
design_connected
$16

Working set
...working set
designconnected
smallaccents working set computer generated 3d model.
3ddd
free
Pinao / Stelar Works
...pinao / stelar works
3ddd
stelar works , stellar works
стулья pinao от stelar works
design_connected
$13
Work Lamp
...work lamp
designconnected
design house stockholm work lamp computer generated 3d model. designed by form us with love.
turbosquid
$6

Road Works
...turbosquid
royalty free 3d model road works for download as on turbosquid: 3d models for games, architecture, videos. (1151328)
3ddd
free
Stellar Works Lumar
...llar works , lumar , барный
stellar works lumar
turbosquid
$20
Work boots
...bosquid
royalty free 3d model work boots for download as stl on turbosquid: 3d models for games, architecture, videos. (1313566)
turbosquid
$8
Desk Work
...osquid
royalty free 3d model desk work for download as blend on turbosquid: 3d models for games, architecture, videos. (1381338)
turbosquid
$5

Work Desk
...osquid
royalty free 3d model work desk for download as blend on turbosquid: 3d models for games, architecture, videos. (1435344)
turbosquid
$1

Plant for work
...uid
royalty free 3d model plant for work for download as obj on turbosquid: 3d models for games, architecture, videos. (1557514)
Light
archibase_planet
free

Light
...light
archibase planet
lamp lighting light
light - s2 - 3d model for interior 3d visualization.
archibase_planet
free

Light
...light
archibase planet
light luminaire lighting
light l0465 - 3d model (*.gsm+*.3ds) for interior 3d visualization.
3d_export
$5

lighting
...lighting
3dexport
lighting
3d_export
$5

lighting
...lighting
3dexport
lighting in livingroom
turbosquid
$3

Lighting Tree with Lights
...d model lighting tree with lights for download as max and 3ds on turbosquid: 3d models for games, architecture, videos. (1585507)
archibase_planet
free

Light
...light
archibase planet
luster lighting solution
light - s - 3d model for interior 3d visualization.
archibase_planet
free

Light
...light
archibase planet
luster lamp lighting
light 1 - 3d model for interior 3d visualization.
archibase_planet
free

Lights
...lights
archibase planet
surgical lights surgical lamp
surgical lights (floor) - 3d model for interior 3d visualization.
archibase_planet
free

Light
...light
archibase planet
lighting luminaire candlelight
light l0463 - 3d model (*.gsm+*.3ds) for interior 3d visualization.
3d_export
$18

street light-lighting-light-xia bing
...
3dexport
street light-lighting-light-xia bing<br>max 2015 v-ray 3 max 2015<br>textures<br>all files in zip...