Thingiverse
Panic Button with attiny85 and RCSwitch 433Mhz module by matghir
by Thingiverse
Last crawled date: 4 years, 7 months ago
I've built this panic button just for emergency, in my house i've set up a domotic system with arduino, basically this button send a 433 code that the base can receive and do whatever you need to do.
it's battery operated with a 12v battery and a 220ohm resistor so the voltage for the circuit it's around 4.5v
the attiny85 it's an "arduino" but for really simple operations, due to low memory available, it must be programmed with an arduino uno or 2009, i'll link the guide...https://create.arduino.cc/projecthub/arjun/programming-attiny85-with-arduino-uno-afb829
attiny85 as pwn pin on 0 and 1.
Material:
https://it.aliexpress.com/item/10PCS-LOT-Original-NEW-ATMEL-ATTINY85-20PU-ATTINY85-20PU-DIP-8/32242662241.html?spm=a2g0y.search0104.3.17.FxKMf6&ws_ab_test=searchweb0_0,searchweb201602_2_10152_10065_10151_10068_5430020_5410020_10304_10307_10137_10060_10302_10155_10154_10333_10334_10056_10335_10055_10336_10054_10059_10332_100031_10099_5400020_10103_10102_10052_10053_10107_10050_10142_10051_5380020_10326_5390020_10084_10083_5370020_10080_10082_10081_10177_10110_10111_5420020_10112_10113_10114_10312_10313_10184_10314_10078_10079_10073-10050_10110,searchweb201603_16,ppcSwitch_5&btsid=94f3b377-9391-4c37-aef4-379f568b0891&algo_expid=450e5a3b-c015-4955-b12b-df8d5a66770e-2&algo_pvid=450e5a3b-c015-4955-b12b-df8d5a66770e&transAbTest=ae803_1
https://it.aliexpress.com/item/433mhz-rf-Transmitter-and-Receiver-superheterodyne-UHF-ASK-remote-control-Module-with-Antenna-Kit-small-size/32651427149.html?spm=a2g0y.search0104.3.1.vOC4ja&ws_ab_test=searchweb0_0,searchweb201602_2_10152_10065_10151_10068_5430020_5410020_10304_10307_10137_10060_10302_10155_10154_10333_10334_10056_10335_10055_10336_10054_10059_10332_100031_10099_5400020_10103_10102_10052_10053_10107_10050_10142_10051_5380020_10326_5390020_10084_10083_5370020_10080_10082_10081_10177_10110_10111_5420020_10112_10113_10114_10312_10313_10184_10314_10078_10079_10073-10333,searchweb201603_16,ppcSwitch_5&btsid=f9199dc4-d6d2-4eae-aa62-303e2f7e34dd&algo_expid=49bebf02-9737-42a7-818f-c760868f8bca-0&algo_pvid=49bebf02-9737-42a7-818f-c760868f8bca&transAbTest=ae803_1
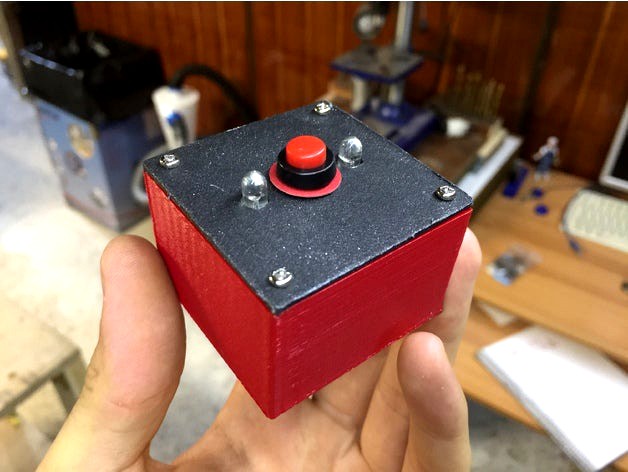
a couple of leds and a push switch
the holes are 5mm for leds and 12mm for the switch
the button just activate the circuit that sends signal immediately in a loop.
//CODE
include
RCSwitch mySwitch = RCSwitch();
void setup() {
// Transmitter is connected to Attiny Pin PB3 <--
// That is physical pin2
mySwitch.enableTransmit(3);
pinMode(1,OUTPUT);
pinMode(0,OUTPUT);
}
void loop() {
mySwitch.send(123123,24);
for(int i=0;i<255;i++){
analogWrite(0,i);
delay(2);
}
digitalWrite(0,LOW);
for(int i=0;i<255;i++){
analogWrite(1,i);
delay(2);
}
digitalWrite(1,LOW);
delay(100);
for(int i=0;i<255;i++){
analogWrite(1,i);
delay(2);
}
digitalWrite(1,LOW);
for(int i=0;i<255;i++){
analogWrite(0,i);
delay(2);
}
digitalWrite(0,LOW);
}
//END
The lib: https://github.com/sui77/rc-switch
Thanks to the creator of the initial box that i've a bit modified:https://www.thingiverse.com/thing:399005
it's battery operated with a 12v battery and a 220ohm resistor so the voltage for the circuit it's around 4.5v
the attiny85 it's an "arduino" but for really simple operations, due to low memory available, it must be programmed with an arduino uno or 2009, i'll link the guide...https://create.arduino.cc/projecthub/arjun/programming-attiny85-with-arduino-uno-afb829
attiny85 as pwn pin on 0 and 1.
Material:
https://it.aliexpress.com/item/10PCS-LOT-Original-NEW-ATMEL-ATTINY85-20PU-ATTINY85-20PU-DIP-8/32242662241.html?spm=a2g0y.search0104.3.17.FxKMf6&ws_ab_test=searchweb0_0,searchweb201602_2_10152_10065_10151_10068_5430020_5410020_10304_10307_10137_10060_10302_10155_10154_10333_10334_10056_10335_10055_10336_10054_10059_10332_100031_10099_5400020_10103_10102_10052_10053_10107_10050_10142_10051_5380020_10326_5390020_10084_10083_5370020_10080_10082_10081_10177_10110_10111_5420020_10112_10113_10114_10312_10313_10184_10314_10078_10079_10073-10050_10110,searchweb201603_16,ppcSwitch_5&btsid=94f3b377-9391-4c37-aef4-379f568b0891&algo_expid=450e5a3b-c015-4955-b12b-df8d5a66770e-2&algo_pvid=450e5a3b-c015-4955-b12b-df8d5a66770e&transAbTest=ae803_1
https://it.aliexpress.com/item/433mhz-rf-Transmitter-and-Receiver-superheterodyne-UHF-ASK-remote-control-Module-with-Antenna-Kit-small-size/32651427149.html?spm=a2g0y.search0104.3.1.vOC4ja&ws_ab_test=searchweb0_0,searchweb201602_2_10152_10065_10151_10068_5430020_5410020_10304_10307_10137_10060_10302_10155_10154_10333_10334_10056_10335_10055_10336_10054_10059_10332_100031_10099_5400020_10103_10102_10052_10053_10107_10050_10142_10051_5380020_10326_5390020_10084_10083_5370020_10080_10082_10081_10177_10110_10111_5420020_10112_10113_10114_10312_10313_10184_10314_10078_10079_10073-10333,searchweb201603_16,ppcSwitch_5&btsid=f9199dc4-d6d2-4eae-aa62-303e2f7e34dd&algo_expid=49bebf02-9737-42a7-818f-c760868f8bca-0&algo_pvid=49bebf02-9737-42a7-818f-c760868f8bca&transAbTest=ae803_1
a couple of leds and a push switch
the holes are 5mm for leds and 12mm for the switch
the button just activate the circuit that sends signal immediately in a loop.
//CODE
include
RCSwitch mySwitch = RCSwitch();
void setup() {
// Transmitter is connected to Attiny Pin PB3 <--
// That is physical pin2
mySwitch.enableTransmit(3);
pinMode(1,OUTPUT);
pinMode(0,OUTPUT);
}
void loop() {
mySwitch.send(123123,24);
for(int i=0;i<255;i++){
analogWrite(0,i);
delay(2);
}
digitalWrite(0,LOW);
for(int i=0;i<255;i++){
analogWrite(1,i);
delay(2);
}
digitalWrite(1,LOW);
delay(100);
for(int i=0;i<255;i++){
analogWrite(1,i);
delay(2);
}
digitalWrite(1,LOW);
for(int i=0;i<255;i++){
analogWrite(0,i);
delay(2);
}
digitalWrite(0,LOW);
}
//END
The lib: https://github.com/sui77/rc-switch
Thanks to the creator of the initial box that i've a bit modified:https://www.thingiverse.com/thing:399005