Thingiverse
P5 Panel Brackets
by Thingiverse
Last crawled date: 5 years, 6 months ago
These brackets can be used to attach P5 panels together into a larger display.
A few of them include nuts captured on the underside to allow you to attach stuff to the brackets. I'll be creating some mounts for Colorlight cards, a Raspberry Pi, and a few other odds and ends.
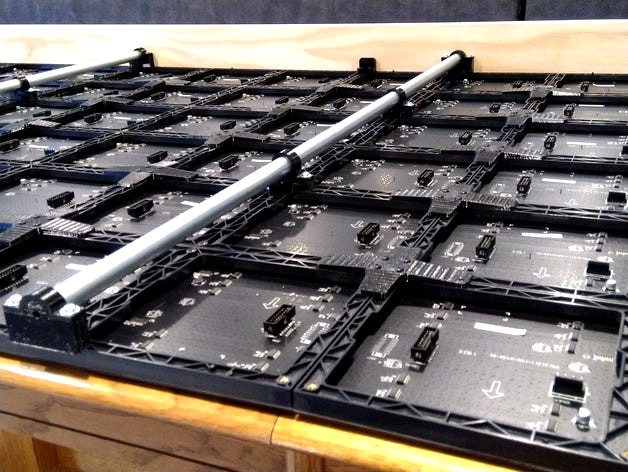
There's also a couple of brackets that allow you to attach sections of 1/2" EMT conduit to stiffen larger sets of panels. I'm using two pieces of conduit for my 5x6 panel display and it's far more effective than trying to use stiffer brackets.
To attach the brackets to the P5 panels use M3 x 0.5 pitch screws. The brackets are 6mm thick, so a 10mm screw without a washer will go 4 mm into the panel.
For attaching the EMT loops and other stuff to the brackets, use #8 machine screws with nuts and washers. To attach to a wood frame, use #8 sheet metal screws with a washer.
The Four Corner bracket is used to attach four panels together and requires four 3mm screws.
The Side bracket can be used to attach two panels at the center of the long edges.
The Edge bracket is used to attach the panels to a wood frame along the edges. This bracket can be used at panel corners or at the middle of the panels.
The Corner bracket is for the four outer corners of your matrix.
The EMT Base and Loop is for interior locations and attaches a piece of 1/2" EMT to the P5 panels.
The EMT Edge and Edge Loop is for the ends of the EMT. Screw the bracket to the wood frame before adding the EMT. Note, you might need to file a small notch in the EMT to slip it past the screw head or cut it slightly shorter.
The Colorlight bracket is designed to attach a 5A-75B receiver card and can be oriented in any of four ways. Use four #8 x 1/2" screws and nuts to attach the card to the bracket.
The Terminal Blocks bracket supports two 8-position screw terminal strips. I use one for 5V and the other for ground, with the jumper strips on the middle side of each terminal block. #8 screws are a tight fit in the holes of the terminal block, but should fit. Here's the ones I bought:https://www.amazon.com/gp/product/B06XKFCTSM/ref=ppx_yo_dt_b_asin_title_o02_s00?ie=UTF8&psc=1
The Base with Supports includes a captured nut to attach support brackets for items such as Colorlight cards, Raspberry Pi's, power supplies, etc. (coming soon).
Note - the edge and corner brackets extend 6mm past the edge of the P5 panels, so make your wood frame 12mm (1/2") larger than your matrix in each direction.
Note - picture doesn't show all the brackets attached yet as I'm still printing them.
A few of them include nuts captured on the underside to allow you to attach stuff to the brackets. I'll be creating some mounts for Colorlight cards, a Raspberry Pi, and a few other odds and ends.
There's also a couple of brackets that allow you to attach sections of 1/2" EMT conduit to stiffen larger sets of panels. I'm using two pieces of conduit for my 5x6 panel display and it's far more effective than trying to use stiffer brackets.
To attach the brackets to the P5 panels use M3 x 0.5 pitch screws. The brackets are 6mm thick, so a 10mm screw without a washer will go 4 mm into the panel.
For attaching the EMT loops and other stuff to the brackets, use #8 machine screws with nuts and washers. To attach to a wood frame, use #8 sheet metal screws with a washer.
The Four Corner bracket is used to attach four panels together and requires four 3mm screws.
The Side bracket can be used to attach two panels at the center of the long edges.
The Edge bracket is used to attach the panels to a wood frame along the edges. This bracket can be used at panel corners or at the middle of the panels.
The Corner bracket is for the four outer corners of your matrix.
The EMT Base and Loop is for interior locations and attaches a piece of 1/2" EMT to the P5 panels.
The EMT Edge and Edge Loop is for the ends of the EMT. Screw the bracket to the wood frame before adding the EMT. Note, you might need to file a small notch in the EMT to slip it past the screw head or cut it slightly shorter.
The Colorlight bracket is designed to attach a 5A-75B receiver card and can be oriented in any of four ways. Use four #8 x 1/2" screws and nuts to attach the card to the bracket.
The Terminal Blocks bracket supports two 8-position screw terminal strips. I use one for 5V and the other for ground, with the jumper strips on the middle side of each terminal block. #8 screws are a tight fit in the holes of the terminal block, but should fit. Here's the ones I bought:https://www.amazon.com/gp/product/B06XKFCTSM/ref=ppx_yo_dt_b_asin_title_o02_s00?ie=UTF8&psc=1
The Base with Supports includes a captured nut to attach support brackets for items such as Colorlight cards, Raspberry Pi's, power supplies, etc. (coming soon).
Note - the edge and corner brackets extend 6mm past the edge of the P5 panels, so make your wood frame 12mm (1/2") larger than your matrix in each direction.
Note - picture doesn't show all the brackets attached yet as I'm still printing them.