Thingiverse

Octoshield Case for Raspberry Pi 4 for Prusa Mk3 by adjuro
by Thingiverse
Last crawled date: 2 years, 10 months ago
I am using Octoprint (https://octoprint.org/) to manage my 3d printer and I bumped into a really nice plugin called “OctoPrint-Enclosure” (https://plugins.octoprint.org/plugins/enclosure/).
I found the functionality brought by this plugin useful as I am myself using and Enclosure for my printer.
The very same person who wrote this plugin, vitormhenrique, posted a thing (https://www.thingiverse.com/thing:2245493) where he was sharing his hardware set up.
At this point I got really scared by the amount of cable swarming everywhere as I am myself trying to keep my “working place” as neat as possible.
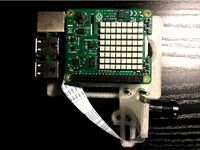
So, I started to look around trying to find an all-integrated solution for my enclosure. This is where I found the nice project on hackaday called “Octoshield” (https://hackaday.io/project/172223-octoshield). It is basically a HAT rerouting Raspberry Pi’s GPIO and having all electronics component already assembled (handy). So, you simply need to connect your sensor, your switch, LEDs and other fans to your Raspberry Pi and install the plugin for having everything operational (cool).
Only problem is that you need to build it yourself and because I am not found of soldering tiny things I decided to “subcontract” the production of the HAT to the company mentioned in the Youtube video link of the Hackaday project. This project has been realized by goodwin for which I must give all credit to (good job).
In a nutshell the “Octoshield” HAT allows you to :
Plug a temperature sensor
Plug a 5V fan to cool the Raspberry Pi
Plug a 12V fan for your enclosure
Add an input (switch or sensor)
Plug RGB LED stripes
Plug Neopixel LED stripes
Control a relay
Power the raspberry pi with a 12V power input instead of the 5V USB C.
To keep things shorts, you must purchase the Printed Circuit Board (or PCB) which is cheap to be honest (You get 5 pieces for 40$ I think). Then you have the possibility either to weld all components by yourself, meaning that you must source all parts yourself, or you have the possibility to ask the PCB company to do it for you (yes!). They will source the components and have them mounted for you. This will cost you an extra 40$. Otherwise, I think you can get all component for 10$.
I am attaching the component list for the HAT, other relevant information to have the HAT built and the details of the purchasing basket I used. The team is friendly, and they will help you build it easily. I must admit my interest in electronic does not go that deep, but you do not really need to know a lot to order the PCB fully assembled.
Once I received my “Octoshields” (I order more than one fully assembled) and after making the different test to have all component working with “OctoPrint-Enclosure” plugin I started designing the case for the Raspberry Pi + Octoshield + All component. As mentioned, before I wanted to have enclosure function all included in a box so to have something compact and neat (bad cables, bad).
For this project, my requirements were as follow (following Octoshield capacities):
Have a temperature + humidity sensor to monitor my enclosure environment.
Be able to control the printer’s PSU trough a relay (On/Off)).
Control the air management in the enclosure (Fans).
Cool down the Raspberry Pi4 (Must be done it is over heating).
Have a Raspberry Pi Cam plugged.
Have a Webcam plugged.
Have a DSI screen plugged.
Power the Raspberry Pi.
Mount it to my printer’s frame.
I designed a case as compact as possible to be able to fit all component and have opening for every cables.
Mounting instruction are given here below
I found the functionality brought by this plugin useful as I am myself using and Enclosure for my printer.
The very same person who wrote this plugin, vitormhenrique, posted a thing (https://www.thingiverse.com/thing:2245493) where he was sharing his hardware set up.
At this point I got really scared by the amount of cable swarming everywhere as I am myself trying to keep my “working place” as neat as possible.
So, I started to look around trying to find an all-integrated solution for my enclosure. This is where I found the nice project on hackaday called “Octoshield” (https://hackaday.io/project/172223-octoshield). It is basically a HAT rerouting Raspberry Pi’s GPIO and having all electronics component already assembled (handy). So, you simply need to connect your sensor, your switch, LEDs and other fans to your Raspberry Pi and install the plugin for having everything operational (cool).
Only problem is that you need to build it yourself and because I am not found of soldering tiny things I decided to “subcontract” the production of the HAT to the company mentioned in the Youtube video link of the Hackaday project. This project has been realized by goodwin for which I must give all credit to (good job).
In a nutshell the “Octoshield” HAT allows you to :
Plug a temperature sensor
Plug a 5V fan to cool the Raspberry Pi
Plug a 12V fan for your enclosure
Add an input (switch or sensor)
Plug RGB LED stripes
Plug Neopixel LED stripes
Control a relay
Power the raspberry pi with a 12V power input instead of the 5V USB C.
To keep things shorts, you must purchase the Printed Circuit Board (or PCB) which is cheap to be honest (You get 5 pieces for 40$ I think). Then you have the possibility either to weld all components by yourself, meaning that you must source all parts yourself, or you have the possibility to ask the PCB company to do it for you (yes!). They will source the components and have them mounted for you. This will cost you an extra 40$. Otherwise, I think you can get all component for 10$.
I am attaching the component list for the HAT, other relevant information to have the HAT built and the details of the purchasing basket I used. The team is friendly, and they will help you build it easily. I must admit my interest in electronic does not go that deep, but you do not really need to know a lot to order the PCB fully assembled.
Once I received my “Octoshields” (I order more than one fully assembled) and after making the different test to have all component working with “OctoPrint-Enclosure” plugin I started designing the case for the Raspberry Pi + Octoshield + All component. As mentioned, before I wanted to have enclosure function all included in a box so to have something compact and neat (bad cables, bad).
For this project, my requirements were as follow (following Octoshield capacities):
Have a temperature + humidity sensor to monitor my enclosure environment.
Be able to control the printer’s PSU trough a relay (On/Off)).
Control the air management in the enclosure (Fans).
Cool down the Raspberry Pi4 (Must be done it is over heating).
Have a Raspberry Pi Cam plugged.
Have a Webcam plugged.
Have a DSI screen plugged.
Power the Raspberry Pi.
Mount it to my printer’s frame.
I designed a case as compact as possible to be able to fit all component and have opening for every cables.
Mounting instruction are given here below
Similar models
grabcad
free

Smart Enclosure
...raspberry pi 3 running octoprint as well as a custom application to control lighting, fan speed, power etc. inside the enclosure.
thingiverse
free

Raspberry Pi & Electronics Control Case by E_Raw
... gnd) and manage properly:
2x pwn 120mm fans
1x neopixel 60 ledss strip (rgb)
4x relay ports
3x 1-wire ds18b20 temperature probes
thingiverse
free

Raspberry pi case night vision motion sensor mount and PCB by cherrybomb37
...tegrated this all with a separate pi running home assistant for home security.
remix of https://www.thingiverse.com/thing:4227360
thingiverse
free

Cooling fan and support frame for OctoPrint rig 3.5 PiTFT
...ystem. i also mounted the 40 mm fan to draw air out of the enclosure. the fan mounting hardware is m3 x 20 button head cap screw.
thingiverse
free

Lacas Signature Raspberry Pi 4b Octoprint Enclosure
...io cable slot above the ethernet port. i made this case for octoprint and a pi cam on my ender 5 pro. press fit 20mm fan fingers
thingiverse
free

Raspberry Pi B+ Enclosure Aluminum Profile Mount by schwamster
...things/05vnphsombm?display=4vwqmjgw9ji
used it to attach a raspberry pi to my felix 3.0 printer so i could run octoprint on it.
thingiverse
free

Raspberry Pi 4 case - Octoprint server by CilloDK
...m=a2g0s.9042311.0.0.27424c4dtp6q8f
the screws for the pcbs and top is m2.5
it is desiged in fusion 360, the file is free for use.
thingiverse
free

Pi & Pi Camera Case for OctoPrint by Skull-64
... up much space. i have been using this for several months and i am really pleased with the design it does what you need it to do.
thingiverse
free

Raspberry Pi Printer Rail Case by speedysk1
...fan was not tall enough if you had heat sinks.
i modified this to use with octoprint and attach the raspberry pi to my printer.
thingiverse
free
Raspberry Pi - Camera - Sense Hat - Node Red - Octopi - Web Dashboard - Perfect for Remix to other Projects by Padi89
...ted all the time.
check link for serial communication problems!https://discourse.octoprint.org/t/my-new-bq-hephestos-2-setup/1248
Adjuro
thingiverse
free

3dupfitters door knob by adjuro
...y 3dupfitters enclosure so i designed a new one.
is uses a m4x12 screw and the corresponding flat head given with the enclosure.
thingiverse
free

PolyBox PTFE adapter by adjuro
..., the adapter consists of a bottom part m8 screw with a hole inside connecting to the top part receiving the pneumatic connector.
thingiverse
free

Cosmo Ride magnetic support by adjuro
...).
the remote support is designed for a 24 mm rode and for the light used as rear light a 27 mm rod.
use zip ties to attach them.
thingiverse
free

Foot Mount for Raspberry Pi Camera by adjuro
...culating raspberry pi camera mount for prusa mk3 and mk2 :
raspicamcover
raspicamback
ballnut (petg)
thumb_bolt (petg)
gblock_v2
thingiverse
free

92mm Fan Adapter for 3d upfitters enclosure by adjuro
...2mm fan, so i simply did a “me-too“ of the 80mm adapter part compatible with my 92mm fan.
also made a fan grid for safety reason.
thingiverse
free

Magnetic connector for a 3 pins spring loaded pogo by adjuro
... will need to assemble everything for each pair :
8 neodymium 6 mm diameter 2 mm thickness
4 m2.5 8mm screws
4 m2.5 10mm screws
thingiverse
free

92mm Fan to 60mm Adapter for 3d upfitters enclosure by adjuro
...2mm fan, so i simply did a “me-too“ of the 80mm adapter part compatible with my 92mm fan.
also made a fan grid for safety reason.
thingiverse
free

3d upfitters 60mm fan adapter for the grommet holes by adjuro
...g instruction you should first mount the fan to the adapter and then screw the whole assembly with the nut to the enclosure wall.
thingiverse
free

Arducam IMX219 USB camera case for Articulating Raspberry Pi Camera Mount for Prusa MK3 and MK2 by adjuro
...a module who is bigger than the raspi cams.
this allows me to use multiple camera with small form factor to monitors my printing.
thingiverse
free

Dyson Quick Release Nozzle V7 V8 V10 by adjuro
...st to use support for the hanging parts.
for better finishing i print the lock with 0.1 resolution.
for the nozzle i choose 0.2mm
Mk3
turbosquid
$50

cention mk3
...ty free 3d model cention mk3 for download as ma, obj, and fbx on turbosquid: 3d models for games, architecture, videos. (1454148)
turbosquid
$129

MK3 Tank
... available on turbo squid, the world's leading provider of digital 3d models for visualization, films, television, and games.
turbosquid
$100

Toyota Supra MK3
... available on turbo squid, the world's leading provider of digital 3d models for visualization, films, television, and games.
turbosquid
$44

cention mk3 low poly
...d model cention mk3 low poly for download as ma, obj, and fbx on turbosquid: 3d models for games, architecture, videos. (1454666)
turbosquid
$30

Challenger I Mk3 Falcon
... available on turbo squid, the world's leading provider of digital 3d models for visualization, films, television, and games.
turbosquid
$10

American Frag hand grenade MK3
...free 3d model american frag hand grenade mk3 for download as on turbosquid: 3d models for games, architecture, videos. (1393624)
turbosquid
$20

Mk3 US Navy Combat Knife
...ty free 3d model mk3 us navy combat knife for download as fbx on turbosquid: 3d models for games, architecture, videos. (1172791)
3d_export
$29

Ford Fiesta MK3 Modified 3D Model
...7 tumerfx mtumer mehmet t?mer 1993 1995 1996 wrc special modifed modifiye
ford fiesta mk3 modified 3d model mtumer 30698 3dexport
3d_export
$99

Toyota Supra Mk3 19861993 3D Model
...ort fast coupe japan 1986 1987 1988 1989 1990 1991 1992 1993 tuning turbo
toyota supra mk3 19861993 3d model squir 62530 3dexport
turbosquid
$5

Timothy Oulton Mars Chair MK3
...on mars chair mk3 for download as 3ds, max, obj, fbx, and dae on turbosquid: 3d models for games, architecture, videos. (1209782)
Raspberry
3d_export
free

raspberry
...raspberry
3dexport
3d model of a raspberry. i tried to make it realistic.
turbosquid
$27

Raspberries
...y free 3d model raspberries for download as max, obj, and stl on turbosquid: 3d models for games, architecture, videos. (1354176)
turbosquid
$14

Raspberries
...y free 3d model raspberries for download as max, obj, and fbx on turbosquid: 3d models for games, architecture, videos. (1364663)
3d_export
$5

raspberry pi
...raspberry pi
3dexport
carcasa para la raspberry pi
turbosquid
$99

Raspberry
... available on turbo squid, the world's leading provider of digital 3d models for visualization, films, television, and games.
turbosquid
$10

raspberries
... available on turbo squid, the world's leading provider of digital 3d models for visualization, films, television, and games.
archive3d
free

Raspberries 3D Model
...raspberries 3d model archive3d raspberries raspberry raspberries n300911 - 3d model (*.3ds) for interior 3d...
3d_export
$5

raspberry fruit
...raspberry fruit
3dexport
3d_export
$5

raspberry
...y different sizes. their color ranges from light burgundy to pink. there are formats: obj, 3ds, blend, dae, fbx, mtl.<br>:)
evermotion
$12

raspberries 23 am130
...evermotion raspberries 23 am130 evermotion key 23 food fruit raspberry fruits am130 raspberries highly detailed 3d model of raspberries...
Prusa
turbosquid
$2

Frame Filament Guide Clip-On for Prusa Mk3
...rame filament guide clip-on for prusa mk3 for download as stl on turbosquid: 3d models for games, architecture, videos. (1634730)
3d_export
free

prusa i3 mk3s laser mount for opt lasers
...to learn more about the blue laser technology that conceived the cutting and engraving laser heads from opt lasers, please visit:
turbosquid
free

Prusa small printer adapter holder
...er for download as ipt, skp, dwg, dxf, fbx, ige, obj, and stl on turbosquid: 3d models for games, architecture, videos. (1642936)
3d_export
$30

geisha by jonathan adler
...** i did a 3d printing test in the prusa software, you can find it among the attached images.<br>exchange:<br>.blend...
thingiverse
free

Prusa without Prusa (rc2) by madless
...prusa without prusa (rc2) by madless
thingiverse
just the main part of prusa rc2 faceshield, without writing.
enjoy :)
thingiverse
free

Prusa by acejbc
...prusa by acejbc
thingiverse
prusa knob info
m3 8mm screw
thingiverse
free

Prusa house
...prusa house
thingiverse
how prusa house could look like...
thingiverse
free

Prusa Mk2 "Fake Prusa" LCD cover by anraf1001
...r by anraf1001
thingiverse
version of prusa's lcd cover with "fake prusa" instead of "original prusa"
thingiverse
free

Prusa stabilizator by gutiueugen
...prusa stabilizator by gutiueugen
thingiverse
prusa stabilizator
thingiverse
free

Keychain Prusa by rbarbalho
...keychain prusa by rbarbalho
thingiverse
keychain with text prusa.
Pi
design_connected
$11

Pi
...pi
designconnected
ligne roset pi chairs computer generated 3d model. designed by thibault desombre.
3d_export
$5
raspberry pi
...raspberry pi
3dexport
carcasa para la raspberry pi
turbosquid
$18

pied
... available on turbo squid, the world's leading provider of digital 3d models for visualization, films, television, and games.
3ddd
$1

Emme pi light
...emme pi light
3ddd
emme pi light
люста emme pi light
3ddd
$1

Emme pi light
...emme pi light
3ddd
emme pi light
бра классическое emme pi light
3ddd
$1

Emme Pi Light
...emme pi light
3ddd
emme pi light
3ddd
$1

Emme Pi Light
...emme pi light
3ddd
emme pi light
design_connected
$16

Pi-Air
...pi-air
designconnected
living divani pi-air lounge chairs computer generated 3d model. designed by harry & camila.
3d_ocean
$15

Manneken Pis
...picting a naked little boy urinating into a fountain’s basin. (wikipedia) the model was sculpted in blender 2.70a rendered wit...
3ddd
$1

Emme pi light
...emme pi light
3ddd
emme pi light
люстра классическая фирма: emme pi light
артикул: 3595/5/cot/12/wh
Case
3d_export
$1

case
...case
3dexport
case
archibase_planet
free

Case
...case
archibase planet
showcase show-case glass case
glass-case + cakes - 3d model for interior 3d visualization.
archibase_planet
free

Case
...case
archibase planet
showcase show-case glass case
glass-case for chips - 3d model for interior 3d visualization.
archibase_planet
free

Case
...case
archibase planet
case shelving drawer
case - 3d model for interior 3d visualization.
archibase_planet
free

Case
...case
archibase planet
case rack locker
case - 3d model for interior 3d visualization.
archibase_planet
free

Case
...case
archibase planet
case drawer kitchen furniture
case - 3d model for interior 3d visualization.
archibase_planet
free

Case
...case
archibase planet
case cupboard shelving
glass case - 3d model for interior 3d visualization.
archibase_planet
free

Case
...case
archibase planet
case handbag suitcase
case - 3d model (*.gsm+*.3ds) for interior 3d visualization.
archibase_planet
free

Case
...case
archibase planet
case suitcase
case 5 - 3d model (*.gsm+*.3ds) for interior 3d visualization.
archibase_planet
free

Case
...case
archibase planet
locker case dresser
case - 3d model (*.gsm+*.3ds) for interior 3d visualization.
4
turbosquid
$9

Office Chair 4-4
... available on turbo squid, the world's leading provider of digital 3d models for visualization, films, television, and games.
3d_export
$5

doors- 4
...doors- 4
3dexport
doors 4
3d_export
$5

hinge 4
...hinge 4
3dexport
hinge 4
3ddd
$1

Штора №4
...штора №4
3ddd
штора №4
3d_export
free

playstation 4
...playstation 4
3dexport
playstation 4
turbosquid
$1

re 4-4 electric locomotive
... free 3d model re 4 4 electric locomotive for download as obj on turbosquid: 3d models for games, architecture, videos. (1707845)
3ddd
$1

nexus 4
...nexus 4
3ddd
lg , телефон
nexus 4
3ddd
$1

4 Poufs
...4 poufs
3ddd
пуф
4 soft poufs
turbosquid
$12

Calligraphic Digit 4 Number 4
...hic digit 4 number 4 for download as max, obj, fbx, and blend on turbosquid: 3d models for games, architecture, videos. (1389332)
3ddd
$1

Dauphin 4+
...dauphin 4+
3ddd
кресло
dauphin 4+ конференц кресло