Thingiverse
Nintendo DS Lite clip
by Thingiverse
Last crawled date: 4 years, 2 months ago
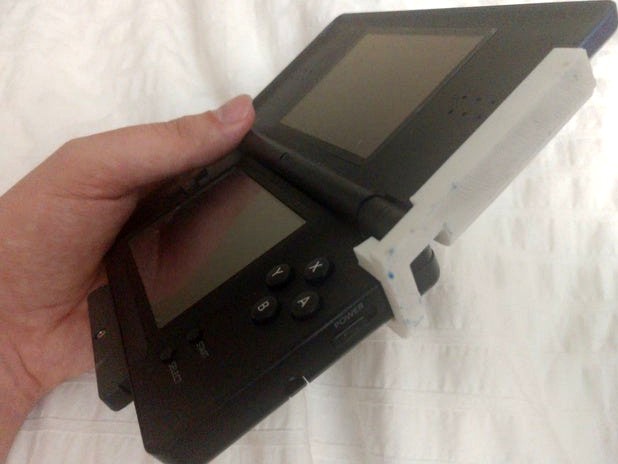
A Nintendo DS has a hinge that's supposed to open just the right amount and stop. In order to go further and open it all the way or to close it, you have to actually push or pull on it. Gravity alone can't pull the top screen out of place. It's like a car door that stops at a few angles rather than swinging wildly.
The hinge broke on the DS my brother gave me after years of good use, meaning it began just swinging freely rather than stopping at the sweet spot. It would cost a lot more to repair it than to get a new DS, which would only be around $40 since it's an old system. If I wanted a replacement I'd probably just get a newer system, and I wasn't even sure I wanted a replacement since I should probably play fewer games anyway.
However, the idea struck me that I could use this as an opportunity for invention. Rather than repair the DS, I could create a clip that would hold the DS open at the correct angle. I had some experience with a 3D printer but only printing decorative trinkets that other people mostly designed. Printing functional components that are meant to fit onto real-world objects with precise measurements is much more difficult than printing art, and I'd have to learn to design it myself.
I spent weeks learning how to use Blender, the 3D-modeling software. Then once I became competent in Blender I spent weeks working with it to model my DS clip. Eventually I was ready to print my first draft, so I transferred the digital model to the 3D printer at my office. And then I discovered the printer would not work!
It seems that at some point after the time I had printed those trinkets I mentioned, the 3D printer had become clogged so that no filament could be extruded through it. I asked the Internet for help and I got in touch with a former employee who had previously been responsible for the printer. When I couldn't adequately answer the questions they posed to me about the problem, it became clear to them that I was a 3D-printing amateur. I said that I wanted to disassemble part of the printer to remove the clog but they insisted that I learn more about 3D printing before I attempted something so drastic, since there is often a simpler solution to these problems.
So I spent weeks studying 3D printing like I had studied 3D modeling. The usual approach to remove clogs is to just heat the hot end up hotter than usual so the clog melts, but I had to figure out how to even do that first. Eventually I had tried all the Internet's advice and I decided I knew enough about 3D printers to try disassembling the printer with the help of a crafty coworker. Once we found and removed the clog it became clear that we couldn't have done it without disassembling the printer, so my original idea from before all my studies turned out to be right all along. And the printer was working again!
After the exhausting journey of learning Blender, using Blender, learning about 3D printing, and fixing the 3D printer, I was finally able to start printing. My first draft was so incredibly flimsy that I carried it home in a loosely-closed fist because I was sure it would break if I tried putting it in a bag. Of course this meant it couldn't hold up the weight of the top screen on the DS, so the clip didn't last long. I had to modify my 3D model to make the shape much thicker, and I also tried modifying the settings in the printer software so that the density would be higher. After more weeks of printing draft after draft, I finally ended up with the functional version you see posted here.
I'm including the .blend and .stl files for all my drafts, but 5 and 6 are the finished product (one for each side of the DS).
Similar models
thingiverse
free

Universal Filament Filter and Lubricator with mount for Geeetech Prusa I3 by jonathanmcharg
...tor". rather than free moving, i modified the design to mount it to the printer. since using this i haven't had a clog!!
thingiverse
free

Filament Spool Stabilizer by Yatalia
...s to be, but it does the job just fine. also, this isn't really a stabilizer, but i couldn't come up with a better name.
thingiverse
free

Lothcat by emmaguy
...pretty happy with him.
printing:
supports needed. i printed him at about 8x8cm with 20% infil and he came out fine on my voxelab.
thingiverse
free

Caliper for small printers by NebNorse
...ldn't find a caliper that would fit in my small 3d printer... so i made one. printed and tested with an xyz davinchi jr. 1.0
thingiverse
free

Nerf 24mm Flashlight Clip by Horsengineer
...i had a flashlight that was 24mm in diameter and couldn't find a model online that would fit it so i made one and here it is.
thingiverse
free

MockingJay Pin thicker clips by fehknt
...ldn't get the slicer to get the clip output right so i just made the clip a little thicker so it would be solid in my output.
grabcad
free

Compressor wheel
... on this. i wanted to draw blades on the wheel that would change direction, so i couldn't really use the helix tool for this.
thingiverse
free

Remote Control Holder
...hem. i also notice they begin to sag after a week so perhaps increase the width of the clip walls so they don't bend as much.
thingiverse
free

Logitech G930 replacement microphone arm. by simonx
...rophone to be routed around the outside of the arm, so you don't need to disassemble the whole headset and resolder the wire.
grabcad
free

Logitech G930 Headset replacement microphone arm.
...rophone to be routed around the outside of the arm, so you don't need to disassemble the whole headset and resolder the wire.
Ds
3ddd
$1

DS-277
...ds-277
3ddd
desede
ds-277
3ddd
$1

DS-47_Sofas
...ds-47_sofas
3ddd
desede
ds-47_sofas
3ddd
$1

DS-3_Sofas
...ds-3_sofas
3ddd
desede
ds-3_sofas from desede
design_connected
$27

DS-152
...ds-152
designconnected
de sede ds-152 computer generated 3d model.
design_connected
$9

DS 9045
...ds 9045
designconnected
de sede ds 9045 computer generated 3d model. designed by bestenheider, philippe.
design_connected
$16

DS 315
...ds 315
designconnected
de sede ds 315 armchairs computer generated 3d model. designed by philippe bestenheider.
design_connected
$20

DS 166
...ds 166
designconnected
de sede ds 166 armchairs computer generated 3d model. designed by hugo de ruiter.
design_connected
$18

DS-9090
...ds-9090
designconnected
de sede ds-9090 computer generated 3d model. designed by de sede design-team.
3ddd
$1

DS-278-chair
...ds-278-chair
3ddd
desede
ds-278-chair
design_connected
$20

DS-220
...ds-220
designconnected
de sede ds 220 armchairs computer generated 3d model. designed by de sede design-team.
Lite
design_connected
$11

Lite
...lite
designconnected
sphaus lite coffee tables computer generated 3d model. designed by eero saarinen.
3ddd
$1

Foscarini_Giga-Lite
... giga-lite , лампы , light
foscarini_giga-lite
turbosquid
free

LegendarySwords - Lite
...odel legendaryswords - lite for download as dae, fbx, and obj on turbosquid: 3d models for games, architecture, videos. (1559781)
turbosquid
$85

DS Lite
... available on turbo squid, the world's leading provider of digital 3d models for visualization, films, television, and games.
turbosquid
$5

Jet Lite
... model jet lite for download as 3ds, obj, fbx, blend, and stl on turbosquid: 3d models for games, architecture, videos. (1476173)
turbosquid
$1

Mod-Lite
... available on turbo squid, the world's leading provider of digital 3d models for visualization, films, television, and games.
turbosquid
free

lite on.max
... available on turbo squid, the world's leading provider of digital 3d models for visualization, films, television, and games.
design_connected
$13

Multi-Lite Pendant
...multi-lite pendant
designconnected
gubi multi-lite pendant computer generated 3d model. designed by weisdorf, louis .
turbosquid
$120

Cartoon Pack Lite
...
royalty free 3d model cartoon pack lite for download as fbx on turbosquid: 3d models for games, architecture, videos. (1255320)
turbosquid
$100

HUAWEI P3 Lite
...id
royalty free 3d model huawei p30 lite for download as c4d on turbosquid: 3d models for games, architecture, videos. (1515805)
Nintendo
turbosquid
$25

Nintendo
...del super nintendo/ tv for download as 3ds, max, obj, and fbx on turbosquid: 3d models for games, architecture, videos. (1213066)
3d_export
$40

nintendo switch
...nintendo switch
3dexport
3d model of nintendo switch, made in blender.
3d_ocean
$18

Nintendo Wii
...h quality renders, close ups and animations. the polycount is manualy optimized so it’s not hardware intensive when importing ...
3d_export
$25

The heart of nintendo
...the heart of nintendo
3dexport
do you need to know how nintendo is inside? that's it!
turbosquid
$10
SUPER NINTENDO
...uid
royalty free 3d model super nintendo for download as c4d on turbosquid: 3d models for games, architecture, videos. (1291068)
turbosquid
$19
Nintendo Switch
...ree 3d model nintendo switch for download as ma, obj, and fbx on turbosquid: 3d models for games, architecture, videos. (1169424)
turbosquid
$8

Nintendo Switch
...ee 3d model nintendo switch for download as fbx, dae, and obj on turbosquid: 3d models for games, architecture, videos. (1617647)
turbosquid
$200
Nintendo Wii
... available on turbo squid, the world's leading provider of digital 3d models for visualization, films, television, and games.
turbosquid
$99
Nintendo Wii
... available on turbo squid, the world's leading provider of digital 3d models for visualization, films, television, and games.
turbosquid
$99

Nintendo 3DS
... available on turbo squid, the world's leading provider of digital 3d models for visualization, films, television, and games.
Clip
archibase_planet
free
Clip
...clip
archibase planet
paper-clip clip office equipment
clip band - 3d model for interior 3d visualization.
3d_export
$5
screw clip
...screw clip
3dexport
screw clip
3d_ocean
$4
Butterfly clip
... a butterfly clip, it comes with a ready to render set for out of the box rendering. obj version and max alones version included.
turbosquid
$2

clip
...
royalty free 3d model clip for download as ma, obj, and fbx on turbosquid: 3d models for games, architecture, videos. (1358622)
turbosquid
$5

Clip
...lty free 3d model clip for download as c4d, 3ds, fbx, and obj on turbosquid: 3d models for games, architecture, videos. (1521355)
turbosquid
$19
Clip
... available on turbo squid, the world's leading provider of digital 3d models for visualization, films, television, and games.
turbosquid
$4
Clips
... available on turbo squid, the world's leading provider of digital 3d models for visualization, films, television, and games.
turbosquid
$3
clip
... available on turbo squid, the world's leading provider of digital 3d models for visualization, films, television, and games.
turbosquid
$2

clips
... available on turbo squid, the world's leading provider of digital 3d models for visualization, films, television, and games.
turbosquid
free

clip
... available on turbo squid, the world's leading provider of digital 3d models for visualization, films, television, and games.