Thingiverse
NanoDrives Time Machine by Zurkeyon
by Thingiverse
Last crawled date: 2 years, 12 months ago
Introducing,
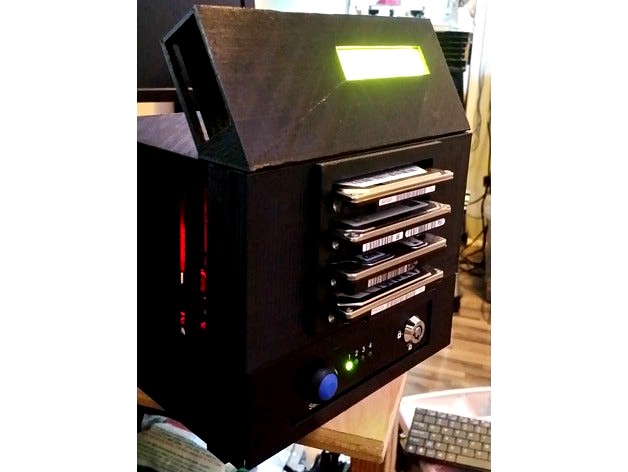
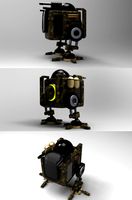
The NanoDrivesTM!
Nano v3 (Arduino Compatible) Based 4-Port SATA Switcher, with 24 hour auto-switching Function.
(Poor Man's Physical Layer Switch)
This Stack-able Backup Unit, allows 4 (and up to 20!) Laptop 2.5" Hard drives or Solid state drives, to be switched out like cartridges automatically, every 24 hours.
(Using a Single Arduino Nano!)
Eliminating Human Error and Providing a Power Down and FULL DISCONNECT of all drives not currently selected.
(Preventing backups from being infected while those volumes are powered down)
This unit is FULLY programmable, Fully Open Source, and ALL Sketchup, Fritzing, and Arduino files are INCLUDED!
Possible Customizations Include...
More buttons and functions
Additional LED indicators
Bluetooth Control and Updates
Web Based Management Portal
NAS Capabilities (Add an SoC and GO!)
Alerts and Notifications
Expanded LCD Menu System
Cloud mirroring and connectivity
And SO much more!
The Sky is the Limit!
EVERY Part is available online, thus, the unit should be serviceable... Forever!
Current Features:
4-Bay Stack-able
LCD Status Display
Hot Swap Design
Trayless System (No Drive Hardware, just slide Drives In/out!)
Optical Button Interface
Low Parts and Build cost
Unlimited Lifespan - 100% Easily Sourced Parts
Easy to Print Design, works on any 7x7x7+ Print Bed
Prints well in PLA or ABS
FULLY Programmable Arduino NanoV3 Core
Simple to Advanced Firmware Options. (Simple and advanced Code Samples Included)
Configurable Alarms to Trigger Drive Selection
Switch Pos#5 Eliminated in the code to prevent all drives from being powered down.
All ATX Molex Power Connectors.
USB3 or ESATA connection to PC (Either Option, not both... Yet)
Arduino USB Port Accessible from the back panel for additional programming/updates.
Up to 12.5mm Drive Height, with 2.5mm Clearance over each drive for airflow.
12v or 5v cooling fan ready (Power-Wise... Just add mounts)
Space left in design to allow for massive amounts of feature expansion.
Stack multiple units, and control the switching all from a single Arduino Nano, up to 20 Drives! (Code Still needs to be Written for This)
Designed using the SATA switcher found at the sites below as a "Core" to do the physical layer switching.
http://www.cooldrives.com/index.php/4posaiisw3ba.html
http://www.usbgear.com/SW-SATA2X4.html?pk_campaign=googleshop&gclid=CjwKEAiAm8nCBRD7xLj-2aWFyz8SJAAQNalarGuWWgDVhhbHVvGLbHNUH96ogsJjax3tPHGjPQrRpBoCjf7w_wcB
https://www.amazon.com/Port-Switch-3-5inch-Design-KeyLock/dp/B00R8IEXHI
http://www.coolgear.com/product/4-port-sata-ii-switch-3-5inch-bay-mount-design-with-keylock-and-led
http://www.compusb.com/shop/4-port-sata-iii-ii-i-switch-with-keylock-and-led-6gbps-compatible/
Full disclosure: I got mine from Cooldrives... As they were Cheapest!
PARTS List:
SATA Switcher: See list of suppliers above
80$
x4 Laptop 2.5" SATA Hard Drives (See Pricewatch.com or Newegg.com)
25$+ Each
LCD and I2C interface boardhttps://www.amazon.com/gp/product/B019DB9IC2/ref=oh_aui_detailpage_o00_s01?ie=UTF8&psc=1
9$
RTC modulehttps://www.amazon.com/gp/product/B00LZCTMJM/ref=oh_aui_detailpage_o02_s00?ie=UTF8&psc=1
6$
Arduino Nanohttps://www.amazon.com/gp/product/B00SGMEH7G/ref=oh_aui_detailpage_o07_s00?ie=UTF8&psc=1
4.50$
(EDIT) It was pointed out to me on the arduino forums, that my Arduino source may not be the best one for a 100% compatible Nano v3.
So Below I have listed several others that the guys on the Arduino forums recommeded.http://www.yourduino.com/sunshop/index.php?l=product_detail&p=84
orhttp://search.store.yahoo.net/yhst-27389313707334/cgi-bin/nsearch?query=nano&searchsubmit=Go&vwcatalog=yhst-27389313707334&.autodone=http%3A%2F%2Fwww.gravitech.us%2F
USB to SATA Adapter (Includes The Projects Power Supply!)https://www.amazon.com/Sabrent-USB-DSC9-SATA-Drive-Converter/dp/B00DQJME7Y/ref=sr_1_6?ie=UTF8&qid=1481873250&sr=8-6&keywords=USB+3.0+to+SATA
23$
Prototype PCBhttps://www.amazon.com/gp/product/B0147YM3DG/ref=oh_aui_detailpage_o01_s00?ie=UTF8&psc=1
5$ for 5
X1 Photoresistor
x1 White LED (2.5v or 5v)
x1 LED Pulldown Resistor to Limit Current. (220 Ohm)
x1 150 Ohm Resistor to Limit Ground Current on the Circuit (Input Side)
x1 Tactile/Momentary Switch for Reset (Optional)
2-4 $ Total...
Male Break Away Header Pinshttps://www.sparkfun.com/products/116
1.50$
Female Break Away Pinshttps://www.sparkfun.com/products/115
1.50$
Optional Parts:
Jumper Wire (Doubles as Project wire for the Whole Build)https://www.amazon.com/gp/product/B01LZF1ZSZ/ref=oh_aui_detailpage_o00_s00?ie=UTF8&psc=1
7$
Sharp PC817 optoCoupler
1$
4 Drive 250GB unit Build Cost = Approx 242.50$ + Shipping
4 Drive 1000GB unit Build Cost = Approx 340.50$ + Shipping
4 Drive 2000GB unit Build Cost = Approx 582.50$ + Shipping
BUILD Guide:
(EDIT: SATA Switcher must be mounted in the included 5.25" Adapter bracket to accomodate the design dimensions.)
Step 1: Print All Parts
All Parts Except for the Drive Cage Print as they are, The Drive Cage Must be re-oriented Vertical With the Tabs Facing UP away from your build Plate. Do NOT use Supports on the Drive Cage, as it will cause issues with Removal after printing.
The NanoDrivesTM itself MUST Be printed with Supports, and was ONLY tested with Cura 15.04.06. However, it is a basic geometry that should print well from any slicer.
(EDIT: There is a Geometry issue with the TMv3 Main body. Please use the TMv2 Body until I can correct the issue. Thx!
Step 2: Solder Together the interface board.
See the Fritzing Diagram included in the download, and use it to Wire up Your interface board onto your PCB Prototype. Pay CLOSE Attention to the placement of the components.
Especially the NANO!
Step 3: Rewire the Switch Button to the Nano
Interfere with the button on the front of the SATA switcher, and wire it up to the Arduino as your main switch (Larger one pictured in the Circuit Diagram) You may need to make the Poor Man's Optocoupler listed in the Circuit Design Unless you have a sharp PC817 laying around :-) Use it to complete the button Interface by coupling it into the socket on the Sata switcher, where its original button used to plug in. (Now connected to our Nano)
Step 4: Program the Nano
Get the Sketch (code) Of your choice from the downloaded files, and upload it to your Nano using the Arduino IDE.https://www.arduino.cc/en/Main/Software
Step 5: Test the Circuit
At this point, with all items powered up, the button should behave much as it did before we started. but with a slight input lag. (From the Interface, can be adjusted and fine tuned to be almost unnoticeable.) If this appears to be working as normal, you are in the right track!
Step 6: Set the Time
Use the Included Time Set code to Set the time on the RTC in the Serial Console.http://forum.arduino.cc/index.php?topic=439308.0
(See Pages 4, 5, 6 for help on this.)
Step 7: Set Your Alarm Time
Set the time of each day that you would like the arduino to switch the SATA position.http://forum.arduino.cc/index.php?topic=439308.0
(See Pages 4, 5, 6 for help on this.)
Step 8: Set the Auto ON position of your Switcher
HOLD down the button on the switcher While it is set to Position # 1. This will save the "Power On" position of the SATA Switcher. This MUST be set to position #1 in order for the Arduino code to work on a single unit. Stacked units will be programmed differently. But for your first unit, Hold it down for 5 Seconds while on Position 1, and release and wait for all the lights to go solid, confirming that you have saved the position.
Step 9: Drive Cage Install
Using the Provided SATA combo cables that came with the SATA switcher, Connect one to a Laptop hard drive and size it up onto the slot so that it fits within the tabs molded into the cage. Then Using Hot Glue, Epoxy, or Even Super glue, Apply the connector to the recessed area between the tabs and secure it with glue. Then using the Drive cage spacer, Secure the connector Down Permanently into the Recess by pressing the insert in through the back and then locking it in with a glue as mentioned above. Then carefully route the SATA and Power Cables According to the Guide Included with the Switch. You can arrange 1-4 Top Down or Bottom up. Totally up to you. Hot Glue the Drive cage into the unit, so that it cannot come back out of the Nanodrives Unit, as you will need to use some force to pull drives from the bays. Then Clamshell the unit back together, and secure it to the SATA switcher base with screws. (ToDo: Add holes to the STL for this) The unit is now physically ready/built.
Step 10: Backup configuration
Set up all drives in Windows to associate with the same drive letter when connected. Since the switcher only EVER connects one drive at a time, this will not be an issue for the device or the backup software.
Use the link below to accomplish this.http://www.sevenforums.com/hardware-devices/342077-how-make-windows-assign-same-drive-letter-all-externals.html
Step 11: Final Thoughts and Testing
Once Configured, Test the Unit for at least 5 days to see the whole cycle repeat before deploying. I would test for 30 days on your first unit to prevent sending it out into the field with possible build issues. Test Long, Test Well, Test Hard! :-D
**** A Special Thanks to "Cattledog" on the Arduino forums, for writing the majority of the NanoDrives initial Code! ****
(Our entire thread can be found here)http://forum.arduino.cc/index.php?topic=439308.0
If you have ANY questions on the build or the process, feel free to comment here or on the Arduino forums Thread. I'll be happy to answer what I can.
This project was undertaken in an effort to provide an automated swap/out style backup and to better protect my IT Customers from RANSOMWARE, MALWARE, and The Like.
Please make whatever use of it you can, and just give credit where credit is due.
This project is for use in the Commercial IT sector, at Home, or in your Home Office or Small Business. Retail Suggested for a bare 4-bay Main unit without drives, is $429.00
The CLOSEST physical Layer SATA switch i could find to what this unit does (though FAR more advanced), was in the neighborhood of 3500$...
So, here is to saving your customers 3000$! :-D
Enjoy!
-Z-
Full Instructable Available Also.http://www.instructables.com/id/NanoDrives-Time-Machine
Similar models
thingiverse
free

Desk Fan by NebNorse
...lpages04?ie=utf8&psc=1
motor control: https://www.amazon.com/gp/product/b01cnl6imc/ref=od_aui_detailpages04?ie=utf8&psc=1
thingiverse
free

PVC Bluetooth Speaker
...qlkkws5a2a&keywords=12v+power+supply&qid=1569933646&s=lawn-garden&sprefix=12v+power%2clawngarden%2c160&sr=1-4
thingiverse
free

Sims light-up Plumbob with WS2812b lights by nmurray48
...x_yo_dt_b_asin_title_o09_s00?ie=utf8&psc=1
button:https://www.amazon.com/adafruit-tactile-button-switch-ada367/dp/b00kldq0bo.
thingiverse
free

Star Citizen Control Panel 2 by kmobley6030
... to order this twice because i didn't notice that one of the switches in normally closed. you need both to be normally open.
thingiverse
free

40A Power Supply Cover W/LCD Display by hkgary_g
...lpage_o06_s01?ie=utf8&psc=1
power socket
www.amazon.com/gp/product/b06xnmt3wl/ref=oh_aui_detailpage_o06_s00?ie=utf8&psc=1
thingiverse
free
12 Function Deep Dish Button Box by coyoteyz13
..._title_o03_s00?ie=utf8&psc=1
https://www.amazon.com/gp/product/b07vhcb1q4/ref=ppx_yo_dt_b_search_asin_title?ie=utf8&psc=1
thingiverse
free

Raspberry Pi 4 + GeeekPi Raspberry Pi 4 Low-Profile CPU Cooler + X825 + SSD Housing by JasonKnight298
...;psc=1
power supplyhttps://www.amazon.com/gp/product/b07yjds71k/ref=ppx_od_dt_b_asin_title_s00?ie=utf8&psc=1
enjoy! have fun!
thingiverse
free

Arduino Nano and motor cases with battery by fbd38
...case it could be needed when colsed).
the second box allows to contain a 5v motor driver (i use it to drive two 5v fans).
enjoy !
thingiverse
free

4x 18650 Charging Station w/ 5v1a Single Cell Lipo Chargers by memisis
...e button while the until is powered gives you a powered voltage from the charger.
hope you enjoy! this was a fun project for me.
grabcad
free

Momentary Button Switch - SPST - M6
...u can find these switches here: https://www.amazon.com/gp/product/b07q6c3nsn/ref=ppx_yo_dt_b_asin_image_o02_s00?ie=utf8&psc=1

Zurkeyon
thingiverse
free
Magnetic Container Rack by Zurkeyon
...gth.
1/4" x 1/4" x 1"https://www.kjmagnetics.com/proddetail.asp?prod=b44x0
can hold about 4-5 lbs. (approx)
enjoy!
thingiverse
free
Graphics Card Brace by Zurkeyon
...odify to your liking.
i have included the sketchup files for tweaking and adjustments.
make whatever use of it you can.
enjoy!
thingiverse
free

PC504XS Camera Mount (Supercircuits) by Zurkeyon
...4.6 as the enclosure walls are very thin.
but i'm sure someone will be a bit more perfectionist and correct this :-)
enjoy!
thingiverse
free

140MM Dia Blower Fan Wheel by Zurkeyon
... the apparatus to perform the balancing.
http://whiteglovefans.com/blog/2013/9/22/static-balancing-blades
balancing info (manual)
thingiverse
free

Odroid-VU7 and VU7+ Screen Frame by Zurkeyon
...ught i would include.
enjoy!
(current version should hide the screen edges better than in the pics, if not its easy to modify.)
thingiverse
free
Laptop HDD Hot Swap Cage by Zurkeyon
...of screw holes on the end of the drive for mounting a handle to.
glue them together for unlimited sata storage upgrades!
enjoy!
thingiverse
free
SoC ExoSkeleton DevTop by Zurkeyon
...most a necessity. with enough flexibility to make it truly useful!
a place for everything, everything in its place!
:-p
enjoy!
z
thingiverse
free

PiCade Light Frames - RetroPi - Pac Man by ChrisMayhew
...some alternative light frames for the picade designed by zurkeyon retropi text with pacman logo. for the transparent part,...
thingiverse
free

SoC ExoSkeleton DevTop 2.0 by Zurkeyon
...ost a necessity. with enough flexibility to make it truly useful!
a place for everything, everything in its place!
:-p
enjoy!
-z-
Machine
archibase_planet
free

Machine
...machine
archibase planet
sewing-machine sewing machine equipment
singer machine- 3d model for interior 3d visualization.
archibase_planet
free
Machine
...hine
archibase planet
percolator equipment coffee-machine
machine n230708 - 3d model (*.gsm+*.3ds) for interior 3d visualization.
archibase_planet
free
Machine
...chibase planet
percolator coffee-machine kitchen equipment
coffee machine - 3d model (*.gsm+*.3ds) for interior 3d visualization.
archibase_planet
free
Slot machine
...ase planet
slot machine slot-machine playing machine
slot machine n260311 - 3d model (*.gsm+*.3ds) for interior 3d visualization.
turbosquid
$7

Machine
...ne
turbosquid
royalty free 3d model machine for download as on turbosquid: 3d models for games, architecture, videos. (1391792)
3d_ocean
$10
War machine
...war machine
3docean
camuflage machine robot war war machine
war machine created in 3dmax 2009 15.497-poly count
turbosquid
$7

machine
...turbosquid
royalty free 3d model machine for download as obj on turbosquid: 3d models for games, architecture, videos. (1452674)
3d_ocean
$12
Weighing-machine
...weighing-machine
3docean
market shop weighing-machine
3d model weighing-machine
archibase_planet
free

Sewing machine
...ine
archibase planet
sewing machine sewing-machine
sewing machine n080311 - 3d model (*.gsm+*.3ds) for interior 3d visualization.
archibase_planet
free
Coffee machine
...se planet
coffee machine percolator coffee-machine
coffee machine n010715 - 3d model (*.gsm+*.3ds) for interior 3d visualization.
Time
3d_export
$9

time
...time
3dexport
time
3ddd
$1

Комод time
...комод time
3ddd
stilema , time
комод от итальянского производителя stilema. модель time.
design_connected
free

Time Hourglasses
...time hourglasses
designconnected
free 3d model of time hourglasses by hay
design_connected
$9

Time Flies
...time flies
designconnected
jenny walsh design time flies computer generated 3d model.
design_connected
$13

Space-time
...space-time
designconnected
zero space-time computer generated 3d model. designed by rashid, karim.
3ddd
free

TUFTY-TIME
...tufty-time
3ddd
b&b italia , модульный
tufty-time from b&b;
3ddd
$1

Time Sofa
... time , arbel
om website: beltafrajumar.com
designer: arbel
formats: 3ds, c4d, fbx, obj
3ddd
$1

Modern Times 9185P
...modern times 9185p
3ddd
modern times
modern times 9185p
3ddd
$1

Modern Times 0402P
...modern times 0402p
3ddd
modern times
modern times 0402p
3ddd
$1

Modern Times 9446P
...modern times 9446p
3ddd
modern times
modern times 9446p