Thingiverse
MyRCCar 1/10 MTC Chassis Upgrades (OLD) by dlb5
by Thingiverse
Last crawled date: 3 years ago
Hi there everyone!
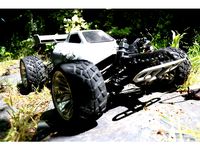
I tested intensively my new Monster Truck / Crawler Chassis (MRCC_MTC Chassis) and based on results I have improved some of the parts, make variations of them with a purpose and created new ones to make the chassis more complete.
The car behavour has improved a lot with the gearbox and i'm starting to control temps, also inside the new electronics housing. It's now ready for dirty 4x4 real scenarios.
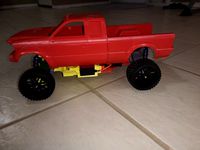
NEW: Take a look to the MyRCCar MTC Chassis with the Typical Pickup Body in Action! In this video I'm using a 1:3 reduction gearbox. Everything went ok but, after doing the video i gave some hard accel / braking and some teeth of my ABS pinion wich attacks the center diff broke... I will give a try to the 1:2 version someday!
Whats NEW:
Ultra-NEW Parts for using Motor Fan:
If you take a look to Yuran Liu's Truggy make, he is using a Motor fan with disipator. In my last order i bought one but i could not find the way to easily acommodate it into the MTC Chassis. After taking some measures and doing some tests i have modified 3 parts of the chassis to allow to use 60mm motor disipator with 50x50mm fan.
I think this will not be compatible with the center diff. locking system because the disipator takes al the space between motor and central diff output vases. This would be intented to use a big low KV 3660 or so motor, in my case, without gearbox so, all metal gearing. So same config than in this video but now i hope it won't heat up till 70ºC. I have done some tests and the temperature of the esc is always hotter than the motor one.
To fit the described motor fan + disipator i had to make a shorter version of the "FRsidebars". There is one hole less if you take a look. I am using 145mm partial front wheelbase. I think you will need to use this one or bigger to be able to use a 60mm long motor.
You also need to replace front top cover if you use the same position for the disipator and fan than me. And the center top cover (cutted version). You can find parts and photos about it at the end of the publication's photos and files. This parts will be incompatible with some others in this publication, take care to do not print some in vain.
Maximazing battery size:
3 different rear platforms will allow you to have the max space for long batteries. Use the longest one if you have a "partial rear wheelbase" of 135mm to have max. battery space in the long direction. If you have a "partial rear wheelbase of 155 or 165 use the normal one, the shortest. For 145 use the medium one.
Also 3 NEW Battery Holders/Trays will allow you to position your battery correctly and will protect it from the bottom. You can finally secure it with a velcro Stap or something similar. Use the shortest for 135, the medium for 145 and the long one for 155 and 165 partial wheelbases.
I also created a new F/R TopCover wich allow wider batteries to get in place. With this part and the appropriate rear platform and battery holder the max battery size you should be able to fit is 149.5x51x18 mm (L,W,H), anyway try to do not get max in all directions if you don't want to have problems to fit it in place.
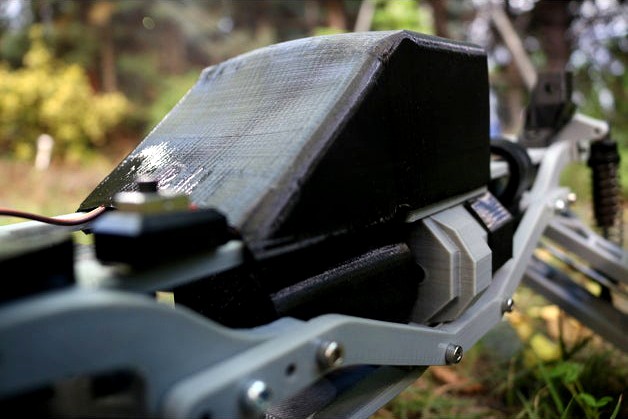
NEW Protections for Mud/Water Splashes:
As I'm using not waterproof brushless sensored ESC/Motor and also some of my plastic gearings of the new gearbox are outside i decided to protect them mostly from sand,dust and water/mud splashes making some TPU covers wich take advantage of this plastic flexibility to be placed in the case of the bottom Motor and Gears Covers, and with 2-4 mm wall thickness in the top Electronics Cover it will allow to roll the car over it without damaging ESC or other components and the same time making a good shell to protect from rain and water splashes making good enough seal.
To avoid cooking electronics inside this sealed box i added a hole in the back of it to mount a 30x30 mm fan to get hot air out of the box. I'm using a 12V one with 2S so it moves slower than needed. If anyone knows a way to increase V for that fan, please tell me.
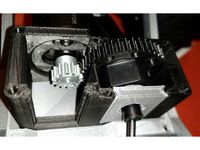
New Gear-Sets for MyRCar 1/10 Gearbox:
First of all, you must know this gearbox is not perfect. Anyway through testing and learning im trying to make it work the best possible.
With testing purpposes i have made 6 gear-sets, 3 in 32p and 3 in Mod1 pitches, and they can reduce 1:2, 1:3 or 1:4.
I saw that there was more room than needed between the outside gears and this made the teeth to do not use all its surface to push the other gear teeth. This gave me added problems in the original 1:4 gearbox, wich i corrected this time adding one teeth in one of the gears of the pair.
My last try was with 1:2 Mod1 gear-set (21T-22T) and some of the teeth of the 21T gear were damaged during some hard accel/brake tests after 5 min.
I'm now trying the smaller teeth using the 1:2 32p gear-set. I have made the same tests than with previous set and this time the car still behaves good after those tests and playing a little more for fun with the "puzzle ladder". I want to make some photos before breaking it again and maybe a video next time i have to replace external gears.
The distance between interchangeable gears axles is 21.75mm. For that distance i made the next gear-sets:
Mod1 1:2 (21T+22T)
Mod1 1:3 (17T+26T)
Mod1 1:4 (15T+28T)
32p 1:2 (26T+27T)
32p 1:3 (21T+32T)
32p 1:4 (18T+35T)
Note: The 1:2, 1:3, and 1:4 are aproximate when used with a 14T Mod1 Motor pinion and 28T Mod1 crown in the first gear pair.
I also discovered the same "extra room" between teeth from center diff and center diff pinion. I initially designed it as 14T and is the one im using by now because it did not give me problems. Anyway I created the Mod1 15T Center Diff. Pinion for the 44T Trooper Diff. and the 13T for the 46T SST Diff.
If you take a deep look to the GearBox publication, the long axle of the gerarbox was included in the 14T long pinion. Now this axle is a separate part to allow you to change the reduction easy with the provided gear-sets. So no more pinion/crown naming for the outer gears, just gears.
If you want to play with reductions between 1:2 and 1:1 you can try swapping the gears of one gear-set, but i can't ensure you there will be enough space for bigger gears in the outer position. The gear cover is also designed with very little room so it won't work for a swaped gears config.
You should also be able to use any Mod1 Motor pinion from 11T to 17T or maybe others, including 32p ones in combination with a 32p gear instead of the original Mod1 28T one.
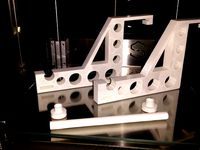
Stronger Steering Servo Tower:
Eveytime i break something i analyze it to see wich was the weak point that made it break. The servo arm of this tower is so short and needed to be stronger around the hole. So the new stronger part is shared here.
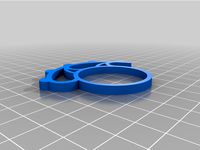
Forgotten FJ Cruiser Body Links:
As i did initially for the OpenRC Truggy chassis and then for MyRCCar OBTS Chassis (on-road, buggy, truggy, ShortCourse chassis) i made the links to use the FJ Cruiser Body with this MTC chassis. I think is the more appropriate one for this body, in a visual way and for off-road big obstacles, but its height in combination with the extra weight of the body makes it to roll easy when turning at high speeds.
So, that's all?¿?
If you have read above all this upgrades explanations and you know what i'm talking about, you are really into MyRCCar way of thinking!
Tomorrow I'm making 1 year in Thingiverse!!! I have always loved free info and knowledge and i'm trying to do my part here in thingiverse, but i think i'm not recieving a proportional feedback from you users or thingiverse itself.
Last Thoughts
I need to feel a change mostly in you "users", becoming more kind of friends or active community members. Also maybe you can imagine what i feel when i see some of the featured things. Ok MyRCCar is just a rc car... maybe people had enough of that... OMG what i see?¿? a new Featured RC Car?¿?
So, you want me to go on working for free the way i did this last year?¿? Ok, i think this designs will be part of my next CV Upgrade anyway, but more than that, i would like MyRCCar to be a real community instead of my CV project.
Yours, waiting for the change,
dlb5!
I tested intensively my new Monster Truck / Crawler Chassis (MRCC_MTC Chassis) and based on results I have improved some of the parts, make variations of them with a purpose and created new ones to make the chassis more complete.
The car behavour has improved a lot with the gearbox and i'm starting to control temps, also inside the new electronics housing. It's now ready for dirty 4x4 real scenarios.
NEW: Take a look to the MyRCCar MTC Chassis with the Typical Pickup Body in Action! In this video I'm using a 1:3 reduction gearbox. Everything went ok but, after doing the video i gave some hard accel / braking and some teeth of my ABS pinion wich attacks the center diff broke... I will give a try to the 1:2 version someday!
Whats NEW:
Ultra-NEW Parts for using Motor Fan:
If you take a look to Yuran Liu's Truggy make, he is using a Motor fan with disipator. In my last order i bought one but i could not find the way to easily acommodate it into the MTC Chassis. After taking some measures and doing some tests i have modified 3 parts of the chassis to allow to use 60mm motor disipator with 50x50mm fan.
I think this will not be compatible with the center diff. locking system because the disipator takes al the space between motor and central diff output vases. This would be intented to use a big low KV 3660 or so motor, in my case, without gearbox so, all metal gearing. So same config than in this video but now i hope it won't heat up till 70ºC. I have done some tests and the temperature of the esc is always hotter than the motor one.
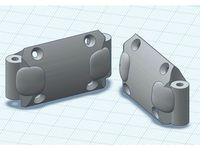
To fit the described motor fan + disipator i had to make a shorter version of the "FRsidebars". There is one hole less if you take a look. I am using 145mm partial front wheelbase. I think you will need to use this one or bigger to be able to use a 60mm long motor.
You also need to replace front top cover if you use the same position for the disipator and fan than me. And the center top cover (cutted version). You can find parts and photos about it at the end of the publication's photos and files. This parts will be incompatible with some others in this publication, take care to do not print some in vain.
Maximazing battery size:
3 different rear platforms will allow you to have the max space for long batteries. Use the longest one if you have a "partial rear wheelbase" of 135mm to have max. battery space in the long direction. If you have a "partial rear wheelbase of 155 or 165 use the normal one, the shortest. For 145 use the medium one.
Also 3 NEW Battery Holders/Trays will allow you to position your battery correctly and will protect it from the bottom. You can finally secure it with a velcro Stap or something similar. Use the shortest for 135, the medium for 145 and the long one for 155 and 165 partial wheelbases.
I also created a new F/R TopCover wich allow wider batteries to get in place. With this part and the appropriate rear platform and battery holder the max battery size you should be able to fit is 149.5x51x18 mm (L,W,H), anyway try to do not get max in all directions if you don't want to have problems to fit it in place.
NEW Protections for Mud/Water Splashes:
As I'm using not waterproof brushless sensored ESC/Motor and also some of my plastic gearings of the new gearbox are outside i decided to protect them mostly from sand,dust and water/mud splashes making some TPU covers wich take advantage of this plastic flexibility to be placed in the case of the bottom Motor and Gears Covers, and with 2-4 mm wall thickness in the top Electronics Cover it will allow to roll the car over it without damaging ESC or other components and the same time making a good shell to protect from rain and water splashes making good enough seal.
To avoid cooking electronics inside this sealed box i added a hole in the back of it to mount a 30x30 mm fan to get hot air out of the box. I'm using a 12V one with 2S so it moves slower than needed. If anyone knows a way to increase V for that fan, please tell me.
New Gear-Sets for MyRCar 1/10 Gearbox:
First of all, you must know this gearbox is not perfect. Anyway through testing and learning im trying to make it work the best possible.
With testing purpposes i have made 6 gear-sets, 3 in 32p and 3 in Mod1 pitches, and they can reduce 1:2, 1:3 or 1:4.
I saw that there was more room than needed between the outside gears and this made the teeth to do not use all its surface to push the other gear teeth. This gave me added problems in the original 1:4 gearbox, wich i corrected this time adding one teeth in one of the gears of the pair.
My last try was with 1:2 Mod1 gear-set (21T-22T) and some of the teeth of the 21T gear were damaged during some hard accel/brake tests after 5 min.
I'm now trying the smaller teeth using the 1:2 32p gear-set. I have made the same tests than with previous set and this time the car still behaves good after those tests and playing a little more for fun with the "puzzle ladder". I want to make some photos before breaking it again and maybe a video next time i have to replace external gears.
The distance between interchangeable gears axles is 21.75mm. For that distance i made the next gear-sets:
Mod1 1:2 (21T+22T)
Mod1 1:3 (17T+26T)
Mod1 1:4 (15T+28T)
32p 1:2 (26T+27T)
32p 1:3 (21T+32T)
32p 1:4 (18T+35T)
Note: The 1:2, 1:3, and 1:4 are aproximate when used with a 14T Mod1 Motor pinion and 28T Mod1 crown in the first gear pair.
I also discovered the same "extra room" between teeth from center diff and center diff pinion. I initially designed it as 14T and is the one im using by now because it did not give me problems. Anyway I created the Mod1 15T Center Diff. Pinion for the 44T Trooper Diff. and the 13T for the 46T SST Diff.
If you take a deep look to the GearBox publication, the long axle of the gerarbox was included in the 14T long pinion. Now this axle is a separate part to allow you to change the reduction easy with the provided gear-sets. So no more pinion/crown naming for the outer gears, just gears.
If you want to play with reductions between 1:2 and 1:1 you can try swapping the gears of one gear-set, but i can't ensure you there will be enough space for bigger gears in the outer position. The gear cover is also designed with very little room so it won't work for a swaped gears config.
You should also be able to use any Mod1 Motor pinion from 11T to 17T or maybe others, including 32p ones in combination with a 32p gear instead of the original Mod1 28T one.
Stronger Steering Servo Tower:
Eveytime i break something i analyze it to see wich was the weak point that made it break. The servo arm of this tower is so short and needed to be stronger around the hole. So the new stronger part is shared here.
Forgotten FJ Cruiser Body Links:
As i did initially for the OpenRC Truggy chassis and then for MyRCCar OBTS Chassis (on-road, buggy, truggy, ShortCourse chassis) i made the links to use the FJ Cruiser Body with this MTC chassis. I think is the more appropriate one for this body, in a visual way and for off-road big obstacles, but its height in combination with the extra weight of the body makes it to roll easy when turning at high speeds.
So, that's all?¿?
If you have read above all this upgrades explanations and you know what i'm talking about, you are really into MyRCCar way of thinking!
Tomorrow I'm making 1 year in Thingiverse!!! I have always loved free info and knowledge and i'm trying to do my part here in thingiverse, but i think i'm not recieving a proportional feedback from you users or thingiverse itself.
Last Thoughts
I need to feel a change mostly in you "users", becoming more kind of friends or active community members. Also maybe you can imagine what i feel when i see some of the featured things. Ok MyRCCar is just a rc car... maybe people had enough of that... OMG what i see?¿? a new Featured RC Car?¿?
So, you want me to go on working for free the way i did this last year?¿? Ok, i think this designs will be part of my next CV Upgrade anyway, but more than that, i would like MyRCCar to be a real community instead of my CV project.
Yours, waiting for the change,
dlb5!
Similar models
thingiverse
free

MyRCCar Central Differential Housing for HSP02024 Diff conversion, SST09304 and other 1/8 diffs. by dlb5
... it will fit in myrccar universal chassis. also please join the myrccar group to help improving myrccar, yourrccar i hope soon ;)
thingiverse
free

MyRCCar 1/10 Monster / Crawler 1:4 Gearbox (OLD) by dlb5
...have the right set of parts so you dont have to re-print them to use the gearbox, you should just have to print the gearbox body.
thingiverse
free
Adapter to fit NiKO2On's printed HSP 02024 gear into dlb5's MTC Diff by Saccco
...'s myrccar central differential housing for hsp02024 diff conversion, sst09304 and other 1/8 diffs. check remix links for it.
thingiverse
free

MyRCCar Center Diff. Remote Locking System by dlb5
... myrccar group and don't forget to introduce yourself! :)
note: the shared main body part is for a fixed blocked center diff.
grabcad
free

Center diff and motor mount. HPI Savage
...iff or one big spur gear. this is for hobbywing max6 1100kv motor.
worked very good, you may have to drill some new holes in tvp.
thingiverse
free

32p Spur gear by jsloat31
... a traxxas 32p gear and designed a spur gear to match it's pitch. the gear is 50 teeth and is made for the openrc f1 project.
thingiverse
free

12:1 Gear Box Upgrade by BlueBoxGoblin
...ar two 61/15 teeth
to access original gearbox and additional information use link below:https://www.thingiverse.com/thing:2620402
thingiverse
free

MyRCCar 1/10 TPB Extras (Typical Pickup Body Extras) by dlb5
...hings... the tpu links and holders will absorve a lot of the hits so they are not transmitted fully to the car structure/chassis.
thingiverse
free

Traxxas T-maxx electric motor mount conversion by pipi135
...d and forward only kits then mess around with the gearing some more but for now the mount works so i figured id share it on here.
grabcad
free

Pinion Gear Z12 M0.8 Shaft 3.2mm
...is also means the adapter plate between the motor and the gearbox needs to be modified otherwise the gears do not mesh correctly.
Dlb5
thingiverse
free
Adapter to fit NiKO2On's printed HSP 02024 gear into dlb5's MTC Diff by Saccco
...'s myrccar central differential housing for hsp02024 diff conversion, sst09304 and other 1/8 diffs. check remix links for it.
thingiverse
free

MyRCBike NSR500, First 1/5 3D Printed Hobby Level RC Bike: number 5 by dlb5
...st test ride of the v1 bike here:https://youtu.be/0ou5d9lsckc
if you want to find the full publication please come to see it here
thingiverse
free
MyRCCar MTC Styled Lower Suspension Arm 769 (even easier to print) by Saccco
...769 (even easier to print) by saccco thingiverse thanks dlb5 made my own version of the lower arms. intended...
thingiverse
free

MyRCCar 1/10 Buggy / Truggy LED Lights Holders (OLD) by dlb5
...ore space for shocks or due to caster.
i hope "you see the light" with this thing and start making your myrccar soon!!!
thingiverse
free
MyRCCar Dogbone Making Tool by dlb5
...t;martir" table, so, one time you have drill the backpart of the thing you don't drill the floor or something undesired.
thingiverse
free

MyRCCar Steering System for three different bearings: 5x8x4, 5x10x4 and 6x12x4 by dlb5
... would be related more to the whole proyect please join the myrccar group. i hope i see you there soon building your own rc car:)
thingiverse
free
MyRCCar Center Diff. Remote Locking System by dlb5
... myrccar group and don't forget to introduce yourself! :)
note: the shared main body part is for a fixed blocked center diff.
thingiverse
free

Airbrush CNC Support and control with Marlin (OLD) by dlb5
...ease take a look at this video:video you can now also take a look to 5my first attemps airbrushing cmyk
will you give it a try?¿?
thingiverse
free

MyRCCar OBTS Chassis Building Instructions by dlb5
... shell, bumper, wing and lights
myrccar 1/10 buggy / truggy led lights holders. rc car light show!
myrccar 1/10 4th build testing
thingiverse
free
MyRCCar 1/10 Truggy rc car. With TITAN Shell, Bumper, Wing and Lights (OLD) by dlb5
...he car to put the shell lower or maybe accomodate some foam.
hope you like it and start soon making your own 3d printed rc car :)
Myrccar
thingiverse
free
Tarmo3 with myrccar truck body
...tarmo3 with myrccar truck body
thingiverse
i made a new front mount for the myrccar to connect to the tarm o3
thingiverse
free

Shock Spacer for MyRCCar by BotYoyo
...shock spacer for myrccar by botyoyo
thingiverse
you may need this shock spacer for some of the 1/10 shocks.
thingiverse
free

MyRCCar 1/10 12mm Wheel HEX (for HSP 188015 CVD) by BotYoyo
...12mm wheel hex (for hsp 188015 cvd) by botyoyo
thingiverse
this is a wheel hex remix for myrccar if you are using hsp 188015 cvd
thingiverse
free
MyRCCAR MTC Servo On Front RigAixs
...ing servo on the front bridge will keep the chasiss more stable when turning, so i give a try. and it works better as expected :)
thingiverse
free

MyRCCar LAS 0C and 6C for Ø3.0 x 56mm suspension rod by BotYoyo
...ension rod for myrccar. you may noticed the whole is not deep enough for the rod. this remix has deeper holes could fit 56mm rod.
thingiverse
free
MyRCCar MTC Improved Lower Suspension Arm 769 (easier to printer) by BotYoyo
...good. by not increase the weight, i just remix it to make it stronger and much easier to print. (maybe looks a little better? xd)
thingiverse
free

MyRCCar MTC Parts (Updated) by Saccco
...m.
for the complete chassis head on to dlb5's: myrccar 1/10 monster /crawler chassis with configurable 270 to 330mm wheelbase
thingiverse
free
MyRCCar OBTS Chassis Building Instructions by dlb5
... shell, bumper, wing and lights
myrccar 1/10 buggy / truggy led lights holders. rc car light show!
myrccar 1/10 4th build testing
thingiverse
free
Stronger Lower Arm Holder for MyRCCar MTC by BotYoyo
...ot which i broke it by a 0.3m height landing.
i just added some extra plastic to the weak spot. now the lower arm is rock solid!
thingiverse
free
MyRCCar MTC Styled Lower Suspension Arm 769 (even easier to print) by Saccco
...by saccco
thingiverse
thanks dlb5!
made my own version of the lower arms. intended to print without support.
hexa and m support.
Mtc
cg_studio
$10

MTC3d model
...mtc3d model
cgstudio
.obj .mb .ma .dae - mtc 3d model, royalty free license available, instant download after purchase.
thingiverse
free

GADGET POST-IT by mtc
...gadget post-it by mtc
thingiverse
pla
sharebot ng
thingiverse
free
PORTA BOBINA by mtc
...porta bobina by mtc
thingiverse
porta bobina per stampante sharebot ng
thingiverse
free

ATTENTI AL CANE by mtc
...attenti al cane by mtc
thingiverse
sharebot ng
thingiverse
free

ORGANIZE NAIL POLISH by mtc
...organize nail polish by mtc
thingiverse
sharebot ng
thingiverse
free
MTC Swat scope focus ring by mattvokes1983
...mtc swat scope focus ring by mattvokes1983
thingiverse
scope focus ring for the 52x12 mtc swat scope
thingiverse
free

MTC Prismatic SWAT scope focus ring by WrightWells
...ocus ring by wrightwells
thingiverse
this fits snugly on to the mtc prismatic swat atom scope 10x30.
it may fit other mtc scopes
thingiverse
free
PACKAGE CIGARETTES by mtc
...d on the project http://www.thingiverse.com/thing:173316 , created for cigarettes compact and small bic .
contains 5-6 cigarettes
thingiverse
free
GADGET FOR POST-IT by mtc
...have printed with pla and low resolution and i think it's great, you could print a material flex to improve the closing book.
thingiverse
free
MyRCCAR MTC Servo On Front RigAixs
...ing servo on the front bridge will keep the chasiss more stable when turning, so i give a try. and it works better as expected :)
Chassis
design_connected
$16

Chassis
...chassis
designconnected
wilkhahn chassis chairs computer generated 3d model. designed by stefan diez.
3d_export
$10

truck chassis
...truck chassis
3dexport
truck chassis
3d_export
$5
Truck chassis
...truck chassis
3dexport
truck chassis
3d_export
$5

buggy chassi
...buggy chassi 3dexport chassis of a simple ride...
turbosquid
$35

Chassis
...odel chassis for download as 3ds, dxf, obj, c4d, fbx, and stl on turbosquid: 3d models for games, architecture, videos. (1413332)
design_connected
$16

Chassis Armchair
...chassis armchair
designconnected
baxter chassis armchair armchairs computer generated 3d model. designed by n/a.
turbosquid
$25
DRONE CHASSIS
...bosquid
royalty free 3d model drone chassis for download as on turbosquid: 3d models for games, architecture, videos. (1699724)
turbosquid
$79

Car Chassis
...quid
royalty free 3d model car chassis for download as blend on turbosquid: 3d models for games, architecture, videos. (1593376)
turbosquid
$50
Car Chassis
...osquid
royalty free 3d model car chassis for download as dwg on turbosquid: 3d models for games, architecture, videos. (1164087)
turbosquid
$75

Chassis 8x8
...free 3d model chassis 8x8 for download as ige, obj, and sldas on turbosquid: 3d models for games, architecture, videos. (1221250)
Upgrades
turbosquid
$15

Upgraded Glock
...e 3d model upgraded glock for download as obj, fbx, and blend on turbosquid: 3d models for games, architecture, videos. (1185950)
3ddd
$1

Calligaris / UPGRADE
...calligaris / upgrade
3ddd
calligaris
c материалом
3d_export
free

cz upgrade
...cz upgrade
3dexport
https://www.buymeacoffee.com/mestrezen3d https://linktr.ee/mestrezen3
turbosquid
$80

Custer Tank upgrade
... available on turbo squid, the world's leading provider of digital 3d models for visualization, films, television, and games.
turbosquid
$39

Domestos 1 upgrade
... available on turbo squid, the world's leading provider of digital 3d models for visualization, films, television, and games.
3d_export
$10

Upgraded tea cup
...upgraded tea cup
3dexport
a cup with an unusual design and a unique shape for a more enjoyable tea experience
3d_export
$8

dixy outlander classic style upgraded poplar wood lounge chair
...utlander classic style upgraded poplar wood lounge chair
3dexport
dixy outlander classic style upgraded poplar wood lounge chair
turbosquid
free

AK-12 + Upgrades low-poly 3D model
...ow-poly 3d model for download as fbx, blend, and unitypackage on turbosquid: 3d models for games, architecture, videos. (1501145)
evermotion
$700

Upgrade from V-ray 1.5 to 3.5 for 3ds max
...here is no need to purchase a new dongle - your current dongles will be reprogrammed to carry v-ray 3. evermotion 3d models shop.
evermotion
$300

Upgrade from V-Ray 2.0 to V-ray 3.5 for 3ds Max
... interface (gui) for editing settings on one machine and one render node for rendering on one machine. evermotion 3d models shop.
Old
turbosquid
$17

Old
...old
turbosquid
royalty free 3d model old for download as on turbosquid: 3d models for games, architecture, videos. (1646242)
3d_ocean
$9

Old phone
...old phone
3docean
classic old phone phone
classic old phone
3d_ocean
$15

Old telephone
...old telephone
3docean
old phone telephone
old telephone v-ray render
3d_ocean
$3
Old Ambry
...old ambry
3docean
ambry furniture highpoly old
old ambry made in high detail.
3ddd
free

Old England
...nd
3ddd
old england , смеситель
двухрычажный смеситель old england. производство италия.
3d_export
$20

the old man
...the old man
3dexport
the old man.
3d_export
$5
an old trailer
...an old trailer
3dexport
an old trailer
3d_export
$5

old tv
...old tv
3dexport
old tv
3d_export
$5

old iron
...old iron
3dexport
old iron
3d_export
$5
Old TV
...old tv
3dexport
old tv
10
turbosquid
$25

10
... available on turbo squid, the world's leading provider of digital 3d models for visualization, films, television, and games.
turbosquid
$10

a-10
... available on turbo squid, the world's leading provider of digital 3d models for visualization, films, television, and games.
3ddd
$1

EX 10
...ex 10
3ddd
samsung , фотоаппарат
ex 10
3ddd
$1

Bed 10
...bed 10
3ddd
постельное белье
bed 10
evermotion
$25

Scene 10 Archinteriors vol. 10
...dering design interior
take a look at textured and shadered visualization scene ready to be rendered.. evermotion 3d models shop.
3ddd
$1

Curtains 10
...curtains 10
3ddd
curtains 10
3ds max 2011,fbx + textures
polys: 100355
3ddd
free

PLANTS 10
...plants 10
3ddd
цветок , горшок
plants 10,, with 3 different color planter boxes
design_connected
$29

Nuvola 10
...nuvola 10
designconnected
gervasoni nuvola 10 computer generated 3d model. designed by navone, paola.
design_connected
$22

Kilt 10
...kilt 10
designconnected
zanotta kilt 10 computer generated 3d model. designed by progetti, emaf.
design_connected
$11

Domino 10
...domino 10
designconnected
zanotta domino 10 computer generated 3d model. designed by progetti, emaf.
1
turbosquid
$15

ring 1+1
... available on turbo squid, the world's leading provider of digital 3d models for visualization, films, television, and games.
turbosquid
$10

chair(1)(1)
... available on turbo squid, the world's leading provider of digital 3d models for visualization, films, television, and games.
turbosquid
$8

Chair(1)(1)
... available on turbo squid, the world's leading provider of digital 3d models for visualization, films, television, and games.
turbosquid
$2

RING 1(1)
... available on turbo squid, the world's leading provider of digital 3d models for visualization, films, television, and games.
turbosquid
$1

Table 1(1)
... available on turbo squid, the world's leading provider of digital 3d models for visualization, films, television, and games.
turbosquid
$1

house 1(1)
... available on turbo squid, the world's leading provider of digital 3d models for visualization, films, television, and games.
turbosquid
$59

Formula 1(1)
...lty free 3d model formula 1 for download as max, fbx, and obj on turbosquid: 3d models for games, architecture, videos. (1567088)
design_connected
$11

No 1
...no 1
designconnected
sibast no 1 computer generated 3d model. designed by sibast, helge.
turbosquid
$2

desert house(1)(1)
...3d model desert house(1)(1) for download as 3ds, max, and obj on turbosquid: 3d models for games, architecture, videos. (1055095)
turbosquid
$50
door 1 darkwood 1
... available on turbo squid, the world's leading provider of digital 3d models for visualization, films, television, and games.