Thingiverse
My Twin Dream MTD Landing Gear by Mochanic
by Thingiverse
Last crawled date: 3 years ago
READ NOTES SECTION BELOW BEFORE DOWNLOADING!!!
Read about the tailwheel assembly on my Mini Talon Thingiverse page here: https://www.thingiverse.com/thing:3155583
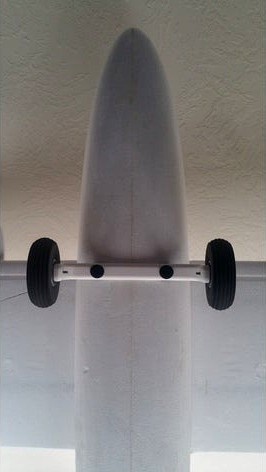
Due to the popularity of the landing gear that I designed for the Mini Talon, I have brought the same concept to the MTD.
This design replaces the original wooden battery tray with a printed tray that has built in legs for the front gear to mount to. It is very strong and insures a solid platform to mount the front landing gear to your MTD using 2 nylon bolts that you can easily remove when you do not require landing gear.
As for the rear gear, this is the same design as what I created for the front of the Mini Talon (https://www.thingiverse.com/thing:2981809) but has been adapted to fit a glue in housing that can be fitted to any foam model giving you a steerable front or rear wheel. This design also allows you to quickly remove the landing gear and install a blank plate when you do not require it.
Parts Needed:
Front:
2 1/4-20 x 1-1/4" long NYLON bolts. (Such as Dubro #142 cut down to 1-1/4" threaded length)
Number 7 (.201) drill bit
1/4-20 tap
2 foam wheels (mine are 3" (75mm) from Bangood
2 M4 bolts. Length will be determined by the wheels that you choose.
Used for rear gear:https://www.banggood.com/DIY-60-Level-Tail-Wheel-Bracket-Assembly-for-RC-airplane-p-908726.html?rmmds=search&cur_warehouse=CN
2 MR128ZZ bearings for front shaft: (FastEddy is my favorite eBay seller for quality bearing in the USA shipped fast!)https://www.ebay.com/sch/i.html?_from=R40&_trksid=m570.l1313&_nkw=MR128ZZ&_sacat=0
1 Emax ES08 metal gear servo. (analog or digital):https://www.banggood.com/EMAX-ES08MA-II-12g-Mini-Metal-Gear-Analog-Servo-for-RC-Model-p-935479.html
ORhttps://www.banggood.com/Wholesale-Emax-ES08MDII-Metal-Digital-Micro-Servo-p-68600.html
I am not specifying the control linkage since there are so many options for this. You probably already have something that will work laying around.
Front:
Once you have printed the pieces, use a #7 (.201) drill bit to properly size the holes in the legs of the battery tray. (You can get away with a 5mm drill bit too) now place the battery tray upside down inside the fuselage and then by hand, run the same drill bit through the same holes all the way through the bottom of the fuselage drilling out the foam. Now remove the battery tray. From the outside, gradually use larger drill bits to open these 2 holes in the foam, but be sure not to allow hole to move around, it needs to remain centered on the original holes. The final size of the 2 holes will be approximately .656" which is a 21/32 drill bit.
Now tap the holes on the battery tray all the way through with a 1/4-20 tap.
Once you have everything fitted and are satisfied, use either E6000, or Uhu Por to glue the battery tray into place with the legs facing down (of course).
Once you have printed the front landing gear, run a 1/4" drill bit through the landing gear's mounting holes to insure your bolts will fit, then drill the holes for the axle bolts with a 1/8" drill bit and tap these holes all the way through with an M4 tap.
USE 1/4-20 NYLON SCREWS to hold gear to belly mount! This will allow them to break in a severe landing rather than ripping the gear off the plane!
REAR:
Go here for instructions: https://www.thingiverse.com/thing:3155583
Gluing rear housing to fuselage:
Place the printed housing wherever you like in the rear of the fuselage (the pictures show where I put mine) Now carefully cut into the foam around the outside of the housing just deep enough to make the housing fit flush into the foam. Finish removing the foam so that the housing will sit down into the hole just below the bottom of the fuselage.
Once you have everything fitted and are satisfied, use either E6000, or Uhu Por to glue the housing into place. If you choose to make the gear permanent I suggest you also glue the servo mount to the foam to help strengthen this area even more.
Note: I changed out the wheels that came with my gear for larger wheels since I use a grass runway.
Please let me know if I missed anything... There is a lot going on to remember!
https://youtu.be/qJZGLSQbhl0
Read about the tailwheel assembly on my Mini Talon Thingiverse page here: https://www.thingiverse.com/thing:3155583
Due to the popularity of the landing gear that I designed for the Mini Talon, I have brought the same concept to the MTD.
This design replaces the original wooden battery tray with a printed tray that has built in legs for the front gear to mount to. It is very strong and insures a solid platform to mount the front landing gear to your MTD using 2 nylon bolts that you can easily remove when you do not require landing gear.
As for the rear gear, this is the same design as what I created for the front of the Mini Talon (https://www.thingiverse.com/thing:2981809) but has been adapted to fit a glue in housing that can be fitted to any foam model giving you a steerable front or rear wheel. This design also allows you to quickly remove the landing gear and install a blank plate when you do not require it.
Parts Needed:
Front:
2 1/4-20 x 1-1/4" long NYLON bolts. (Such as Dubro #142 cut down to 1-1/4" threaded length)
Number 7 (.201) drill bit
1/4-20 tap
2 foam wheels (mine are 3" (75mm) from Bangood
2 M4 bolts. Length will be determined by the wheels that you choose.
Used for rear gear:https://www.banggood.com/DIY-60-Level-Tail-Wheel-Bracket-Assembly-for-RC-airplane-p-908726.html?rmmds=search&cur_warehouse=CN
2 MR128ZZ bearings for front shaft: (FastEddy is my favorite eBay seller for quality bearing in the USA shipped fast!)https://www.ebay.com/sch/i.html?_from=R40&_trksid=m570.l1313&_nkw=MR128ZZ&_sacat=0
1 Emax ES08 metal gear servo. (analog or digital):https://www.banggood.com/EMAX-ES08MA-II-12g-Mini-Metal-Gear-Analog-Servo-for-RC-Model-p-935479.html
ORhttps://www.banggood.com/Wholesale-Emax-ES08MDII-Metal-Digital-Micro-Servo-p-68600.html
I am not specifying the control linkage since there are so many options for this. You probably already have something that will work laying around.
Front:
Once you have printed the pieces, use a #7 (.201) drill bit to properly size the holes in the legs of the battery tray. (You can get away with a 5mm drill bit too) now place the battery tray upside down inside the fuselage and then by hand, run the same drill bit through the same holes all the way through the bottom of the fuselage drilling out the foam. Now remove the battery tray. From the outside, gradually use larger drill bits to open these 2 holes in the foam, but be sure not to allow hole to move around, it needs to remain centered on the original holes. The final size of the 2 holes will be approximately .656" which is a 21/32 drill bit.
Now tap the holes on the battery tray all the way through with a 1/4-20 tap.
Once you have everything fitted and are satisfied, use either E6000, or Uhu Por to glue the battery tray into place with the legs facing down (of course).
Once you have printed the front landing gear, run a 1/4" drill bit through the landing gear's mounting holes to insure your bolts will fit, then drill the holes for the axle bolts with a 1/8" drill bit and tap these holes all the way through with an M4 tap.
USE 1/4-20 NYLON SCREWS to hold gear to belly mount! This will allow them to break in a severe landing rather than ripping the gear off the plane!
REAR:
Go here for instructions: https://www.thingiverse.com/thing:3155583
Gluing rear housing to fuselage:
Place the printed housing wherever you like in the rear of the fuselage (the pictures show where I put mine) Now carefully cut into the foam around the outside of the housing just deep enough to make the housing fit flush into the foam. Finish removing the foam so that the housing will sit down into the hole just below the bottom of the fuselage.
Once you have everything fitted and are satisfied, use either E6000, or Uhu Por to glue the housing into place. If you choose to make the gear permanent I suggest you also glue the servo mount to the foam to help strengthen this area even more.
Note: I changed out the wheels that came with my gear for larger wheels since I use a grass runway.
Please let me know if I missed anything... There is a lot going on to remember!
https://youtu.be/qJZGLSQbhl0
Similar models
thingiverse
free

Old Version Mini Talon Convertible Landing Gear by Mochanic
... use a grass runway.
please let me know if i missed anything... there is a lot going on to remember!
https://youtu.be/qjzglsqbhl0
thingiverse
free

Small RC Landing Gear Cub Style by Benm96
...elf tapping screws, on my plane this wasn't needed.
if you would like a different size comment and ill do my best to make it.
thingiverse
free

Battery tray for Talon Pro by epquilloy
...a but lighter and shorter. mount it with foam safe glue to the fuselage. dont forget to slide in the battery strap before gluing.
grabcad
free

1/4-20 STI Tap
...r tapping a hole for helical threaded insert. use letter "h" drill bit (.2660" diameter). not a #7 .201 drill bit.
thingiverse
free

Full rotation servo driven rover by EnduranceRC
...u can mount maxbotix sonar modules, cameras, or other sensors.
tap all holes with a 4-40 tap and use 3/8" socket cap screws.
thingiverse
free

Flite Test Mini Guinea Front and Rear Landing Gear (Fixed)
...section of the wire in a vice or something similar when mounted, wiggle the part onto the wire, making...
thingiverse
free

Mini Talon Pro Rear Spar Brace by rx-midget
...issue. remove braces and glue them to the fuse sides making sure no glue obscures the inner opening for spar at the wing saddle.
thingiverse
free

knob for 1/4" bolt by marmil
...: epoxy the bolt (or nut) in place if the knob will be regularly completely unscrewed so you don't loose your bolt (or nut).
thingiverse
free

Mini Talon V2 Wing Servo Pod for Emax ES08MAII by shannonmbaker
... the servo to screw the cover down.
if you use 4 of these same servos for the mini talon v2, you'll have a total of 8 screws.
thingiverse
free

Nano Talon 1 axis gimbal by pjbca
...thingiverse
1 axis gimbal for runcam split 2 inside nano talon fuselage.
servo for gimbal: corona 919mg digital metal gear servo
Mochanic
thingiverse
free

MTD Servo Housing by Mochanic
...o your mtd (my twin dream) or if you broke one in a crash.
exactly the same as the original.
recommend abs or petg
.20mm
supports
thingiverse
free

Prusa MK* LCD Knob by Mochanic
...pprox. .236" once printed. make sure you scrape the edge of the hole, most likely it will have a small lip (elephant foot).
thingiverse
free

Mini Talon Belly Cover by Mochanic
... to glue it on.
if you are looking to fit landing gear to the mini talon use this link: https://www.thingiverse.com/thing:2981809
thingiverse
free

Pitlab GPS Case by Mochanic
...es you to desolder the angled header pins from the gps sensor and resolder in new straight pins to the bottom side of the sensor.
thingiverse
free

MT Cradle iNav FC Mount by osgibson
...inav fc mount by osgibson thingiverse a remix of mochanic#39;s mini talon cradle for a standard 30.5mm fc stack...
thingiverse
free

My Twin Dream FC Mount by Mochanic
...l. (the mtd flies nose up about 2.3 degrees, so this was taken into account during design.)
all screw holes are for m3 hardware.
thingiverse
free

Mini Talon Flush Hatch Latch by Mochanic
...g anywhere, so i did not use additional rods on the rear plate)
my hatch will be spray painted all black once i get to that point
thingiverse
free

Mini Talon Flight Controller Mounts by Mochanic
...een uploaded at this time, but i am working on it)
let me know if you guys would like for me to add other mounting plate options.
thingiverse
free

FPV Joystick Housing for RC Radio by Mochanic
...;) i used curved lexan cutting scissors. if you do not trim the bottom skirt, it will hit the housing when moving the joystick.
Mtd
cg_studio
$49

Robot MTD - Matilda Alias White Eagle - 0023d model
...dxf .3ds - robot mtd - matilda alias white eagle - 002 3d model, royalty free license available, instant download after purchase.
thingiverse
free

MTD Canopy by Kija
...py for mtd. unfortunately i lost one during a flight, so i made this one. it's obviously a bit heavier, but still acceptable.
thingiverse
free

mtd wiglets by Costy85
...mtd wiglets by costy85
thingiverse
my twin dream winglets
thingiverse
free

MTD Mower Front Wheel Bushings by bval
...mtd mower front wheel bushings by bval
thingiverse
mtd mower front wheel bushings by brandon [created on 3dtin]
thingiverse
free
MTD Servo Housing by Mochanic
...o your mtd (my twin dream) or if you broke one in a crash.
exactly the same as the original.
recommend abs or petg
.20mm
supports
thingiverse
free

Motor Mount MTD by weskern64
...motor mount mtd by weskern64
thingiverse
this is an motor mount for the fixed wing my twindream
thingiverse
free

MTD 384sp Wheel Cover by ctrlrst
...r mtd 384sp, tight fit as i didnt want them coming off like the originals. my print looks rough as i printed it with a 0.6 nozzle
thingiverse
free

MTD Snowblower Key
...with my settings, it prints in about 8 minutes.
i suggest printing extra hot and with 4 walls so that it has plenty of strength.
thingiverse
free

MTD MyFlyDream forward navigation light
...mtd myflydream forward navigation light
thingiverse
myflydream forward navigation light
thingiverse
free

MTD Steering Bushing by BMITW
...etg to get by. i will see how long it lasts. it was made in tinkercad. this will replace mtd part number 741-0656a and 941-0656a.
Dream
3ddd
$1

Зеркало Dream
...зеркало dream
3ddd
dream
зеркало dream
высота - 100см
ширина - 80см
3d_export
$5

dream catcher
...dream catcher
3dexport
low poly dream catcher
3ddd
free

dream land / sicilia
...dream land / sicilia
3ddd
dream land
dream land sicilia
3ddd
$1

DREAM LIGHT
...dream light
3ddd
dream light
a contemporary light design derived from nature
3ddd
$1

Dream Land / Монтсеррат
...dream land / монтсеррат
3ddd
dream land , капитоне
производитель: dream land
3ddd
$1

Poliform Dream Bed
...m , dream , постельное бельё
poliform dream bed
design_connected
$16

Dream Chair
...dream chair
designconnected
carl hansen dream chair computer generated 3d model. designed by ando, tadao.
3ddd
$1

Dream Land / Дьюла
...am land / дьюла
3ddd
dream land , россия
кровать дейли люкс (фабрика dream land, россия)
design_connected
free

Dream Mirror
...dream mirror
designconnected
free 3d model of dream mirror by gallotti & radice designed by bello dias, ricardo.
3d_export
$10

dreaming girl
...dreaming girl
3dexport
Twin
3ddd
free

Twin
...twin
3ddd
twin , flaminia
flaminia
twin column + twin set
diameter - 42 cm
h 85 cm
3ddd
$1

Twin Column
...twin column
3ddd
twin column
twin column
3ddd
$1

Woo Twins
...woo twins
3ddd
тумба , woo twins
прикроватная тумба из серии woo twins
3ddd
$1

Wunderlicht / TWINS
...wunderlicht / twins
3ddd
wunderlicht
wunderlicht twins
3ddd
$1

Twin shelves
...twin shelves
3ddd
twin
twin shelves. полки-близнецы от чилийских дизайнеров и русского математика
копия в 3ds
3ddd
$1

Elica / Twin
...elica / twin
3ddd
elica , вытяжка
вытяжка "twin" от "elica"
design_connected
$16

SAAR twin
...saar twin
designconnected
piet boon saar twin computer generated 3d model. designed by boon, piet.
design_connected
$11

Loft twin
...loft twin
designconnected
jieldé loft twin computer generated 3d model. designed by domecq, jean-louis.
turbosquid
$100

Twin turtle
...osquid
royalty free 3d model twin turtle for download as max on turbosquid: 3d models for games, architecture, videos. (1234762)
turbosquid
$24

Solitare twins
...uid
royalty free 3d model solitare twins for download as 3dm on turbosquid: 3d models for games, architecture, videos. (1548252)
Landing
3d_export
free

land
...land
3dexport
3d_export
$20

land rover
...land rover
3dexport
land rover
3d_export
$65
landing
...landing
3dexport
simple rendering of the scene file
3ddd
free

Land Bond
... тумба
land bond-авторская коллекция мебели жана франсуа роле.сделана из натуральной древесины.
3ddd
$1
Land Bond
...land bond
3ddd
land bond-авторская коллекция мебели жана франсуа роле.
3ddd
$1

Land Bond
...land bond
3ddd
land bond-авторская коллекция мебели жана франсуа роле
3ddd
free
dream land / sicilia
...dream land / sicilia
3ddd
dream land
dream land sicilia
3ddd
$1
Dream Land / Монтсеррат
...dream land / монтсеррат
3ddd
dream land , капитоне
производитель: dream land
design_connected
$29

Land Sofa
...land sofa
designconnected
alivar land sofa computer generated 3d model. designed by bavuso, giuseppe.
design_connected
$27

Land Meridiana
...land meridiana
designconnected
bonaldo land meridiana computer generated 3d model. designed by crs bonaldo.
Gear
3d_ocean
$4
Gears
...gears
3docean
gear gears iron
4 different size of gears
3d_export
$5
gear
...gear
3dexport
gear
3d_export
free
Gears
...gears
3dexport
gears
3d_export
$5
gear
...gear
3dexport
a simple model of gear
3d_export
$5

gear
...gear
3dexport
gear for transmission , case machine
3d_ocean
$3
Gears
...nical parts process steampunk vehicle wheel work
10 different gear models volume 01-10 files: .3ds .c4d .obj note: you need vray
3d_ocean
$1

Spur Gear
...spur gear
3docean
decoration gear
a typical spur gear
3d_ocean
$4
Gear wheels
...gear wheels
3docean
engine engineering gear gears industry machinery mechanical toothwheel wheel
pair of gear wheels : animated.
turbosquid
$9

Gear
...gear
turbosquid
royalty free 3d model gear for download as on turbosquid: 3d models for games, architecture, videos. (1712328)
turbosquid
$2

Gears
...rs
turbosquid
royalty free 3d model gears for download as ma on turbosquid: 3d models for games, architecture, videos. (1166710)