Thingiverse

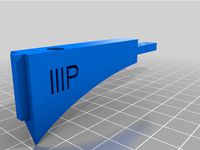
MPMD Bed hold down clips
by Thingiverse
Last crawled date: 4 years, 3 months ago
These clips are a work in progress, please leave me feedback if you try them.
This requires you open up the printer case. If you're not comfortable doing this, you may want to try another clip such as https://www.thingiverse.com/thing:3380266
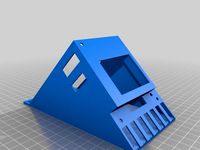
This is a version of a bed hold down clip for the Monoprice mini Delta.
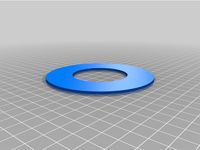
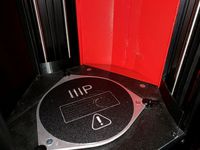
I've included 2 versions of the base, 1 has a debris shield added. (adapted from https://www.thingiverse.com/thing:3380266)
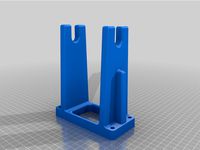
Print 3 of the tab, and 3 of the base you wish to use.
Required hardware:
3x M3 nuts
3x M3x10mm screw
3x 6mm or shorter screw, about M3
To install:
Do not install the tabs until told to!
Remove the top and bottom covers from the base of the printer. Be careful as the display panel will be loose, it can be unplugged and set aside.
It is not necessary to remove any other parts, be careful to keep track of what plugs in where if you do remove anything else.
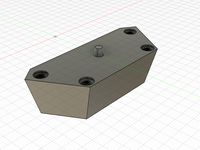
Remove the stock bed clips, and replace it with one of the bases. The small circle on the bottom of the base should fit into the hole, and insert a screw from below to hold it in place.
Once you have all 3 bases installed, re-install the display and top plate of the base on the printer.
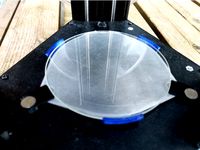
Put the print bed back in place, then prepare the tabs by putting an M3 nut in the slot in the back of each tab.
Install the tabs by putting the pins into the slot on the base, with the nut facing away from the print bed. Gently push the tab toward the print bed until you feel it click into place.
Insert the M3x10mm screws into the back of the tabs, through the nut.
Adjust the screws until there is just enough play for the bed switches to be activated and deactivated.
For further calibration information, go to https://www.mpminidelta.com/start
This requires you open up the printer case. If you're not comfortable doing this, you may want to try another clip such as https://www.thingiverse.com/thing:3380266
This is a version of a bed hold down clip for the Monoprice mini Delta.
I've included 2 versions of the base, 1 has a debris shield added. (adapted from https://www.thingiverse.com/thing:3380266)
Print 3 of the tab, and 3 of the base you wish to use.
Required hardware:
3x M3 nuts
3x M3x10mm screw
3x 6mm or shorter screw, about M3
To install:
Do not install the tabs until told to!
Remove the top and bottom covers from the base of the printer. Be careful as the display panel will be loose, it can be unplugged and set aside.
It is not necessary to remove any other parts, be careful to keep track of what plugs in where if you do remove anything else.
Remove the stock bed clips, and replace it with one of the bases. The small circle on the bottom of the base should fit into the hole, and insert a screw from below to hold it in place.
Once you have all 3 bases installed, re-install the display and top plate of the base on the printer.
Put the print bed back in place, then prepare the tabs by putting an M3 nut in the slot in the back of each tab.
Install the tabs by putting the pins into the slot on the base, with the nut facing away from the print bed. Gently push the tab toward the print bed until you feel it click into place.
Insert the M3x10mm screws into the back of the tabs, through the nut.
Adjust the screws until there is just enough play for the bed switches to be activated and deactivated.
For further calibration information, go to https://www.mpminidelta.com/start
Similar models
thingiverse
free

MPMD (Mini Delta) bed adjuster (hidden clips)
...h. the click should spend the same space-length.
you can let original clips on the printer, but it has no purpose there any more.
thingiverse
free

AnyCubic Kossel Bed Clips by DaHai8
...0 t-nuts
6x m3x10mm hex head screws
highly recommend printing these in petg as pla will soften and warp from the heat of the bed.
thingiverse
free

MKS Sbase 1.3 Mount for 2020 by lowfat
...0mm screws and m3 t-nuts to hold in place. m3x5mm brass inserts are to be used on the feet to hold the controller board in place.
thingiverse
free

Delta raised heated bed mount for 2020 aluminium profile by MegaMaking
... bases according to the bed.
tighten the m4 screws when you find the correct alignments
install the clips by using the m3 screws.
thingiverse
free

2020 Delta bed retainer clip by joochung
... be positioned far enough away from an heated bed to allow for pla to be used to print it. otherwise go for petg, abs, or ht pla.
thingiverse
free

geeetech i3 pro (letter) lcd case by Filament_eater1
...le)
-remove lcd from printer
-remove acrylic from lcd
-install front and back using m3 bolts nuts and washers as spacers!!!
-done
thingiverse
free

Ultimaker Original Pi camera corner mount by Undack
...ultimaker original frame, for use in an octopi or similar setup for monitoring prints. uses existing screws on the...
thingiverse
free
Maiskolben soldering station by freiser77
...o the top with the m3 plastic nuts and the m3x20mm screws
the top is screwed to the base with the m3x10mm screws
happy soldering!
thingiverse
free

Orbiter adapter for Duet Smart effector Delta printers by lorinczroby
... nuts + 2x m3 insert nuts in the adapter for mounting the orbiter on top.
thanks frank g. for helping and supporting this design.
thingiverse
free

Prusa i3 heat bed nut holder by J_Seppala
...int out nicely and the nut should have a snug fit to hold the nut in place. i printed these with pla and for me they work nicely.
Mpmd
thingiverse
free
MPMD Spool Forks - single piece
...mpmd spool forks - single piece
thingiverse
mpmd filament spool
thingiverse
free
MPMD Replacement Spool Holder by dscpt
...mpmd replacement spool holder by dscpt
thingiverse
basic replacement mpmd rear mounted spool holder.
thingiverse
free
MPMD feet
...e vibration absorption.
i used some double sided tape to assemble them to the printer in case i ever need to unscrew the endcaps.
thingiverse
free

MPMD Leg
...iverse
this is yet another leg model for monoprice mini delta, because i did not like other models of it. stock screws are okay.
thingiverse
free

MPMD fan mount for radiator
...mpmd fan mount for radiator
thingiverse
for standard cooler 30mm
thingiverse
free

mpmd 40mm fan shroud by lsirhc
...
thingiverse
mpmd 40mm fan shroud remix of ericrobodox stock shroud.
i haven't tried it yet, it may interfere with the arms.
thingiverse
free
MPMD (Mini Delta) bowden slider - endstop shield
....
this slider solved it.
printable on mpmd. the one piece is not possible to print on mpmd and it is not easy to get it in place.
thingiverse
free
MPMD top spool holder
...mpmd top spool holder
thingiverse
slip this on top of the monoprice mini delta printer and put a spool on top.
thingiverse
free
MPMD Frame Column Shield Remix
...m tall, 1.6mm thick in most places, 0.8mm on the ends.
mpmd shield. check out my enclosure as well, they work together perfectly.
thingiverse
free
Glass Bed Retainer - Monoprice Mini Delta (MPMD) by bLITzJoN
...op. this requires a larger printer, so if the mpmd is all you have then look at the glass bed clip - monoprice mini delta (mpmd).
Clips
archibase_planet
free
Clip
...clip
archibase planet
paper-clip clip office equipment
clip band - 3d model for interior 3d visualization.
3d_export
$5
screw clip
...screw clip
3dexport
screw clip
3d_ocean
$4
Butterfly clip
... a butterfly clip, it comes with a ready to render set for out of the box rendering. obj version and max alones version included.
turbosquid
$2

clip
...
royalty free 3d model clip for download as ma, obj, and fbx on turbosquid: 3d models for games, architecture, videos. (1358622)
turbosquid
$5

Clip
...lty free 3d model clip for download as c4d, 3ds, fbx, and obj on turbosquid: 3d models for games, architecture, videos. (1521355)
turbosquid
$19
Clip
... available on turbo squid, the world's leading provider of digital 3d models for visualization, films, television, and games.
turbosquid
$4
Clips
... available on turbo squid, the world's leading provider of digital 3d models for visualization, films, television, and games.
turbosquid
$3
clip
... available on turbo squid, the world's leading provider of digital 3d models for visualization, films, television, and games.
turbosquid
$2

clips
... available on turbo squid, the world's leading provider of digital 3d models for visualization, films, television, and games.
turbosquid
free

Clip
... available on turbo squid, the world's leading provider of digital 3d models for visualization, films, television, and games.
Hold
turbosquid
$15

Holds
...royalty free 3d model holds for download as max, obj, and fbx on turbosquid: 3d models for games, architecture, videos. (1479462)
archive3d
free

Hold 3D Model
...ld 3d model
archive3d
hold include enclose
hold k0029 - 3d model for interior 3d visualization.
turbosquid
$19

Brown curtains in the hold
...lty free 3d model brown curtains in the hold for download as on turbosquid: 3d models for games, architecture, videos. (1617521)
3ddd
$1

Holds for indoor and outdoor climbing
...holds for indoor and outdoor climbing
3ddd
holds for indoor and outdoor climbing
3d_export
free

men holding a stone
...men holding a stone
3dexport
turbosquid
$1

Hold-down Assembly
... available on turbo squid, the world's leading provider of digital 3d models for visualization, films, television, and games.
turbosquid
$12

Dragon Holding Sphere
...lding sphere for download as ma, dae, fbx, gltf, obj, and stl on turbosquid: 3d models for games, architecture, videos. (1554881)
3ddd
$1

Art.com-HOLD ON TIGH
...art.com-hold on tigh
3ddd
michael mullan
framed art print michael mullan
3ddd
$1

iNeo sofa- Bold Hold collection
... collection
ineo sofa bold hold. original chair designed by mostafa jamaluddin www.i.n.e.o.com
3ddd
$1

iNeo table- Bold Hold collection
... collection
ineo table bold hold. original chair designed by mostafa jamaluddin www.i.n.e.o.com
Bed
3ddd
$1

bed
...bed
3ddd
bed , постельное белье
bed
3ddd
$1

bed
...bed
3ddd
bed , постельное белье
bed
3ddd
$1

bed
...bed
3ddd
bed , постельное белье
bed
3ddd
$1

bed
...bed
3ddd
bed , постельное белье
bed
3ddd
$1

bed
...bed
3ddd
bed , постельное белье
bed
3ddd
$1

bed
...bed
3ddd
bed , постельное белье
bed
3ddd
free

bed
...bed
3ddd
bed , постельное белье
bed
3ddd
free

bed
...bed
3ddd
bed , постельное белье
bed
3ddd
$1

Bed
...bed
3ddd
bed , постельное белье , постель
bed
3d_export
$7

bed adairs bed
...rs bed
3dexport
bed adairs bed in modern style. if you want a smoother surface, please turn on turbosmooth in the modifier list.