Thingiverse
MPCNC Primo Dewalt 660 Mount & Dust Shoe by jmillerfo
by Thingiverse
Last crawled date: 3 years, 3 months ago
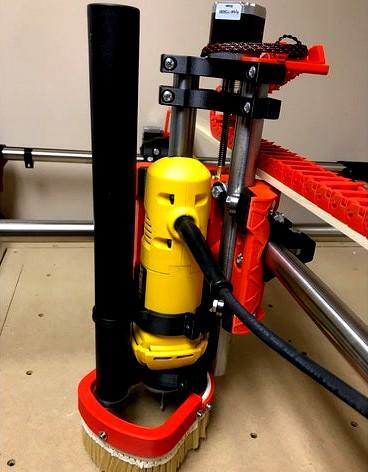
This accessory is an add-on to V1 Engineering's MPCNC Primo version CNC machine and provides a mount and dust collection attachment for the DeWalt 660 Router. See https://www.thingiverse.com/thing:4493589.
Here is a short animation showing the forward brust closeout in operation: https://youtu.be/rB8bBY6TmeQ
PTFE is recommended for strength and flexibility. See attached D660 Mount-PTEG.3mf file for detail settings. This file was created using PrusaSlicer.
Test prints may be made with infill = 5%. This reduces print time and filament volume substantially. Production parts must be printed with infill >50% for streingth.
Discussion
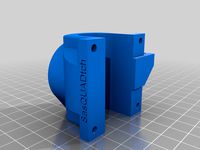
This Dust Shoe supports the DeWalt 660 Router when mounted in a V1 Engineering MPCNC Primo CNC. The required mounts files are provided with the attached .stl files.
The Dust Shoe connects to a ShopVac or equivalent vacuum source having a 30mm diameter solid hose extension. A flexible hose connects the extension tube to the vacuum source. The extension tube should be between 300 and 360mm in length. The flexible hose should be suspended overhead, centered on the work area and should have at least a 4 foot rise with ample slack so as not to place side loads on the tool anywhere within the work area.
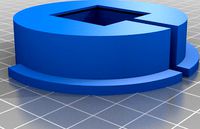
File Brush-Mount-Plate.stl may be printed or cut (preferred) from 5mm Acrylic stock using the MPCNC router. Clear Acrylic sheet provides visability of the bit and milling area.
The Dust Shoe is designed to have the aft portion fixed to the Brush-Mount-Plate with is in turn attached to the DW660-Lower-Mount. The forward portion of the dust shoe is designed to slid onto the Brush-Mount-Plate and to be held in place by four 5x3mm magnets, two on the fixed (aft) portion and two on the sliding (forward) portion. The magnets should be welded in place using CA super glue or equivalent. When installing the magnets make sure the two haves of the Dust Shoe are attracting rather than repelling magnets.
The brush stock listed below is 70mm in length. This is too long for most bit lengths and must be trimmed to approximately 35mm. Once trimmed the brush stock is cut to size and inserted between the Fixed-Brush-Mount and the Fixed-Brush-Clamp using 4 M3x16 screws and locknuts. In like manner cut another section of Brush stock and mount it between the Sliding-Brush-Mount and the Sliding-Brush-Clamp using 3 M3x16 screws and locknuts.
The Sliding-Brush assembly should now slide freely over the Dust-Shoe-Mount and be held in place by the four magnets.
BOM
Qty
Item
Source
10
M3x.5x16 Screws
https://www.amazon.com/Assortment-Lengths-Stainless-Machine-Hardware/dp/B0881X3Y4X
3
M4x.7x20 Screws
https://www.amazon.com/Eowpower-210Pcs-Stainless-Socket-Assortment/dp/B06XC8BMCM
4
M4x.7x30 Screws
See Above
4
M5x.8x30 Screws
https://www.amazon.com/dp/B077WL4SBQ
3
M3 Square Nuts
https://www.amazon.com/gp/product/B018JPZNS6
7
M3 Locknuts
https://www.amazon.com/Stainless-Steel-Assortment-Insert-Locknut/dp/B074PJV3N1
7
M4 Locknuts
See Above
4
5x3mm Magnets
https://www.amazon.com/gp/product/B07C69PHMR
1
Brush Stock
https://www.amazon.com/gp/product/B07VM6FG45
Here is a short animation showing the forward brust closeout in operation: https://youtu.be/rB8bBY6TmeQ
PTFE is recommended for strength and flexibility. See attached D660 Mount-PTEG.3mf file for detail settings. This file was created using PrusaSlicer.
Test prints may be made with infill = 5%. This reduces print time and filament volume substantially. Production parts must be printed with infill >50% for streingth.
Discussion
This Dust Shoe supports the DeWalt 660 Router when mounted in a V1 Engineering MPCNC Primo CNC. The required mounts files are provided with the attached .stl files.
The Dust Shoe connects to a ShopVac or equivalent vacuum source having a 30mm diameter solid hose extension. A flexible hose connects the extension tube to the vacuum source. The extension tube should be between 300 and 360mm in length. The flexible hose should be suspended overhead, centered on the work area and should have at least a 4 foot rise with ample slack so as not to place side loads on the tool anywhere within the work area.
File Brush-Mount-Plate.stl may be printed or cut (preferred) from 5mm Acrylic stock using the MPCNC router. Clear Acrylic sheet provides visability of the bit and milling area.
The Dust Shoe is designed to have the aft portion fixed to the Brush-Mount-Plate with is in turn attached to the DW660-Lower-Mount. The forward portion of the dust shoe is designed to slid onto the Brush-Mount-Plate and to be held in place by four 5x3mm magnets, two on the fixed (aft) portion and two on the sliding (forward) portion. The magnets should be welded in place using CA super glue or equivalent. When installing the magnets make sure the two haves of the Dust Shoe are attracting rather than repelling magnets.
The brush stock listed below is 70mm in length. This is too long for most bit lengths and must be trimmed to approximately 35mm. Once trimmed the brush stock is cut to size and inserted between the Fixed-Brush-Mount and the Fixed-Brush-Clamp using 4 M3x16 screws and locknuts. In like manner cut another section of Brush stock and mount it between the Sliding-Brush-Mount and the Sliding-Brush-Clamp using 3 M3x16 screws and locknuts.
The Sliding-Brush assembly should now slide freely over the Dust-Shoe-Mount and be held in place by the four magnets.
BOM
Qty
Item
Source
10
M3x.5x16 Screws
https://www.amazon.com/Assortment-Lengths-Stainless-Machine-Hardware/dp/B0881X3Y4X
3
M4x.7x20 Screws
https://www.amazon.com/Eowpower-210Pcs-Stainless-Socket-Assortment/dp/B06XC8BMCM
4
M4x.7x30 Screws
See Above
4
M5x.8x30 Screws
https://www.amazon.com/dp/B077WL4SBQ
3
M3 Square Nuts
https://www.amazon.com/gp/product/B018JPZNS6
7
M3 Locknuts
https://www.amazon.com/Stainless-Steel-Assortment-Insert-Locknut/dp/B074PJV3N1
7
M4 Locknuts
See Above
4
5x3mm Magnets
https://www.amazon.com/gp/product/B07C69PHMR
1
Brush Stock
https://www.amazon.com/gp/product/B07VM6FG45
Similar models
thingiverse
free

Dremel 4000 Tool Mount and Dust Shoe by jmillerfo
...nd-multi-use-magnets-refrigerator-project/dp/b07g83ywg3
1
brush stock
https://www.amazon.com/gp/product/b07vm6fg45
thingiverse
free

Magnetic X-Carve Dust Shoe
...the pieces together if the thin slide walls should break.https://www.amazon.com/40-pack-round-magnets-tenby-living/dp/b079fw5b16/
thingiverse
free

Magnetic vacuum dust shoes for MPCNC Primo by chrishornby
... x 2mm thick x 3mm c/sink neodymium magnet . available from amazon or ebay.
if you want to use my skirt (brush) use tpu filament
thingiverse
free

Makita RT700 series dust shoe for MPCNC Primo by sonmer
... as the original makita holder.
i also included a remix version of the pipe holder from https://www.thingiverse.com/thing:1668687
thingiverse
free

Dewalt DW611 Dust Shoe by oldenglishworkshop
...nnects to a 2 1/4" shopvac hose.
https://www.amazon.com/gp/product/b002ylre1g/ref=oh_aui_search_detailpage?ie=utf8&psc=1
thingiverse
free

MPCNC primo tool mount for Dewalt D26200 by toastfr35
...o hold vacuum hose) will fit in a 21mm (or larger) internal diameter tube.
remixed from https://www.thingiverse.com/thing:1772756
thingiverse
free

MPCNC Primo Makita (65mm) Dust Shoe by IMDR_5534
... of dust shoe and brush
-removed 3mm from shoe brush line up closer to bottom of collet
-added pins to hold in place side to side
thingiverse
free

MPCNC Primo Dewalt 660 Dust Management (Remix) by knuckl3dragg3r
...hese by modifying the existing stls in solidworks, which added a significant amount of size to the "front" mount piece.
thingiverse
free

MPCNC Primo Mafell PV 1000 Tool Mount & Dust Collector by linuxpaul
...cnc primo with mafell pv1000. the brush height for the collector shoe should not be larger than 30mm and the width more than 5mm.
thingiverse
free

Dewalt 611 router dust shoe for CNC router by cmarko00
...im router. uses original adjustment collar that comes with router for height adjustment. fits 2 inch vacuum/ dust collector hose.
Jmillerfo
thingiverse
free

Triplett 9005-A Meter Stand by jmillerfo
...is no longer in production and replacement parts are not available. this thing is a functional replacement of the original part.
thingiverse
free

Whitmore Dual Laundry Tote by jmillerfo
...-laundry-hamper/dp/b0017l33iw
this parts captures the dowel and fastens it to the upper metal tube using the existing #10 screws.
thingiverse
free

mpcnc pipe extension 25,4 mm to adapt jmillerfo drag chain by husyildiz
...m to take cable inside easily and thighten strongly in pipes
thanks for his design
https://www.thingiverse.com/jmillerfo/designs
thingiverse
free

Petrichorwa Massage Table Adjustable Headrest Arm by jmillerfo
...eaded rod into the shaft to reinforce the arm. except for the threaded rod, the part was cloned and printed using pteg filament.
thingiverse
free

Aero Bed Pump Coleman Adaptor by jmillerfo
... the coleman mattress.
attached are two models:
direct inflator
adapter that marries with coleman air mattress inflation nozzles.
thingiverse
free

DaVinci 1.0 Pro Filament Guide by jmillerfo
...ol holders listed in thingiverse. thing:583800 is shown in pictures included with this item but others will likely work as well.
thingiverse
free

Landscape Lighting Repair Kit by jmillerfo
...a .step file containing the combined model for the individual parts in case some customization is required for your installation.
thingiverse
free

Jenn-Air Microwave/Oven Combo Closeout Trim by jmillerfo
...ed over the area left void. the assembly is attached to the area below the new units using double sided tape and m3 wood screws.
thingiverse
free

Prusa Filament Out Sensor by jmillerfo
...ands. other applications could utilize this accessory as long as they rely on gpio4 (board pin 7) to signal filament exhaustion.
thingiverse
free

DaVinci 1.0 Pro Cable Chain by jmillerfo
...182
the individual cable lines and retaining clips included here for convenience are from:http://www.thingiverse.com/thing:193948
Primo
3ddd
$1

Eichholtz / Primo Large
...oltz , primo
http://www.eichholtz.com/wall-lamp-primo-large-0087001631114.aspx
3ddd
$1

Skandiform Primo
...iform primo
3ddd
skandiform
кресло фирмы skandiform, модель primo, 2015. кожа, хром.
габаритные размеры (шхвхг): 530х850х590 мм
3ddd
$1

BNOS / Primo Space
...dd
om , тумба
комплект шкафов серии primo space фирмы bnos. подробнее на www.bnos.com.ua
3ddd
$1

BNOS / Primo Space
... , стол
стол для руководителя серии primo space фирмы bnos. подробнее на www.bnos.com.ua
3d_export
$65

Fiat Primo 3D Model
...fiat primo 3d model
3dexport
fiat primo concept car 500 128 roadster coupe prototype
fiat primo 3d model cardess 30926 3dexport
3d_export
$5

El Primo Matreshka
...el primo matreshka
3dexport
3d model el primo from brawl stars. style - toy matreshka. vertices: 4584 faces: 4762
turbosquid
$10

Primo wall sconce
...
royalty free 3d model primo wall sconce for download as max on turbosquid: 3d models for games, architecture, videos. (1263862)
3ddd
free

Baby Expert / Primo Amore
...baby expert / primo amore
3ddd
baby expert
детская кроватка baby expert primo amore
3ddd
free

Baby Expert / Primo Amore
...aby expert / primo amore
3ddd
комод , baby expert
комод детский baby expert primo amore
turbosquid
$79

Water Cooler Primo
... available on turbo squid, the world's leading provider of digital 3d models for visualization, films, television, and games.
660
turbosquid
$249

Yamaha Rhino 660
... available on turbo squid, the world's leading provider of digital 3d models for visualization, films, television, and games.
3ddd
free

Торшер OR Illuminazione, serie 660
...шер от фабрики or illuminazione srl (www.orilluminazione.it), d31cm,h177cm, кристаллы, фурнитура золото или хром, модель 660/pt3.
3d_export
$60

Architecture 660 3D Model
...lege campus max street landscape commercial building medical hospital offices
architecture 660 3d model lotusmodel 48797 3dexport
3d_export
$15

Earrings 660 3D Model
... gold sterling silver engagement wedding stl cad printable 3d jewelry design ring
earrings 660 3d model ritaflower 86424 3dexport
3ddd
free

Люстра Or Illuminazione SRL, serie 660
...ione
люстра от фабрики or illuminazione srl (www.orilluminazione.it) d45cm, h50/150cm, фурнитура золото или хром, модель 660/s45.
3ddd
free

Бра OR Illuminazione SRL, серия 660
... фабрики or illuminazione srl (www.orilluminazione.it), d20cm, sp10cm, h24cm. кристаллы, фурнитура золото или хром. модель 660/a2
3d_export
$160

3d building 660 3D Model
...metropolis street block detailed definition realistic skyscraper huge collection
3d building 660 3d model kanhtart 44721 3dexport
3d_export
$50

3D Home 660 3D Model
... chair furniture texture table lamp apartment rug carpet restaurant hotel sitting
3d home 660 3d model richard3015 46815 3dexport
turbosquid
$6

(660) Baluster -3d STL model for CNC
... available on turbo squid, the world's leading provider of digital 3d models for visualization, films, television, and games.
3d_export
$12

wacom intuos pro medium pth-660
...). - textures are already built into the *.blend file, but it is possible to download them as a separate file. textures: formats:
Mpcnc
thingiverse
free

MPCNC Laser Mount
...mpcnc laser mount
thingiverse
custom laser mount for mpcnc.
thingiverse
free

MPCNC Remix
...mpcnc remix
thingiverse
test
thingiverse
free
MPCNC Belt Mod
...mpcnc belt mod
thingiverse
belt mod for mpcnc. alternative to zip tie.
thingiverse
free

MPCNC Y PLATE
...mpcnc y plate
thingiverse
ender 3 printable y plate for mpcnc lowrider 2
thingiverse
free
MPCNC adapter for pen holder
...mpcnc adapter for pen holder
thingiverse
adapter to mpcnc
thingiverse
free

MPCNC Higher Feet
...mpcnc higher feet
thingiverse
extra height and width feet to minimize wobbling on higher mpcnc 2.5mm configurations.
thingiverse
free
MPCNC 30x30 Laser by DariusO
...mpcnc 30x30 laser by dariuso
thingiverse
mpcnc lasermodul in 30x30
thingiverse
free

mpcnc penholder
...mpcnc penholder
thingiverse
a quick remix of two different ideas
thingiverse
free
MPCNC Drillign Guide by isiks_tech
...mpcnc drillign guide by isiks_tech
thingiverse
mpcnc drilling guide for gantry rails.
thingiverse
free

MPCNC Proxxon Mount by CNC_Fan
...mpcnc proxxon mount by cnc_fan
thingiverse
this is my proxxon mount for use mpcnc
Dewalt
3ddd
$1

DeWalt DW735
...dewalt dw735
3ddd
рейсмус dewalt dw735
3d_export
$5

logo dewalt
...logo dewalt
3dexport
dewalt logo/lowpoly/obj
turbosquid
$15

dewalt
... available on turbo squid, the world's leading provider of digital 3d models for visualization, films, television, and games.
3ddd
$1
Перфоратор DeWALT
...перфоратор dewalt
3ddd
инстурмент , перфоратор
хай поли модель перфоратора dewalt
turbosquid
$140

Dewalt 9 tools
...ewalt 9 tools for download as ma, max, 3ds, fbx, obj, and stl on turbosquid: 3d models for games, architecture, videos. (1552245)
3d_export
$15
plastic housing with dewalt battery holder
...t will be powered by a dewalt battery. the case measures 155x106x60. inside the case there are two pcb of 130x98 and 98x42 sizes.
3d_export
$159

Nascar Toyota Camry DeWalt Matt Kenseth 2015 3D Model
...e chassis nascar camry hipoly hi-detail circuit dewalt
nascar toyota camry dewalt matt kenseth 2015 3d model squir 98098 3dexport
turbosquid
$15

DEWALT Manual Flooring Cleat Nailer DWMFN-201
...ler dwmfn-201 for download as ma, max, 3ds, fbx, obj, and stl on turbosquid: 3d models for games, architecture, videos. (1549318)
cg_studio
$159

Nascar Toyota Camry DeWalt Matt Kenseth 20153d model
...4d .3ds - nascar toyota camry dewalt matt kenseth 2015 3d model, royalty free license available, instant download after purchase.
turbosquid
$20
DEWALT 20V Max Green Rotary Tough Laser DW079LG
...laser dw079lg for download as ma, max, 3ds, fbx, obj, and stl on turbosquid: 3d models for games, architecture, videos. (1548702)
Dust
3d_export
$10

of dust filter
...of dust filter
3dexport
3d model of dust filter
3ddd
$1

Dust Furniture
..., тумба
мебель dust furniturehttp://www.dnssupply.com.au/home/brands/dust.html
turbosquid
$99

Moon Dust
...rbosquid
royalty free 3d model moon dust for download as max on turbosquid: 3d models for games, architecture, videos. (1263800)
turbosquid
$2

closed to dust
...uid
royalty free 3d model closed to dust for download as stl on turbosquid: 3d models for games, architecture, videos. (1403703)
turbosquid
$2

Dust Bin
...urbosquid
royalty free 3d model dust bin for download as obj on turbosquid: 3d models for games, architecture, videos. (1201308)
turbosquid
$3

Dust Bin
...d
royalty free 3d model dust bin for download as obj and fbx on turbosquid: 3d models for games, architecture, videos. (1448076)
turbosquid
$40

Dust Glasses
... available on turbo squid, the world's leading provider of digital 3d models for visualization, films, television, and games.
turbosquid
$15

dust broom
... available on turbo squid, the world's leading provider of digital 3d models for visualization, films, television, and games.
turbosquid
$10

Dust Pan
... available on turbo squid, the world's leading provider of digital 3d models for visualization, films, television, and games.
turbosquid
$7

Luminaires Dust
... available on turbo squid, the world's leading provider of digital 3d models for visualization, films, television, and games.
Shoe
3d_ocean
$10

Shoes
...shoes
3docean
adidas colorful shoes nike shoe shoes sports
3d model of sports shoes
3d_ocean
$8

Shoes
...shoes
3docean
cloth shoes
women shoes
archibase_planet
free

Shoes
...shoes
archibase planet
shoes open shoes open toed shoes
shoes n151112 - 3d model (*.gsm+*.3ds) for interior 3d visualization.
archibase_planet
free
Shoes
...shoes
archibase planet
shoes open shoes open toed shoes
shoes n120513 - 3d model (*.gsm+*.3ds) for interior 3d visualization.
archibase_planet
free

Shoes
...shoes
archibase planet
shoes open shoes open toed shoes
shoes n280614 - 3d model (*.gsm+*.3ds) for interior 3d visualization.
archibase_planet
free

Shoes
...shoes
archibase planet
court shoes footwear shoes
shoes - 3d model for interior 3d visualization.
archibase_planet
free

Shoes
...base planet
shoes high heels evening shoes high heels shoes
shoes n140713 - 3d model (*.gsm+*.3ds) for interior 3d visualization.
archibase_planet
free

Shoes
...chibase planet
shoes open shoes high heels high heels shoes
shoes n231013 - 3d model (*.gsm+*.3ds) for interior 3d visualization.
archibase_planet
free

Shoes
...shoes
archibase planet
court shoes patent-leather shoes footwear
black shoes n060707 - 3d model for interior 3d visualization.
3d_export
$7

shoes
...shoes
3dexport
shoes man
Mount
3d_export
free

mounting bracket
...mounting plate is the portion of a hinge that attaches to the wood. mounting plates can be used indoors, cabinetry and furniture.
turbosquid
$2

MOUNTING
... available on turbo squid, the world's leading provider of digital 3d models for visualization, films, television, and games.
turbosquid
free

Mounts
... available on turbo squid, the world's leading provider of digital 3d models for visualization, films, television, and games.
turbosquid
free

Mount Fuji
...fuji
turbosquid
free 3d model mount fuji for download as obj on turbosquid: 3d models for games, architecture, videos. (1579977)
3d_export
$5

Headphone mount LR
...headphone mount lr
3dexport
headphone mount l+r
turbosquid
$39

Mount rainier
...quid
royalty free 3d model mount rainier for download as fbx on turbosquid: 3d models for games, architecture, videos. (1492586)
turbosquid
$5

pipe mounting
...quid
royalty free 3d model pipe mounting for download as obj on turbosquid: 3d models for games, architecture, videos. (1293744)
turbosquid
$3

Mounting Tires
...uid
royalty free 3d model mounting tires for download as fbx on turbosquid: 3d models for games, architecture, videos. (1708511)
3d_export
$5

Magnetic GoPro Mount
...pro mount
3dexport
cool magnetic mount for gopro. allows you to mount the camera on flat metal surfaces and get exclusive shots.
turbosquid
$5

Stone Mount
...ty free 3d model stone mount for download as ma, obj, and fbx on turbosquid: 3d models for games, architecture, videos. (1370306)