Thingiverse
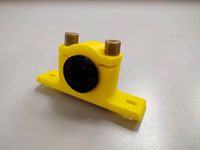
MPCNC Corner Block Upgrade V3, M3 Hardware by Humanisticnick
by Thingiverse
Last crawled date: 3 years ago
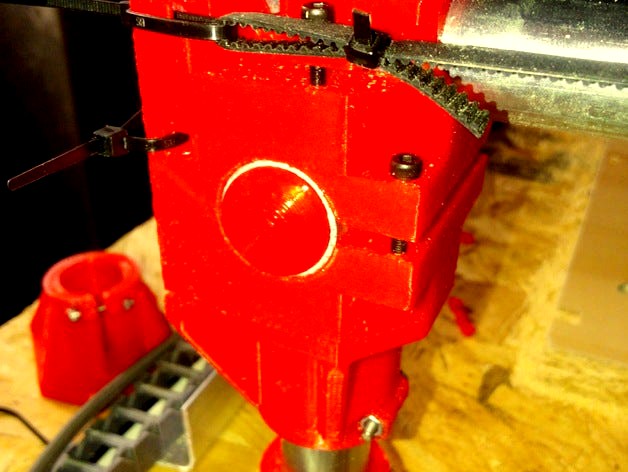
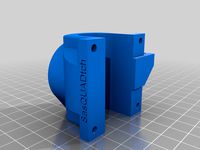
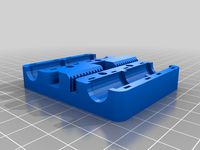
Printed, tested working. Uses M3 bolts and nuts.
PLEASE NOTE: corner block should be printed in the orientation where the main conduit hole is perpendicular to your print surface. Otherwise this part will probably de-laminate when you screw it together.
Also: dowels should technically be printed sideways so they have more sheer strength, but it's not as big of a deal.
Improvements (in my opinion) over original
All nuts are held captive by the model itself, so you only need an Allen wrench to tighten things up
Moved the belt mount off the nut lock and on to the corner block to fight warping
3 round indents in the bottom make for super-glue-less mounting to the new legs
Legs are held on by printing 3 dowels and using one M3 nut&Bolt (that way if you need to reprint something you don't have to reprint both.
To take full advantage of this you will need to print the new corner, 3 dowels, and the upper leg. 2 solid end caps are optional, no function but they look nice.
Hardware requirements for full set:
6 X M3nuts
6 X 25mm screws
Similar models
thingiverse
free

2020 Delta bed retainer clip by joochung
... be positioned far enough away from an heated bed to allow for pla to be used to print it. otherwise go for petg, abs, or ht pla.
thingiverse
free

Microsoft Lifecam Mount by njb5102
...n place.
there also is a 2020 mount included.
hardware needed:
m3x16 bolts
m3 nuts
optional hardware:
1 - m4x20 bolt
1 - m4 nut
thingiverse
free

E3D V6 Hotend Mount For Creality Printers by 3DQue
...th support interface and 0.2mm support z distance.
probe mount hardware:
2x m3 x 6 cap screw
1x m3 x 25 cap screw
1x m3 hex nut
thingiverse
free
Original Prusa MK2 style Octopi cover by luc_e
...pi on the top using the 2 x m3 countersunk 16mm screws.
connect you wifi adapter, power and usb cable and you're done.
enjoy!
thingiverse
free

Ikea Januari Mounting Plate by Madda
...can't fall out, when screwing the lamp on.
i included the sketchup files, so you can cosumize this print to fit other models.
thingiverse
free
3mm glass bracket for Flashforge and clones by unsunghero48
...r the printed bracket after the new 15mm print bed screw has been placed with it's new bolt and original nut 1 per unit made)
thingiverse
free

X/Y slider with LM8UU and 8mm rods by Beeh1
...ibrated fine then they will go through.
the picture i have is of it after a year of use, so it does last.
print without supports.
thingiverse
free
CR-10s Pro Frame Brace V2
...e bottom mount:
1) there are 2 screws at the corner, remove it first.
2) install the bottom mount.
3) put those 2 screws back in.
thingiverse
free

Powerpole x2 panel mount by drewcassidy
...panel-mount hardware for two pairs of powerpole connectors. requires 6 8mm m3 screws and nuts, and a 1 inch 3/32" dowel pin.
thingiverse
free

MINI TRIPODS (3mm SCREW) & UNIVERSAL PHONE MOUNT by mck_maah
...ad clamp or
-m3 x 40mm allen bolt - for the ballhead clamp if you no use tripod_knob
-m3 nut - for the tripod_knob or tripod_base
Humanisticnick
thingiverse
free

Funbot MK8 Extruder Mount by Humanisticnick
...funbot mk8 extruder mount by humanisticnick
thingiverse
useful if your filament is mounted in a similar location
thingiverse
free

Easier to Attach Brackets for Drag chain MPCNC by Humanisticnick
...ttach brackets for drag chain mpcnc by humanisticnick
thingiverse
kept breaking the original trying to screw in the motor mount.
thingiverse
free

85MM 28BYJ-48 Wheel by Humanisticnick
...enough torque but lack in the speed department. so by making the wheels bigger you can make your little stepper robot run faster!
thingiverse
free

80mm Case for Arduino Mega R3 and RAMPS 1.4 by Humanisticnick
...80mm case for arduino mega r3 and ramps 1.4 by humanisticnick
thingiverse
a remixed top so you can use an 80mm case fan.
thingiverse
free

Modified LCD Mount by Humanisticnick
...just as a side note, you may need to remove material from where ever you are planning to mount this to make room for the cables!!
thingiverse
free

Funbot 8mm x Carriage by Humanisticnick
...s are i3 compatible. also the zip ties hold the lm8uu a little better in my opinion. printed and jogged but not tested otherwise.
thingiverse
free

MPCNC Corner Block & Addon Leg Combo (US Version) by Humanisticnick
...ombo (us version) by humanisticnick
thingiverse
update: i would instead recommend using: http://www.thingiverse.com/thing:997875
thingiverse
free

MAKERCORE BOX by Humanisticnick
...the usa. only stls for now. once i finish all my revisions i will try to post legit dxf files (i haven't even made them yet).
thingiverse
free

Reinforced Clip-On 50mm Fan Duct for XYZprinting Davinci 1.0 by Humanisticnick
...e broke when i tired to clip on, i just added some additional solid material in a spot where the original was not 100% connected.
thingiverse
free

MPCNC Tool nut trap drill-guide by Humanisticnick
...esigned this to help me get it right the second time. if you are worried about getting it right the first time, give this a shot.
Mpcnc
thingiverse
free

MPCNC Laser Mount
...mpcnc laser mount
thingiverse
custom laser mount for mpcnc.
thingiverse
free

MPCNC Remix
...mpcnc remix
thingiverse
test
thingiverse
free
MPCNC Belt Mod
...mpcnc belt mod
thingiverse
belt mod for mpcnc. alternative to zip tie.
thingiverse
free

MPCNC Y PLATE
...mpcnc y plate
thingiverse
ender 3 printable y plate for mpcnc lowrider 2
thingiverse
free
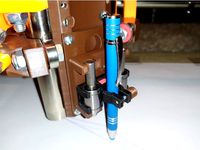
MPCNC adapter for pen holder
...mpcnc adapter for pen holder
thingiverse
adapter to mpcnc
thingiverse
free

MPCNC Higher Feet
...mpcnc higher feet
thingiverse
extra height and width feet to minimize wobbling on higher mpcnc 2.5mm configurations.
thingiverse
free
MPCNC 30x30 Laser by DariusO
...mpcnc 30x30 laser by dariuso
thingiverse
mpcnc lasermodul in 30x30
thingiverse
free

mpcnc penholder
...mpcnc penholder
thingiverse
a quick remix of two different ideas
thingiverse
free
MPCNC Drillign Guide by isiks_tech
...mpcnc drillign guide by isiks_tech
thingiverse
mpcnc drilling guide for gantry rails.
thingiverse
free

MPCNC Proxxon Mount by CNC_Fan
...mpcnc proxxon mount by cnc_fan
thingiverse
this is my proxxon mount for use mpcnc
V3
thingiverse
free

Watch v3 by Rasmusskoeld
...watch v3 by rasmusskoeld
thingiverse
watch v3
thingiverse
free

v3 Panel by SpencerR87
...v3 panel by spencerr87
thingiverse
v3 panel
thingiverse
free

Box v3 by robinmorris
...box v3 by robinmorris
thingiverse
box. v3.
thingiverse
free

Minion v3 by bjarkemape
...minion v3 by bjarkemape
thingiverse
minion v3
thingiverse
free

HappyBrush V3 Wallmount
...happybrush v3 wallmount
thingiverse
wallmount for happybrush v3
thingiverse
free

NodeMCU v3 Case
...nodemcu v3 case
thingiverse
its a nodemcu v3 case
thingiverse
free

Jet engine V3
...jet engine v3
thingiverse
jet engine v3 re
thingiverse
free

PLA guider V3
...pla guider v3
thingiverse
updated pla guider v3
thingiverse
free

Pedestal v3 by DanTech
...pedestal v3 by dantech
thingiverse
pedestal v3 - two variants
thingiverse
free

v3 street
...v3 street
thingiverse
for joe
Upgrade
thingiverse
free
upgrade graber
...upgrade graber
thingiverse
upgrade graber
thingiverse
free
Ultimaker Feeder Upgrade, Upgrade :) by yzorg
...deformation.
i made this grooved ring for the new feeder upgrade from ultimaker.
replaces the delrin ring.
test at your own risk.
thingiverse
free

Crosshairs upgrade
...crosshairs upgrade
thingiverse
upgraded wheels, hubcaps and axle joints for a certain transforming robot toy. print 4 of each.
thingiverse
free

Slingfire upgrades by RayvenLover
...slingfire upgrades by rayvenlover
thingiverse
slingfire upgrade.
thingiverse
free

Drawer Upgrade. by AcTiv
...drawer upgrade. by activ
thingiverse
drawer upgrade.
thingiverse
free

RF1000 Upgrade by LHardy
...rf1000 upgrade by lhardy
thingiverse
rf1000 upgrade
thingiverse
free

Tronxy X3 upgrades
...tronxy x3 upgrades
thingiverse
3 axis upgrades
thingiverse
free

Upgrade Anet ET4
...upgrade anet et4
thingiverse
39/5000
upgrade parts for anet printer
thingiverse
free
reel upgrade by gjay21
...reel upgrade by gjay21
thingiverse
upgrade for the fishing rod http://www.thingiverse.com/thing:896767
thingiverse
free

ender 3 upgrade by dog19721972
...ender 3 upgrade by dog19721972
thingiverse
upgrade
Hardware
thingiverse
free

Hardware Tray
...hardware tray
thingiverse
hardware parts tray with bevel for label.
thingiverse
free

Hardware case by ToolboxBodensee
...hardware case by toolboxbodensee
thingiverse
just a case we built to cover a piece of hardware we developed.
thingiverse
free

Open hardware logo by Otomar
...open hardware logo by otomar
thingiverse
open hardware logo
thingiverse
free

Hardware Box (Short) by nunchakuslei
...hardware box (short) by nunchakuslei
thingiverse
the hardware box with magnet holder
thingiverse
free

Renegade Hardware logo coaster
...renegade hardware logo coaster
thingiverse
renegade hardware logo coaster. fanart creation.
thingiverse
free

Open Hardware Sign by ea00d009
...open hardware sign by ea00d009
thingiverse
open hardware logo remix. added a frame.
thingiverse
free

Open Hardware Badge by wiglot
...open hardware badge by wiglot
thingiverse
a badge to show your open hardware pride.
thingiverse
free

Cabnet Hardware Jig by ideamanhandle
...cabnet hardware jig by ideamanhandle
thingiverse
locates hardware holes on cabnets 1in x 1in
thingiverse
free

Hatchbox Spool Drawers - No Hardware
...x spool drawers - no hardware
thingiverse
a stackable set of drawers for all the hatchbox spools. no hardware or tools required.
thingiverse
free

Bow Tie Hardware by KrisFab
...ardware for completing a fabric bow tie when you can't find your bow tie and your craft store doesn't carry the hardware.
Block
thingiverse
free

Concrete Block / Cinder Block
...concrete block / cinder block
thingiverse
scale model of a concrete block or cinder block, drawn in mastercam.
thingiverse
free
Blocks
...blocks
thingiverse
small blocks to play around with kids
thingiverse
free

Block by block 3D game by lac826
...block by block 3d game by lac826
thingiverse
block by block 3d game
thingiverse
free

Block
...block
thingiverse
?
thingiverse
free

block by jriley
...block by jriley
thingiverse
block
thingiverse
free

Block by NedXM
...block by nedxm
thingiverse
a block
thingiverse
free

block by jriley
...block by jriley
thingiverse
block
thingiverse
free

Blocks by DavidOcasio16
...blocks by davidocasio16
thingiverse
blocks
thingiverse
free

Blocks by nevitdilmen
...blocks by nevitdilmen
thingiverse
blocks
thingiverse
free
plummer block
...plummer block
thingiverse
plummer block
Corner
thingiverse
free

corner by gazknight
...corner by gazknight
thingiverse
corner
thingiverse
free

corner by ashli
...corner by ashli
thingiverse
corner
thingiverse
free

corner protector
...corner protector
thingiverse
corner protector
thingiverse
free

corner by pauluxlebidouilleure
...corner by pauluxlebidouilleure
thingiverse
corner for fixation
thingiverse
free

Corner by jamesdeb
...corner by jamesdeb
thingiverse
confirmation corner
thingiverse
free

Corner (customizable)
...corner (customizable)
thingiverse
a corner of customizable sizes.
thingiverse
free

corners by Rimom
...corners by rimom
thingiverse
corners to build an enclosure
thingiverse
free

Corner by Mika1Ove
...corner by mika1ove
thingiverse
corner 145mm x 20mm
thingiverse
free

Corner Holder
...corner holder
thingiverse
simple corner holder for wood fraiming
thingiverse
free

Corner Shelf
...corner shelf
thingiverse
this is a shelf for a corner that can be mounted with construction glue.
M3
thingiverse
free

Schraubenschlüssel M3 / Wrench M3 metric by Lucifor
...chraubenschlüssel m3 / wrench m3 metric by lucifor
thingiverse
schraubenschlüssel m3 für alle 3d drucker mit m3 verschraubungen.
thingiverse
free

M3 Knob
...m3 knob
thingiverse
i designed a knob for small drawers. only one m3 thread needs to be cut in and mounted with a m3 screw.
thingiverse
free

washer for m3
...washer for m3
thingiverse
washer for m3 screws. 12.5mm x 12.5mm x 5.0mm
thingiverse
free

Knob M3 by mrstanlez
...knob m3 by mrstanlez
thingiverse
knob for m3 screw and/or m3 nut.
thingiverse
free

M3 Halftrack to SPM (M3 GMC/T12)
...ingiverse
this is a drop in kit to convert a warlord 1/56 scale m3 halftrack to a m3 gmc / spm t-12 75mm anti tank assault gun.
thingiverse
free

M3 Spacers
...m3 spacers
thingiverse
6 mm and 11 mm m3 spacers. can easily be transformed to other lengths.
thingiverse
free

SF12 M3 by Alxlmm
...sf12 m3 by alxlmm
thingiverse
for m3 screw
thingiverse
free

table m3 by DoESLiverpool
...table m3 by doesliverpool
thingiverse
table m3
thingiverse
free

M3 Handle by Luca0212
...m3 handle by luca0212
thingiverse
m3 handle. enjoy
thingiverse
free

Thumbscrew M3 by darthandred
...thumbscrew m3 by darthandred
thingiverse
thumbscrew m3 . made in solidedge.