Thingiverse
Monster Kossel v2 by goeland86
by Thingiverse
Last crawled date: 3 years ago
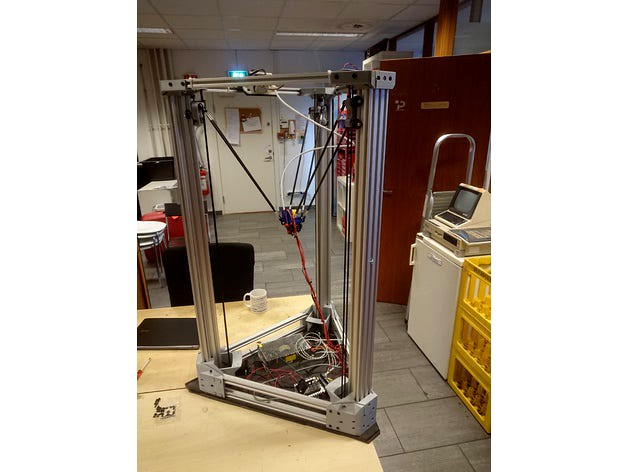
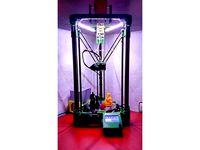
It's a Kossel! It's a Monster! It's huge!
And it prints!!!https://photos.app.goo.gl/8krHL2YXkWXtWrMx1
UPDATE 29 Apr 2020: V3 in the works on Github!
I've used my Monster Kossel V2 without major changes to the design for over a year now. I've grown used to working around its limitations, but after getting my workshop, I find it's time to take it to the next level. The v3 is undergoing design, but it is no longer done in Blender. Instead, I am using FreeCAD, and keeping the files on Github - so anyone can fork and contribute their changes to the design. Details on the FreeCAD version & plugins to use are in the readme file on the github repo. As such, I am removing the WIP label on this printer. I only wish there was a deprecated label.
UPDATE 11 Jan 2019:
Back from Oslo, where I built most of the 20x20-based version of the Monster Kossel v2 at present. Due to delays and lack of time to get all required parts for the build, I was forced to leave before it had its first print - all it was missing was a heated print bed wired up, attached to the frame and Redeem on a Replicape B3A configured. The Replicape in there will (I was told) be replaced by a Revolve when those are available. Looking forward to more pictures and feedback from Bitraf members finishing and using the printer.
UPDATE 7 Dec 2018:
It's confirmed I will be building a second Monster Kossel at Bitraf in Oslo in the first week of January 2019. I will try to document the build with lots of pictures and/or videos. It is meant to serve as a test platform for Elias Bakken's Revolve prototype (i.e. verify the board is able to print) before he sends it out to be mass-produced.
UPDATE 16 Nov 2018:
added 20x20-compatible corner frames for those who have difficulty sourcing the 15x15 extrusions for the triangle frame. These have not yet been printed, but I will be building a printer with those parts in early January 2019.
NOTE:
Manga Screen 2 holder is currently still a WIP part. Currently it has not been printed, as due to location the screen on the top would not be accessible to me. I may revisit that design at a later date to fit it on the bottom frame instead.
It's the Monster Kossel v2!
The reasons for the original Monster Kossel were simply that I like a delta frame. I also like to print model airplanes, and deltas are easy to make taller. Thus a delta with 350mm diameter bed, and 1 meter towers. Print volume is 350mm diameter by 440mm tall. You can fit a 230x230mm square on the plate and have a bit of room left around the corners. And you can go real high.
The version 2 came about because the Monster Kossel v1 was functional but needed an extra feature to keep the lady in the house happy: enclosed build chamber with air filters to keep the home healthy (I don't have a garage or basement to put it in). While I was redesigning it, I also figured, well, let's build it with a bit more thought into everything that was clunky:
I remixed a number of objects, and re-included a few of the parts I'd designed for v1 under this single Thing here, to simplify people's lives when wanting to look for files.
Sturdier frame.
The v1 was working, but I had to go get 2mm steel wire to setup as cross braces between top and bottom of neighboring towers to prevent torsion. I probably didn't put the 2040 openbuilds in the right direction. But I made the whole thing beefier by moving to a T of 2040 serving as rails for the rollers still, backed by a 20x60 to add torsional rigidity to it. Corners top and bottom are also massively redesigned to be able to keep things aligned a lot tighter with less flex.
Easy to open enclosure.
I like to tinker with my printer, try new things, fix things. I need to be able to get in to change stuff when needed. So, the panels needed an easy way in and out, that still gives a decent airtight enclosure. Queue sliding panels from the corners into the OpenBeam triangular grooves. Simple, easy, no fasteners needed. Just some joints on the tower corners to get a semi decent seal.
Dead quiet.
If it's going to not cause issues with the lady for running at all, might as well run it all the time. So it's designed around the Replicape, my board of choice. Using Noctua fans, even in full operations it's quieter than the average desktop computer, thanks to the TMC drivers in stealthchop. It will be upgraded to Revolve as soon as it becomes available. Note that if you're enclosing the printer, you can reduce the noise level further by installing a liquid-cooled hotend instead of air-cooled, to maintain performance even as the build chamber temperature climbs.
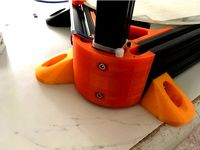
Better bed fastening mechanism.
The v1 has one flaw bigger than the others, and that's the way the bed is held in place. I remixed other delta bed holders for it, but... I found the solution of plastic tabs sticking out with a grip on top very unsatisfactory. My bed has wings with holes on the sides for mounting. I re-designed the bottom corners to be able to mount the bed using the wings and into the corners.
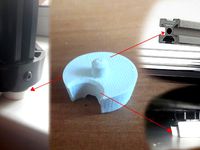
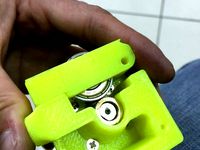
Detacheable motor frame.
The Kossel Mini, Kossel XL and the v1 suffer from the same annoyance when it comes to maintenance: the motors are pretty much locked in unless you manage to take off everything from the frame, with a great change of misaligning things during unmounting. No more. There is now an inner coupling for the motors that can be removed with 4 screws. No need for awkward tilting the printer over to get to the bottom screws of the motors. It's the same frame that the bed mounts on, too. So anything with wiring can be unmounted from the bare chassis quickly and with a minimum amount of fuss.
Bill of Materials
3x OpenBuilds 20x40x1000mm V-Slot extrusions
3x OpenBuilds 20x60x1000mm V-Slot extrusions
9x OpenBeam 15x15x450mm extrusionsOR 9x OpenBuilds 20x20x450mm V-Slot extrusion (if you use the top_corner_2020 and bottom_corner_2020 printed parts)
9x OpenBuilds V-Slot mini V wheels
M3 screws in 5, 8 and 20-25mm lengths. Suggested M3 kit
M5 screws in 5 and 30mm lengths. 9x the 30mm (for the carriage rollers), 57x the 5mm
6x 360mm tubes (6mm diameter), carbon is lighter, but aluminum would work too
12x rod ends. Traxxas or Igus. Note Traxxas uses M4, Igus M3 threads
12x threaded rod caps in M3 or M4 depending on rod ends
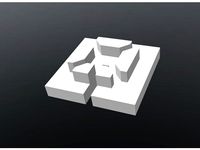
3x bottom_frame_cornerOR 3x bottom_frame_corner_2020 if you prefer using 20x20mm extrusions instead of 15x15mm for sourcing reasons
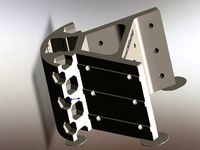
3x top_frameOR 3x top_frame_2020 if using 20x20mm extrusions instead of 15x15mm
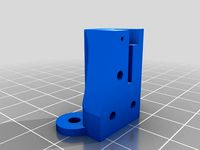
3x motor_frame
1x effector_e3dv6_igus
1x effector_e3dv6_igus_clamp
3x carriage_v_roller_thick
3x Kossel Carriage with belt tensioners or any other compatible carriage (same joint spacing & same hole pattern)
350mm aluminum heated bed (Mine is from here
Optional parts
1x 40mm_e3d_cooling
1x frame_bottom (if you have a Replicape board to put in it)
1x frame_top
if you have a Manga Screen 2 (or want one), the whole frame set
1x Ultibots' FSR kit for probing with the nozzle
I'm not going to cover the essential electronics here. Needless to say if you're building one, you should know what you want to power it with. Being a Replicape/Redeem contributor I'll be powering it with the Replicape and Beaglebone Black until the Revolve comes out.
Assembly instructions will not be detailed. This is not a printer for beginners, nor for the faint of heart. You should be building one because:
you want a big volume printer
you don't mind tinkering
you want to own your platform, not a generic out of the box system
you have the know-how
If you've build a delta before, specifically a Kossel Mini, then everything will look, and feel, familiar. I've loosely based myself off the excellent work done on the original Kossel Mini by Johann Rocholl. It was my first printer and I really love the elegance of its design and the hypnotic effect of the kinematics.
Note: The OpenBuilds double L brackets don't align properly to fit bolts through into the grooves when aligning the 2060 and 2040 into a T, so I will instead recommend a 5mm M5 into a relatively tight position holding nut (but loose enough you can slide it up and down by pushing on it) between the open rails of the 2040 where it meets the 2060. It works plenty well if you put 3 of them in place on a 1m length, one in the middle and one at each end.
And it prints!!!https://photos.app.goo.gl/8krHL2YXkWXtWrMx1
UPDATE 29 Apr 2020: V3 in the works on Github!
I've used my Monster Kossel V2 without major changes to the design for over a year now. I've grown used to working around its limitations, but after getting my workshop, I find it's time to take it to the next level. The v3 is undergoing design, but it is no longer done in Blender. Instead, I am using FreeCAD, and keeping the files on Github - so anyone can fork and contribute their changes to the design. Details on the FreeCAD version & plugins to use are in the readme file on the github repo. As such, I am removing the WIP label on this printer. I only wish there was a deprecated label.
UPDATE 11 Jan 2019:
Back from Oslo, where I built most of the 20x20-based version of the Monster Kossel v2 at present. Due to delays and lack of time to get all required parts for the build, I was forced to leave before it had its first print - all it was missing was a heated print bed wired up, attached to the frame and Redeem on a Replicape B3A configured. The Replicape in there will (I was told) be replaced by a Revolve when those are available. Looking forward to more pictures and feedback from Bitraf members finishing and using the printer.
UPDATE 7 Dec 2018:
It's confirmed I will be building a second Monster Kossel at Bitraf in Oslo in the first week of January 2019. I will try to document the build with lots of pictures and/or videos. It is meant to serve as a test platform for Elias Bakken's Revolve prototype (i.e. verify the board is able to print) before he sends it out to be mass-produced.
UPDATE 16 Nov 2018:
added 20x20-compatible corner frames for those who have difficulty sourcing the 15x15 extrusions for the triangle frame. These have not yet been printed, but I will be building a printer with those parts in early January 2019.
NOTE:
Manga Screen 2 holder is currently still a WIP part. Currently it has not been printed, as due to location the screen on the top would not be accessible to me. I may revisit that design at a later date to fit it on the bottom frame instead.
It's the Monster Kossel v2!
The reasons for the original Monster Kossel were simply that I like a delta frame. I also like to print model airplanes, and deltas are easy to make taller. Thus a delta with 350mm diameter bed, and 1 meter towers. Print volume is 350mm diameter by 440mm tall. You can fit a 230x230mm square on the plate and have a bit of room left around the corners. And you can go real high.
The version 2 came about because the Monster Kossel v1 was functional but needed an extra feature to keep the lady in the house happy: enclosed build chamber with air filters to keep the home healthy (I don't have a garage or basement to put it in). While I was redesigning it, I also figured, well, let's build it with a bit more thought into everything that was clunky:
I remixed a number of objects, and re-included a few of the parts I'd designed for v1 under this single Thing here, to simplify people's lives when wanting to look for files.
Sturdier frame.
The v1 was working, but I had to go get 2mm steel wire to setup as cross braces between top and bottom of neighboring towers to prevent torsion. I probably didn't put the 2040 openbuilds in the right direction. But I made the whole thing beefier by moving to a T of 2040 serving as rails for the rollers still, backed by a 20x60 to add torsional rigidity to it. Corners top and bottom are also massively redesigned to be able to keep things aligned a lot tighter with less flex.
Easy to open enclosure.
I like to tinker with my printer, try new things, fix things. I need to be able to get in to change stuff when needed. So, the panels needed an easy way in and out, that still gives a decent airtight enclosure. Queue sliding panels from the corners into the OpenBeam triangular grooves. Simple, easy, no fasteners needed. Just some joints on the tower corners to get a semi decent seal.
Dead quiet.
If it's going to not cause issues with the lady for running at all, might as well run it all the time. So it's designed around the Replicape, my board of choice. Using Noctua fans, even in full operations it's quieter than the average desktop computer, thanks to the TMC drivers in stealthchop. It will be upgraded to Revolve as soon as it becomes available. Note that if you're enclosing the printer, you can reduce the noise level further by installing a liquid-cooled hotend instead of air-cooled, to maintain performance even as the build chamber temperature climbs.
Better bed fastening mechanism.
The v1 has one flaw bigger than the others, and that's the way the bed is held in place. I remixed other delta bed holders for it, but... I found the solution of plastic tabs sticking out with a grip on top very unsatisfactory. My bed has wings with holes on the sides for mounting. I re-designed the bottom corners to be able to mount the bed using the wings and into the corners.
Detacheable motor frame.
The Kossel Mini, Kossel XL and the v1 suffer from the same annoyance when it comes to maintenance: the motors are pretty much locked in unless you manage to take off everything from the frame, with a great change of misaligning things during unmounting. No more. There is now an inner coupling for the motors that can be removed with 4 screws. No need for awkward tilting the printer over to get to the bottom screws of the motors. It's the same frame that the bed mounts on, too. So anything with wiring can be unmounted from the bare chassis quickly and with a minimum amount of fuss.
Bill of Materials
3x OpenBuilds 20x40x1000mm V-Slot extrusions
3x OpenBuilds 20x60x1000mm V-Slot extrusions
9x OpenBeam 15x15x450mm extrusionsOR 9x OpenBuilds 20x20x450mm V-Slot extrusion (if you use the top_corner_2020 and bottom_corner_2020 printed parts)
9x OpenBuilds V-Slot mini V wheels
M3 screws in 5, 8 and 20-25mm lengths. Suggested M3 kit
M5 screws in 5 and 30mm lengths. 9x the 30mm (for the carriage rollers), 57x the 5mm
6x 360mm tubes (6mm diameter), carbon is lighter, but aluminum would work too
12x rod ends. Traxxas or Igus. Note Traxxas uses M4, Igus M3 threads
12x threaded rod caps in M3 or M4 depending on rod ends
3x bottom_frame_cornerOR 3x bottom_frame_corner_2020 if you prefer using 20x20mm extrusions instead of 15x15mm for sourcing reasons
3x top_frameOR 3x top_frame_2020 if using 20x20mm extrusions instead of 15x15mm
3x motor_frame
1x effector_e3dv6_igus
1x effector_e3dv6_igus_clamp
3x carriage_v_roller_thick
3x Kossel Carriage with belt tensioners or any other compatible carriage (same joint spacing & same hole pattern)
350mm aluminum heated bed (Mine is from here
Optional parts
1x 40mm_e3d_cooling
1x frame_bottom (if you have a Replicape board to put in it)
1x frame_top
if you have a Manga Screen 2 (or want one), the whole frame set
1x Ultibots' FSR kit for probing with the nozzle
I'm not going to cover the essential electronics here. Needless to say if you're building one, you should know what you want to power it with. Being a Replicape/Redeem contributor I'll be powering it with the Replicape and Beaglebone Black until the Revolve comes out.
Assembly instructions will not be detailed. This is not a printer for beginners, nor for the faint of heart. You should be building one because:
you want a big volume printer
you don't mind tinkering
you want to own your platform, not a generic out of the box system
you have the know-how
If you've build a delta before, specifically a Kossel Mini, then everything will look, and feel, familiar. I've loosely based myself off the excellent work done on the original Kossel Mini by Johann Rocholl. It was my first printer and I really love the elegance of its design and the hypnotic effect of the kinematics.
Note: The OpenBuilds double L brackets don't align properly to fit bolts through into the grooves when aligning the 2060 and 2040 into a T, so I will instead recommend a 5mm M5 into a relatively tight position holding nut (but loose enough you can slide it up and down by pushing on it) between the open rails of the 2040 where it meets the 2060. It works plenty well if you put 3 of them in place on a 1m length, one in the middle and one at each end.
Similar models
thingiverse
free

Delta printer (Monster kossel) by 3dinvisible
...d numbers of screws
if you want to use air cooled heat end you can use effector from this link to effector
i used 15x7mm magnets
thingiverse
free

Delta Printer 2040 Corner by puddled
... was deliberate, so as to minimise movement / alignment issues.
upper mount is also designed to use a standard openbuilds pulley.
thingiverse
free

Replicape Kossel Mini holder by goeland86
... my answer to the issue. three parts instead of one. the three parts are held together by the screws holding down the beaglebone.
thingiverse
free

BeagleBone Replicape Bracket by PoZCon
...delta frame off the work surface. i am using a standard set of tennis ball mounts, and have plenty of clearance under the board.
thingiverse
free

Monster Kossel Mixed Frame by goeland86
...argin upwards on the top screws, so you can tension by pulling the screws up, instead of re-sizing the cable. works like a charm!
thingiverse
free

Flsun Kossel Plexiglass Enclosure by Xlemos
...el is hold with 6 10mm x 3mm magnets.
print: 3x corner back, 4x corner front, 1x corner front bottom r, 1x corner front bottom l.
thingiverse
free

2040 Delta Corner Foot
... and 2x m5 t nuts.
i recommend printing in tpu with ~2mm walls and ~40% infill for a balance of vibration dampening and strength.
thingiverse
free

RoStrong(er) Delta Printer Corner Bracket by cgcrute
... infill and the frame is now rigid.
more rostrong remixes coming soon as the build progresses, thanks to ngarst for the original!
thingiverse
free

FlSun Delta Upgrade by jorisjanssen
...is is insufficient for you, let me know and i can provide a version with a tolerance that matches your printer's capability.
thingiverse
free

2020 to 2040 corner brackets by vtell
...
if you have the frame assembled as the 20 side of the 2040 is on the left than just mirror the model in the slicer before print.
Goeland86
thingiverse
free

Thickx180 by goeland86
...quite well. last crash i did break an arm, but in my defense i was going full throttle straight into a tree trunk while inverted.
thingiverse
free

Screw-on bubbler by goeland86
... screw it on your bottle top (i'm using cleaned soda bottles), fill the top with water up to below the inside gap, and voila!
thingiverse
free

Kossel Igus+v6 Effector by goeland86
...he carriage side just fine. only on the effector were they too close together.
so, space the ending on the effector a bit.
enjoy!
thingiverse
free
Replicape Kossel Mini holder by goeland86
... my answer to the issue. three parts instead of one. the three parts are held together by the screws holding down the beaglebone.
thingiverse
free

K4 Quad by goeland86
... showing v1 with the escs ziptied to the underside of the arms.
also, i need to design a landing gear. it's coming. patience.
thingiverse
free

FSR 350mm bed remix by goeland86
...t re-posted here for convenience. please refer to kevinlo's excellent original thing for reference or comments on the design.
thingiverse
free

Xperia Z5 Compact basic case by goeland86
...t version in polyflex, and it's just a tiny bit loose. but the rubbery texture makes sure it doesn't slip off too easily.
thingiverse
free

HoTT GR16/12L Rx Vortex cases by goeland86
...na. if there's a demand i can also upload an stl for gr-16 shortened to match the gr-12's length with both antenna holes.
thingiverse
free

Kossel Mini Spool Holder Brackets: extended by goeland86
...the original instructions and find the rest of the parts on chrisparish's thing page: http://www.thingiverse.com/thing:454808
thingiverse
free

Miniquad Sony Action Cam holder by goeland86
... scale it by -1 on the x axis until i upload a corrected version. this way your buttons don't get pushed accidentally anyway.
Kossel
thingiverse
free
kossel bottom by keisukelin
...kossel bottom by keisukelin
thingiverse
kossel bottom
thingiverse
free
Leg for kossel by exelon
...leg for kossel by exelon
thingiverse
leg for kossel
thingiverse
free
Extruder for kossel by spencer_chen7
...extruder for kossel by spencer_chen7
thingiverse
extruder for kossel
thingiverse
free
Kossel parts by breezer83
...kossel parts by breezer83
thingiverse
kossel parts
thingiverse
free

Anycubic Kossel PID calibration
...ir mount:
kossel raspberry camera ir mount
extruder pid calibration.
simple extruder temperature calibration of your 3d printer.
thingiverse
free

Kossel Medium by flux83
...kossel medium by flux83
thingiverse
vertex for upgraded kossel mini
thingiverse
free
Kossel Mini by salesmendesandre
...kossel mini by salesmendesandre
thingiverse
custom kossel mini
frame 20x20
thingiverse
free
leg for kossel by ionulet
...leg for kossel by ionulet
thingiverse
leg for kossel with channel for end- stop cables
thingiverse
free

Optical Endstops Mounts for Kossel (with Better Kossel carriages) by dellfer
...stops on the anycubic kossel with better kossel carriages by codefreak https://www.thingiverse.com/thing:2501337
more precission
thingiverse
free
kossel??????? by wangrui19890704
...kossel??????? by wangrui19890704
thingiverse
??2020?2060???
Monster
3d_export
$5
monster
...monster
3dexport
very realistic monster
3d_export
free

monster
...monster
3dexport
bloody monster! (looks terrifying)
3d_ocean
$12

Monster
... this code “envatoguest2016” . visit our store high details 3d character model for small monster , useful for animations, movi...
3d_ocean
$15
Monster
...monster
3docean
android game ios java main model monster playdesign
polycount :1118 texture :1024×1024png
3d_ocean
$8
Monster Man
...monster man
3docean
giant monster
monster man software: 3ds max, mental ray.
turbosquid
$60

MONSTER
...turbosquid
royalty free 3d model monster for download as max on turbosquid: 3d models for games, architecture, videos. (1220728)
turbosquid
$60
Monster
...turbosquid
royalty free 3d model monster for download as fbx on turbosquid: 3d models for games, architecture, videos. (1320840)
turbosquid
$19

Monster
...turbosquid
royalty free 3d model monster for download as max on turbosquid: 3d models for games, architecture, videos. (1248452)
turbosquid
$15

Monster
...turbosquid
royalty free 3d model monster for download as max on turbosquid: 3d models for games, architecture, videos. (1293042)
turbosquid
$15
Monster
...turbosquid
royalty free 3d model monster for download as ztl on turbosquid: 3d models for games, architecture, videos. (1417804)
V2
3d_export
free

Lamp v2
...lamp v2
3dexport
lamp v2 with solar panel
3d_export
$5

hammerhead v2
...hammerhead v2
3dexport
razer hammerhead v2 headphones, modeled in cinema 4d, render in corona
3d_export
$5

manometer v2
...manometer v2
3dexport
3d_export
$5

potato v2
...potato v2
3dexport
turbosquid
$52

Lifebuoys v2
...squid
royalty free 3d model lifebuoys v2 for download as fbx on turbosquid: 3d models for games, architecture, videos. (1560870)
turbosquid
$2

Mask v2
...turbosquid
royalty free 3d model mask v2 for download as stl on turbosquid: 3d models for games, architecture, videos. (1527741)
turbosquid
free

Flashlight V2
...d
free 3d model flashlight v2 for download as , obj, and fbx on turbosquid: 3d models for games, architecture, videos. (1663559)
turbosquid
$29

Thanos v2
...
royalty free 3d model thanos v2 for download as ztl and obj on turbosquid: 3d models for games, architecture, videos. (1651077)
turbosquid
$29

Titan v2
...d
royalty free 3d model titan v2 for download as ztl and obj on turbosquid: 3d models for games, architecture, videos. (1540228)
turbosquid
$29

Frieza v2
...
royalty free 3d model frieza v2 for download as ztl and obj on turbosquid: 3d models for games, architecture, videos. (1701238)