Thingiverse

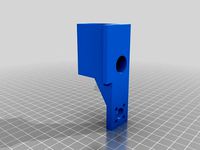
Monoprice Select Mini Z Carriage by mfink70
by Thingiverse
Last crawled date: 3 years ago
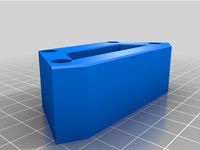
I purchased a V2 mini off of ebay as a parts printer and after a few repairs it's as good as new, however the x-axis end stop switch post was broken on the original carriage. I also found out the mount for the lead screw was integrated into the carriage design so you can't add a nema 17 motor without replacing the carriage. This helped in both areas for me.
I'm not the original designer, just modified it for my preferences. I integrated an end stop switch bracket, cut down the one side to accept the standard 35mm bearings (length), enlarged the bearing holes and thickened the mounting plates for the nema 17 motor and the lead screw nut. The original was two piece design and I made it into a one piece design.
Original design:
https://www.myminifactory.com/object/replacement-z-axis-assembly-for-monoprice-select-mini-v1-52822
I used petg with 100% infill for structural integrity.
Update 11/14/18:
Added a second z carriage, listing as V2 specific, it's in the correct orientation to print. My original model was remixed stating that the bearing holes were misaligned. Since I have the original working file it was much easier for me to correct. The holes were a bit off I admit, now they are perfectly aligned. I also modified the model so you can use a M3 nut and bolt to secure X axis rods rather than gluing them in. The model integrates the x axis switch so you can remove that terrible noisy X axis cover. The remix removes the integrated switch mount and adds the mount for that cover (don’t know why you would want to do that) but you can check out the remix for that, infill is up to you.
Similar models
thingiverse
free
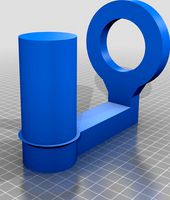
Monoprice Select Mini dual z motor adapters by mfink70
... and needs.
update: 2/17/18
added a mount that will use 6mm linear bearings for those that have a 6mm rod for their z stabilizer.
thingiverse
free

Monoprice select mini x-axis end cap with z-stabilizer bearing hole. by mfink70
... in the correct position. i'm not sure they will work with other mounts as i have only tested them with my side plate mounts.
thingiverse
free

Monoprice Select Mini Z-Stabilizer 6mm bearing bracket and cap by mfink70
...cap for monoprice select mini. must drill the screw holes to attach the bearing cap to the x-axis bracket.
infill is up to you.
thingiverse
free

switch holder for monoprice select mini V2
...you to remove the black sheet metal useless thing on the monoprice select mini v2 (mpsm) and still mount the x axis limit switch.
thingiverse
free

3.9mm z axis spacer for glass bed on Monoprice mini select v2, no disassembly by stavrosg
...emixed this one
it is .2mm taller, and .4mm thicker on the z axis
clips on the back on the z-axis carriage, as in the last photo.
thingiverse
free

WASHER, STEPPER, NEMA 17
...ly for a monoprice mini mp sla (dlp) to allow greater adjustment of the z-axis stepper/lead screw with respect to the build axis.
thingiverse
free

Evolution Z-axis carriages for FLSun i3 (fixed x-rod end spacing, adjustable Z-stop) by macelius
...vo x-axis carriage with integrated belt tensioner here: https://www.thingiverse.com/thing:2251944
if you make it, please post it!
thingiverse
free

HyperCube LM10UU Z Axis Carriage by henryarnold
...nal and v2 are posted. the original was a direct copy of the original design posted here:http://www.thingiverse.com/thing:1830472
thingiverse
free

Prusa i3 leadscrew Z-axis upgrade by Rektinator
...tweak the z-axis height.
link:http://www.sainsmart.com/sainsmart-nema-17-lead-screw-300mm-stepper-motor-z-axis-3d-printer.html
thingiverse
free

K8200 Z Axis Upgrade by pcsentinel
...dity.
obviously you need to change your z axis steps per mm.
see http://www.thingiverse.com/thing:2079048 for the compete rebuild
Mfink70
thingiverse
free

Monoprice Mini misc. files by mfink70
...s by mfink70
thingiverse
a few designs i made for my own mini for the dual z motor setup. modify as needed.
infill is up to you.
thingiverse
free

Lead Screw Adapter Da Vinci by mfink70
... up with a different bracket for the z end stop as this bracket may interfere with the factory bracket.
tested and works perfect!
thingiverse
free

Axial SCX10 ESC Box by mfink70
... esc today and it was a bit tight. added a second enclosure box that i trimmed back the screw mounts to allow for more clearance.
thingiverse
free
Monoprice Select Mini Z-Stabilizer 6mm bearing bracket and cap by mfink70
...cap for monoprice select mini. must drill the screw holes to attach the bearing cap to the x-axis bracket.
infill is up to you.
thingiverse
free

MPSM Extruder box with Fan by mfink70
...nfig file it still got a bit too warm for me.
infill is up to you, 25% or better is probably good enough.
i used a 40 x 20mm fan.
thingiverse
free

Monoprice Select Mini MKS 3.2" LCD full enclosure with lid by mfink70
...ieboard conversion. must drill holes to attach lid to enclosure.
i mounted this all the way to the left even with the side plate.
thingiverse
free

Da Vinci MKS Sbase smoothieboard and mosfet mount by mfink70
... needed to the mount. i also ended up lengthening it a bit.
great mount! saved a ton of time. thanks go to the original designer!
thingiverse
free

Monoprice Mini Delta Effector / Mount by mfink70
... e3d v6 to keep it from sliding in the mount. this will locate the bottom of the e3d v6 heatsink with the bottom of the effector.
thingiverse
free

Monoprice mini X-Axis end cap by mfink70
...id another test print, alignment clip fits perfect now, i think i'm satisfied.
again infill is up to you.
thanks for looking!
thingiverse
free

Clodbuster beadlock wheel for SCX10 by mfink70
...n.com/hot-racing-slf10y08-aluminum-extension/dp/b00xf8g9zo/ref=sr_1_1?ie=utf8&qid=1532192912&sr=8-1&keywords=slf10y08
Monoprice
thingiverse
free

Display frame for Monoprice MP10
...display frame for monoprice mp10
thingiverse
display frame for monoprice mp10
thingiverse
free

Bridge covers Monoprice MP10
...bridge covers monoprice mp10
thingiverse
bridge covers monoprice mp10
thingiverse
free
Monoprice Coin by Peyton_Guyot
...monoprice coin by peyton_guyot
thingiverse
print this!
thingiverse
free
Voxel Monoprice spool holder by avalero
...voxel monoprice spool holder by avalero
thingiverse
voxel monoprice spool holder
thingiverse
free
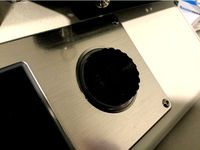
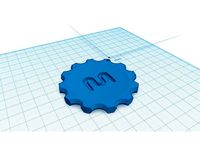
Monoprice select mini knob by BramRausch
...monoprice select mini knob by bramrausch
thingiverse
this is a replacement knob for the monoprice select mini.
thingiverse
free

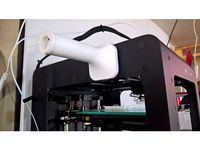
Monoprice 3d printer hook by dmitriyf
...monoprice 3d printer hook by dmitriyf
thingiverse
this is an attachment to monoprice select 3d printer v2
thingiverse
free
monoprice ultimate spool mount by death4u
...older by danmannert to monoprice ultimate 3d printer. it clips into the slot on the top of the printer for the optional enclosue.
thingiverse
free
Monoprice Mini Delta Foot
...a foot for a monoprice mini delta. it helps to increase airflow under the printer. it also helps to reduce the volume of the fan.
thingiverse
free
Monoprice Select Mini Fan Guard
...y fan protection. this is an essential upgrade.
used it on the monoprice select mini pro (from www.3dprinthings.be).
perfect fit!
thingiverse
free

Monoprice Cable Tie Mount
... but had to cut down the straps a bit to make them work. designed a quick mount that fits the full strap, item 6457 on monoprice.
Carriage
archibase_planet
free

Carriage
...arriage
archibase planet
perambulator baby carriage pram
carriage n250908 - 3d model (*.gsm+*.3ds) for interior 3d visualization.
3d_export
free

carriage
...carriage
3dexport
old fashion carriage model, more files here:
turbosquid
$140

Carriage
...urbosquid
royalty free 3d model carriage for download as max on turbosquid: 3d models for games, architecture, videos. (1482052)
turbosquid
$25

Carriage
...urbosquid
royalty free 3d model carriage for download as max on turbosquid: 3d models for games, architecture, videos. (1285944)
3d_export
free

carriage
...carriage
3dexport
game cart
3d_ocean
$15

Barrel Carriage
...ieval oak old transport wheels wine wood
this model contains a barrel and a carriage. it is a medieval type of wood oak carriage.
turbosquid
$40

Carriage
...ty free 3d model carriage for download as obj, fbx, and blend on turbosquid: 3d models for games, architecture, videos. (1290094)
turbosquid
free

Carriage
...yalty free 3d model carriage for download as ma, obj, and fbx on turbosquid: 3d models for games, architecture, videos. (1239157)
3d_export
$5

Medieval carriage
...medieval carriage
3dexport
medieval carriage in fairy style
turbosquid
$58

Carriage
...d model carriage with scene for download as max, obj, and fbx on turbosquid: 3d models for games, architecture, videos. (1276262)
Select
3ddd
$1

TUBADZIN SELECT
...max 2014, 2011.
fbx 2014, 2013, 2011,
obj
_____________________________________http://www.tubadzin.pl/en/collection/324
3ddd
$1
Плитка Selection
... supergres , плитка
плитка selection - supergres ceramiche
turbosquid
$15
Christmas Selection
...royalty free 3d model christmas selection for download as fbx on turbosquid: 3d models for games, architecture, videos. (1696333)
turbosquid
$39

Vases selection
... available on turbo squid, the world's leading provider of digital 3d models for visualization, films, television, and games.
turbosquid
free

SELECTIVE RACKING SYSTEM
...yalty free 3d model selective racking system for download as on turbosquid: 3d models for games, architecture, videos. (1282512)
turbosquid
$10
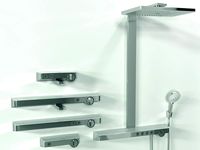
Hansgrohe ShowerTablet Select
...ee 3d model hansgrohe showertablet select for download as max on turbosquid: 3d models for games, architecture, videos. (1336955)
turbosquid
$29
Chill selectional sofa
...odel chill selectional sofa for download as max, obj, and fbx on turbosquid: 3d models for games, architecture, videos. (1465691)
3ddd
free

Lunaria - Nova, ASA Selection
... asa selection , dried flowers
ветка лунарии в вазе nova, asa selection
3ddd
$1
inno SELECT SLIM chair
...inno select slim chair
3ddd
inno
high detailed inno select slim chair
turbosquid
$29

Select Chaise Lounge
... available on turbo squid, the world's leading provider of digital 3d models for visualization, films, television, and games.
Z
3d_export
$5

nissan z
...nissan z
3dexport
nissan z
3ddd
$1

Vase Z
...vase z
3ddd
vase z
3ddd
$1

полотенцесушить Z
...полотенцесушить z
3ddd
полотенцесушитель
полотенцесушить z
design_connected
free

Z-Chair
...z-chair
designconnected
free 3d model of z-chair designed by karman, aleksei.
design_connected
$11

Z Lamp
...z lamp
designconnected
phillips z lamp computer generated 3d model. designed by kalff, louis.
3d_export
$5

Dragon balls z
...dragon balls z
3dexport
dragon ball z
turbosquid
$20

Fighter Z
...
turbosquid
royalty free 3d model fighter z for download as on turbosquid: 3d models for games, architecture, videos. (1292563)
turbosquid
$9

Pen Z
...pen z
turbosquid
free 3d model pen z for download as obj on turbosquid: 3d models for games, architecture, videos. (1686775)
turbosquid
free

z chair
...z chair
turbosquid
free 3d model z chair for download as max on turbosquid: 3d models for games, architecture, videos. (1410230)
turbosquid
$5

Letter Z
...urbosquid
royalty free 3d model letter z for download as max on turbosquid: 3d models for games, architecture, videos. (1408540)
Mini
turbosquid
$10

Mini Mini Luceplan
...
royalty free 3d model mini mini luceplan for download as max on turbosquid: 3d models for games, architecture, videos. (1227359)
3d_ocean
$39

Mini Cooper
...mini cooper
3docean
cabrioler cooper mini
mini cooper cabrioler
3d_export
$30

Mini lathe
...mini lathe
3dexport
mini lathe
3d_export
$5

mini mouse
...mini mouse
3dexport
mini mouse
3d_export
$5

mini house
...mini house
3dexport
mini house
3d_export
free

Mini Mecha
...mini mecha
3dexport
concept of mini mecha
3d_ocean
$20

Mini Gun
...mini gun
3docean
gatling gun gun machine gun mini gun weapon
model of a mini gatling gun.
3ddd
free

Herve mini
... кофейный , herve
http://www.mobiliavenanti.it/ru/products/hervè-mini
3d_export
$5

mini wall
...mini wall
3dexport
mini wall for living room
3d_export
$5

mini bank
...mini bank
3dexport
mini bank 3d model