Thingiverse

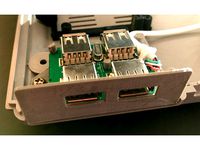
Modular Raspberry Pi Server Case by Dreiko22
by Thingiverse
Last crawled date: 2 years, 11 months ago
A modular case to house a Raspberry Pi based application server, that can be adjusted to fit a variety of components.
Server Components:
Raspberry Pi
External HDD x2
Powered USB Hub
Cables to connect everything
Fixtures are created to fit the following items:
Raspberry Pi 3B
Powered USB Hub
External HDD x2
If you are using your own components, you may have to redesign the fixtures to ensure they fit properly.
Other Useful Items:
Hex Socket Head Cap Bolt Set
Hex Socket Flat Head Countersunk Bolt Set
Right angle USB cables for connecting components
Printing:
Print one each of:
Case Bottom - Slotted v1.stl
Case Top v2.stl
Case Front v9.stl
Case Back v5.stl
Mounting Plate v6.stl
HDD Mounting Plate.stl
Pi 3B Case - Top v2.stl
Pi 3B Case - Bottom v6.stl
Pi Case Fixture v4.stl
Pi Case Secondary Fixture v2.stl
Print two each of:
Case Side v9.stl
USB Hub Fixture v3.stl
HDD Fixture v3.stl
Print four each of:
Case Feet v1.stl
General Assembly Steps:
Note: If these steps only apply if using the same components described above. If using your own components, your assembly will vary.
Note: Read through the steps before starting assembly. You may find it easier to do the steps differently or in a different order.
Slide a USB Hub Fixture onto each end of the USB Hub, and bolt the assembly to the Mounting Plate using 4 countersunk bolts. The end of the USB hub that does not have ports should be close to the end slots cut out of the Mounting Plate.
Install Pi into Pi case and cap screws to attach the Pi case to the Pi fixtures. The secondary fixture should be on the side of the micro USB port, to allow a cable to be plugged in.
Using 4 countersunk bolts, attach the Pi assembly to the mounting plate so that the micro USB port is away from the USB Hub. The Pi fixtures should fit in between the USB Hub Fixtures.
Lay the Mounting Plate in the Case Bottom.
For each of the 4 case feet, thread a cap bolt through the bottom of each foot and then through the Case Bottom and Mounting Plate. Do not secure with a nut yet.
Plug the power cable into the USB Hub.
Connect the USB-B port on the end of the USB Hub to one of the Pi's USB ports.
Connect one of the USB ports on the USB Hub to the micro USB power port on the Pi.
Attach the case front and case back to the case bottom using the four screws used in step 5. When attaching the case back, make sure to slot the USB Hub power cable into the arch shaped cutout. Now a nut can be used to secure each bolt.
Slide the two external HDDs into the HDD Fixtures, and attach the assembly to the HDD Mounting Plate.
Connect each HDD to a USB port on the USB Hub.
Thread a countersunk bolt through each of the four holes in the Case Top, and then through each of the holes on the HDD Mounting Plate. When assembled, the HDD's should be "hanging from the ceiling".
Attach the top assembly to the Case Front and Case Back. You most likely will have to move cables around to make everything fit well.
Attach the Case Sides. This can be done by inserting a nut into each of the slots on the side of the Case Front and Case Back, so that the sides of the nut are parallel to the sides of the slots. Then, line up the holes on the Case Sides with the mount holes on the Case Front and Case Back (make sure the nut is also lined up), and secure using 4 countersunk bolts per side. When screwing in bolts, if you encounter difficult resistance, stop, back out the bolt, make sure the nut is aligned correctly, and try again. If this is not done, the nut can strip out the slot, making the slot useless.
Similar models
thingiverse
free

Case for Raspberry Pi Zero + Pi Zero USB Docking Hub by Xav987
... micro usb port from the raspberry pi zero are inaccessible with the case, because you have to use the port from the hub instead.
thingiverse
free
![Raspberry Pi Server Case [Bulldozer] by ArtemAnufrij](/t/8544069.jpg)
Raspberry Pi Server Case [Bulldozer] by ArtemAnufrij
... four hdd/ssd and an usb-hub
usb-sata:https://amzn.to/2ji0zrt
usb-hub:https://amzn.to/2hwrjx8
card-reader:https://amzn.to/2guor1k
thingiverse
free

Raspberry Pi 3, Pi 2, and Model B+ case with slots 2,5" HDD by salvomaltese
...he design for their own use.
if anyone finds any problems (dimensionally or otherwise) post them up so i can get the model fixed.
thingiverse
free

Raspberry Pi 4 Mounting Plate for High Quality Camera by DavidDeeds
...y pi and high quality camera together, plenty of cable clearance and easy access to the raspberry pi 4 ports when used on tripod.
thingiverse
free

Raspberry Pi 2 - mounting plate by steve6330
...nd usb-hdd 2,5"
(for my owncloud server)
montageplatte für raspberry pi 2 und usb-hdd 2,5"
(für meinen owncloud server)
thingiverse
free

Raspberry Pi Zero W / Makerbot Replicator 2/2X Corner Camera Case by tmclucas
...longer bolt and nut.
m3 bolt and nut
for case back print bolt hole side down for back piece. remove hole support after printing.
thingiverse
free
Retro Playstation Pi Usb Hub Holder by jakobwesthoff
... raspberry only has 4 ports total.
additional parts
i used the following usb-hub as inlay for this part:
usb 2.0 hub smile 4-port
thingiverse
free

Raspberry Pi with HDD sleeve by ChrisParish
...nd not for the hddsleeve + hdd + ir vented - fully vented and with a small window in the end for an ir sensor to pass out though.
thingiverse
free

Raspberry Pi Canakit Case Mount 1405 Printrbot Simple by collintravers
... nut. the screws bolting the bottom of the case onto the bracket is 16mm m3 screws. i mainly designed this to use with octoprint.
thingiverse
free

TV Hook for Raspberry PI Case by Mr_Alicates
... tv using an (up to) m6 bolt.
you will also need the appropiate bolt for your tv hole and a few nuts to lock everything in place.
Server
archibase_planet
free

Server
...
archibase planet
server pc workstation it equipment
server it-pc n270815 - 3d model (*.gsm+*.3ds) for interior 3d visualization.
3d_export
$5

Server
...server
3dexport
3d_export
$10

Server cabinet
...server cabinet
3dexport
server cabinet built on solidworks software.
turbosquid
$50

Server
... available on turbo squid, the world's leading provider of digital 3d models for visualization, films, television, and games.
turbosquid
$36

Server
... available on turbo squid, the world's leading provider of digital 3d models for visualization, films, television, and games.
turbosquid
$15

Server A
... model server a for download as blend, dae, fbx, obj, and stl on turbosquid: 3d models for games, architecture, videos. (1694729)
turbosquid
$2

Server
... available on turbo squid, the world's leading provider of digital 3d models for visualization, films, television, and games.
turbosquid
free

SERVER
... available on turbo squid, the world's leading provider of digital 3d models for visualization, films, television, and games.
turbosquid
free

server
... available on turbo squid, the world's leading provider of digital 3d models for visualization, films, television, and games.
3d_export
$15

server a
...ance painter 2017 and rendered in bledner using eevee. model has two sets of uvs: one for texturing and one for lightmap backing.
Raspberry
3d_export
free

raspberry
...raspberry
3dexport
3d model of a raspberry. i tried to make it realistic.
turbosquid
$27

Raspberries
...y free 3d model raspberries for download as max, obj, and stl on turbosquid: 3d models for games, architecture, videos. (1354176)
turbosquid
$14

Raspberries
...y free 3d model raspberries for download as max, obj, and fbx on turbosquid: 3d models for games, architecture, videos. (1364663)
3d_export
$5

raspberry pi
...raspberry pi
3dexport
carcasa para la raspberry pi
turbosquid
$99

Raspberry
... available on turbo squid, the world's leading provider of digital 3d models for visualization, films, television, and games.
turbosquid
$10

raspberries
... available on turbo squid, the world's leading provider of digital 3d models for visualization, films, television, and games.
archive3d
free

Raspberries 3D Model
...raspberries 3d model archive3d raspberries raspberry raspberries n300911 - 3d model (*.3ds) for interior 3d...
3d_export
$5

raspberry fruit
...raspberry fruit
3dexport
3d_export
$5

raspberry
...y different sizes. their color ranges from light burgundy to pink. there are formats: obj, 3ds, blend, dae, fbx, mtl.<br>:)
evermotion
$12

raspberries 23 am130
...evermotion raspberries 23 am130 evermotion key 23 food fruit raspberry fruits am130 raspberries highly detailed 3d model of raspberries...
Pi
design_connected
$11

Pi
...pi
designconnected
ligne roset pi chairs computer generated 3d model. designed by thibault desombre.
3d_export
$5
raspberry pi
...raspberry pi
3dexport
carcasa para la raspberry pi
turbosquid
$18

pied
... available on turbo squid, the world's leading provider of digital 3d models for visualization, films, television, and games.
3ddd
$1

Emme pi light
...emme pi light
3ddd
emme pi light
люста emme pi light
3ddd
$1

Emme pi light
...emme pi light
3ddd
emme pi light
бра классическое emme pi light
3ddd
$1

Emme Pi Light
...emme pi light
3ddd
emme pi light
3ddd
$1

Emme Pi Light
...emme pi light
3ddd
emme pi light
design_connected
$16

Pi-Air
...pi-air
designconnected
living divani pi-air lounge chairs computer generated 3d model. designed by harry & camila.
3d_ocean
$15

Manneken Pis
...picting a naked little boy urinating into a fountain’s basin. (wikipedia) the model was sculpted in blender 2.70a rendered wit...
3ddd
$1

Emme pi light
...emme pi light
3ddd
emme pi light
люстра классическая фирма: emme pi light
артикул: 3595/5/cot/12/wh
Modular
3ddd
$1
MODULAR
...modular
3ddd
modular , врезной свет
modular потолочные светильники
3ddd
$1
Modular Spock
...modular spock
3ddd
modular
modular spock
3ddd
$1
MODULAR / Spock
...modular / spock
3ddd
modular
modular/spock
design_connected
$7
Modular
...modular
designconnected
emmemobili modular shelves and storage computer generated 3d model. designed by ferruccio laviani.
3ddd
$1
Modular spock
...modular spock
3ddd
modular
spock wall led
turbosquid
$25
Modular sofa Angelo Cappellini Modular
...a angelo cappellini modular for download as max, fbx, and obj on turbosquid: 3d models for games, architecture, videos. (1570923)
turbosquid
$15
Modular sofa Angelo Cappellini Modular
...a angelo cappellini modular for download as max, fbx, and obj on turbosquid: 3d models for games, architecture, videos. (1570304)
3ddd
$1
Modular 2FLAT2C
...modular 2flat2c
3ddd
modular
modularhttp://www.supermodular.com/
3d_export
free
Modular walls
...modular walls
3dexport
modular walls for playing without materials and textures
3ddd
$1
Modular / Lighting Juliette
...modular / lighting juliette
3ddd
modular
modular lighting juliette
Case
3d_export
$1

case
...case
3dexport
case
archibase_planet
free

Case
...case
archibase planet
showcase show-case glass case
glass-case + cakes - 3d model for interior 3d visualization.
archibase_planet
free

Case
...case
archibase planet
showcase show-case glass case
glass-case for chips - 3d model for interior 3d visualization.
archibase_planet
free

Case
...case
archibase planet
case shelving drawer
case - 3d model for interior 3d visualization.
archibase_planet
free

Case
...case
archibase planet
case rack locker
case - 3d model for interior 3d visualization.
archibase_planet
free

Case
...case
archibase planet
case drawer kitchen furniture
case - 3d model for interior 3d visualization.
archibase_planet
free

Case
...case
archibase planet
case cupboard shelving
glass case - 3d model for interior 3d visualization.
archibase_planet
free

Case
...case
archibase planet
case handbag suitcase
case - 3d model (*.gsm+*.3ds) for interior 3d visualization.
archibase_planet
free

Case
...case
archibase planet
case suitcase
case 5 - 3d model (*.gsm+*.3ds) for interior 3d visualization.
archibase_planet
free

Case
...case
archibase planet
locker case dresser
case - 3d model (*.gsm+*.3ds) for interior 3d visualization.