Thingiverse
MK III Piezo Hotend z-probe for e3d v6 + Magnetic Delta Piezo Effector by DjDemonD
by Thingiverse
Last crawled date: 2 years, 12 months ago
Update 04-03-2017 - !!20mm piezo version now available (as alpha for testing)!!
http://www.thingiverse.com/thing:2152709
Update 16-7-17 latest thinking on firmware setup can be read here http://forums.reprap.org/read.php?1,767998,page=9
Update 02-03-17 - Added an stl to make a template to use to mark the centre of the piezo disc before drilling.
Also one for 20mm piezo, for future use.
Update 24-02-17 So have this system running on Smoothieware and improved running on RepRapFirmware (Duet).
Smoothie - configure it as either probe or as a probe and an endstop. You can use the same pin which differs slightly from Smoothieware documentation. Set debounce_ms 1 for both, then probe at decent speed.
RepRapFirmware, Use:
G31 X0 Y0 Z0 P100
M558 P5 I1 F500 X0 Y0 Z0
in config.g remove the I1 from M558 if you configure the signal board as active high instead.
Probe at decent speed.https://www.youtube.com/watch?v=MURqDTL9oVA
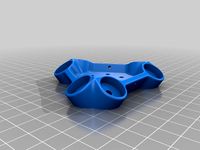
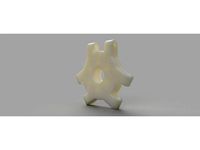
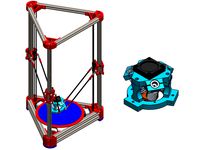
Update 17-02-17 After much testing and in collaboration with Zesty Technologies, maker of the Nimble extruder, Lykle has produced a delta effector for the piezo sensor system. It is designed for Haydn Huntley magnetic rod system (but might suit other magnet-in-rod systems). Assembly guide to follow.
You can also download this and 2 more versions with different design styling and rod spacing from http://www.thingiverse.com/thing:2117069
Update 05-02-17 Piezo controller board mount to attach the board somewhere on your printer by Sakey added. Thanks.
Update 02-01-17: I have changed some of the Marlin settings after some testing to ensure more reliable operation. Also reduced the sensitivity of the piezo using VR1 on the signal board, to reduce false triggers.I have also neaten up some of the text fr better readability.
Update 29-01-17: I have turned the circular upper piece over (for the generic version) as it prints better this way around, if you have already downloaded it re-orientate it before printing, if you are downloading it now its the right way around for printing.
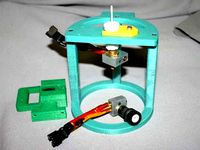
Description and build Instructions:
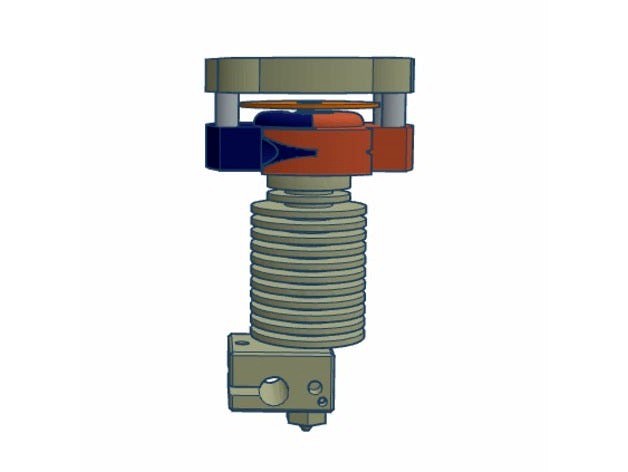
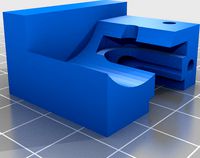
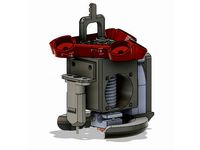
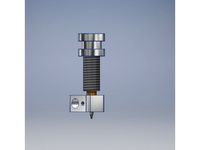
This is the latest and now considered Beta version of the hotend piezo z-probe I have been developing. It follows on from the excellent work done by Leadinglights and Moriquendi (http://forums.reprap.org/read.php?1,635075,page=1) I decided to see if I could move the piezo sensor to the hotend, well the cold-end above the heatsink. This would simplify the process of installation, remove the need to suspend the print bed, keep the piezo away from heat amongst other benefits.
Thanks to Xochal for the 90 degree Tee groove mount adaptor this is derived from.
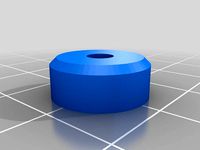
You will need some piezo transducers I used these: Murata 7BB-27-4 As 27mm such ashttp://www.ebay.co.uk/itm/391478525842?_trksid=p2060353.m2749.l2649&ssPageName=STRK%3AMEBIDX%3AIT
Place one on a flat hard surface and drill a 4.5mm hole in the dead centre (you can drill 5mm if easier). It takes a little bit of time, use light pressure and stop frequently to allow the heat to dissipate. Lightly file around the edges of the hole to remove burs. Use a spur point wood drill bit, unless you have something better - let me know.
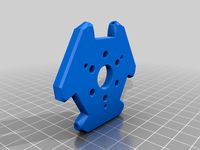
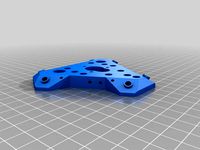
There are two versions, one works with Lykle's effector http://www.thingiverse.com/thing:2047422 and the other can be bolted to the underside of your effector or carriage, the only difference is the side on which the nut traps are located.
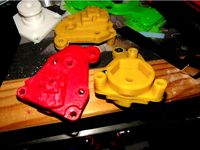
Print the parts. You will need 4x 4mmx20 smooth steel rods (I used some woodscrew shanks cut with a dremel) I have also tried 4mm acetal rods which work too. Push the rods firmly and as straight as possible, into the circular top piece, the rods hang down on the same side as the large circular recess for the piezo disc.
Heat press them or bond them with acetone/superglue, they need to be tight in the top part. Grease the rest of each rod. The lower part (clamp) when assembled, slides over the rods and they provide the lateral stability for the hotend. It can only move vertically when probing.
You can assemble the clamp and try it on to the rods. The holes for the rods, in the clamp will probably need to be enlarged, I drilled them out to 4.5mm. Make sure the clamp can slide up and down, it needs to be a good fit so that it can slide, but be well constrained laterally. Heat press 2xm3 nuts into each clamp part, one to do the clamp up, the other to attach it to the upper part.
The hot end clamp goes around the groove mount of your hotend and is secured with m3 bolts and nuts. Make sure the bolts/nuts do not stick out of the clamp.
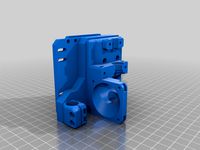
Assembly for the generic version (read this either way):
Attach the bowden tube to the hot end, make sure its tightly inserted with no play, as access to it later is not possible. Attach the clamp and do it up tight, the upper surface has the raised domed part as shown in the images above. Place the piezo disc over the bowden tube with the ceramic and solder pads facing downwards. This has been designed with genuine e3d v6/lite hot ends in mind. If you want to use a clone or other hotend with a groove mount, drill or modify the top piece centre hole to fit the bowden coupler of your choice. Attach your bowden tube here and run a ptfe fialment guide tube from below this through the piezo, into your hotend. This is untested at present but I see no reason why it wont work. Let me know how you get on.
The piezo discs I am using have a solder pad right on the rim of the flange, there is relief in the clamp for the solder pad and wire on the piezo disc. Try to get the solder pad into this groove. It will slip about so there is no harm putting a drop of adhesive between the piezo and the clamp, to keep it in place.
Insert the hotend, clamp and piezo into the upper piece which needs 4 x m3 nuts heat pressed into it either to attach it to your effector or carriage..Use 2 x m3 bolts ideally just the right length (around 20mm) to secure the upper part to the clamp with the piezo disc in between. Try to tighten them evenly, if you do them up quite tight this will make the nozzle firmer, but the sensitivity will be less, its a balance.
If using the generic version you can mark and drill your effector (or print a new one) and attach the assembly with hotend, with 4x m3 bolts.
Assembly Lykle's Effector Verison.
Print the effector, make sure the cross shaped opening in the centre is clean of any brim or elephants foot-first layer, attach it to your printer.
The only difference is the upper part has the nut traps on the other side. Attach the circular upper part (with the 4mm smooth rods inserted and greased as above) with 4 x m3 bolts. Attach the clamp to the hot end and rotate it so it will face the right way when assembled. Attach the bowden tube securely, then slide the piezo over the top, solder pads downwards, a drop of adhesive might help to hold the sensor in the right place. Now lift the hotend, clamp, piezo and bowden tube assembly into the effector, engaging the rods and do up the two m3 bolts that secure it together - tighten as described in the generic version above.
For Both versions:
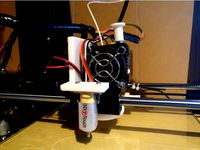
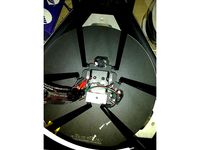
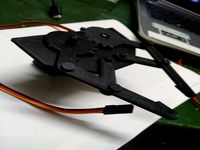
Now secure the leads of the piezo sensor with heatshrink/cable ties to something so they aren't being pulled about as your print head moves around. What I did (image attached above) was to extend the wires by soldering/heatshrink then cable tie the wires to one of the acetal rods (ensuring I did not wedge the two parts apart or the sensor would not trigger).
Attach the piezo to the controller board a design for which is available here https://www.dropbox.com/sh/3q38ew98kt7f8sq/AAB_uA6tQL2ETlGcnfdijm2Ra?dl=0
Moriquendi/Leadinglights designed this board and Moriquendi has some made, PM him at reprap forum he should be able to make you one, for a small fee. He makes them in batches so please be patient.
The controller connects to standard endstop/probe pins on your board. Make sure +,- and sig are the right way around.
Further details on tuning this board and a little video walkthrough are available at https://www.duet3d.com/forum/thread.php?id=752&p=3 I will update the long post I wrote about tuning there as things develop.
Config for Duet wifi is in the post above.
My instruction are based around setting the piezo board to output a falling signal when triggered. So quick guide is:
-attach piezo board to your controller
-attach the piezo (polarity is important)
-turn VR2 (carefully don't short anything) until the LED just comes on and then 1/4 turn more.
-push up on the nozzle, see if the LED blinks positively OFF-ON
-if not adjust VR1 until it does (this is the sensitivity)
-move the print head around, if there is slight flicker during normal moves that's okay, but you want a definite OFF-ON when you push up on the nozzle. Adjust VR1 to get the signal is clearly above the noise.
Configuration for Ramps/mega/Marlin RC bug Fix from 21-01-17 on (it might work on earlier versions but you'll have to adapt the settings).
Connect to Z_min endstop plug, ensure that signal,+,- go the right way, on the piezo board it goes +,sig,- on a ramps board you can swap the pins in a 3 pin plug so that the + is towards the centre of the ramps board, - is the middle pin and sig is towards the outside of the board. Do not get these mixed up. Normally use the z-min endstop pins.
Configuration changes:
-#define Z_MIN_PROBE_ENDSTOP_INVERTING true
-#define fix_mounted_probe
-#define USE_ZMIN_PLUG
-//#define ENDSTOPPULLUP_ZMIN (i.e. you do not need a pullup for z_min
-#define Z_MIN_ENDSTOP_INVERTING true (provided you use the LED on with VR2 method)
-#define X_PROBE_OFFSET_FROM_EXTRUDER 0 // X offset: -left +right [of the nozzle]
-#define Y_PROBE_OFFSET_FROM_EXTRUDER 0 // Y offset: -front +behind [the nozzle]
-#define Z_PROBE_OFFSET_FROM_EXTRUDER 0.2 // Z offset: -below +above [the nozzle]
-#define XY_PROBE_SPEED 1000
-#define Z_HOME_DIR -1
-#define HOMING_FEEDRATE_Z (10*50) (reduce if your z axis can't move this fast but a faster z homing speed makes for better triggers)
-I have enabled auto bed levelling with bilinear mode (non-flat bed) and set options there to suit
(please remove the - symbol from the lines above I have to put this in or Thingiverse formats it strangely).
I have added these lines to my start gcode:
M109 S130; Heat extruder before probing
M201 X300 Y300 ;acceleration low
M205 X2 Y2 ;jerk low
G28 ; home all
G29 ; Grid Level
M201 X1500 Y1500 ;acceleration normal - use your own values
M205 X20 Y20 ;jerk normal - use your own values
So this warms the nozzle to below ooze temperature for almost all filament, you don't want filament on the nozzle when probing (bed should be hot also). I chose a fixed temperature to use for probing to standardise for thermal expansion in your hot end, by altering z offset, you can use babystepping and then offset for the next print.
Then it reduces acceleration and jerk to low values.
Then it homes, then it auto/grid levels.
Then return accelerations/jerks to normal, use your normal values here.
This is necessary as it is so sensitive it will trigger when the head comes to rest over a probing point before it actually probes if your head is moving fast and stopping suddenly. You shouldn't need to go slower than this but do so if you get false triggers.
General approach is the same as for auto bed levelling with an inductive probe.
As mentioned elsewhere the nozzle is the probe so offsets are x0,y0 z0.2 this is an approximate z offset which should leave the nozzle just above the bed at z=0, reduce it for a lower nozzle, increase it for a higher one. In marlin this can be done by sending M851 Zx where x is the offset. Then m500 to save.
Now probe away, its very sensitive but very accurate. Marlin's M48 probe repeatability test shows a standard deviation over 10 probes of 0.009014mm. So its very reproducible. Try this test with your old probe before trying this one.
Please be aware with this sensor in its current build, there is no fail-safe operation if for example the piezo becomes detached etc... So it is recommended after powering on your machine just to check the probe, either read its analogue value from your firmware at rest, and when pushing up on the hotend, visualise the blue LED on the signal board changing, or sending m119 and pushing up on the hot end to check it shows triggered, you might have to try repeated taps whilst sending m119's to get a triggered response..
For early testing if your controller allows easy reduction of motor current (if digital) then you lessen the impact of a head crash if it happens.
Some videos of some of the earlier prototypes and a bit of help to tune the signal board.
https://www.youtube.com/watch?v=F3vi6BOi6sAhttps://www.youtube.com/watch?v=dl_0Geipojchttps://www.youtube.com/watch?v=dDnyhFhq7MIhttps://www.youtube.com/watch?v=pd09Kk_wXvY
http://www.thingiverse.com/thing:2152709
Update 16-7-17 latest thinking on firmware setup can be read here http://forums.reprap.org/read.php?1,767998,page=9
Update 02-03-17 - Added an stl to make a template to use to mark the centre of the piezo disc before drilling.
Also one for 20mm piezo, for future use.
Update 24-02-17 So have this system running on Smoothieware and improved running on RepRapFirmware (Duet).
Smoothie - configure it as either probe or as a probe and an endstop. You can use the same pin which differs slightly from Smoothieware documentation. Set debounce_ms 1 for both, then probe at decent speed.
RepRapFirmware, Use:
G31 X0 Y0 Z0 P100
M558 P5 I1 F500 X0 Y0 Z0
in config.g remove the I1 from M558 if you configure the signal board as active high instead.
Probe at decent speed.https://www.youtube.com/watch?v=MURqDTL9oVA
Update 17-02-17 After much testing and in collaboration with Zesty Technologies, maker of the Nimble extruder, Lykle has produced a delta effector for the piezo sensor system. It is designed for Haydn Huntley magnetic rod system (but might suit other magnet-in-rod systems). Assembly guide to follow.
You can also download this and 2 more versions with different design styling and rod spacing from http://www.thingiverse.com/thing:2117069
Update 05-02-17 Piezo controller board mount to attach the board somewhere on your printer by Sakey added. Thanks.
Update 02-01-17: I have changed some of the Marlin settings after some testing to ensure more reliable operation. Also reduced the sensitivity of the piezo using VR1 on the signal board, to reduce false triggers.I have also neaten up some of the text fr better readability.
Update 29-01-17: I have turned the circular upper piece over (for the generic version) as it prints better this way around, if you have already downloaded it re-orientate it before printing, if you are downloading it now its the right way around for printing.
Description and build Instructions:
This is the latest and now considered Beta version of the hotend piezo z-probe I have been developing. It follows on from the excellent work done by Leadinglights and Moriquendi (http://forums.reprap.org/read.php?1,635075,page=1) I decided to see if I could move the piezo sensor to the hotend, well the cold-end above the heatsink. This would simplify the process of installation, remove the need to suspend the print bed, keep the piezo away from heat amongst other benefits.
Thanks to Xochal for the 90 degree Tee groove mount adaptor this is derived from.
You will need some piezo transducers I used these: Murata 7BB-27-4 As 27mm such ashttp://www.ebay.co.uk/itm/391478525842?_trksid=p2060353.m2749.l2649&ssPageName=STRK%3AMEBIDX%3AIT
Place one on a flat hard surface and drill a 4.5mm hole in the dead centre (you can drill 5mm if easier). It takes a little bit of time, use light pressure and stop frequently to allow the heat to dissipate. Lightly file around the edges of the hole to remove burs. Use a spur point wood drill bit, unless you have something better - let me know.
There are two versions, one works with Lykle's effector http://www.thingiverse.com/thing:2047422 and the other can be bolted to the underside of your effector or carriage, the only difference is the side on which the nut traps are located.
Print the parts. You will need 4x 4mmx20 smooth steel rods (I used some woodscrew shanks cut with a dremel) I have also tried 4mm acetal rods which work too. Push the rods firmly and as straight as possible, into the circular top piece, the rods hang down on the same side as the large circular recess for the piezo disc.
Heat press them or bond them with acetone/superglue, they need to be tight in the top part. Grease the rest of each rod. The lower part (clamp) when assembled, slides over the rods and they provide the lateral stability for the hotend. It can only move vertically when probing.
You can assemble the clamp and try it on to the rods. The holes for the rods, in the clamp will probably need to be enlarged, I drilled them out to 4.5mm. Make sure the clamp can slide up and down, it needs to be a good fit so that it can slide, but be well constrained laterally. Heat press 2xm3 nuts into each clamp part, one to do the clamp up, the other to attach it to the upper part.
The hot end clamp goes around the groove mount of your hotend and is secured with m3 bolts and nuts. Make sure the bolts/nuts do not stick out of the clamp.
Assembly for the generic version (read this either way):
Attach the bowden tube to the hot end, make sure its tightly inserted with no play, as access to it later is not possible. Attach the clamp and do it up tight, the upper surface has the raised domed part as shown in the images above. Place the piezo disc over the bowden tube with the ceramic and solder pads facing downwards. This has been designed with genuine e3d v6/lite hot ends in mind. If you want to use a clone or other hotend with a groove mount, drill or modify the top piece centre hole to fit the bowden coupler of your choice. Attach your bowden tube here and run a ptfe fialment guide tube from below this through the piezo, into your hotend. This is untested at present but I see no reason why it wont work. Let me know how you get on.
The piezo discs I am using have a solder pad right on the rim of the flange, there is relief in the clamp for the solder pad and wire on the piezo disc. Try to get the solder pad into this groove. It will slip about so there is no harm putting a drop of adhesive between the piezo and the clamp, to keep it in place.
Insert the hotend, clamp and piezo into the upper piece which needs 4 x m3 nuts heat pressed into it either to attach it to your effector or carriage..Use 2 x m3 bolts ideally just the right length (around 20mm) to secure the upper part to the clamp with the piezo disc in between. Try to tighten them evenly, if you do them up quite tight this will make the nozzle firmer, but the sensitivity will be less, its a balance.
If using the generic version you can mark and drill your effector (or print a new one) and attach the assembly with hotend, with 4x m3 bolts.
Assembly Lykle's Effector Verison.
Print the effector, make sure the cross shaped opening in the centre is clean of any brim or elephants foot-first layer, attach it to your printer.
The only difference is the upper part has the nut traps on the other side. Attach the circular upper part (with the 4mm smooth rods inserted and greased as above) with 4 x m3 bolts. Attach the clamp to the hot end and rotate it so it will face the right way when assembled. Attach the bowden tube securely, then slide the piezo over the top, solder pads downwards, a drop of adhesive might help to hold the sensor in the right place. Now lift the hotend, clamp, piezo and bowden tube assembly into the effector, engaging the rods and do up the two m3 bolts that secure it together - tighten as described in the generic version above.
For Both versions:
Now secure the leads of the piezo sensor with heatshrink/cable ties to something so they aren't being pulled about as your print head moves around. What I did (image attached above) was to extend the wires by soldering/heatshrink then cable tie the wires to one of the acetal rods (ensuring I did not wedge the two parts apart or the sensor would not trigger).
Attach the piezo to the controller board a design for which is available here https://www.dropbox.com/sh/3q38ew98kt7f8sq/AAB_uA6tQL2ETlGcnfdijm2Ra?dl=0
Moriquendi/Leadinglights designed this board and Moriquendi has some made, PM him at reprap forum he should be able to make you one, for a small fee. He makes them in batches so please be patient.
The controller connects to standard endstop/probe pins on your board. Make sure +,- and sig are the right way around.
Further details on tuning this board and a little video walkthrough are available at https://www.duet3d.com/forum/thread.php?id=752&p=3 I will update the long post I wrote about tuning there as things develop.
Config for Duet wifi is in the post above.
My instruction are based around setting the piezo board to output a falling signal when triggered. So quick guide is:
-attach piezo board to your controller
-attach the piezo (polarity is important)
-turn VR2 (carefully don't short anything) until the LED just comes on and then 1/4 turn more.
-push up on the nozzle, see if the LED blinks positively OFF-ON
-if not adjust VR1 until it does (this is the sensitivity)
-move the print head around, if there is slight flicker during normal moves that's okay, but you want a definite OFF-ON when you push up on the nozzle. Adjust VR1 to get the signal is clearly above the noise.
Configuration for Ramps/mega/Marlin RC bug Fix from 21-01-17 on (it might work on earlier versions but you'll have to adapt the settings).
Connect to Z_min endstop plug, ensure that signal,+,- go the right way, on the piezo board it goes +,sig,- on a ramps board you can swap the pins in a 3 pin plug so that the + is towards the centre of the ramps board, - is the middle pin and sig is towards the outside of the board. Do not get these mixed up. Normally use the z-min endstop pins.
Configuration changes:
-#define Z_MIN_PROBE_ENDSTOP_INVERTING true
-#define fix_mounted_probe
-#define USE_ZMIN_PLUG
-//#define ENDSTOPPULLUP_ZMIN (i.e. you do not need a pullup for z_min
-#define Z_MIN_ENDSTOP_INVERTING true (provided you use the LED on with VR2 method)
-#define X_PROBE_OFFSET_FROM_EXTRUDER 0 // X offset: -left +right [of the nozzle]
-#define Y_PROBE_OFFSET_FROM_EXTRUDER 0 // Y offset: -front +behind [the nozzle]
-#define Z_PROBE_OFFSET_FROM_EXTRUDER 0.2 // Z offset: -below +above [the nozzle]
-#define XY_PROBE_SPEED 1000
-#define Z_HOME_DIR -1
-#define HOMING_FEEDRATE_Z (10*50) (reduce if your z axis can't move this fast but a faster z homing speed makes for better triggers)
-I have enabled auto bed levelling with bilinear mode (non-flat bed) and set options there to suit
(please remove the - symbol from the lines above I have to put this in or Thingiverse formats it strangely).
I have added these lines to my start gcode:
M109 S130; Heat extruder before probing
M201 X300 Y300 ;acceleration low
M205 X2 Y2 ;jerk low
G28 ; home all
G29 ; Grid Level
M201 X1500 Y1500 ;acceleration normal - use your own values
M205 X20 Y20 ;jerk normal - use your own values
So this warms the nozzle to below ooze temperature for almost all filament, you don't want filament on the nozzle when probing (bed should be hot also). I chose a fixed temperature to use for probing to standardise for thermal expansion in your hot end, by altering z offset, you can use babystepping and then offset for the next print.
Then it reduces acceleration and jerk to low values.
Then it homes, then it auto/grid levels.
Then return accelerations/jerks to normal, use your normal values here.
This is necessary as it is so sensitive it will trigger when the head comes to rest over a probing point before it actually probes if your head is moving fast and stopping suddenly. You shouldn't need to go slower than this but do so if you get false triggers.
General approach is the same as for auto bed levelling with an inductive probe.
As mentioned elsewhere the nozzle is the probe so offsets are x0,y0 z0.2 this is an approximate z offset which should leave the nozzle just above the bed at z=0, reduce it for a lower nozzle, increase it for a higher one. In marlin this can be done by sending M851 Zx where x is the offset. Then m500 to save.
Now probe away, its very sensitive but very accurate. Marlin's M48 probe repeatability test shows a standard deviation over 10 probes of 0.009014mm. So its very reproducible. Try this test with your old probe before trying this one.
Please be aware with this sensor in its current build, there is no fail-safe operation if for example the piezo becomes detached etc... So it is recommended after powering on your machine just to check the probe, either read its analogue value from your firmware at rest, and when pushing up on the hotend, visualise the blue LED on the signal board changing, or sending m119 and pushing up on the hot end to check it shows triggered, you might have to try repeated taps whilst sending m119's to get a triggered response..
For early testing if your controller allows easy reduction of motor current (if digital) then you lessen the impact of a head crash if it happens.
Some videos of some of the earlier prototypes and a bit of help to tune the signal board.
https://www.youtube.com/watch?v=F3vi6BOi6sAhttps://www.youtube.com/watch?v=dl_0Geipojchttps://www.youtube.com/watch?v=dDnyhFhq7MIhttps://www.youtube.com/watch?v=pd09Kk_wXvY
Similar models
thingiverse
free

QuadFusion MGN12 PrecisionPiezo Andromeda Mount
...lue, offset and trigger height
be careful setting trigger point, as with any z probe configuration you can damage your print bed.
thingiverse
free

Anet A8 probe holder right (18mm) by dacoon
... y offset: -front +behind [the nozzle]
#define z_probe_offset_from_extruder 0 // z offset: -below +above [the nozzle]
have fun
thingiverse
free

Kossel Mini Effector for E3D V5 Hotend by AlexBorro
... hotend has a tight fit into the effector.
if you prefer clamping, just print 2 clamps and fasten with 2x m3x16mm bolts and nuts.
thingiverse
free

Auto level Cyclops effector by xile6
... then lower the number 0.5
depends on your firmware you can go up to 3 number after decimal point to get that prefect first layer
thingiverse
free

E3d V6 and Bl Touch Clamp by AustenT
...ht [of the nozzle]
define y_probe_offset_from_extruder -2 // y offset: -front +behind [the nozzle]
edit your z offset from tests
thingiverse
free
3D/BL touch mount for Anet A6 by ithinuel
...ly 3 grid points on a linear bed levelling.
i am printing on a borosilicate glass bed, i don't know if more point are needed.
thingiverse
free

Hotend mounted Piezo Sensor Z-Probe (Alpha) by DjDemonD
...https://www.youtube.com/watch?v=dl_0geipojchttps://www.youtube.com/watch?v=ddnyhfhq7mihttps://www.youtube.com/watch?v=pd09kk_wxvy
grabcad
free

Universal Piezo Z-Probe PCB v2.75 (for 1,2,3 or more piezos)
...hes and therefore the colour of the pcb may vary from that shown.
we are pleased to offer a 3 month warranty on this product.
thingiverse
free
Anet A6 BLTouch/3DTouch mount (front) by thvranken
...isplay or with command m851) and saved to the eeprom (using the display or with command m500), in my case, this was around -2 mm.
thingiverse
free

Rostock Kossel Mini 2020 - Effector / Cooler / Z-Probe for E3D Hotend by Lyamecron
...
-effector 1x
-clip 2x (if you don't use the z-probe)
-cooler plate 3x
-z-probe (you just need one clip if you use it)
enjoy!
Djdemond
thingiverse
free
50mm Towball cover Hitch Cap by DjDemonD
...50mm towball cover hitch cap by djdemond
thingiverse
cover for 50mm towball.
thingiverse
free
Duet3D Smarteffector Nimble Mount DjDemonD Remix by DjDemonD
...ess sensitive. you also need to consider the orientation of the large nut to you heatsink when assembling the hotend into the se.
thingiverse
free

Brio Wooden Train Tunnel by DjDemonD
...valley etc.. multiple units can be joined to make a longer tunnel. 80mm diameter so even fairly large trains can make it through.
thingiverse
free

Bowden pushfit locking ring for clone titan and y-splitter by DjDemonD
...for clone titan and y-splitter by djdemond
thingiverse
locking clip for trianglelabs clone titan and y-splitter bowden fittings.
thingiverse
free
3-Way Approach for Brio Thomas Engine Shed by DjDemonD
...ond
thingiverse
i bought one of these engine sheds but didn't have the approach track which is a custom piece so i made one.
thingiverse
free

Precision Piezo - 27mm and 20mm Piezo Disc drill guide. by DjDemonD
... djdemond
thingiverse
drilling guide for piezo discs to centre your drill.
see youtube video here: https://youtu.be/ms1fd0v5z68
thingiverse
free

Mechanical Z Endstop for DjDemonD/AndreasL Dual z axis smartrapcore alu by DjDemonD
...babystep z on the first print and used m206 to enter the home offset. (nb. if the nozzle was 1mm too high the m206 z would be 1.)
thingiverse
free

Paper Towel Holder Strengthened Remix by DjDemonD
...t to allow for the strengthening braces. since altering it, it works perfectly in fact i am even using some as spool holders too.
thingiverse
free
Sensor Test Rig by DjDemonD
...aver. i am not going to provide full build instructions, if you cannot figure out how to build it, should you be testing sensors?
thingiverse
free

Technics 1200 Turntable with spinning record by DjDemonD
... fits over a 5mm motor shaft and spins as my printer prints.
just bond it all together after assembly with superglue or acetone.
Piezo
3d_export
$7

buzzer piezo
...;all materials are logically named<br>the main format is in 3ds max 2013.<br>satisfaction guarranteed<br>thanks
3d_export
$15

Buzzer 3D Model
...audio electronic component signalling piezoelectric disk alarm timer electric piezo industrial part electrical bell doorbell buzzer 3d model download...
thingiverse
free

Hypercube_evolution E3D_Titan_Aero with piezo
...ercube_evolution e3d_titan_aero with piezo
thingiverse
hypercube_evolution a piezo z-axis sensor was attached to e3d_titan_aero.
thingiverse
free

Precision-Piezo Probe with 3 Piezo 15mm by Tech-Raton
...if bigger, you'll lose the piezo marks)
you just have to slide the part between the heatsink and the effector (or your mount)
thingiverse
free
Piezo Chimera mount by RKS7204
...piezo chimera mount by rks7204
thingiverse
mount for e3d chimera hotend and piezo sensor
thingiverse
free

Piezo v1.22 Mount by Suggy
...piezo v1.22 mount by suggy
thingiverse
mount for under bed piezo censor pcb
thingiverse
free
Precision Piezo - 27mm and 20mm Piezo Disc drill guide. by DjDemonD
... djdemond
thingiverse
drilling guide for piezo discs to centre your drill.
see youtube video here: https://youtu.be/ms1fd0v5z68
thingiverse
free

Underbed Piezo Mounts by fcollingwood
...the piezos are smooth. two of the arms a required and two of the mirror arms are required
everything else can be printed at 0.2mm
thingiverse
free

(Beta) Piezo UnderBed Mounts by Precision Piezo by DjDemonD
...sulation to the mounts to keep heat from the bed away from the piezos.
future release might include some clamps on the top parts.
thingiverse
free

Lighter - Piezo Ignition Holder by fawks03
...lighter - piezo ignition holder by fawks03
thingiverse
a housing for the piezo component of a lighter.
Effector
3d_ocean
$5

Radial Sound Effector
...e spheres will expand with your song. fully customisable, change the color, the size of the spheres or even put in different s...
3d_ocean
$12

3D Customizable Puzzle Set (16x10)
...mograph compatible (you can effect the pieces with mograph effector) - included also a non-mograph version with...
thingiverse
free
Effector by olo2000pm
...effector by olo2000pm
thingiverse
effector
thingiverse
free
CERAMBOT-Effector
...cerambot-effector
thingiverse
cerambot-effector
thingiverse
free

modulize effector by candyasdf
...ulize effector by candyasdf
thingiverse
mount things on effector with m3 screws
effector radius : 25.4mm
rod arm distance : 40mm
thingiverse
free
Delta Effector by zavier
...delta effector by zavier
thingiverse
delta effector with radial fan 50 and bltouch
thingiverse
free
D810 Effector by WhiteTiger13
...d810 effector by whitetiger13
thingiverse
this is d810 effector for d810 without autocalibration, and also cap for it.
thingiverse
free
Effector for Delta Printer
...effector for delta printer
thingiverse
effector for delta printer (3 color)
using diamond hotend
thingiverse
free
Delta effector magnetic by fpassos
...delta effector magnetic by fpassos
thingiverse
effector for e3dv6 hotend. i needed put the spheres (10mm) on the effector.
thingiverse
free
End Effector Gripper
...end effector gripper
thingiverse
end effector gripper
for a robotic arm
uses mg995 servo motor
Probe
turbosquid
$25

Probe
... available on turbo squid, the world's leading provider of digital 3d models for visualization, films, television, and games.
turbosquid
$35
Space Probe
...osquid
royalty free 3d model space probe for download as c4d on turbosquid: 3d models for games, architecture, videos. (1571168)
turbosquid
$15
Space Probe
...osquid
royalty free 3d model space probe for download as obj on turbosquid: 3d models for games, architecture, videos. (1314864)
turbosquid
$25

Robot Probe
...y free 3d model robot probe for download as fbx, obj, and dae on turbosquid: 3d models for games, architecture, videos. (1537490)
turbosquid
$1

Dental Probe
...e 3d model dental probe for download as ma, obj, fbx, and stl on turbosquid: 3d models for games, architecture, videos. (1312400)
turbosquid
$60
Police Probe
... available on turbo squid, the world's leading provider of digital 3d models for visualization, films, television, and games.
turbosquid
$9

Space probe
... available on turbo squid, the world's leading provider of digital 3d models for visualization, films, television, and games.
turbosquid
$70
parker solar probe
...3d model parker solar probe for download as jpg, max, and fbx on turbosquid: 3d models for games, architecture, videos. (1372573)
turbosquid
$85

Adams Probe 16
... available on turbo squid, the world's leading provider of digital 3d models for visualization, films, television, and games.
turbosquid
$1

Enviroment Probe Test
... available on turbo squid, the world's leading provider of digital 3d models for visualization, films, television, and games.
Mk
3d_export
$5

scorpion mk
...scorpion mk
3dexport
scorpion mk .zpr,stl,obj,stl,
turbosquid
$6

MK 11
...turbosquid
royalty free 3d model mk 11 for download as blend on turbosquid: 3d models for games, architecture, videos. (1223895)
3d_export
$5

Qubeley MK-II
...qubeley mk-ii
3dexport
3d lowpoly type qubeley mk-ii
turbosquid
$3

MK killer
...lty free 3d model mk killer for download as fbx, obj, and 3ds on turbosquid: 3d models for games, architecture, videos. (1638698)
turbosquid
$25

Valentine Mk
... available on turbo squid, the world's leading provider of digital 3d models for visualization, films, television, and games.
turbosquid
$10

Mk-16
... available on turbo squid, the world's leading provider of digital 3d models for visualization, films, television, and games.
turbosquid
$7

Mk-16
... available on turbo squid, the world's leading provider of digital 3d models for visualization, films, television, and games.
turbosquid
free

mk-2
... available on turbo squid, the world's leading provider of digital 3d models for visualization, films, television, and games.
3d_export
$25

Merkava MK 1 3D Model
... 1 3d model
3dexport
merkava mk-1 tank low-poly model maya mk1 mk mk-2 mk-3 israel army
merkava mk 1 3d model rom64 5311 3dexport
3ddd
$1
мясорубка Panasonic MK G1800P
...мясорубка panasonic mk g1800p
3ddd
мясорубка , panasonic
мясорубка panasonic mk g1800p
Iii
3d_export
$17

JetRanger III
...jetranger iii
3dexport
jetranger iii
3ddd
$1
Jarron III
...jarron iii
3ddd
jarron iii
decorative glass vase
cg_studio
$139

Panzer III - PzKpfw III - Ausf.G3d model
....3ds .c4d .lwo .obj - panzer iii - pzkpfw iii - ausf.g 3d model, royalty free license available, instant download after purchase.
cg_studio
$139
StuG III - Sturmgeschutz III - Ausf.D3d model
....c4d .lwo .obj - stug iii - sturmgeschutz iii - ausf.d 3d model, royalty free license available, instant download after purchase.
3ddd
free

Velashape III
... syneron , candela
velashape iii — аппарат для лечения целлюлита
3d_ocean
$8
Inoplanet III
...inoplanet iii
3docean
3ds arman3dg games inoplanet low max poly trees
inoplanet iii
design_connected
$16

Richard III
...richard iii
designconnected
baleri italia richard iii armchairs computer generated 3d model. designed by philippe starck.
3d_export
$199

cinderella iii
...cinderella iii
3dexport
3d_export
$119

lara iii
...lara iii
3dexport
3ddd
$1

Towel Collection III
...towel collection iii
3ddd
полотенце
towel collection iii
Hotend
thingiverse
free
hotend by fablab_lueneburg
...hotend by fablab_lueneburg
thingiverse
hotend model
thingiverse
free
Hotend for Graber
...hotend for graber
thingiverse
hotend complement pastes for graber printerhttps://youtu.be/0koxhnsuhdy
thingiverse
free
Hotend adapter by antaviana
...hotend adapter by antaviana
thingiverse
hotend adapter
thingiverse
free
hotend fan by mming1106
...hotend fan by mming1106
thingiverse
hotend fan
thingiverse
free

Hotend schema by ione
...hotend schema by ione
thingiverse
hotend project schema
thingiverse
free
Fabtotum XY Hotend holder for E3D Hotend
...s with integrated supports.
more for the project you can see here: https://kf-designs.com/2019/09/07/fabtotum-printer-conversion/
thingiverse
free
HotEnd Stand by onepointdiy
...tend, when you make your new hotend or repair your j-head or mg-plus hotend.
the hole of 16mm, please adjust using a reamer, etc.
thingiverse
free

fast magnetic hotend changer for Chimera Hotend by Draman
...chimera hotend !
and new basis (the hole from original is to small)
it is a remix form skimmy's fast magnetic hotend changer
thingiverse
free

Hotend Fan Adapter for MicroSwiss All Metal Hotend by jo_schi_man
...
thingiverse
little change for the hotend fan adapter to hold the microswiss all metal hotend (slightly longer and sharp edges).
thingiverse
free
Merlin Hotend by Alejanson
...merlin hotend by alejanson
thingiverse
this is a 1:1 drawing of the classic merlin hotend.
Delta
design_connected
$16

Delta
...delta
designconnected
lj lamps delta computer generated 3d model. designed by janowski-lenhart, sasha.
design_connected
$16

Delta
...delta
designconnected
arflex international spa delta computer generated 3d model. designed by koivisto, eero.
design_connected
$13

Delta
...delta
designconnected
emu group delta armchairs computer generated 3d model. designed by marin chiaramonte .
3ddd
$1

Delta Light
...delta light
3ddd
delta light , you-turn reo 3033
точечний светильник delta light
3ddd
$1
Blanco / delta
...blanco / delta
3ddd
blanco , мойка
мойка blanco delta со смесителем
3ddd
$1
Delta Light Spot
...delta light spot
3ddd
delta light
светильник фирмы delta light
3ddd
free

Bianchi Delta LVMDLT200100
...i delta lvmdlt200100
3ddd
bianchi delta , смеситель
смеситель bianchi delta lvmdlt200100
design_connected
free

Delta 190
...delta 190
designconnected
free 3d model of delta 190 by zanotta designed by progetti, emaf.
design_connected
$27

Delta 211
...delta 211
designconnected
zanotta delta 211 computer generated 3d model. designed by progetti, emaf.
design_connected
$27

Delta 234
...delta 234
designconnected
zanotta delta 234 computer generated 3d model. designed by progetti, emaf.
E3D
cg_studio
free

e3d model
...e3d model
cgstudio
- e 3d model, royalty free license available, instant download after purchase.
turbosquid
$2

Syringe C4D (E3D Ready)
...lty free 3d model syringe c4d (e3d ready) for download as c4d on turbosquid: 3d models for games, architecture, videos. (1336720)
turbosquid
$12

Microphone USB E3D and C4D
...ree 3d model microphone usb e3d & c4d for download as c4d on turbosquid: 3d models for games, architecture, videos. (1568216)
cg_studio
$35

Picture Frame Style E3d model
...
cgstudio
.3ds .max .obj .wrl - picture frame style e 3d model, royalty free license available, instant download after purchase.
cg_studio
$10

EVE from cartoon WALL-E3d model
...3d model
cgstudio
.3ds .max - eve from cartoon wall-e 3d model, royalty free license available, instant download after purchase.
cg_studio
$45

WW2 Pz VI Tiger SdKfz 181 Ausf. E3d model
....lwo .ma .max .obj - ww2 pz vi tiger sdkfz 181 ausf. e 3d model, royalty free license available, instant download after purchase.
3d_ocean
$6

Love Heart Element 3D & Cinema4D
...red heart romance valentines simple project simple heart models e3d files, cinema 4d files & obj files step 1...
3d_export
$14

Xiaomi mi band 6
...360. materials for rendering are configured in keyshot, v-ray, e3d blender. the keyshot has 6 strap colors configured. there...
3d_export
$20

apple airpods 3
...max vray, keyshot, e3d. - formats: 3dm, aep, bip, e3d f3d, iges, ksp, max 2013, max 2016, obj, fbx,...
3d_export
$20

Samsung galaxy tab s8 ultra
...blue, beige, white, black, graphite. - in blender and e3d one color of the model is configured, graphite. -...
V6
3d_export
$100

v6 engine
...engine
3dexport
complete v6 engine modeled on solidworks 2017 along with .stl, .sldprt and .sldasm of all th parts and assembly.
3d_export
$10

V6 engine
... the first v6 engines were designed and produced independently by marmon motor car company, deutz gasmotoren fabrik and delahaye.
3d_export
$35

v6 engine
...s a complete model of a v6 engine containing over 400 components. you can contact me for a video of all the components assembling
3d_export
$10

v6 engine
...v6 engine
3dexport
turbosquid
$25

Bed1001-v6
... available on turbo squid, the world's leading provider of digital 3d models for visualization, films, television, and games.
turbosquid
$22

Chair2-v6
... available on turbo squid, the world's leading provider of digital 3d models for visualization, films, television, and games.
turbosquid
$20

V6.mb
... available on turbo squid, the world's leading provider of digital 3d models for visualization, films, television, and games.
3d_export
$20

V6 engine
...rovided in this package is all the parts in sldprt format and assembly in sldasm format. i can also convert the format on demand.
3ddd
$1

Стол V6
...6" в стиле дизельпанк изготовлен из блока двигателя, 4х поршней и 4х шатунов.
столешница изготовлена из стекла толщиной 8мм.
cg_studio
$199

V6 VVTi3d model
...v6 vvti3d model
cgstudio
.3ds - v6 vvti 3d model, royalty free license available, instant download after purchase.
Magnetic
3d_ocean
$2

Magnet
...magnet 3docean 3d 3ds max electric magnet magnetic magnetism max model polygon realistic tesla magnet created in...
turbosquid
$6
Magnet
...
turbosquid
royalty free 3d model magnet for download as obj on turbosquid: 3d models for games, architecture, videos. (1548733)
turbosquid
$6

magnet
...uid
royalty free 3d model magnet for download as 3dm and max on turbosquid: 3d models for games, architecture, videos. (1670606)
turbosquid
$1

Magnet
...y free 3d model magnet for download as 3ds, max, obj, and fbx on turbosquid: 3d models for games, architecture, videos. (1215037)
turbosquid
$7

Magnet
...agnet for download as blend, unitypackage, fbx, gltf, and obj on turbosquid: 3d models for games, architecture, videos. (1576588)
3d_export
$5

magnetic knife holder
...magnetic knife holder
3dexport
ordinary magnetic knife holder
archive3d
free

Fridge magnet 3D Model
...3d model archive3d refrigerator magnet fridge magnet magnet toy magnetic s n280712 - 3d model (*.3ds) for interior 3d...
turbosquid
$35

Magnetic butterflies
...alty free 3d model magnetic butterflies for download as blend on turbosquid: 3d models for games, architecture, videos. (1315792)
turbosquid
$2
Magnetic Board
...quid
royalty free 3d model magnetic board for download as ma on turbosquid: 3d models for games, architecture, videos. (1264141)
turbosquid
$977
Magnetic Lego
...oyalty free 3d model magnetic lego for download as ma and obj on turbosquid: 3d models for games, architecture, videos. (1142761)
Z
3d_export
$5

nissan z
...nissan z
3dexport
nissan z
3ddd
$1

Vase Z
...vase z
3ddd
vase z
3ddd
$1

полотенцесушить Z
...полотенцесушить z
3ddd
полотенцесушитель
полотенцесушить z
design_connected
free

Z-Chair
...z-chair
designconnected
free 3d model of z-chair designed by karman, aleksei.
design_connected
$11

Z Lamp
...z lamp
designconnected
phillips z lamp computer generated 3d model. designed by kalff, louis.
3d_export
$5

Dragon balls z
...dragon balls z
3dexport
dragon ball z
turbosquid
$20

Fighter Z
...
turbosquid
royalty free 3d model fighter z for download as on turbosquid: 3d models for games, architecture, videos. (1292563)
turbosquid
$9

Pen Z
...pen z
turbosquid
free 3d model pen z for download as obj on turbosquid: 3d models for games, architecture, videos. (1686775)
turbosquid
free

z chair
...z chair
turbosquid
free 3d model z chair for download as max on turbosquid: 3d models for games, architecture, videos. (1410230)
turbosquid
$5

Letter Z
...urbosquid
royalty free 3d model letter z for download as max on turbosquid: 3d models for games, architecture, videos. (1408540)