Thingiverse
Mini Mustang 3D by BryanHaley
by Thingiverse
Last crawled date: 3 years ago
https://www.youtube.com/watch?v=z6AjeQHcghg
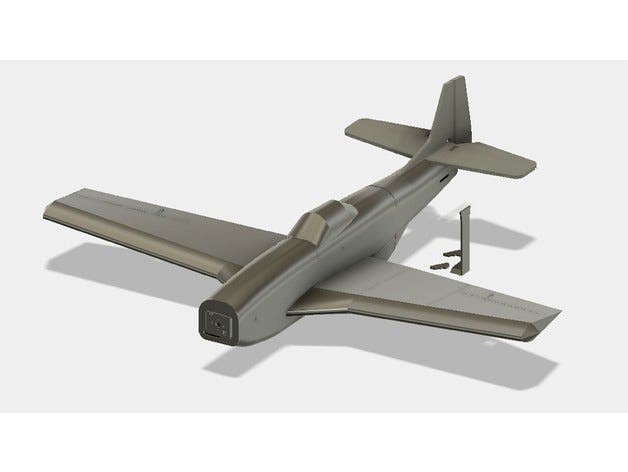
Note: This is pretty much just an experiment. At the time of writing this, I have not yet maiden'd this plane, though I will soon. It's got a roughly 1:1 thrust to weight ratio (with two 3S 850mAh batteries and an added 2 ounces to the nose for balance) and it balances, so it'll -probably- fly, but no guarantees. Dimensions are similar to the foam board FT Mini Mustang. The first version of this design was built directly from the foam board plans, but that came out ridiculously heavy. Version 2 here is completely my own design (apart from using some P-51D blueprints for reference), but obviously the design is inspired from the FT Mini Mustang.
All that said, if you just want something to fly and don't really care for the novelty of a 3D printed aircraft, just get the FT Mini Mustang speed build kit and call it a day. This will take more time and effort and offers few advantages.
This design has a lot of mistakes. It's the first plane I've ever built in a CAD program and is definitely the most complex thing I've ever built in CAD, and I learned a lot from doing it, but if I were to start over now I would've designed it better and spent less time on the design. However, since like I said this offers little advantage over its foamie sister design, I will likely not invest time into a version three - I'd rather design aircraft that would be more difficult to build with foam, and doesn't already have FT plans (some WW2 Japanese aircraft come to mind). I have uploaded the Fusion 360 save file if you wish to take a look.
This was designed with the FT Power Pack F in mind, but you could (and probably should) fit a beefier system in it. The fuselage is much more spacious than the FT Mini Mustang, and with the Power Pack F it needs added weight to the nose to balance anyway, so getting a bigger more powerful motor and a bigger battery instead just makes sense. With how heavy it is, the extra power would be put to good use. I will, however, maiden it with the Power Pack F as I consider that the "baseline" of power it should have.
Warning: I didn't take the time to orient each piece into its ideal printing position, sorry. It should be fairly obvious which way they're intended to be printed, though. Generally fuselage pieces are printed nose down, no support (use 15% infill for the Fore Fuselage piece, and 5% for all others); tail pieces are printed flat, 10% infill; wing pieces are printed with their leading edge on the build plate, using "touching buildplate" supports. After printing, remove the support scaffolding that is included in the design (the length-wise supports in the fuselage; leave the horizontal struts).
Similar models
grabcad
free

FT Mini Mustang Motor Mount
... mustang. i wanted something lower profile then the foam motor mount in the plans to allow a battery further forward in the nose.
thingiverse
free

FT Edge 540 Firewall Motor Mount Power Pod
...nted with a lot of holding power to the fuselage.
you should print as laid out so that the printing makes the motor mount strong.
thingiverse
free

Bix3 Nose by Nevilos
...2200mah 3s battery.
this nose can take a lot of crashes. my first fuselage would end up more broken than this taking a scratch.
thingiverse
free

Wing spar support for Talon Pro mini talon by epquilloy
...ment from the wing spar by having more surface are in contact. apply glue to mount to the fuselage.
note: print 2 pieces of this.
cults
free

Attack on Titan - Bobblehead
...time to print. however, he just didn't seem complete without something to peer over;) the wall measures 206.29, 46.97, 164.5.
thingiverse
free

FT Bloody Baron "power pod" by Bisbonian
... some support to hold the battery, which is held in place by a strap.
this could use some polishing but i'm satisfied as-is.
thingiverse
free

Oculus Quest 2 Lens Cover/Protector with Nose Cover by loloman19
...hout added supports and you just have to remove the little integrated support.
both pieces are just glued to the original design.
thingiverse
free

Attack on Titan - Bobblehead by Mag-net
...me to print. however, he just didn't seem complete without something to peer over;) the wall measures 206.29, 46.97, 164.5.
thingiverse
free

EZ Print Spudger by CorpseShoulder
...quire any supports. i've made a few dozen of them now and i've found i prefer this design to the standard black variety.
thingiverse
free

Freewing F8 Crusader nose by JGplanes
...
i hope someone else finds this useful. you can check out my youtube channel with videos of the f-8 as well as other projects.
jg
Bryanhaley
thingiverse
free

FT Swappable Firewall by BryanHaley
...://www.flitetest.com/articles/ft-swappable-power-pod-kit
choose 1.5mm or 1.6mm depending on the diameter of your printing nozzle.
thingiverse
free

Simplified Demon Girl Bust by BryanHaley
...fixes the non-manifold mesh, a mesh error in each ear, and reduces the number of triangles by about 75% without any quality loss.
thingiverse
free

diiybo (Amiibo Tag Holder) by BryanHaley
... to carry it along with your switch or 3ds, and use your phone with tagmo to change diiybo into any amiibo you require on-the-go.
thingiverse
free

C.H.I.P. Case by BryanHaley
...nt the case to be held together more securely. either use a long enough wood screw, or glue a washer to the top half of the case.
thingiverse
free

Brawler64 GameCube Stick Adapter by BryanHaley
...vertical axis to fine tune how far up you want the stick to protrude; third party vs oem stick caps vary slightly in that regard.
thingiverse
free

Solar Charger Backpack Mount by BryanHaley
...-battery-charger-power-bank-for-cell-phone-/141803317477?hash=item210422e8e5:g:i74aaoswa4dwijj-
you will also need four zip ties.
thingiverse
free

Swivel Latch/Clamp by BryanHaley
.... it is what's shown in the first photo.
if necessary, glue a bit of sandpaper to the finger to give it a little extra grip.
thingiverse
free

Never Lube Jandy Valve Replacement Handle by BryanHaley
...t it is not a 1:1 copy; i designed it to be easy to print. the handle has clearance in my application, but your mileage may vary.
thingiverse
free

Rolling Tray for Cigarette / Cigar / Joint / Etc by BryanHaley
...acking tool/box holders have been made wider, and the cigarette holders have been made longer in the final version uploaded here.
thingiverse
free

COOKIE CAT Cookie Cutter DELUXE by BryanHaley
...ncluded the obj file in case anyone wants to easily adjust the proportions (e.g. make the eyes bigger, change the supports, etc.)
Mustang
3d_export
$20

mustang 1967
...mustang 1967
3dexport
mustang 1967
3d_export
$20

mustang 1971
...mustang 1971
3dexport
mustang 1971
3d_export
$20

mustang 1968
...mustang 1968
3dexport
mustang 1968
3d_export
$20

mustang 1965
...mustang 1965
3dexport
mustang 1965
3d_export
$5

Mustang 1968
...mustang 1968
3dexport
mustang 1968 lowpoly
3ddd
$1

Zapatillas mustang
...zapatillas mustang
3ddd
обувь
zapatillas clasicas mustang
turbosquid
$35

Mustang
... available on turbo squid, the world's leading provider of digital 3d models for visualization, films, television, and games.
turbosquid
$35

mustang
... available on turbo squid, the world's leading provider of digital 3d models for visualization, films, television, and games.
turbosquid
$30

Mustang
... available on turbo squid, the world's leading provider of digital 3d models for visualization, films, television, and games.
3d_ocean
$69

Ford Mustang
...n
car ford mustang speed wheel
ford mustang high poly with details and materials used materials are included /.3ds/.obj/.fbx/.skp
Mini
turbosquid
$10

Mini Mini Luceplan
...
royalty free 3d model mini mini luceplan for download as max on turbosquid: 3d models for games, architecture, videos. (1227359)
3d_ocean
$39

Mini Cooper
...mini cooper
3docean
cabrioler cooper mini
mini cooper cabrioler
3d_export
$30

Mini lathe
...mini lathe
3dexport
mini lathe
3d_export
$5

mini mouse
...mini mouse
3dexport
mini mouse
3d_export
$5

mini house
...mini house
3dexport
mini house
3d_export
free

Mini Mecha
...mini mecha
3dexport
concept of mini mecha
3d_ocean
$20

Mini Gun
...mini gun
3docean
gatling gun gun machine gun mini gun weapon
model of a mini gatling gun.
3ddd
free

Herve mini
... кофейный , herve
http://www.mobiliavenanti.it/ru/products/hervè-mini
3d_export
$5

mini wall
...mini wall
3dexport
mini wall for living room
3d_export
$5

mini bank
...mini bank
3dexport
mini bank 3d model