Thingiverse
Mini-ITX Case Layer for HP 251-a123w by Hidyman
by Thingiverse
Last crawled date: 3 years ago
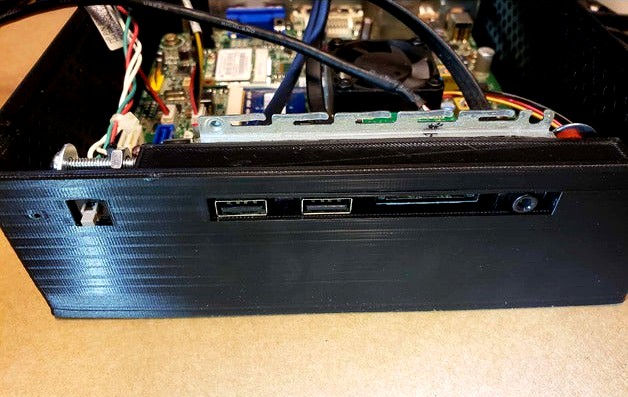
This layer will allow you to disassemble the old case and reuse the Power switch, Power LED, Front Audio Jack/USB/Card Reader unit as well as the backplate.
The Power Switch is retained via a screw/washer/nut slotted into the top of the mount. Do not over tighten. The Power LED fits into the small cavity beside the switch, it does not go all the way through and should be secured by hot glue or some other removable adhesive, the LED should shine through most lighter colors, if you are using a dark color you could create a pinhole for the light to pass through.
The Front Panel Audio Jack/USB/Card Reader unit is retained by #6 x 3/4" screws. I had to drill out the hole in the flange to 5/32" to fit the screw. For the tabbed side I just used a washer to catch the side of the tab. Depending on what layer you add next you may need to bend the top of the flange on the unit down 90 degrees to clear the layer above.
I am designing a second layer to house the DVD drive, the 92mm chassis fan, and the wireless antenna. It will take the flange into account
I was able to get this to bridge the gap for the USB/Headphone/Card Reader opening on my CR6-SE using PLA. The bridge lengths are 90mm and 100mm, you may need supports.
I also had to put in one of the Motherboard mounting screws, then push the board around to get the other screws to line up.
Just for aesthetics I used a sharpie to black out the front of the metal bracket.
Thanks to lightofhonor for this great modular case design.
Todo:
1) Create second layer to hold DVD, Fan, and wireless antenna.
2) Make a button cap for the power switch.
Similar models
grabcad
free

PC case template
...audio jack and sd card reader front plugs
general pc hardware tutorial for sketchup : http://www.youtube.com/watch?v=gnjv1fzfzww
cg_trader
free

PC case template
...pc hardware tutorial for sketchup : http://www.youtube.com/watch?v=gnjv1fzfzww pc case template computer body pc case electronics
grabcad
free

BoxxBSWorkstation
...luray), power switches,microphone and audio in/out jacks,550 w power supply, the materials of case are anonized metal, aluminium.
3dwarehouse
free

DeskConsol for PC Power Switch & SD Card Reader
...on on the desk with ext-usb & sd card reader - case pc 외부스위치, ᅟusb허브, sd card reader 를 포함하는 간이 데스크 콘솔 with casᅟ logo.
thingiverse
free

Anet A8 case for USB card reader and SD card :) by PgSerbia
...my usb sd card reader and i am design that case and put on the frame of my 3d printer put one big like if you are realy like this
thingiverse
free

Rfid card reader Case by ISHAVEYOU
...aspberry pi to the case. this was for my matura project. there is a place where you can put you power bank to power this project.
thingiverse
free

Anycubic I3 Mega SD USB Card Reader Holder by Reyes13
....
i hope you can find it useful, if you want to add something, i can share the design or i can improve it by making new versions.
thingiverse
free

Flashforge Creator SD Card Slot Guide by youkai
...in place, but they're too small. fortunately, it is wide enough that it fits snugly into the slot without slipping back out.
thingiverse
free

Case for UGREEN USB 3.0 SD-Card Reader by PROPELLA
...case for ugreen usb 3.0 sd-card reader by propella
thingiverse
case for ugreen usb 3.0 sd-card reader (15 bucks on amazon)
grabcad
free

Multi Reader Blackboard
...
msd resder
mag stripe reader
network jack - wired network connectivity (rj45)
contactless rfid cards
antenna
camera
headphone
Itx
3d_export
$56

teenage engineering computer 1 mini itx pc chassis
... get the best results in blender. no extra plugins are required for this model. lights and cameras are not included in the scene.
cg_studio
$9

Mini Computer3d model
...hardware harddisk desktop peripheral component leopard tiger snow small mini-itx pc design .3ds .xsi .obj .max .ma .lxo .lwo...
3d_export
$9

Mini Computer 3D Model
...hardware harddisk desktop peripheral component leopard tiger snow small mini-itx pc design maya supply 3ds max mini computer 3d...
thingiverse
free

ITX by irr1449
...itx by irr1449
thingiverse
itx case
thingiverse
free

Mini-ITX to Nano ITX adapter
...mini-itx to nano itx adapter
thingiverse
this is an adapter to put a nanoitx board in a miniitx case.
3dfindit
free

PICO-ITX
...pico-itx
3dfind.it
catalog: winsystems
3dfindit
free

NANO-ITX
...nano-itx
3dfind.it
catalog: winsystems
thingiverse
free

ITX computer case by hlmjjj1994
...itx computer case by hlmjjj1994
thingiverse
for itx mb only
thingiverse
free

Xbox-ITX
...originally went, mount the mini-itx motherboard on the original xbox mounting holes, and use the original power hole on the case.
thingiverse
free

thin ITX model by Goatee
...thin itx model by goatee
thingiverse
thin itx boards rough model
251
turbosquid
$69

Sd.Kfz.251
...bosquid
royalty free 3d model sd.kfz.251 for download as max on turbosquid: 3d models for games, architecture, videos. (1261368)
turbosquid
$39

SDKFZ 251
...
royalty free 3d model sdkfz 251 for download as fbx and obj on turbosquid: 3d models for games, architecture, videos. (1540240)
turbosquid
$1

Male 251, scan
...can
turbosquid
royalty free 3d model 251 for download as obj on turbosquid: 3d models for games, architecture, videos. (1242261)
turbosquid
$129

Sd.Kfz.251/22
...quid
royalty free 3d model sd.kfz.251/22 for download as max on turbosquid: 3d models for games, architecture, videos. (1256093)
turbosquid
$120

Halftrack SdKfz 251
... available on turbo squid, the world's leading provider of digital 3d models for visualization, films, television, and games.
3d_export
$55

Condo 251 3D Model
...iture accessories complete full detailed photorealistic textures materials render ready
condo 251 3d model barmoon 42745 3dexport
3d_export
$155

Building 251 3D Model
...terior resort hotel bank office center university college campus street landscape
building 251 3d model rosestudio 54442 3dexport
3d_export
$60

Architecture 251 3D Model
...lege campus max street landscape commercial building medical hospital offices
architecture 251 3d model lotusmodel 47909 3dexport
3d_export
$30

Villa 251 3D Model
...st suburban architecture building residential suburbs two story vinyl siding house set
villa 251 3d model freebird 49511 3dexport
turbosquid
$59

Sd.Kfz.251-16 Ausf.D Flammpanzerwagen
...-16 ausf.d flammpanzerwagen for download as max, obj, and fbx on turbosquid: 3d models for games, architecture, videos. (1340082)
Hp
3ddd
$1

HP Tablet
...hp tablet
3ddd
hp , планшет
планшет hp
3ddd
$1

Frag Evia HP
...rag , evia hp , titta paoloni
стул frag evia hp
turbosquid
$5

Wardrobe HP
...y free 3d model wardrobe hp for download as max, fbx, and obj on turbosquid: 3d models for games, architecture, videos. (1661127)
3ddd
$1
elica Iconic HP
...dd
elica , iconic , вытяжка
new elica iconic hp
turbosquid
$30

HP laptop
...ree 3d model hp laptop for download as max, obj, fbx, and dwg on turbosquid: 3d models for games, architecture, videos. (1299586)
3ddd
free

hp laserjet 1010
...hp laserjet 1010
3ddd
принтер , hp
мой старый добрый сломавшийся лазерный принтер:)
turbosquid
$99

HP M475dn
... available on turbo squid, the world's leading provider of digital 3d models for visualization, films, television, and games.
turbosquid
$79

HP M1213nf
... available on turbo squid, the world's leading provider of digital 3d models for visualization, films, television, and games.
turbosquid
$79

HP M276n
... available on turbo squid, the world's leading provider of digital 3d models for visualization, films, television, and games.
turbosquid
$50

hp pavilion
... available on turbo squid, the world's leading provider of digital 3d models for visualization, films, television, and games.
Mini
turbosquid
$10

Mini Mini Luceplan
...
royalty free 3d model mini mini luceplan for download as max on turbosquid: 3d models for games, architecture, videos. (1227359)
3d_ocean
$39

Mini Cooper
...mini cooper
3docean
cabrioler cooper mini
mini cooper cabrioler
3d_export
$30

Mini lathe
...mini lathe
3dexport
mini lathe
3d_export
$5

mini mouse
...mini mouse
3dexport
mini mouse
3d_export
$5

mini house
...mini house
3dexport
mini house
3d_export
free

Mini Mecha
...mini mecha
3dexport
concept of mini mecha
3d_ocean
$20

Mini Gun
...mini gun
3docean
gatling gun gun machine gun mini gun weapon
model of a mini gatling gun.
3ddd
free

Herve mini
... кофейный , herve
http://www.mobiliavenanti.it/ru/products/hervè-mini
3d_export
$5

mini wall
...mini wall
3dexport
mini wall for living room
3d_export
$5

mini bank
...mini bank
3dexport
mini bank 3d model
Layer
design_connected
$9

Layer
...layer
designconnected
gallotti & radice layer tables computer generated 3d model. designed by luca nichetto.
3ddd
$1

Calligaris LAYERS
...calligaris layers
3ddd
calligaris , layers
стол фабрики calligaris модель layers
3ddd
$1

Eglo Layer
...eglo layer
3ddd
eglo , layer
люстра eglo layer (89593) h=1100 l=655
3d_export
$5

pipe layer
...pipe layer
3dexport
3d_export
$25

mandala layer
... modelled in cinema 4d r23 hope you like it! also check out my other models, just click on my username to see a complete gallery.
turbosquid
$29

cloth layers
... 3d model cloth layers for download as 3ds, obj, c4d, and fbx on turbosquid: 3d models for games, architecture, videos. (1441919)
turbosquid
$29

Layer desk
... available on turbo squid, the world's leading provider of digital 3d models for visualization, films, television, and games.
3d_export
$65

layered traffic
...layered traffic
3dexport
simple rendering of the scene file
turbosquid
$400

testis with covering layers
...ee 3d model testis with covering layers for download as blend on turbosquid: 3d models for games, architecture, videos. (1431659)
turbosquid
$210

Thoracic wall layers
...alty free 3d model thoracic wall layers for download as blend on turbosquid: 3d models for games, architecture, videos. (1674521)
Case
3d_export
$1

case
...case
3dexport
case
archibase_planet
free

Case
...case
archibase planet
showcase show-case glass case
glass-case + cakes - 3d model for interior 3d visualization.
archibase_planet
free

Case
...case
archibase planet
showcase show-case glass case
glass-case for chips - 3d model for interior 3d visualization.
archibase_planet
free

Case
...case
archibase planet
case shelving drawer
case - 3d model for interior 3d visualization.
archibase_planet
free

Case
...case
archibase planet
case rack locker
case - 3d model for interior 3d visualization.
archibase_planet
free

Case
...case
archibase planet
case drawer kitchen furniture
case - 3d model for interior 3d visualization.
archibase_planet
free

Case
...case
archibase planet
case cupboard shelving
glass case - 3d model for interior 3d visualization.
archibase_planet
free

Case
...case
archibase planet
case handbag suitcase
case - 3d model (*.gsm+*.3ds) for interior 3d visualization.
archibase_planet
free

Case
...case
archibase planet
case suitcase
case 5 - 3d model (*.gsm+*.3ds) for interior 3d visualization.
archibase_planet
free

Case
...case
archibase planet
locker case dresser
case - 3d model (*.gsm+*.3ds) for interior 3d visualization.