Thingiverse
Mini FPV Tank by kevinchen1992
by Thingiverse
Last crawled date: 3 years ago
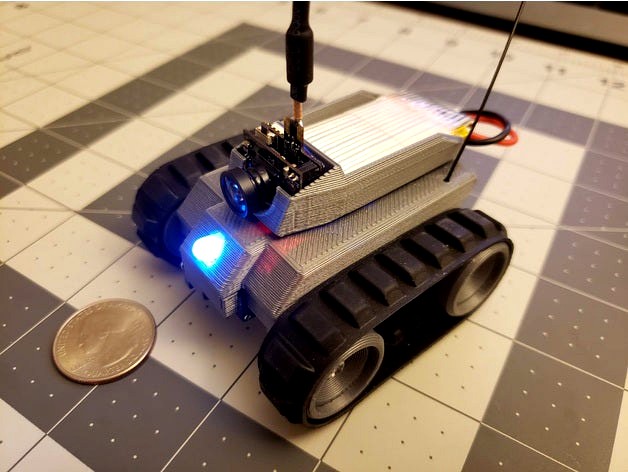
This is small fpv tank, inspired by https://www.thingiverse.com/thing:2896083 and https://www.thingiverse.com/thing:3013262. I created this mainly to practice at fusion 360.
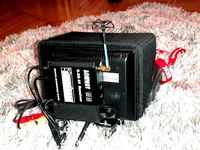
The tank uses lego x939 treads, 9g servos, a 4ch frsky receiver, and a typical small all-in-one fpv camera. It's powered by a 600mah 1s lipo stepped up to 6v with a boost converter. There is also an arduino pro mini that reads in the receiver signals and controls the servos. While not entirely necessary since you can directly hook up the receiver and servos, it does let me control an rgb led, add a deadzone to avoid servo jittering when idle (by just floating the pins), and monitor the battery voltage.
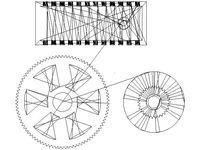
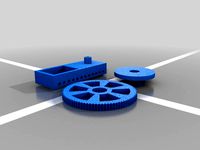
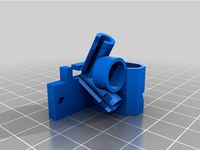
The drive wheels have cutouts for gluing in cut-down servo horns. The idler wheels attach to the chassis with ball bearings and M3 bolts. The body cover directly snaps on to the chassis, and the turret attaches to the body cover via M2 nylon bolts (or just superglue). The lipo battery stays in place with a friction fit.
Parts
• TG9e servos - https://hobbyking.com/en_us/turnigytm-tg9e-eco-micro-servo-1-5kg-0-10sec-9g.html (modified for continuous rotation)
• 4ch frsky receiver - https://www.banggood.com/2_4G-4CH-Mini-Frsky-D8-Compatible-Receiver-With-PWM-Output-p-1143300.html
• MT3608 boost converter - https://www.amazon.com/gp/product/B07RNBJK5F
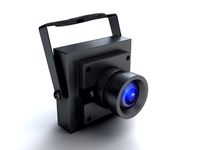
• FPV camera - https://www.amazon.com/gp/product/B07F62M5Z7
• Lego x939 treads
• Arduino Pro Mini
• RGB LED + resistors (I used two 100ohm and a 220ohm)
• M3x19mm bolts, M3 nuts
• 3x8x4mm ball bearings
• M2 nylon bolts
Software
https://github.com/kevinbchen/fpvtank/blob/main/fpvtank.ino
Wiring
Lipo (~3.7V) -> MT3608, FPV camera
MT3608 (5V) -> Arduino, Receiver, Servos
Arduino pins:
A0 <- Lipo voltage
D2, D3, D4, D7 <- Receiver Ch 1-4 PWM
D5, D6, D11 -> LED green, blue, red, respectively
D9 -> Left servo PWM
D10 -> Right servo PWM
Notes/learnings
• I initially designed the wheels with notches in the middle to match the treads. Unfortunately, I think the circumference and notch spacing were slightly off, causing the tracks to ride off the wheel eventually. Just having a smooth inner ring worked fine.
• The snap fit between the chassis and body cover is both very tight yet very fragile due to the print direction of the cantilever joints. Take care when attaching - I also use a screwdriver to pry them apart when needed.
• I ran into an issue where one servo randomly stuttered, but only in one direction. Unfortunately was not able to figure out why, and ended up just swapping the servo. One servo also moves a bit faster than the other.
The tank uses lego x939 treads, 9g servos, a 4ch frsky receiver, and a typical small all-in-one fpv camera. It's powered by a 600mah 1s lipo stepped up to 6v with a boost converter. There is also an arduino pro mini that reads in the receiver signals and controls the servos. While not entirely necessary since you can directly hook up the receiver and servos, it does let me control an rgb led, add a deadzone to avoid servo jittering when idle (by just floating the pins), and monitor the battery voltage.
The drive wheels have cutouts for gluing in cut-down servo horns. The idler wheels attach to the chassis with ball bearings and M3 bolts. The body cover directly snaps on to the chassis, and the turret attaches to the body cover via M2 nylon bolts (or just superglue). The lipo battery stays in place with a friction fit.
Parts
• TG9e servos - https://hobbyking.com/en_us/turnigytm-tg9e-eco-micro-servo-1-5kg-0-10sec-9g.html (modified for continuous rotation)
• 4ch frsky receiver - https://www.banggood.com/2_4G-4CH-Mini-Frsky-D8-Compatible-Receiver-With-PWM-Output-p-1143300.html
• MT3608 boost converter - https://www.amazon.com/gp/product/B07RNBJK5F
• FPV camera - https://www.amazon.com/gp/product/B07F62M5Z7
• Lego x939 treads
• Arduino Pro Mini
• RGB LED + resistors (I used two 100ohm and a 220ohm)
• M3x19mm bolts, M3 nuts
• 3x8x4mm ball bearings
• M2 nylon bolts
Software
https://github.com/kevinbchen/fpvtank/blob/main/fpvtank.ino
Wiring
Lipo (~3.7V) -> MT3608, FPV camera
MT3608 (5V) -> Arduino, Receiver, Servos
Arduino pins:
A0 <- Lipo voltage
D2, D3, D4, D7 <- Receiver Ch 1-4 PWM
D5, D6, D11 -> LED green, blue, red, respectively
D9 -> Left servo PWM
D10 -> Right servo PWM
Notes/learnings
• I initially designed the wheels with notches in the middle to match the treads. Unfortunately, I think the circumference and notch spacing were slightly off, causing the tracks to ride off the wheel eventually. Just having a smooth inner ring worked fine.
• The snap fit between the chassis and body cover is both very tight yet very fragile due to the print direction of the cantilever joints. Take care when attaching - I also use a screwdriver to pry them apart when needed.
• I ran into an issue where one servo randomly stuttered, but only in one direction. Unfortunately was not able to figure out why, and ended up just swapping the servo. One servo also moves a bit faster than the other.
Similar models
3dwarehouse
free

Mini Frsky D8 Compatible Receiver
...mini frsky d8 compatible receiver
3dwarehouse
a 2.4g 4ch mini frsky d8 compatible receiver with pwm output sold on banggood.com.
thingiverse
free

Yet another servo driven fpv tiny tank by Ultrawipf
...era was an eachine ef01 that is not available anymore but most other aio fpv cams should fit.
video: https://youtu.be/xojglxxabre
thingiverse
free

Tiny Servo Driven FPV RC Tank - Tiny Trak by RotorGator
...tch?v=c7dhlbpija4
see my other tiny traks here:https://www.thingiverse.com/thing:3464889https://www.thingiverse.com/thing:3481012
thingiverse
free

Tiny Trak - Print in Place Tread by BigOwnge
...tps://www.facebook.com/groups/181517579149618/
i have printed in pla and works great!
https://www.youtube.com/watch?v=snuvjmeu5ey
thingiverse
free

2.4G 8CH D8 Mini FrSky Compatible Receiver 20x20 adapter by bigvlad
...th pwm ppm sbus outputhttps://www.banggood.com/2_4g-8ch-d8-mini-frsky-compatibel-receiver-with-pwm-ppm-sbus-output-p-1140478.html
grabcad
free

FRSKY D8 Receiver
...frsky d8 receiver
grabcad
frsky 8ch pwm receiver
cults
free

Furious Mini RX FRSKY Adapter Receiver + Buzzer 9mm
...larm-beeper-with-cable-for-eachine-qx70-qx90-qx95-naze32-f3-diy-micro-brushed-fpv-racer-p-1100338.html ? p = ld020411878172015024
thingiverse
free

Arm for Arduino 3d printed modular tank chassis by konto89
...pper design http://www.thingiverse.com/thing:2415 .
mini 9g servos are used for the movements ( they are really cheap on ebay!).
thingiverse
free

Tamiya tank treads by alfonso82
...wheel to be attached to the servo that can get along with the tank treads and a frame for the other wheel that come with the kit.
cults
free

Adapter Receiver For Furious FPV-0121-S FRSKY + Buzzer 9mm
...larm-beeper-with-cable-for-eachine-qx70-qx90-qx95-naze32-f3-diy-micro-brushed-fpv-racer-p-1100338.html ? p = ld020411878172015024
Kevinchen1992
thingiverse
free

Protoman by kevinchen1992
...und that simplify3d struggled with slicing it properly (the model is made up of a lot of individual parts), but cura worked fine.
thingiverse
free

DPS5005 Power Supply Module Case by kevinchen1992
...rel connector (https://www.amazon.com/gp/product/b081v9p8bt/ref=ppx_yo_dt_b_asin_title_o02_s00?ie=utf8&psc=1)
4x m3x5mm bolts
Fpv
turbosquid
$1

FPV VTX Antenna
...e 3d model fpv vtx antenna for download as obj, fbx, and stl on turbosquid: 3d models for games, architecture, videos. (1230317)
3d_export
$9

Fpv logo 3D Model
...onogram vehicle part of auto transport 3d model logo emblem detailed high quality badge
fpv logo 3d model rmodeler 59628 3dexport
3d_export
$8
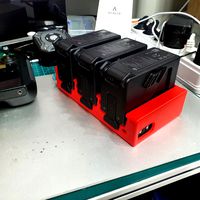
dji fpv battery slot holder
...er for 3 dji fpv batteries. holds perfectly without shaking. need 1 m3 countersunk head bolt. need to print 6 pin, 1 case, 1 cap.
3d_export
$10
fpv camera hd 700tvl
...aterials are logically named<br>the main format is in 3ds max 2009.<br>satisfcation garranteed..<br>thank you !
thingiverse
free
FpV Mount (SOPORTE FPV) by elborjas1987
...fpv mount (soporte fpv) by elborjas1987
thingiverse
this is a fpv mount with the same holes of naza base.
thingiverse
free
fpv by tbutera
...fpv by tbutera
thingiverse
fpv
thingiverse
free
fpv by tbutera
...fpv by tbutera
thingiverse
fpv
thingiverse
free
FPV DRONE ROOSTER DJI FPV PART
...fpv drone rooster dji fpv part
thingiverse
fpv drone rooster dji fpv install part
thingiverse
free
FPV monitor
...tml?rmmds=myorder&cur_warehouse=cn
link for download : https://cults3d.com/fr/mod%c3%a8le-3d/divers/fpv-monitor-ecran-fpv-faf
thingiverse
free
FPV receiver mount for FPV display by petrex
...eceiver mount for fpv display by petrex
thingiverse
aomway receiver mount for field view 777 fpv monitor. with small cable tray.
Tank
archibase_planet
free

Tank
...ibase planet
tank tank-wagon tank-truck tank-car
tank train small n110113 - 3d model (*.gsm+*.3ds) for exterior 3d visualization.
3d_ocean
$49
Tank
...tank
3docean
kv-1s tank
tank kv-1s
archibase_planet
free
Tank
...tank
archibase planet
tank medium tank
tank wmcvun n070712 - 3d model (*.3ds) for exterior 3d visualization.
archibase_planet
free
Tank
...k
archibase planet
tank light tank bt-2 high-speed tank
tank bt-2 n200814 - 3d model (*.gsm+*.3ds) for exterior 3d visualization.
3d_export
$5

tanks
...tanks
3dexport
tanks
3d_export
free
tank
...tank
3dexport
tank
archibase_planet
free
Tank
...tank
archibase planet
tank heavy tank
tank abrams l n090511 - 3d model (*.3ds) for exterior 3d visualization.
archibase_planet
free
Tank
...tank
archibase planet
tank medium tank
tank m60 n070712 - 3d model (*.gsm+*.3ds) for exterior 3d visualization.
archibase_planet
free

Tank
...tank
archibase planet
tank medium tank
tank female n070712 - 3d model (*.gsm+*.3ds) for exterior 3d visualization.
3d_export
$5
tank
...tank
3dexport
tank lowpoly
Mini
turbosquid
$10

Mini Mini Luceplan
...
royalty free 3d model mini mini luceplan for download as max on turbosquid: 3d models for games, architecture, videos. (1227359)
3d_ocean
$39

Mini Cooper
...mini cooper
3docean
cabrioler cooper mini
mini cooper cabrioler
3d_export
$30

Mini lathe
...mini lathe
3dexport
mini lathe
3d_export
$5

mini mouse
...mini mouse
3dexport
mini mouse
3d_export
$5

mini house
...mini house
3dexport
mini house
3d_export
free

Mini Mecha
...mini mecha
3dexport
concept of mini mecha
3d_ocean
$20

Mini Gun
...mini gun
3docean
gatling gun gun machine gun mini gun weapon
model of a mini gatling gun.
3ddd
free

Herve mini
... кофейный , herve
http://www.mobiliavenanti.it/ru/products/hervè-mini
3d_export
$5

mini wall
...mini wall
3dexport
mini wall for living room
3d_export
$5

mini bank
...mini bank
3dexport
mini bank 3d model