Thingiverse

Milwaukee M12 lantern/torch by ksuszka
by Thingiverse
Last crawled date: 3 years, 1 month ago
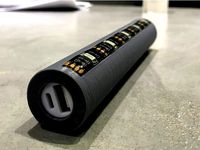
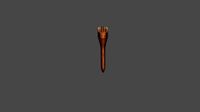
This is a lantern-type flashlight for Milwaukee M12 battery.
It is my first design made with Fusion 360, so the quality of it may be questionable, but if you want to use it, go ahead.
BOM
To assembly it, you will need:
3d printed base - a material with high heat resistance (like ABS/PETG) is recommended.
3d printed led strip holder - a material with high heat resistance (like ABS/PETG) is recommended.
3d printed shade - a transparent material with high heat resistance is needed. I used transparent PETG.
150cm of 12V, self adhesive, white LED strip
2 pieces of 6.3mm spade male connectors
1 piece of 21x15mm rocker on/off switch
35cm of wire
soldering iron
Printing instruction
Important note: Depending on the power of the LED strip you plan to use you may need to choose a material with high heat resistance for all parts.
Base
Print with the thread on the bottom. Support is required. Use pliers to remove support from the inside. Don't worry too much if it doesn't look nice, as the inside is not visible after the assembly. I used 25% infill with 1mm shell.
LED strip holder
Print with the wide ring on the bottom. No support is needed. This part is not visible.
Shade
Print from a transparent material (I used transparent PETG) with the thread on the top. I used 100% infill (it is only used in a small area near the thread). Some support may be used to achieve nice round edge.
Assembly instruction
Print all 3 parts (I've uploaded two versions of the shade, but only one is needed). Use pliers to remove the support from the base part.
Make sure that the shade can be screwed to the base. You may need to screw/unscrew it a few times to make sure that all excess material is removed.
Make sure that the M12 battery can be put/removed to/from the base.
Solder two 15cm wires to the one side of the LED strip.
Attach the LED strip to a 3d printed LED strip holder. Put both wires through a small hole on the bottom of the LED strip holder and start attaching the LED strip from the bottom in a spiral pattern (see photos). Wires should stick out from the inside of the cylinder. Use one of top grooves to hook the last part of the LED strip so it doesn't detach itself from the cylinder.
IMPORTANT: put one of already soldered wires through the switch hole in the base part (from the inside to the outside) and solder it to the first terminal of the rocker on/off switch. As wires are 15cm long, you should have a lot of freedom here. When you solder the switch, you basically connect it to the LED strip cylinder. The wire needs to be already reeved through the hole in the base.
Solder the 5cm wire to the second terminal of the rocker on/off switch.
Solder the first 6.3mm male spade connector to the other end of the 5cm wire.
Solder the second 6.3mm male spade connector to the second wire attached to the LED strip.
Put the rocker on/off switch into the base into its final position.
Check which spade connector is + and which is -.
Put spade connectors in their final position inside the base. Use pliers to push them through holes. Try not to bend them.
Insert the M12 battery into the base, turn on the switch and check if LED strip is working correctly.
Put the cylinder with the LED strip inside the base, put wires inside the cylinder.
Screw the shade to the base.
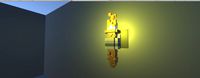
Congratulations, You should have a working lantern :)
Final note
M12 battery voltage goes from 12.6V to 8.4V. As there is no voltage/current regulation, the LED strip light is brighter on the fully charged battery and it gets dimmer when the battery discharges. But it still should give a lot of light.
To fix this, one could use 24V LED strip with DC-DC step-up converter. There should be plenty of space inside the LED strip holder to put such converter inside.
It is my first design made with Fusion 360, so the quality of it may be questionable, but if you want to use it, go ahead.
BOM
To assembly it, you will need:
3d printed base - a material with high heat resistance (like ABS/PETG) is recommended.
3d printed led strip holder - a material with high heat resistance (like ABS/PETG) is recommended.
3d printed shade - a transparent material with high heat resistance is needed. I used transparent PETG.
150cm of 12V, self adhesive, white LED strip
2 pieces of 6.3mm spade male connectors
1 piece of 21x15mm rocker on/off switch
35cm of wire
soldering iron
Printing instruction
Important note: Depending on the power of the LED strip you plan to use you may need to choose a material with high heat resistance for all parts.
Base
Print with the thread on the bottom. Support is required. Use pliers to remove support from the inside. Don't worry too much if it doesn't look nice, as the inside is not visible after the assembly. I used 25% infill with 1mm shell.
LED strip holder
Print with the wide ring on the bottom. No support is needed. This part is not visible.
Shade
Print from a transparent material (I used transparent PETG) with the thread on the top. I used 100% infill (it is only used in a small area near the thread). Some support may be used to achieve nice round edge.
Assembly instruction
Print all 3 parts (I've uploaded two versions of the shade, but only one is needed). Use pliers to remove the support from the base part.
Make sure that the shade can be screwed to the base. You may need to screw/unscrew it a few times to make sure that all excess material is removed.
Make sure that the M12 battery can be put/removed to/from the base.
Solder two 15cm wires to the one side of the LED strip.
Attach the LED strip to a 3d printed LED strip holder. Put both wires through a small hole on the bottom of the LED strip holder and start attaching the LED strip from the bottom in a spiral pattern (see photos). Wires should stick out from the inside of the cylinder. Use one of top grooves to hook the last part of the LED strip so it doesn't detach itself from the cylinder.
IMPORTANT: put one of already soldered wires through the switch hole in the base part (from the inside to the outside) and solder it to the first terminal of the rocker on/off switch. As wires are 15cm long, you should have a lot of freedom here. When you solder the switch, you basically connect it to the LED strip cylinder. The wire needs to be already reeved through the hole in the base.
Solder the 5cm wire to the second terminal of the rocker on/off switch.
Solder the first 6.3mm male spade connector to the other end of the 5cm wire.
Solder the second 6.3mm male spade connector to the second wire attached to the LED strip.
Put the rocker on/off switch into the base into its final position.
Check which spade connector is + and which is -.
Put spade connectors in their final position inside the base. Use pliers to push them through holes. Try not to bend them.
Insert the M12 battery into the base, turn on the switch and check if LED strip is working correctly.
Put the cylinder with the LED strip inside the base, put wires inside the cylinder.
Screw the shade to the base.
Congratulations, You should have a working lantern :)
Final note
M12 battery voltage goes from 12.6V to 8.4V. As there is no voltage/current regulation, the LED strip light is brighter on the fully charged battery and it gets dimmer when the battery discharges. But it still should give a lot of light.
To fix this, one could use 24V LED strip with DC-DC step-up converter. There should be plenty of space inside the LED strip holder to put such converter inside.
Similar models
thingiverse
free

TS100 Milwaukee M12 battery adapter case by Philtek
...als make connection to the battery. adjusting the locking tabs with hot air can provide for more positive engagement if required.
thingiverse
free

T12 Soldering Station for DEKO 18V battery by Rafix095
...dering station for deko 18v battery
you will need:
t12 soldering kit
2x blade wire connectors
some wire
some screws
rocker switch
thingiverse
free
Portable Ambient Light LED Powerbank by vmi
...te controller 5v
single 18650 diy powerbank
18650 li-ion battery
22mm switch
wire
soldering iron
glue
heat shrink tube
multimeter
thingiverse
free

LED, battery, switch clip-on light by kpaulsen
...just slide it onto the end of the z-axis arm, and switch it on. using a battery, there's no need to tap into any other wires.
grabcad
free

Connector 4PIN RGB strip
...know about the connector on my blog:
https://nerd-corner.com/printed-connector-as-soldering-aid-for-jumper-cables-and-led-strips/
grabcad
free

Connector 3PIN WS2812b - SK6812 strip
...know about the connector on my blog:
https://nerd-corner.com/printed-connector-as-soldering-aid-for-jumper-cables-and-led-strips/
thingiverse
free

Milwaukee M12 flashlight with adjustable head by ksuszka
...d it fits the thread perfectly. bear in mind that power of those bulb is greatly exaggerated, 9w bulb in reality draws around 3w.
thingiverse
free

Ikea RIBBA Led Frame by DasUbrot
...e, put on the back cover, put on your most beautiful cat picture in and close the picture frame with the metal clips on the side.
thingiverse
free

Cat in the ball by Greaser57
...t and the ball.
the model show use the coins cell base but it is harder to pass the wires and make a good contact with the coins.
thingiverse
free

Colorful light from IKEA Pyssla beads by ridercz
... at the moment, you can modify the base to fit the switch from bottom, if you wish. we are removing the batteries to turn it off.
Ksuszka
thingiverse
free

OpenSCAD terrain generation library by ksuszka
...
thingiverse
this is a simple openscad library for generating randomized terrain block.
source code is also available on github.
thingiverse
free

A model for a Neuron Cell (splitted) by ksuszka
...goes to him.
print all four parts and glue them together. a small amount of support is required for proper printing of dendrites.
thingiverse
free

Makita Guide Rail by ksuszka
... model in fusion 360.
note: this is not based on any official design papers. it was created from measuring the single guide rail.
thingiverse
free

Parametric drill stop by ksuszka
... it till the nut is in the position
gently unscrew the long screw leaving the nut in the place
put the washer and the final screw
thingiverse
free

Ikea/Pyssla/Perler bead bases by ksuszka
...izes you can change parameters at the begining of the script.
i printed it with abs so they are more durable when used with iron.
thingiverse
free

Vacuum Hose Pivoting Adapter by ksuszka
...ched openscad file and modify the part diameter by yourself.
acknowledgments
i used the excellent thread library by dan kirshner.
thingiverse
free

Makita Guide Rail Splinter Guard Cover by ksuszka
...after the print.
to fully protect your rail you will need:
1x rail guide left cap
1x rail guide right cap
2x splinter guard cover
thingiverse
free
Milwaukee M12 flashlight with adjustable head by ksuszka
...d it fits the thread perfectly. bear in mind that power of those bulb is greatly exaggerated, 9w bulb in reality draws around 3w.
thingiverse
free

Vacuum Hose Cuff Ridgid
...but keeps the nozzle tip diameter the 34.5mm print ksuszka#39;s "insert" and "cap" at 105%...
M12
turbosquid
$10

M12 Rifle
... available on turbo squid, the world's leading provider of digital 3d models for visualization, films, television, and games.
turbosquid
$2

Eye Nut M12
...yalty free 3d model eye nut m12 for download as sldpr and stl on turbosquid: 3d models for games, architecture, videos. (1677968)
3ddd
free

Шторы m12
...шторы m12
3ddd
рюши
polys: 79398
модель декора:http://3ddd.ru/3dmodels/show/vietochki_lozy
turbosquid
$12

Samsung Galaxy M12
...axy m12 for download as max, 3ds, dwg, fbx, obj, wrl, and dxf on turbosquid: 3d models for games, architecture, videos. (1693494)
turbosquid
$12

Samsung Galaxy M12
...axy m12 for download as max, 3ds, dwg, fbx, obj, dxf, and wrl on turbosquid: 3d models for games, architecture, videos. (1693498)
3d_export
$45

BMW Nazca M12 3D Model
...design nazca m12 european italy mental ray sport concept bmw model 3ds max 3d obj fbx
bmw nazca m12 3d model laguf 28424 3dexport
3ddd
$1

Полотенца m12
...олотенец:
500mm.x900mm.
340mm.x780mm.
цвет меняется картой tow_color, можно с рисунком.
дополнительное сглаживание по группам.
3d_export
$18

samsung galaxy m12
...e so that the exported files (.dae, .stl, .usdc, .obj and .fbx) is ok please tell me in private message if you have any problems.
3d_export
$8
shaft bearing
...shaft bearing 3dexport shaft bearing m10, m12m16, m20 and...
3d_export
$10

ring nuts din582
...nuts din582 3dexport din 582 ring nuts respectively : m8,m10,m12m16 m20 dimensions according to...
Milwaukee
3d_export
$49

Milwaukee Mitchell Airport 10km
...milwaukee mitchell airport 10km
3dexport
turbosquid
$30

Table lamp MILWAUKEE by Ferr
...ree 3d model table lamp milwaukee by ferr for download as max on turbosquid: 3d models for games, architecture, videos. (1247510)
turbosquid
$12

Milwaukee m28 cell holder
...y free 3d model milwaukee m28 cell holder for download as 3ds on turbosquid: 3d models for games, architecture, videos. (1237815)
turbosquid
free

milwaukee ep 2 electric locomotive
... model milwaukee ep 2 electric locomotive for download as obj on turbosquid: 3d models for games, architecture, videos. (1707833)
turbosquid
$1

hiawatha milwaukee class a steam locomotive
...aukee class a steam locomotive for download as , 3ds, and obj on turbosquid: 3d models for games, architecture, videos. (1713563)
3d_export
$199

milwaukee city wisconsin usa 50km
...der ready. 1. suitable for games, games, education, architecture etc. 2. mainly used for town and urban planning, real estate etc
3d_export
$7

Wrench 3D Model
...wrench 3d model 3dexport wrench makita torque milwaukee tool dewalt how to impact bosch gun adjustable right...
thingiverse
free

Milwaukee by
...milwaukee by
thingiverse
milwaukee
thingiverse
free

milwaukee batteriholder
...milwaukee batteriholder
thingiverse
batteriholder for milwaukee
easy to print
thingiverse
free

Milwaukee Makerspace by raster
...milwaukee makerspace by raster
thingiverse
a line rendition of the milwaukee makerspace logo.
Torch
3d_ocean
$16

Torch
...flashlight high poly model. day high poly torch light mag lite night lamp rays shine new torch torch
high detailed 3d torch model
design_connected
$13

Torch
...torch
designconnected
established & sons torch computer generated 3d model. designed by willenz, sylvain .
3ddd
$1
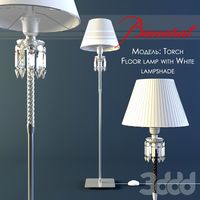
Baccarat - Torch
...- torch
3ddd
baccarat , torch
торшер фирмы baccarat, модель torch, текстуры прилагаются.
turbosquid
$10

Torch
...h
turbosquid
royalty free 3d model torch for download as max on turbosquid: 3d models for games, architecture, videos. (1364794)
turbosquid
$4
Torch
...h
turbosquid
royalty free 3d model torch for download as c4d on turbosquid: 3d models for games, architecture, videos. (1264168)
turbosquid
free

Torch
...urbosquid
free 3d model torch for download as , fbx, and obj on turbosquid: 3d models for games, architecture, videos. (1598202)
turbosquid
$5

torch
...quid
royalty free 3d model torch for download as max and stl on turbosquid: 3d models for games, architecture, videos. (1531004)
turbosquid
$1
Torch
...d
royalty free 3d model torch for download as , fbx, and obj on turbosquid: 3d models for games, architecture, videos. (1622961)
3d_export
free
torch
...torch
3dexport
turbosquid
$10
Torch
...
royalty free 3d model torch for download as ma, obj, and fbx on turbosquid: 3d models for games, architecture, videos. (1194449)
Lantern
3ddd
free

Lantern
...lantern
3ddd
lantern
потолочный светильник lantern
3d_export
$10

Lantern
...lantern
3dexport
modeling of lantern
3d_export
$5

lantern
...lantern
3dexport
eid lantern
3ddd
free

lantern
...lantern
3ddd
фонарь
lantern
3d_export
$5

lantern
...lantern
3dexport
model 3d lantern
3d_export
$5

lantern
...lantern
3dexport
modeling of lantern... rendered with vray.
3d_export
$1

lantern
...lantern
3dexport
low-poly lantern with little metal scratches
3d_ocean
$14

lantern
...ern
3docean
candle craft design detail fire glass high poly high poly model interior lantern old
high poly detailed lantern model
turbosquid
$1

Lantern
...rn
turbosquid
royalty free 3d model lantern for download as on turbosquid: 3d models for games, architecture, videos. (1684643)
3d_export
$5

ship lantern
...ship lantern
3dexport
ship lantern