Thingiverse
Milling Machine Ring Light For 85mm Quill's (Warco GH18) by Gazz292
by Thingiverse
Last crawled date: 3 years ago
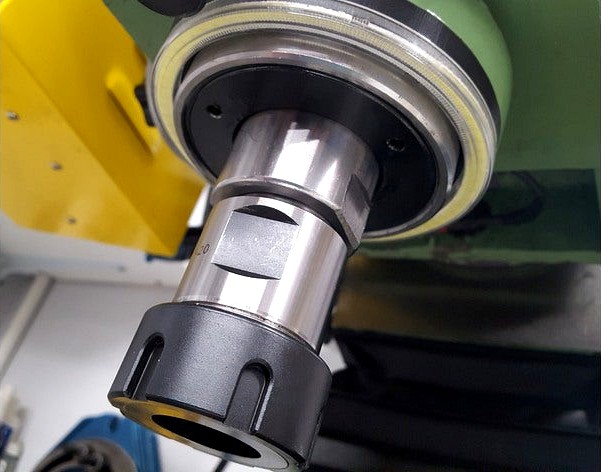
This is a mount to hold a 'ring light' on a milling machine with an 85mm quill.
The 'ring light' is a 100 mm "Angel Eye" LED ring, sold for about £8 on ebay... make sure you get a white one, and not one with that tacky blue tinge boy racers love.
I bought a single 100mm one of these :https://www.ebay.co.uk/itm/254587768837
The 100mm led ring has an 88mm hole in it, just right for an 85mm quill to pass through, and is 'secured' by 3 tabs on it's back that clip into this mount.
There's 2 parts, and 4 .stl files to choose from,
The main part is the "Mill Ring Light Mount" this fixes to the quill and allows the angel eye to just clip in place.
The "Converter Holder" is a clip that holds the little plastic 'jelly bean' that is half way along the angel eyes power cable, there's a buck/boost converter in it, as the angel eye is sold for fitting into car headlights, so has to handle 10 to 18 volts from a cars alternator (some are rated for 24 volts too) I chose to power it from a 1 amp 12 volt DC psu (aka wall wart, power brick) The led right pulls ~300 milliamps.
The ring light mounts:
There's 2 versions, The "Mill Ring Light Mount Bottom Screw.stl" has 2 vertical bolt holes, to allow you to drill and tap the cast iron quill ring, and use M3 x 16 allen bolts to fix it on (my photo shows an earlier version with 4 holes... but i only used 2 of them, as that's more than enough for this and less likely to interfere with the clamping part it's secured to)
The "Mill Ring Light Mount Side Screw.stl" has 3 horizontal M6x1 threads in it, this allows you to use M6 bolts, or ideally set screws, which allows the mount to grip the quill, thus no need to drill any holes in the mill parts.
Please not, that version is untested as i prefer to hard mount things, but i know not everyone wants to drill holes in their mill so i made this version.... it's the same dimensions as the one i've fitted, just the mounting holes are in different locations.
The 2 other parts are different holders for the 'jelly bean' converter box.
The "Mill Ring Light Converter Holder Warco GH18 Mount.stl" is for this particular mill (and other small gear head mills that this is a clone of... this is NOT an RF-45 clone, it's smaller than that, it's also known as the Prescription Matthews 727, Grizzly G0761 and so on)
There's a small angled 'wall' under the rear half of the mill head, and this holder allows you to just clip the jelly bean converter on that 'wall'
The GH18 mill has 75mm quill travel, and the cable length from the jelly bean to the led pcb is about 85mm, so this worked out just right, the jelly bean held horizontal also ensures the cable loops nicely and doesn't get caught on the clamp of the quill ring as you lower the quill.
The "Mill Ring Light Converter Holder Flat Mount.stl" has a flat mount that you can stick / drill and fit anywhere you want on your own mill.
You may have to extend the wire between the jelly bean and the led pcb tho, if you do, try to use silicone wire (as is used originally) as that stuff is extra flexible, just right for wires that will be moving up and down every time you move the quill position.
You can choose to just leave the jelly bean dangling if you wish, cable tie it to another wire on the mill or what ever works for you, you can see i used some of that finger trap cable braid stuff just to hide the pink and white wires.
I chose to feed the wire for the ring light up the cable conduit from the mill head to the switch / electrics box.
It's tight in that thar conduit, so i had to feed some stiff wire from the electrics box to the mill head, then i soldered the 2 wires from the jelly bean to the stiff wire (that i extended and fitted a plug and socket to earlier) and pulled it through.
The stock wire in that conduit is for the 'safety switch' on that clear cover guard thing that everyone removes, and the tapping auto reverse micro switches, so i had 2 free wires that used to be for the safety switch already between the mill head and electrics box i could have repurposed... dang you hindsight)
I then fitted a 1 amp 12 volt DC psu in the electrics box.... my mill is the 3 phase motor with inverter version (the latest WARCO GH18) so that big yellow box is stuffed full of nothing... just the switches on the front panel and the wires out the conduits at the back.
On the single phase motor models there's contactors and timers in there for the auto tapping function... if fitted.
I wired the 12 volt psu's mains connection to the main switch of the mill, this is after the main fuse so it's protected by that, and it means the ring light turns on and off with the main mill power button.
Similar models
thingiverse
free

Strip Light Bracket for Mini Mill by BobInOK
... of the switch box to the output of the wall wart. this eliminates extra wires and the lights come on when the mill is turned on.
thingiverse
free

Jelly Bean Switch on Loc-Line by OTandAT
.../2 to 3/4 loc-line adapter as the 3/4 loc-line can handle more weight without moving. the two half's just press fit together.
thingiverse
free

CR-10 RGB LED Lightbar by grieg
...x. i've soldered everything together and glued the parts it with some hot glue.
you could easily remove the box with a knife.
thingiverse
free

Pokémon Pumpkaboo Lantern by IXPatch
...oo, so i decided to turn it into a little lantern :)
it's got a little hole in the back for a cable/wire/switch for the leds.
thingiverse
free

C270 Logitech mount with "cableless" LED holder for Prusa printer by TiToHa
...mount with "cableless" led holder for prusa printer (or similar. you can mount it on the arm i included...
thingiverse
free

Loc Line Switch by OTandAT
...ideo-game-big-round-push-button-led-lighted-illuminated-lamp-p-1044297.html?rmmds=detail-left-hotproducts__4&cur_warehouse=cn
thingiverse
free

CR-10S4 Round Illuminated Light Switch for 2020 Extrusion by HowardB
...ver contact of the switch.
the skp file is also included, if you wish to change the holes, etc.
turned out well and works great.
thingiverse
free

LED, battery, switch clip-on light by kpaulsen
...just slide it onto the end of the z-axis arm, and switch it on. using a battery, there's no need to tap into any other wires.
thingiverse
free

Quill light for bridgeport clone mill by tbaggins
...; plexiglass. inner hole diameter is 2.2" outer diameter is 4.2" if you want to make a plexiglass cover for the lights.
thingiverse
free

CNC CABINET WIRE CONDUIT LARGE by camaroboy383
...mit switch wires where they enter the cabinet to keep them in a bundle.. this is a large conduit that is 25mm wide inside...enjoy
Warco
thingiverse
free

Warco 918 Lathe Spindle Thread Protector - 1 1/2" x 8TPI by Rainingheavy
...
designed to protect the nose threads when transporting, storing and using collet chucks, when the thread is otherwise uncovered.
thingiverse
free

mini lathe screw cover by davedix
...mini lathe screw cover by davedix thingiverse warco super mini lathe screw...
thingiverse
free

Chinese milling machine drawbar cap. by tgoacher
...cap. by tgoacher thingiverse a replacement drawbar cap for warco wm16 (and similar chinese) milling machine. fits 50mm diameter...
thingiverse
free

Chinese milling machine DRO battery cover by tgoacher
...by tgoacher thingiverse a replacement battery cover for the warco wm16 and similar chinese milling machine built in dro....
thingiverse
free

Mini lathe tool tray by davedix
...tool tray to clip on the back of my warco super mini lathe. it just just needs 4 self...
thingiverse
free

50mm Fly Cutter holder by Gazz292
...holder for a 50mm fly cutter (mines the one warco sell for £29) the holders interlock with other ones...
thingiverse
free

16mm Drill chuck on R8 shank holder by Gazz292
...this fits the 16mm chuck that comes with a warco gh-18 mill. the holders interlock with other ones i...
grabcad
free

Lathe spindle encoder
...lathe spindle encoder grabcad a spindle encoder for a warco gh1322...
grabcad
free

4th Axis
...and made for my milling machine which is a warco wm16b, similar to pm25v, g0704 etc. the idea behind...
Gazz292
thingiverse
free

HV6 Rotary Table Parts Holder by Gazz292
...elector arm for a hv6 (150mm) rotary table.
mates up with my other wall mount mill tool holders, but this is the largest one yet.
thingiverse
free
50mm Fly Cutter holder by Gazz292
...ww.thingiverse.com/thing:3588076
the screws i use to mount these to the wall are called 'flange head self tapping screws'
thingiverse
free

Centre Drill Bits Holder by Gazz292
...ww.thingiverse.com/thing:3588076
the screws i use to mount these to the wall are called 'flange head self tapping screws'
thingiverse
free

Counter Bore Bits Holder by Gazz292
...ww.thingiverse.com/thing:3588076
the screws i use to mount these to the wall are called 'flange head self tapping screws'
thingiverse
free

Counter Sink Holder by Gazz292
...ww.thingiverse.com/thing:3588076
the screws i use to mount these to the wall are called 'flange head self tapping screws'
thingiverse
free

Edge Finder and Wiggler Holder by Gazz292
...ww.thingiverse.com/thing:3588076
the screws i use to mount these to the wall are called 'flange head self tapping screws'
thingiverse
free

R8 Collet Holders (Metric) by Gazz292
...ww.thingiverse.com/thing:3588076
the screws i use to mount these to the wall are called 'flange head self tapping screws'
thingiverse
free

MT2 Revolving Centre Wall Mount by Gazz292
...ww.thingiverse.com/thing:3588076
the screws i use to mount these to the wall are called 'flange head self tapping screws'
thingiverse
free

50mm Face/Shell Mill holder by Gazz292
...ww.thingiverse.com/thing:3588076
the screws i use to mount these to the wall are called 'flange head self tapping screws'
thingiverse
free

MT2 Dead Centre Wall Mount Holder by Gazz292
...ww.thingiverse.com/thing:3588076
the screws i use to mount these to the wall are called 'flange head self tapping screws'
Quill
design_connected
free

Quille Desk Lamp
...quille desk lamp
designconnected
free 3d model of quille desk lamp by ligne roset designed by droze, thomas.
3ddd
$1

Paper quilling house
... квиллинг
декор выполнен в стиле квиллинг.http://www.larkcrafts.com/craft-your-life/a-look-at-paper-quilling/
turbosquid
$19

Quilling Flowers 01
... available on turbo squid, the world's leading provider of digital 3d models for visualization, films, television, and games.
turbosquid
$3

Feather3/Quill flat profile
... free 3d model feather3/quill flat profile for download as ma on turbosquid: 3d models for games, architecture, videos. (1252627)
3d_export
$7

quill
...enter.<br>polygons: 2492<br>vertices: 1252<br>formats: fbx, obj, stl, dae.<br>i hope you enjoy the model!
3d_export
$8

Quill Paper Ink 3D Model
...t music poser 3d model score composing classical parchment inkwell pen writing
quill paper ink 3d model uncle808us 81096 3dexport
turbosquid
$19

Quilling Snowflakes Grid 03
... available on turbo squid, the world's leading provider of digital 3d models for visualization, films, television, and games.
3d_export
$19

Quill pen with ink bottle 3D Model
... games lowpoly max model wooden desk office medieval monk old detailed
quill pen with ink bottle 3d model bondiana 64130 3dexport
turbosquid
$19

Quilling I Love You 1
... available on turbo squid, the world's leading provider of digital 3d models for visualization, films, television, and games.
3d_export
$24

Quill pen and black ink bottle 3D Model
...s lowpoly max model wooden desk office medieval monk old detailed
quill pen and black ink bottle 3d model bondiana 64154 3dexport
85Mm
3d_ocean
$15

Soviet 85mm Shell
...ormats: -.blend, rendered with cycles, as seen in the images; -.obj, with materials applied; -.dae, with materials applied; -....
turbosquid
$25

85mm Telephoto SLR Lens
... available on turbo squid, the world's leading provider of digital 3d models for visualization, films, television, and games.
3d_export
$20

Soviet 85mm Shell 3D Model
...plosive armor damage
soviet 85mm shell 3d model download .c4d .max .obj .fbx .ma .lwo .3ds .3dm .stl dragosburian 108523 3dexport
turbosquid
$2

A mug 80 x 80 x 85mm 3D model
... 3d model for download as blend, dae, stl, fbx, gltf, and obj on turbosquid: 3d models for games, architecture, videos. (1531727)
3d_export
$150

T3485 Soviet Tank 3D Model
...t-34 ussr medium tank panzer military stalin soviet union 85mm victory vehicle t3485 soviet tank 3d model kozzak3d 93511...
3d_export
$99

T34 Tank Drivetrain 3D Model
...t34 tank drivetrain 3d model 3dexport 34 85mm russian soviet tank war ww2 military vehicle medium ussr...
3d_export
$89

T34-76 Tank 3D Model
...t34-76 tank 3d model 3dexport 34 85mm russian soviet tank war ww2 military vehicle medium ussr...
3d_export
$29

T-34 Engine 3D Model
...t-34 engine 3d model 3dexport 34 85mm russian soviet tank war ww2 military vehicle medium ussr...
3d_export
$179

T34-76 Tank with Interior 3D Model
...t34-76 tank with interior 3d model 3dexport 34 85mm russian soviet tank war ww2 military vehicle medium ussr...
3d_export
$179

T-34-85 with Interior 3D Model
...t-34-85 with interior 3d model 3dexport 34 85mm russian soviet tank war ww2 military vehicle medium ussr...
Milling
design_connected
$18

Mills
...mills
designconnected
minotti mills computer generated 3d model. designed by dordoni, rodolfo.
3ddd
$1

Mille Nuits
...mille nuits
3ddd
mille nuits
люстра из коллекции mille nuits
turbosquid
$25

Mill
...ll
turbosquid
royalty free 3d model mill for download as fbx on turbosquid: 3d models for games, architecture, videos. (1292872)
turbosquid
$15

The Mill
...urbosquid
royalty free 3d model the mill for download as obj on turbosquid: 3d models for games, architecture, videos. (1459219)
turbosquid
$3

Mill
...ll
turbosquid
royalty free 3d model mill for download as max on turbosquid: 3d models for games, architecture, videos. (1233201)
turbosquid
$1

mill
...
turbosquid
royalty free 3d model mill for download as blend on turbosquid: 3d models for games, architecture, videos. (1613409)
3d_export
$10
Coffee Mill
...coffee mill
3dexport
coffee mill
3d_export
$5
impact mill
...impact mill
3dexport
impact mill
archibase_planet
free

Milling machine
...base planet
milling machine miller milling-machine
milling machine vhf-680 n250413 - 3d model (*.gsm+*.3ds) for 3d visualization.
3ddd
$1

Minotti / Mills
...minotti / mills
3ddd
minotti
minotti / mills
Machine
archibase_planet
free

Machine
...machine
archibase planet
sewing-machine sewing machine equipment
singer machine- 3d model for interior 3d visualization.
archibase_planet
free

Machine
...hine
archibase planet
percolator equipment coffee-machine
machine n230708 - 3d model (*.gsm+*.3ds) for interior 3d visualization.
archibase_planet
free

Machine
...chibase planet
percolator coffee-machine kitchen equipment
coffee machine - 3d model (*.gsm+*.3ds) for interior 3d visualization.
archibase_planet
free

Slot machine
...ase planet
slot machine slot-machine playing machine
slot machine n260311 - 3d model (*.gsm+*.3ds) for interior 3d visualization.
turbosquid
$7

Machine
...ne
turbosquid
royalty free 3d model machine for download as on turbosquid: 3d models for games, architecture, videos. (1391792)
3d_ocean
$10

War machine
...war machine
3docean
camuflage machine robot war war machine
war machine created in 3dmax 2009 15.497-poly count
turbosquid
$7

machine
...turbosquid
royalty free 3d model machine for download as obj on turbosquid: 3d models for games, architecture, videos. (1452674)
3d_ocean
$12

Weighing-machine
...weighing-machine
3docean
market shop weighing-machine
3d model weighing-machine
archibase_planet
free

Sewing machine
...ine
archibase planet
sewing machine sewing-machine
sewing machine n080311 - 3d model (*.gsm+*.3ds) for interior 3d visualization.
archibase_planet
free

Coffee machine
...se planet
coffee machine percolator coffee-machine
coffee machine n010715 - 3d model (*.gsm+*.3ds) for interior 3d visualization.
Ring
3d_export
$5

ring
...ring
3dexport
ring
3d_export
free

ring
...ring
3dexport
ring
3d_export
free

ring
...ring
3dexport
ring
3d_export
free

ring
...ring
3dexport
ring
3d_export
$10

ring
...ring
3dexport
lord of the rings
3d_export
$5

ring
...ring
3dexport
golden ring
3d_export
free
ring
...ring
3dexport
cherub ring
3d_export
$10

ring
...ring
3dexport
3d ring model
3d_export
$5

ring
...ring
3dexport
ring 3d model
3d_export
$5

ring
...ring
3dexport
ring top black...
Light
archibase_planet
free

Light
...light
archibase planet
lamp lighting light
light - s2 - 3d model for interior 3d visualization.
archibase_planet
free

Light
...light
archibase planet
light luminaire lighting
light l0465 - 3d model (*.gsm+*.3ds) for interior 3d visualization.
3d_export
$5

lighting
...lighting
3dexport
lighting
3d_export
$5

lighting
...lighting
3dexport
lighting in livingroom
turbosquid
$3

Lighting Tree with Lights
...d model lighting tree with lights for download as max and 3ds on turbosquid: 3d models for games, architecture, videos. (1585507)
archibase_planet
free

Light
...light
archibase planet
luster lighting solution
light - s - 3d model for interior 3d visualization.
archibase_planet
free

Light
...light
archibase planet
luster lamp lighting
light 1 - 3d model for interior 3d visualization.
archibase_planet
free

Lights
...lights
archibase planet
surgical lights surgical lamp
surgical lights (floor) - 3d model for interior 3d visualization.
archibase_planet
free

Light
...light
archibase planet
lighting luminaire candlelight
light l0463 - 3d model (*.gsm+*.3ds) for interior 3d visualization.
3d_export
$18

street light-lighting-light-xia bing
...
3dexport
street light-lighting-light-xia bing<br>max 2015 v-ray 3 max 2015<br>textures<br>all files in zip...