Thingiverse

Microphone kit by simonwebnet
by Thingiverse
Last crawled date: 3 years, 4 months ago
I don't think there is a need to explain what it is.
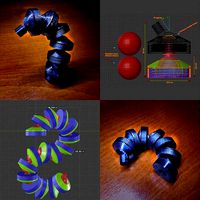
For a visual reference on the dimensions the measure of the outer circle is 64mm.
I ordered on Aliexpress (I will put the links at the end of the description) some condenser microphone capsules (pack of 10) and I have put into activity 9 to keep the value of the capacity unchanged, but the printable parts are also valid for a single capsule of any dimension that can enter the body. Customizing the capsule holder (number 0 in the files) is very simple.
In the images you should easily understand the assembly method which is however very intuitive. Those in yellow are rubber bands (very soft) that must be adapted in length and locked (I used knots of very thin wire for electronics) so that they hold the capsule block suspended, inside the body and then the body all the way. inside the cage.
All the parts to be assembled must be glued and inside the body, a 4/5mm axis must be inserted into the 4 holes (of files 6&7) from a clip for office sheets (attach).
The holes under the base are used to house magnets (if you have metal parts to attach it to).
the preamplifier box is just as simple and the ideal is to power it with battery (minimum 3v maximum 9v), I use two lipo in series (about 7.4v are fine), but a 9V battery is also ideal and lasts a lot , if disconnected when not needed.. The small screwdriver is used to adjust the gain, in the absence of something better at hand, but once you find the right setting you don't need to change it anymore. The preamp also has a 3.5mm jack input, but it doesn't coexist well with the molded mic, so if you're using one, it's best to keep the other unplugged. the output is line level and works well when connected to the line input of a PC, for example.
I suggest to use a layer thickness of 0.12mm and for the body, if possible even less). The stl files for the body come in two versions: one classic and one with the necessary support included (I needed that). There are some stl files in function of accessory or variant, you see.
Note: in the images where you see the rubber bands, those inside the microphone body pass through the support (it is the modified version to be printed without supports) which must be removed at the end of printing.
Note2: the slicer images indicate the suggested orientation. Check when supports are needed and when not. In any case, the supports are easy to remove and of very small quantities.
For suggestions to leave and clarifications to ask, there are comments, even if I don't go there very often.
Good make and remix to whoever wants.
reference electronics links:
https://it.aliexpress.com/item/4000390259471.html?spm=a2g0s.9042311.0.0.1a264c4dXS7ou8
https://it.aliexpress.com/item/4000089334876.html?spm=a2g0s.9042311.0.0.27424c4dy38uNl
Similar models
thingiverse
free

TenLOG 3d-Pro: LED light support by StikkaDesign
...136639.html?spm=a2g0s.9042311.0.0.27424c4dnwt7vs
compatible with:
adapter for mgn z axishttps://www.thingiverse.com/thing:4818178
thingiverse
free

Temperature sensor holder
...ure sensor holder.
you can buy a sensor here:https://it.aliexpress.com/item/32936762466.html?spm=a2g0s.9042311.0.0.27424c4dz6lxtq
thingiverse
free

Mods for FX-951 Soldering iron holder replica by Kaishou
...daptor and the tip holder are kept in place with double sided tape.
i modified the tips holder to make room for more tips, enjoy!
thingiverse
free

ESP32CAM Body by PrinterGenius
...html?spm=a2g0s.9042311.0.0.9a004c4demwdk8
https://www.aliexpress.com/item/4000130467485.html?spm=a2g0s.9042311.0.0.9a004c4demwdk8
thingiverse
free

AKG K52 microphone upgrade
...o your existing headphones.
fits on the k72 and k92 headphones as well.
the parts are printer friendly. no supports needed.
enjoy
thingiverse
free

Power Bank IP5328P by Sky_Rider
...ghtened with some pliers since is quite difficult to reach inside the case with a screwdriver.
for info and cad files contact me.
thingiverse
free

HDD Back case for SAS Cables. by crazy72
...e
small change to fit the sata-sas adapterhttps://it.aliexpress.com/item/4001076644411.html?spm=a2g0s.9042311.0.0.47e04c4dfyzoof
thingiverse
free
![Fishing lure _ Light JIG [ver.1.0]](/t/4864059.jpg)
Fishing lure _ Light JIG [ver.1.0]
...48.html?spm=a2g0s.9042311.0.0.516c6c37dcqzrj
https://fr.aliexpress.com/item/32982661851.html?spm=a2g0s.9042311.0.0.516c6c37dcqzrj
thingiverse
free

Powerbank Li-Ion 2S3P with 5V 3A double USB Output
...ally you also need a solder iron.
i fixed the components with hot glue
if you have any questions, don't hesitate to write me.
thingiverse
free

Voltmeter support for anycubic / delta / more or less any printer by marcottt
...30098202.html?spm=a2g0s.9042311.0.0.2qq9k6
the support do no need glue or screws and let free to use the sd slot without problem.
Simonwebnet
thingiverse
free
Joint (Low Profile Ball Joint) by simonwebnet
... can integrate.
i thank and greet everyone.
link to 3d modular system and other joints:
https://www.thingiverse.com/thing:4768067
thingiverse
free

Joint (double ball joint) and support system by simonwebnet
...tation to the preferences and needs of each.
greetings to all
link to low profile joint:https://www.thingiverse.com/thing:4781065
Microphone
3ddd
$1
microphone
...microphone
3ddd
microphone , микрофон
microphone
3d_ocean
$7
Microphone
...microphone
3docean
mic microphone mike
microphone
3d_ocean
$4

Microphone
...microphone
3docean
mic microphone mike
microphone with spherical grill
archibase_planet
free
Microphone
...hone conference microphone
digital conference selector microphone n170912 - 3d model (*.gsm+*.3ds) for interior 3d visualization.
3d_export
$7

microphone
...microphone
3dexport
black microphone
3d_export
$5

microphone
...microphone
3dexport
black modern microphone for streaming
archibase_planet
free
Microphone
...microphone
archibase planet
microphone audio equipment
microphone n260809 - 3d model (*.3ds) for interior 3d visualization.
archibase_planet
free
Microphone
...microphone
archibase planet
equipment microphone
microphone n230410 - 3d model (*.gsm+*.3ds) for interior 3d visualization.
archibase_planet
free

Microphone
...microphone
archibase planet
microphone audio equipment
microphone n250608 - 3d model (*.gsm+*.3ds) for interior 3d visualization.
archibase_planet
free
Microphone
...microphone
archibase planet
microphone audio equipment
microphone n160309 - 3d model (*.gsm+*.3ds) for interior 3d visualization.
Kit
turbosquid
$3

Bathroom Kit Baño kit
... available on turbo squid, the world's leading provider of digital 3d models for visualization, films, television, and games.
turbosquid
$19

Kit
... available on turbo squid, the world's leading provider of digital 3d models for visualization, films, television, and games.
3d_export
$20

Drift Kit
...drift kit
3dexport
turbosquid
$40

BitCoin Kit
...urbosquid
royalty free 3d model bitcoin kit for download as on turbosquid: 3d models for games, architecture, videos. (1519068)
turbosquid
$9

Industrial kit
...osquid
royalty free 3d model industrial kit for download as on turbosquid: 3d models for games, architecture, videos. (1144117)
turbosquid
$6

Kit Vases
...
turbosquid
royalty free 3d model kit vases for download as on turbosquid: 3d models for games, architecture, videos. (1285114)
turbosquid
free

Survival Kit
...rbosquid
royalty free 3d model survival kit for download as on turbosquid: 3d models for games, architecture, videos. (1637721)
turbosquid
$50

Ninja Kit
...rbosquid
royalty free 3d model ninja kit for download as fbx on turbosquid: 3d models for games, architecture, videos. (1672364)
turbosquid
$35

Brushes Kit
...osquid
royalty free 3d model brushes kit for download as max on turbosquid: 3d models for games, architecture, videos. (1216721)
turbosquid
$19
Medical kit
...osquid
royalty free 3d model medical kit for download as fbx on turbosquid: 3d models for games, architecture, videos. (1486089)