Thingiverse

MGN12H for Predator by StikkaDesign
by Thingiverse
Last crawled date: 3 years, 1 month ago
MGN12H for Predator
necessary material:
3x 800mm MGN12H
to attach the adapter to the linear guide carriage:
12x M3x25mm
12x 15mm spacers
12x M3 washers (optional)
to fix the rod holder on the adapter:
3x 2 nuts M4
original M4 screws
to fix the linear guide to the upright:
TOT M3x20mm (in picture M3x25)
TOT M3 nuts (self-locking nuts in the picture)
3x 2 meters of GT2 6mm (optional. reinforced type, in the picture)
drill with 3.25mm bit
procedure
remove the uprights (pay attention to the motor wiring cable)
remove the motor plate and bottom plate
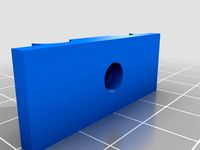
mount the adapter on the trolley and make sure it is at the same distance from the upright as the original plate (photo 1)
remove the original carriage and remove the support for the rods
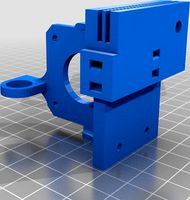
mount the rod support on the adapter
position the linear guide using the appropriate spacers (4 pieces recommended). as a reference take the holes - motor side - on the upright (photo2)
drill the uprights and fix the MGN12H with M3 screws and nuts
fasten the belts with zipper on the spacers (ATTENTION: fix them on the same side as on the original plate. this avoids reversing the direction of rotation of the motors)
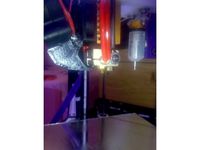
pay VERY attention to the belt. it must remain as parallel as possible to the upright. it is advisable to turn the bottom plate 180 degrees (see photo 3) and, if necessary, shim with washers. turn the crankshaft toothed pulley 180 degrees and fix it at a suitable distance (photo 4)
reassemble. be very careful that the metal L activates the endstop
Italiano:
MGN12H per Predator
materiale necessario:
3x MGN12H da 800mm
per fissare l adattatore al carrello della guida lineare:
12x M3x25mm
12x distanziatori da 15mm
12x rondelleM3 (opzionale)
per fissare il supporto rod sull adattatore:
3x 2 dadi M4
viti M4 originali
per fissare la guida lineare al montante:
TOT M3x20mm (in foto M3x25)
TOT M3 dadi (in foto dadi autobloccanti)
3x 2 metri di cinghia (opzionale. in foto cinghia rinforzata)
trapano con punta da 3,25mm
procedura
smontare i montanti (fare attenzione al cavo di cablaggio del motore)
smontare piastra motore e piastra inferiore
montare l adattatore sul carrello e assicurarsi che sia alla stessa distanza dal montante della piastra originale(foto1)
sfilare il carrello originale e smontare il supporto per le rod
montare il supporto rod sull adattatore
posizionare la guida lineare utilizzando gli appositi spaziatori (consigliato 4 pezzi). come riferimento prendere i fori - lato motore - sul montante (foto2)
forare i montanti e fissare le MGN12H con viti e dadi M3
fissare le cinghie con fascette elettriche sui distanziatori (ATTENZIONE: fissarli sullo stesso lato come da piastra originale. questo evita di invertire il senso di rotazione dei motori)
prestare MOLTA attenzione alla cinghia. essa deve restare il più possibile parallela al montante. si consiglia di girare di 180 gradi la piastra inferiore (vedi foto3) e se necessario spessore con rondelle. girare di 180 gradi la puleggia dentata dell albero motore e fissarla a una distanza opportuna (foto4)
rimontare. fare molta attenzione che la L metallica attivi l endstop
necessary material:
3x 800mm MGN12H
to attach the adapter to the linear guide carriage:
12x M3x25mm
12x 15mm spacers
12x M3 washers (optional)
to fix the rod holder on the adapter:
3x 2 nuts M4
original M4 screws
to fix the linear guide to the upright:
TOT M3x20mm (in picture M3x25)
TOT M3 nuts (self-locking nuts in the picture)
3x 2 meters of GT2 6mm (optional. reinforced type, in the picture)
drill with 3.25mm bit
procedure
remove the uprights (pay attention to the motor wiring cable)
remove the motor plate and bottom plate
mount the adapter on the trolley and make sure it is at the same distance from the upright as the original plate (photo 1)
remove the original carriage and remove the support for the rods
mount the rod support on the adapter
position the linear guide using the appropriate spacers (4 pieces recommended). as a reference take the holes - motor side - on the upright (photo2)
drill the uprights and fix the MGN12H with M3 screws and nuts
fasten the belts with zipper on the spacers (ATTENTION: fix them on the same side as on the original plate. this avoids reversing the direction of rotation of the motors)
pay VERY attention to the belt. it must remain as parallel as possible to the upright. it is advisable to turn the bottom plate 180 degrees (see photo 3) and, if necessary, shim with washers. turn the crankshaft toothed pulley 180 degrees and fix it at a suitable distance (photo 4)
reassemble. be very careful that the metal L activates the endstop
Italiano:
MGN12H per Predator
materiale necessario:
3x MGN12H da 800mm
per fissare l adattatore al carrello della guida lineare:
12x M3x25mm
12x distanziatori da 15mm
12x rondelleM3 (opzionale)
per fissare il supporto rod sull adattatore:
3x 2 dadi M4
viti M4 originali
per fissare la guida lineare al montante:
TOT M3x20mm (in foto M3x25)
TOT M3 dadi (in foto dadi autobloccanti)
3x 2 metri di cinghia (opzionale. in foto cinghia rinforzata)
trapano con punta da 3,25mm
procedura
smontare i montanti (fare attenzione al cavo di cablaggio del motore)
smontare piastra motore e piastra inferiore
montare l adattatore sul carrello e assicurarsi che sia alla stessa distanza dal montante della piastra originale(foto1)
sfilare il carrello originale e smontare il supporto per le rod
montare il supporto rod sull adattatore
posizionare la guida lineare utilizzando gli appositi spaziatori (consigliato 4 pezzi). come riferimento prendere i fori - lato motore - sul montante (foto2)
forare i montanti e fissare le MGN12H con viti e dadi M3
fissare le cinghie con fascette elettriche sui distanziatori (ATTENZIONE: fissarli sullo stesso lato come da piastra originale. questo evita di invertire il senso di rotazione dei motori)
prestare MOLTA attenzione alla cinghia. essa deve restare il più possibile parallela al montante. si consiglia di girare di 180 gradi la piastra inferiore (vedi foto3) e se necessario spessore con rondelle. girare di 180 gradi la puleggia dentata dell albero motore e fissarla a una distanza opportuna (foto4)
rimontare. fare molta attenzione che la L metallica attivi l endstop
Similar models
thingiverse
free

Direct Drive Support for MGN12H+V6+BMG Clone by Gigigno79
...ideal-cinghia-fissaggio-morsetto-stampante/dp/b07fxt3p2x
e di n. 01 bullone m4*10
se avete domande chiedete pure.
buone stampe :)
thingiverse
free
Prusa i3 Y-motor stabilizzatore by Giovannicmr
...pendendo di allentare la cinghia del carrello.
il blocco è facilmente chiedibile con un dado m3 e un vite m3 circa lunghezza 15mm
thingiverse
free

Supporto motore nema 17 e trascinatore MK8 per prusa I3 by netserfer
...3 by netserfer
thingiverse
supporto per motore nema 17 e trascinatore filamento mk8 compatibile con il carrello della prusa i3
thingiverse
free

Piastra supporto J-Head E3D V6 by ThePieWalker
...iverse
piastra di supporto per estrusore j-head e3d v6.
il fissaggio della piastra al blocco estrusore avviene mediante viti m4.
thingiverse
free

AM8 external y motor by strabo
... stato creato per poter mettere il motore y fuori dal telaio e mantenere la cinghia più dritta possibile sotto al piano di stampa
thingiverse
free

Tendi Cinghia per ZoneStar P802 by massimo61
...tendi cinghia per zonestar p802 by massimo61
thingiverse
tendi cinghia progettato e stampato per non dover smontare la stampante
thingiverse
free

Tendi Cinghia by massimo61
...tendi cinghia by massimo61
thingiverse
tendi cinghia progettato e stampato per non dover smontare la stampante
thingiverse
free

Bowden extruders motors - Geeetech I3 Pro B/C by djbyte
...re due fascette da elettricista per fissare i cavi dei motori.
nello zp troverete anche il file sorgente per freecad del progetto
grabcad
free

piastra di supporto bobina
...piastra di supporto bobina
grabcad
supporto per bobina al telaio
thingiverse
free

Fan duct for 3drag by cellino92
...
la stampa non richiede materiale di supporto
nb: sono necessarie 3 viti e dadi m3 in più per fissare correttamente la ventola
Stikkadesign
thingiverse
free

Z_knob by StikkaDesign
...z_knob by stikkadesign
thingiverse
knob to manually move the z axis your t8 leadscrew
thingiverse
free
Fanduct for chimera by StikkaDesign
...thingiverse
a simply fanduct for chimera (configuration with the rotating heating blocks - resistance and thermistor in lateral)
thingiverse
free

Another Cable Chain by StikkaDesign
...another cable chain by stikkadesign
thingiverse
a simple cable chain
rotation angle: almost 270 degrees
thingiverse
free

Fanduct for Cyclops by StikkaDesign
...th:
adapter for cyclops hotend: https://www.thingiverse.com/thing:3110986
x_carriage:: https://www.thingiverse.com/thing:3110935)
thingiverse
free

Cyclops_Hotend adapter - with BLTouch by StikkaDesign
.../thing:3111004
only for the type of cyclops in the imagine
21/09/18
added version v2
the part around the hotend is more resistant
thingiverse
free

X_carriage 3wheel - also for the Cyclops Hotend by StikkaDesign
...le with:
adapter for cyclops hotend: https://www.thingiverse.com/thing:3110986
fanduct: https://www.thingiverse.com/thing:3111004
thingiverse
free

Fanduct5015 for TenLOG D3 PRO by StikkaDesign
...grades (bltouch, led lights, etc.)
the rectangular holes are for the electrical clamps and the internal wiring of the fan cables.
thingiverse
free

TenLOG 3d-Pro: LED light support by StikkaDesign
...136639.html?spm=a2g0s.9042311.0.0.27424c4dnwt7vs
compatible with:
adapter for mgn z axishttps://www.thingiverse.com/thing:4818178
thingiverse
free

Bed Support by StikkaDesign
... (use the hole as a guide) and fix the four central m3x25 screws
drill and fix the angle with four m3x25 screws
mount on the rail
thingiverse
free

TenLOG - upgrade pack by StikkaDesign
...ce more resistant)
it is fixed with the two existing m3 screws
you need one (or two) m3x30 screws to fix the sensor to the holder
Mgn12H
thingiverse
free

Mount 775 motor mgn12h by crazysova
...mount 775 motor mgn12h by crazysova
thingiverse
mount 775 motor mgn12h
thingiverse
free

Servo mount for MGN12H rail by Kieranod
...servo mount for mgn12h rail by kieranod
thingiverse
servo mount for mgn12h rail
thingiverse
free

MGN12H Titan Mount Vfire by 3DPrintingEverything
...mgn12h titan mount vfire by 3dprintingeverything
thingiverse
mgn12h mount for a titan e3d extuder
thingiverse
free

Kossel Mini carriage for MGN12H by gnahz
...kossel mini carriage for mgn12h by gnahz
thingiverse
kossel mini carriage for mgn12h with end stop
thingiverse
free

Tarantula Y carriage for MGN12H by ikong
...tarantula y carriage for mgn12h by ikong
thingiverse
tevo tarantula y carriage for mgn12h (of mgn12 rail).
thingiverse
free

MGN12H clamping V-slot by SviatoslavWolf
...mgn12h clamping v-slot by sviatoslavwolf
thingiverse
создал крепление для напрявляющих mgn12h под профиль v-slot
thingiverse
free
MGN12H aero p3steel v18 campy by maskeperro
...eperro
thingiverse
mgn12h aero p3steel v18 campy , pieza modificada para usar con mgn12h ....la original de campy es para mgn12c
thingiverse
free

MGN12H to 2020 and belt holder for x Axis by Kieranod
...epper.
mgn12h without belts.stl has no belt i used it on the side of the nema17 stepper.https://www.thingiverse.com/thing:2959042
thingiverse
free

MGN12C and MGN12H adapter plate by 3r4th
...h
thingiverse
i created a adapter plate for the y axis from mgn12c and mgn12h to a hole pattern of the sc8uu.
best regards 3r4th
thingiverse
free

MGN12H linear rail 20x20 adapter by Goretec
... linear rail 20x20 adapter by goretec
thingiverse
mgn12h linear rail adapter for mounting 20x20 extrusion to the linear guide.
Predator
3d_export
$15

predator
...predator
3dexport
predator
3d_export
$18

predator
...predator
3dexport
turbosquid
$9

Predator
...r
turbosquid
royalty free 3d model predator for download as on turbosquid: 3d models for games, architecture, videos. (1322726)
3d_export
free

predator shuriken
...predator shuriken
3dexport
predator shuriken
turbosquid
$10

Predator
...d
royalty free 3d model predator for download as 3ds and obj on turbosquid: 3d models for games, architecture, videos. (1152845)
3d_export
$6
predator mask
...predator mask
3dexport
predator mask lowpoly
turbosquid
$299

Predator
... available on turbo squid, the world's leading provider of digital 3d models for visualization, films, television, and games.
3d_export
$5

mask predator
...mask predator
3dexport
an incredible mask, very detailed. based on predator. any questions write me please
3d_export
$17

MQ-1B Predator
...mq-1b predator
3dexport
mq-1b predator
3d_ocean
$5

Predator
...plane poly predator remote texture uav vehicle
ready to be used in production ready situation including all the major 3d formats.