Thingiverse

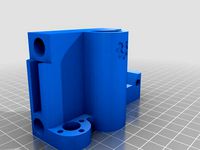
MendelMax Vertical X Axis Ends & Carriage - 10mm Z by josefcub
by Thingiverse
Last crawled date: 3 years, 1 month ago
After successfully getting as much Z height from my first MendelMax as I could with these carriages:
MendelMax Vertical X Axis Carriages
I promptly dismantled it and sold its frame to fund a self-built Prusa i3 clone. Long story short, a few months later, I once again have a MendelMax! Thanks to the Postal Service, a large amount of the plastics in the kinematics were completely shattered. Since I had to replace the gantries anyway, I thought I'd install my previous vertical carriages onto this printer.
This machine, however, had 10mm smooth rods on the Z axis. Rather than reprint the Z tops and motor mounts, and replace them with 8mm rods, I decided to modify my previous carriage design to hold the LM10UU bearings that the machine came with.
Surprisingly, it's coming together and seems to work perfectly. So now, I share the design with you!
Technical Details
The Z axis smooth rods are 10mm in diameter, but the lead screw mounts are designed for 8mm TR-8x2 brass nuts, with four-screw flanges for attachment. LM10UU or LM10LUU bearings should work well here, as well as TR8 eBay leadscrews with the flanged nuts.
The rod distances (30mm smooth/leadscrew for Z, and 50mm smooth/smooth for X) are the same as in the "standard" Mendel design and do not require customized motor mounts or upper vertex rod stays.
Speaking of the smooth rods, X is still 8mm, while Z is now 10mm.
You likely will need a longer belt for the X axis. The original, stock, belt was too short for this configuration by an inch or two.
The X carriage itself has holes designed to securely hold a metal NEMA 17 motor mount. These work well for mounting Titan extruders.
There is no provision for mounting an X axis end stop switch. I'm re-using the existing one for this experiment.
The LM10UU bearings I use literally just snapped into the half-pipe provided. However, to get them seated correctly, you will likely need to file down or otherwise fit the overhang so that one of the bearings slides snugly into the circular hole next to the lead screw mounting holes.
Use your favorite flavor of zip tie to ensure that the bearings don't go anywhere.
This mod gave me, with a clone Titan extruder, and clone V6 hotend, 145mm of vertical height. I can push that to around 155mm, if I don't home the axis before lowering it, and I choose to lose ~30mm of X.
Bonus
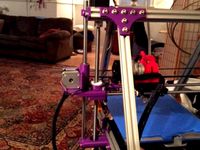
For Z, I have included an end stop screw mount that attaches to the X carriage's 8mm rods. It's designed to hit this Z end stop mount:
XYZ End Stops for Mendelmax 1.5+
Come to think of it, this will work with my 8mm rod version of these carriages, too!
Attribution
I used:
the "roundedRect" OpenSCAD module by WilliamAAdams
the excellent zip-tie LM8UU bearing holder by skarab
I've added them as remixes on the side, and attributed them in the included source code for the parts. You will need skarab's STL file in order to fully render my SCAD source, and you will need to change the file path in the source to point at your version.
Caveat Emptor
Until I'm finished rebuilding this particular MendelMax, I am marking this as a Work in Progress, and consider it experimental. I don't believe I'll need to edit these carriages again, but I'd rather be safe than sorry.
MendelMax Vertical X Axis Carriages
I promptly dismantled it and sold its frame to fund a self-built Prusa i3 clone. Long story short, a few months later, I once again have a MendelMax! Thanks to the Postal Service, a large amount of the plastics in the kinematics were completely shattered. Since I had to replace the gantries anyway, I thought I'd install my previous vertical carriages onto this printer.
This machine, however, had 10mm smooth rods on the Z axis. Rather than reprint the Z tops and motor mounts, and replace them with 8mm rods, I decided to modify my previous carriage design to hold the LM10UU bearings that the machine came with.
Surprisingly, it's coming together and seems to work perfectly. So now, I share the design with you!
Technical Details
The Z axis smooth rods are 10mm in diameter, but the lead screw mounts are designed for 8mm TR-8x2 brass nuts, with four-screw flanges for attachment. LM10UU or LM10LUU bearings should work well here, as well as TR8 eBay leadscrews with the flanged nuts.
The rod distances (30mm smooth/leadscrew for Z, and 50mm smooth/smooth for X) are the same as in the "standard" Mendel design and do not require customized motor mounts or upper vertex rod stays.
Speaking of the smooth rods, X is still 8mm, while Z is now 10mm.
You likely will need a longer belt for the X axis. The original, stock, belt was too short for this configuration by an inch or two.
The X carriage itself has holes designed to securely hold a metal NEMA 17 motor mount. These work well for mounting Titan extruders.
There is no provision for mounting an X axis end stop switch. I'm re-using the existing one for this experiment.
The LM10UU bearings I use literally just snapped into the half-pipe provided. However, to get them seated correctly, you will likely need to file down or otherwise fit the overhang so that one of the bearings slides snugly into the circular hole next to the lead screw mounting holes.
Use your favorite flavor of zip tie to ensure that the bearings don't go anywhere.
This mod gave me, with a clone Titan extruder, and clone V6 hotend, 145mm of vertical height. I can push that to around 155mm, if I don't home the axis before lowering it, and I choose to lose ~30mm of X.
Bonus
For Z, I have included an end stop screw mount that attaches to the X carriage's 8mm rods. It's designed to hit this Z end stop mount:
XYZ End Stops for Mendelmax 1.5+
Come to think of it, this will work with my 8mm rod version of these carriages, too!
Attribution
I used:
the "roundedRect" OpenSCAD module by WilliamAAdams
the excellent zip-tie LM8UU bearing holder by skarab
I've added them as remixes on the side, and attributed them in the included source code for the parts. You will need skarab's STL file in order to fully render my SCAD source, and you will need to change the file path in the source to point at your version.
Caveat Emptor
Until I'm finished rebuilding this particular MendelMax, I am marking this as a Work in Progress, and consider it experimental. I don't believe I'll need to edit these carriages again, but I'd rather be safe than sorry.
Similar models
thingiverse
free

MendelMax Vertical X Axis Ends & Carriage by josefcub
...l file in order to fully render my scad source, and you will need to change the file path in the source to point at your version.
thingiverse
free

X-Ends for ACME Screws and LM10UU by dbozec
...d lm10uu by dbozec
thingiverse
these are x-ends for my mendelmax printer which is built with acme screws and 10mm rods on z axis
thingiverse
free

MendelMax Z axis mounts and clamp for a 10mm smooth rod, 1/4 lead screw by LT1Pat
...z axis mount to accomodate a 10mm smooth rod and a 1/4" lead screw
the bearing bore has been modified to fit a r4zz bearing.
thingiverse
free

MendelMax 1.5 10mm X Carriage - LM10UU by norm8332
...erse.com/thing:34326 two versions included. one with only center holes for extruder mounting and another with all original holes.
thingiverse
free
Smooth X-axis for LM10UU by MazaaFIN
...me (could make it 3mm wider for this)
use http://www.thingiverse.com/thing:1270385 to connect rework -type extruder to x-carriage
thingiverse
free

MendelMax 1.5 Modified Z End Stop Screw Mount by josefcub
... to sit on the 50mm center-to-center x/z carriages of a mendelmax 1.5 series printer with 8mm x rods.
ymmv, caveat emptor, etc.
thingiverse
free

Z-Axis Stop adjustable - smooth rod mounted by futnik
... 15 screws. the smoothed rod hole will need drilled with an 8mm drill bit to smooth off the inside and loosen the fit slightly.
thingiverse
free
Modifications for Bind-Reducing X-ends with Makers Tool Works Leadscrews For MendelMax and 10mm Rods by Achase79
...th upper motor mounts in my mendelmax 2, so i thought i'd give it a try, and it works pretty well with the aluminum couplers.
thingiverse
free

Mendelmax 1.5 X End Motor and Clamp for 10mm rods by pk_47
...lve the problem i constructed my own parts following the example of kludgineer.
if there are any questions, write me a message.
thingiverse
free

Geeetech Z axis bearing mount by woody_matt
...zed for the common 608 bearing (8mm id, 22mm od, 7mm thk). the model has 21mm centres between smooth rod hole and leadscrew axis.
Josefcub
thingiverse
free

No Frills Screwdriver Stand by josefcub
...fcub
thingiverse
this is designed to hold six screwdrivers whose shafts are 100mm long or less. it's very simple in design.
thingiverse
free

Cubes with Corners Functions by josefcub
... to make use of it if you like, or improve/fix them as needed. caveat emptor, as i've only tested these in a few situations.
thingiverse
free

Small Card Tray for Square Cards by josefcub
...e "roundedrect" openscad module by williamaadams
i've attributed him also in the included source code for the part.
thingiverse
free

Solidoodle 3 Spool Holder by josefcub
... do not have an sd2 to measure, and i'm unwilling to remove the lid on one of my sd4s to measure whether or not this is true.
thingiverse
free

Printrbot LC v1 Replacement Foot by josefcub
...inter off of the table often.
created at 2am using openscad, sliced with slic3r, and printed using octoprint.
open source wins!
thingiverse
free

Spooler for MendelMax - Remix with Support and Speed Holes by josefcub
... slic3r to maintain a proper brim. the result is what i share with you.
it works pretty well, and is pretty nice to look at too!
thingiverse
free

Solidoodle 4 Lawsy X Carriage Mod by josefcub
...racket to the carriage. because of how the early revision sd4s work, the hot end will sit about 10-15mm further out than normal.
thingiverse
free
MendelMax 1.5 Modified Z End Stop Screw Mount by josefcub
... to sit on the 50mm center-to-center x/z carriages of a mendelmax 1.5 series printer with 8mm x rods.
ymmv, caveat emptor, etc.
thingiverse
free

MendelMax RepRapDiscount Smart LCD Controller - Top Rail Mount by josefcub
...ongly recommend the use of one or two washers with the m5 screws, to prevent cracking of the enclosure around the mounting holes.
thingiverse
free
MendelMax Vertical X Axis Ends & Carriage by josefcub
...l file in order to fully render my scad source, and you will need to change the file path in the source to point at your version.
Mendelmax
thingiverse
free

Logo Mendelmax by tytanos
...logo mendelmax by tytanos
thingiverse
logo mendelmax
thingiverse
free

MendelMax Toolbox by STB
...mendelmax toolbox by stb
thingiverse
small toolbox for the mendelmax.
thingiverse
free

PenHolder for MendelMax by makeitBana
...penholder for mendelmax by makeitbana
thingiverse
penholder for mendelmax
add rubberbands
thingiverse
free

Spooler for Mendelmax by Lke
...spooler for mendelmax by lke
thingiverse
universal spooler for mendelmax printer.
thingiverse
free

MendelMax Panel by Jezu88
...mendelmax panel by jezu88
thingiverse
my first project, panel mendelmax fan and light switch
thingiverse
free

MendelMax Cable Clip by nischi
...mendelmax cable clip by nischi
thingiverse
mendelmax cable clip
it is a clip for mendelmax misumi parts to hold cables.
thingiverse
free

Filament guide for MendelMax by Simonious
...filament guide for mendelmax by simonious
thingiverse
filament guide for mendelmax
thingiverse
free

MendelMax Keychain by kludgineer
...mendelmax keychain by kludgineer
thingiverse
just a keychain to print on your mendelmax to show your friends what it can do.
thingiverse
free

MendelMax plug profile by grzesiek82
...mendelmax plug profile by grzesiek82
thingiverse
za?lepka profila mendelmax 10cm
thingiverse
free

Messuhrhalter für Mendelmax by giersberg
...messuhrhalter für mendelmax by giersberg
thingiverse
messuhrhalter für mendelmax mit magneten.
Carriage
archibase_planet
free

Carriage
...arriage
archibase planet
perambulator baby carriage pram
carriage n250908 - 3d model (*.gsm+*.3ds) for interior 3d visualization.
3d_export
free

carriage
...carriage
3dexport
old fashion carriage model, more files here:
turbosquid
$140

Carriage
...urbosquid
royalty free 3d model carriage for download as max on turbosquid: 3d models for games, architecture, videos. (1482052)
turbosquid
$25

Carriage
...urbosquid
royalty free 3d model carriage for download as max on turbosquid: 3d models for games, architecture, videos. (1285944)
3d_export
free

carriage
...carriage
3dexport
game cart
3d_ocean
$15

Barrel Carriage
...ieval oak old transport wheels wine wood
this model contains a barrel and a carriage. it is a medieval type of wood oak carriage.
turbosquid
$40

Carriage
...ty free 3d model carriage for download as obj, fbx, and blend on turbosquid: 3d models for games, architecture, videos. (1290094)
turbosquid
free

Carriage
...yalty free 3d model carriage for download as ma, obj, and fbx on turbosquid: 3d models for games, architecture, videos. (1239157)
3d_export
$5

Medieval carriage
...medieval carriage
3dexport
medieval carriage in fairy style
turbosquid
$58

Carriage
...d model carriage with scene for download as max, obj, and fbx on turbosquid: 3d models for games, architecture, videos. (1276262)
10Mm
turbosquid
$3

10mm socket
...osquid
royalty free 3d model 10mm socket for download as skp on turbosquid: 3d models for games, architecture, videos. (1191445)
turbosquid
$5

Flower Of Life 10mm
... available on turbo squid, the world's leading provider of digital 3d models for visualization, films, television, and games.
turbosquid
$6

10mm Hex Key
...hex key for download as max, 3dm, c4d, lxo, obj, 3ds, and fbx on turbosquid: 3d models for games, architecture, videos. (1686655)
turbosquid
$2

10mm Sci-fi PDW
...odel 10mm sci-fi pdw for download as blend, obj, dae, and 3ds on turbosquid: 3d models for games, architecture, videos. (1636456)
turbosquid
$10

10mm Cd Jewel Case
... available on turbo squid, the world's leading provider of digital 3d models for visualization, films, television, and games.
3d_export
$29
Nikkor 1 10mm lens 3D Model
...te black lens digital camera lense optic nikon photo photography objective
nikkor 1 10mm lens 3d model 3dlogicline 44222 3dexport
turbosquid
$1

10mm-box CG CAD data
... dxf, ige, lwo, obj, wrl, x, rib, fbx, cob, dwg, dae, and stl on turbosquid: 3d models for games, architecture, videos. (1200349)
3d_export
$95
Nikon V1 with Nikkor 10mm and 1030mm lens 3D Model
...0mm photo mirrorless interchangeable compact new j1
nikon v1 with nikkor 10mm and 1030mm lens 3d model 3dlogicline 44587 3dexport
3d_export
$45

Nikkor 1 10mm and 1030mm lenses for Nikon V1 J1 3D Model
... nikon photo photography objective collection
nikkor 1 10mm and 1030mm lenses for nikon v1 j1 3d model 3dlogicline 44596 3dexport
3d_export
$5

Spanner 6mm-32mm 10mm spanner vs nomber
... vs nomber
3dexport
spanner 3ds max 2021 model with textures all models, formats, textures, converted formats in 1 rar. archive.
Axis
3ddd
$1

Мария Axis
...
3ddd
кухня , классическая , axis
модель кухни.
3d_export
$22

Axis robot 6-axis robotic arm
...ing parts drawings, standard parts purchased parts list, can be produced directly according to the drawings, welcome to download!
3ddd
free

Versatile Axis
...ddd
nexus , плитка
http://bvtileandstone.com/ceramic-porcelain/versatile-axis/
3d_export
$19

robot 2 axis
...robot 2 axis
3dexport
robot 2 axis
turbosquid
$40

Axis R5F
... available on turbo squid, the world's leading provider of digital 3d models for visualization, films, television, and games.
turbosquid
$40

Axis S5F
... available on turbo squid, the world's leading provider of digital 3d models for visualization, films, television, and games.
turbosquid
$30

Axis Athlon
... available on turbo squid, the world's leading provider of digital 3d models for visualization, films, television, and games.
turbosquid
$10

Linear Axis
... available on turbo squid, the world's leading provider of digital 3d models for visualization, films, television, and games.
3d_export
$15

drawing axis
...drawing axis
3dexport
simple rendering of the scene file
3ddd
$1

versatile axis ARC
...versatile axis arc
3ddd
versatile , плитка
versatile axis arc red dot design award
Z
3d_export
$5

nissan z
...nissan z
3dexport
nissan z
3ddd
$1

Vase Z
...vase z
3ddd
vase z
3ddd
$1

полотенцесушить Z
...полотенцесушить z
3ddd
полотенцесушитель
полотенцесушить z
design_connected
free

Z-Chair
...z-chair
designconnected
free 3d model of z-chair designed by karman, aleksei.
design_connected
$11

Z Lamp
...z lamp
designconnected
phillips z lamp computer generated 3d model. designed by kalff, louis.
3d_export
$5

Dragon balls z
...dragon balls z
3dexport
dragon ball z
turbosquid
$20

Fighter Z
...
turbosquid
royalty free 3d model fighter z for download as on turbosquid: 3d models for games, architecture, videos. (1292563)
turbosquid
$9

Pen Z
...pen z
turbosquid
free 3d model pen z for download as obj on turbosquid: 3d models for games, architecture, videos. (1686775)
turbosquid
free

z chair
...z chair
turbosquid
free 3d model z chair for download as max on turbosquid: 3d models for games, architecture, videos. (1410230)
turbosquid
$5

Letter Z
...urbosquid
royalty free 3d model letter z for download as max on turbosquid: 3d models for games, architecture, videos. (1408540)
Ends
archibase_planet
free

Cigarettes end
...d
archibase planet
cigarettes end cigarette stub cigar-butt
cigarette-end - 3d model (*.gsm+*.3ds) for interior 3d visualization.
3d_export
$5
end table
...end table
3dexport
end table 3d model dimensions:(w)60cm×(d)60cm×(h)56cm
3d_export
$5
end table
...end table
3dexport
end table 3d model dimensions:(w)60cm×(d)60cm×(h)56cm
turbosquid
$10
End Table
...rbosquid
royalty free 3d model end table for download as max on turbosquid: 3d models for games, architecture, videos. (1570610)
turbosquid
$5
End Table
...urbosquid
royalty free 3d model end table for download as ma on turbosquid: 3d models for games, architecture, videos. (1622809)
turbosquid
$3
End Table
...rbosquid
royalty free 3d model end table for download as fbx on turbosquid: 3d models for games, architecture, videos. (1315115)
3d_export
$5

rope end ring
...rope end ring
3dexport
rope end ring
turbosquid
$2

End Tables
...
royalty free 3d model end tables for download as max and obj on turbosquid: 3d models for games, architecture, videos. (1706896)
turbosquid
$14
End Table
...lty free 3d model end table for download as max, obj, and fbx on turbosquid: 3d models for games, architecture, videos. (1403051)
turbosquid
$12

End Table
...lty free 3d model end table for download as max, obj, and fbx on turbosquid: 3d models for games, architecture, videos. (1574707)
Vertical
3ddd
$1
Vertical curtain
...vertical curtain
3ddd
роллеты
vertical curtain
modern curtain
design_connected
$11
Mr.Tubes Vertical
...mr.tubes vertical
designconnected
tonone mr.tubes vertical computer generated 3d model.
3ddd
free

Vertical gardening
... фитомодуль , фитостена
vertical gardening
2000x1000x165
vizpark
$5

Einstein Vertical
...tical is a set of 3d brick textures for modern buildings, including mulit-textures and 4k tileable textures with material layers.
turbosquid
$5

brazier vertical
... free 3d model brazier vertical for download as sldas and ige on turbosquid: 3d models for games, architecture, videos. (1647570)
turbosquid
$18
Vertical blinds
...ee 3d model vertical blinds for download as max, obj, and fbx on turbosquid: 3d models for games, architecture, videos. (1604868)
3d_export
$40

vertical stirling engine
...vertical stirling engine
3dexport
vertical stirling engine
turbosquid
$6
vertical fence
...d model vertical fence for download as c4d, 3ds, dxf, and obj on turbosquid: 3d models for games, architecture, videos. (1571631)
turbosquid
$50

Vertical Garden
... available on turbo squid, the world's leading provider of digital 3d models for visualization, films, television, and games.
turbosquid
$20

vertical flag
... available on turbo squid, the world's leading provider of digital 3d models for visualization, films, television, and games.