Thingiverse

MegaTronXY CoreXY by tlmxcpmpp
by Thingiverse
Last crawled date: 3 years, 1 month ago
Hello everyone.
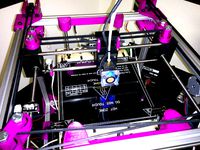
I have converted my MegaTronXY X1 into a CoreXY Printer.
The printing area is 400x450x370
I read all about how fast the corexy printers print so I wanted to take a shot at it.
So I tock my MegaTronXY X1 printer frame and I made it into a CoreXY printer.
the Ramps full Graphic Display 12864 Case and Mount can be found here https://www.thingiverse.com/thing:1343964
any Ramps1.4 case will work, I just wanted to use the Graphics display from above to make it easy to adjust the screen.
I have 3 types of Anti-wobble inserts to add which stop any and all wobble. you can either drill out the Z_stage_carriage_100mm v2 or edit it to have the anti wobble inserted in the carriage platform, I just drilled it out and then glued it in place once I leveled the carriage.
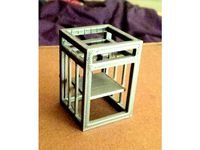
This conversion uses the same frame mounts found on my MegaTronXY X1 and parts/supplies from Lowes and Home Depot.
This can be built with either 3/4 aluminum square tubing or 1 inch square tubing. the frame mounts are scalable. just resize for 3/4 tubing.
You can also use the 3/8 aluminum rods from Home Depot and Lowes, they may be .5 mm's smaller but they work just as well.
You can look at my MegaTronXY X1 here https://www.thingiverse.com/thing:2326560 and check out the tubing mounts.
and I borrowed the X and Y stepper mounts from here https://www.thingiverse.com/thing:1849704
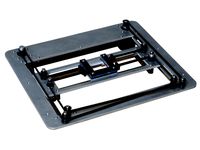
I've made some changes to the Z axis bed support and there is no wobble what so ever. I've also added level springs and screws to make the bed level. Haven't needed a auto level install since I can adjust the bed.
Everything was made from 3/4 square tubing or 1 inch square tubing which you can get at home depot or Lowes.
the heatbed consist of 4 120 watt glued on mk heat plates which can be purchased on Ebay or any 3d printer supply store.
They were glued on with Fireplace caulk which can also be purchased at home depot or Lowes, the screws were 3/4 and 1 inch self drilling metal screws again purchase at Home Depot or Lowes.
This model consist of 3 400 watt power supplies 2 of which are used for the heat bed and connected to the ramps 1.4 board with 12 volt automotive relays which are rated at 60 amps each at 14.4 vdc. the 3rd power supply runs the extruder and motors along with L.E.D. leds to light up the bed.
Heating the bed doesn't take very long. The relays have their very own fans to keep them cool.
On a side note, The Bed Z Motors are wired together in series to evenly raise and lower the bed.
I'll be adding a new Hot end extruder Platform on a later date. This update will allow you to make adjusting the belts on the fly
After test printing for more then 12 hours I found out the printed Anti-Wobble inserts failed. So I still use them in conjunction the Brass Lead Screw I was able to keep the anti-wobble working. and printing for another 12 hours the wobble still didn't come in to play at all.
So I just drilled out 3/8 hole so I could insert the Brass Lead screw and it worked. Please see Anti-Wobble Brass inset picture.
12-23-2017: I've updated the Z Axis Carriage to a more wider and stable platform.
This new platform increases the stability and level of the bed.
I've also updated the Hotend Carriage to wider and longer GT2 belt holder.
I've also added y Bearing stabilizer and anti belt slip off.
11-24-2018: I've added some extra Fan Adapters to the CoreXY. You will have to print a new Hotend Carriage or print the Adapters and then glue them on. With this Mod you can add a Fan that can be adjustable.
I've also added some Chains so you can mount your cables and not worry about them getting caught.
On the new Fan Mount I've added a place to mount either a BT Touch or a Bed Sensor.
I have converted my MegaTronXY X1 into a CoreXY Printer.
The printing area is 400x450x370
I read all about how fast the corexy printers print so I wanted to take a shot at it.
So I tock my MegaTronXY X1 printer frame and I made it into a CoreXY printer.
the Ramps full Graphic Display 12864 Case and Mount can be found here https://www.thingiverse.com/thing:1343964
any Ramps1.4 case will work, I just wanted to use the Graphics display from above to make it easy to adjust the screen.
I have 3 types of Anti-wobble inserts to add which stop any and all wobble. you can either drill out the Z_stage_carriage_100mm v2 or edit it to have the anti wobble inserted in the carriage platform, I just drilled it out and then glued it in place once I leveled the carriage.
This conversion uses the same frame mounts found on my MegaTronXY X1 and parts/supplies from Lowes and Home Depot.
This can be built with either 3/4 aluminum square tubing or 1 inch square tubing. the frame mounts are scalable. just resize for 3/4 tubing.
You can also use the 3/8 aluminum rods from Home Depot and Lowes, they may be .5 mm's smaller but they work just as well.
You can look at my MegaTronXY X1 here https://www.thingiverse.com/thing:2326560 and check out the tubing mounts.
and I borrowed the X and Y stepper mounts from here https://www.thingiverse.com/thing:1849704
I've made some changes to the Z axis bed support and there is no wobble what so ever. I've also added level springs and screws to make the bed level. Haven't needed a auto level install since I can adjust the bed.
Everything was made from 3/4 square tubing or 1 inch square tubing which you can get at home depot or Lowes.
the heatbed consist of 4 120 watt glued on mk heat plates which can be purchased on Ebay or any 3d printer supply store.
They were glued on with Fireplace caulk which can also be purchased at home depot or Lowes, the screws were 3/4 and 1 inch self drilling metal screws again purchase at Home Depot or Lowes.
This model consist of 3 400 watt power supplies 2 of which are used for the heat bed and connected to the ramps 1.4 board with 12 volt automotive relays which are rated at 60 amps each at 14.4 vdc. the 3rd power supply runs the extruder and motors along with L.E.D. leds to light up the bed.
Heating the bed doesn't take very long. The relays have their very own fans to keep them cool.
On a side note, The Bed Z Motors are wired together in series to evenly raise and lower the bed.
I'll be adding a new Hot end extruder Platform on a later date. This update will allow you to make adjusting the belts on the fly
After test printing for more then 12 hours I found out the printed Anti-Wobble inserts failed. So I still use them in conjunction the Brass Lead Screw I was able to keep the anti-wobble working. and printing for another 12 hours the wobble still didn't come in to play at all.
So I just drilled out 3/8 hole so I could insert the Brass Lead screw and it worked. Please see Anti-Wobble Brass inset picture.
12-23-2017: I've updated the Z Axis Carriage to a more wider and stable platform.
This new platform increases the stability and level of the bed.
I've also updated the Hotend Carriage to wider and longer GT2 belt holder.
I've also added y Bearing stabilizer and anti belt slip off.
11-24-2018: I've added some extra Fan Adapters to the CoreXY. You will have to print a new Hotend Carriage or print the Adapters and then glue them on. With this Mod you can add a Fan that can be adjustable.
I've also added some Chains so you can mount your cables and not worry about them getting caught.
On the new Fan Mount I've added a place to mount either a BT Touch or a Bed Sensor.
Similar models
thingiverse
free

Midsized 350x350x270 CoreXY by tlmxcpmpp
... and not worry about them getting caught.
on the new fan mount i've added a place to mount either a bt touch or a bed sensor.
thingiverse
free

Hypercube 3d Printer Z Carriage Remix by mattjoyce
...carriage reaches further down the print bed for better support.
also added a bed mount, you will need to print a mirrored pair..
thingiverse
free

Flsun i3 Dual Extruder Auto Level Sensor Mount by petkog
...
parts required
2x m3x20mm or longer (to bolt sensor to mount)
1x m3x12mm or longer (to bolt mount on to the carriage)
3x m3 nuts
thingiverse
free

Anti-Wobble Mount and Spacers | Artillery Sidewinder X1
...nti-backlash nuts)
3.4mm - 3 dot
3.6mm - 4 dot
3.8mm - 5 dot (should fit the stock nut)
4.0mm - 6 dot
needed parts:
8 m3x6 screws
thingiverse
free

Ez3D Phoenix Print Bed Leveling Screw Mount by Parmodels
...acing the original print bed mounts with this mount allows leveling screws to be added so print bed leveling can be accomplished.
thingiverse
free

Jurassic Park: The Barbasol Can by Gorilla_Grodd
...d editing before print. i've modeled the can cover hollow so you could be able to insert the tube holder into the can itself.
thingiverse
free

DTI gauge holder for bed leveling on the Da Vinci Jr. by Gadjet0
...used. - again, not tried it myself yet!
i've left the 20x20mm hole to enable another fixing to be inserted for anything else?
thingiverse
free

CoreXY Chimera and Cyclops X carriage by landie
...to allow it to be adapted to suit other similar printer...
thingiverse
free

MendelMax Aluminum Plate Y-carriage Bed nut holder by MasterSketchup
...re stable bed platform during printing.
once printing, you have to mark and drill mounting holes to and bolt them to the plate.
thingiverse
free

220x525 Delta by tlmxcpmpp
... inch print bed if you want to take this version to the next level.
the final print area is 220x454.7 with and extra 40mm at top.
Megatronxy
thingiverse
free

MegaTronXY X1 by tlmxcpmpp
...t you need.
i've added a video link so you can see the printing process.https://www.youtube.com/watch?v=ccp7_7hjijc&t=4s
thingiverse
free
Midsized 350x350x270 CoreXY by tlmxcpmpp
...same 12 white and rgb led lighting as my megatronxy current bed height is only 270 but as soon...
thingiverse
free

Mega Delta 405x305 by tlmxcpmpp
...thingiverse this is my newest design. i built the megatronxy x! with a 440x440x300 print area, https://www.thingiverse.com/thing:2326560 but it...
Tlmxcpmpp
thingiverse
free

Dalek Neck Rings by tlmxcpmpp
...dalek neck rings by tlmxcpmpp
thingiverse
this is the full size version of the full size dalek costume.
thingiverse
free

E-Cig tip by tlmxcpmpp
...rse
this is a narrow opening e-cig tip.
i didn't like the wide mouth tips so i wanted to see if i can make a new narrow tip.
thingiverse
free

L.E.D. Motorcycle Headlight Mount by tlmxcpmpp
... with 5mm thick wall and @ 92% infill with a .6 tip with a layer of .2 mm
i'll have more pictures as this project progresses.
thingiverse
free

Test Tube Shot Dispenser by tlmxcpmpp
...ifficult to pour mixed shots into test tube so i made it my mission to make one to help her out.
and this is what i came up with.
thingiverse
free

Bowling Ball Holder by tlmxcpmpp
...
both designs can be made out of abs or pla, pla however allows you to spin the ball to clean it.
the abs ball is harder to spin.
thingiverse
free

Full Size Dalek Head by tlmxcpmpp
...ll size head so you wouldn't have to use so much filament.
7-15-2017: i've added updated files for the new improved head.
thingiverse
free

Dalek Light Cage by tlmxcpmpp
...s auto store.
8/30/2017: as of today the lights are done and wired up. have a look here.https://www.thingiverse.com/thing:2469978
thingiverse
free

Sun Visor Clip by tlmxcpmpp
...nted to make it larger so it sits flush against the ceiling.
the first picture is the passenger clip, the next is the one i made.
thingiverse
free

Complete Full Size Dalek Eye with Rings by tlmxcpmpp
...8/30/2017: the eye is complete and mounted on my daleks head, you can have a look here. https://www.thingiverse.com/thing:2469978
thingiverse
free

Dalek Claw by tlmxcpmpp
... this one has the hole to add a spring, the springs from the heat beds work great, i had some extra laying around so i used them.
Corexy
thingiverse
free

CoreXY by Kaz_tech
...corexy by kaz_tech
thingiverse
this is the model of corexy platform. i separately put the parts on this place.
thingiverse
free

corexy plotter by tjwan
...corexy plotter by tjwan
thingiverse
parts for corexy mill inspired by http://der-frickler.net/technik/corexyportal
thingiverse
free
ScribbleJ CoreXY Beta by ScribbleJ
...j/corexy-v1https://github.com/scribblej/corexy-v1#corexy-beta
full gallery of development photos here: http://imgur.com/a/donun
thingiverse
free

CoreXY Emblem by emkajot
...by emkajot
thingiverse
an emblem for your corexy printer.
size: 100mm x 38mm x 2mm.
update: added a version with a proper mount.
thingiverse
free

SolidCore CoreXY Carriage by shanehooper
...olidcore 3d printer. this design could be used in other corexy 3d printers.
also see:https://3ddistributed.com/corexy-3d-printer/
thingiverse
free
CoreXY 3D Printer Model by ReginaFabricam
...bricam
thingiverse
this is an original design of a corexy printer.https://www.tinkercad.com/things/jggr9qk4s4p-3d-printer-corexy
thingiverse
free

coreXY Upper structure Left
...corexy upper structure left
thingiverse
my customized corexy 3d printer upper left parts
thingiverse
free
CoreXY by frankie
...ing machines, etc. the design is described in greater detail at http://www.corexy.com . a video is at http://vimeo.com/40914530 .
thingiverse
free

Endstop block for CoreXY carriage by svkeulen
...endstop block for corexy carriage by svkeulen
thingiverse
endstop for corexy carriage
thingiverse
free
X carriage for the CoreXY MGN12 by hackerbijay
...x carriage for the corexy mgn12 by hackerbijay
thingiverse
x carriage for the corexy frame