Thingiverse
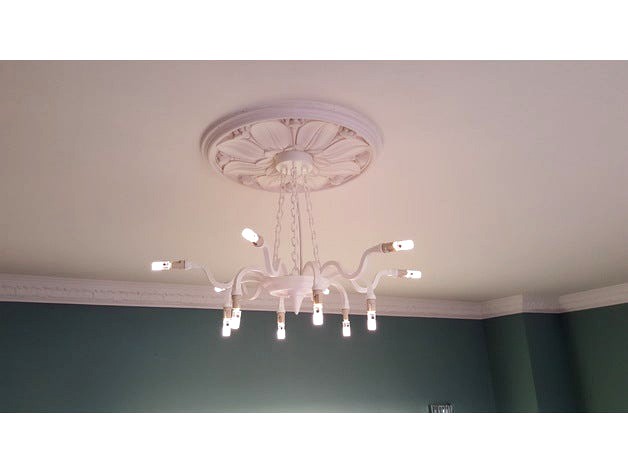
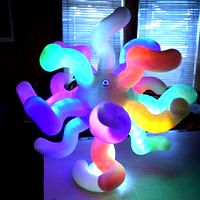
Medusa Chandelier by woofy
by Thingiverse
Last crawled date: 3 years ago
First a warning - Mains is dangerous!
If you are not competent with electrical wiring get an electrician to wire this for you.
Use with LED G9 lamps ONLY.
Printing:
This is printed with premium PLA (Raise3D) which has a higher glass transition temperature than standard PLA. Print the chains first, you need three of them. Next print three Chand5 parts. When they are 3/4 printed loop the chains in so they finish printing with the parts on the ends of the chains. Part Chand7 should be rotated 180 degrees so the 3 loops are on top and printed with raft and support. Again, when the loops are high enough loop the other ends of the chains to the fixture so that Chand7, three chains and three Chand5's are all one fitting.
The remaining parts can be printed in any order.
The G9 lamp holders came from http://stores.ebay.co.uk/discountcdrom/
The ceiling fixture (Chand6) is designed to fit 8mm Terminal strips such as these:http://uk.farnell.com/hylec/hyks-02412pp/terminal-block-barrier-12pos-12awg/dp/2056626?MER=bn_search_2TP_LastViewed_1
If you want to use dimmable G9 lamps make sure you purchase ones marked as dimmable from a reputable source. You will also need to purchase a dimmer that is designed for LED lamps to avoid flickering. I used a varilight v-pro dimmer.
Similar models
thingiverse
free

Shelly Dimmer 2 - Compact Case for 2-wire Lamp Install by djos_1475
...instead.
you just need 4 smallish counter sunk screws to attach the lid and some zip-ties to act as internal cable strain relief.
thingiverse
free

Anet A8 Heatbed Adapter for Generic Chain by nikollou
...ne direction.
so you can use this part in conjunction with a purchased chain to have your heatbed wires under control in no time!
thingiverse
free

Amoeba LED Lamp-V1 by ChrisTheViolaNerd
...ints, and negative battery terminal will be wired to the (com) switch point. no wires will be connected to the (nc) switch point.
thingiverse
free

Post LED-Lamp (Downlight) no screws by AKampmeier
...this one for me.
the housing clips together and no screws where used, very useful for outdoor assembly.
i hope you like the lamp.
thingiverse
free

One LED Lamp by kimzorba
... need because the top and wires won't be visible. no secret, just print it.
catia files are there for modification as needed.
cg_trader
$2

DENVER By Astro Lighting
...teel-ceiling-lamp-denver_451933 denver astro lighting ceilling lamp led lamp ceiling light interior glass architectural furniture
thingiverse
free

Eskimo Lamp - the 3D printed DeskLamp by Shruikan
...esklamp,
printable without support.
you need the following parts to build one:
e27 socket
e27 led-bulb
wire
switch
plug
cults
free
Amoeba LED Lamp-V1
...nts, and negative battery terminal will be wired to the (com) switch point. no wires will be connected to the (nc) switch point.
thingiverse
free

Micro LED Lamp by geit_de
...d of creating
useless cubes or other stuff, i want to create actual
functional parts as kind of reward for myself.
happy printing
thingiverse
free

Omron ice cube relay box by Old-Steve
...duino boxes.https://www.thingiverse.com/thing:1719567
that box is 40mm tall.
this box is 30mm tall so it fits the relay perfectly
Woofy
turbosquid
free

Woofie
... available on turbo squid, the world's leading provider of digital 3d models for visualization, films, television, and games.
thingiverse
free

Magnetic Ring Tower by woofy
...ower by woofy
thingiverse
a floating ring magnetic toy, designed to inspire enquiring young minds to the nature of the universe.
thingiverse
free

UP Printer 1kg Spool Holder by woofy
...ginal holder and includes a recess to clear the lower fixing screw on the up.
updated here:http://www.thingiverse.com/thing:28176
thingiverse
free

Strong 1kg Spool Holder by woofy
...;ve also strengthened the upright by adding 3 ribs. finally i made the barrel solid so i could print it raftless and supportless.
thingiverse
free

UP! Plus 3D Printer Spool Holder V2 by Cool_Components
...second version of the spool holder originally created by woofy for the up! plus 3d printer. new features in...
cg_trader
$4

WOOFY TEX AVERY | 3D
...girls in nightclubs - without, it has to be said, a great deal of success. tex avery cartoon wolf woofy 2022 miniatures figurines
3dwarehouse
free

woofys dog house
...woofys dog house
3dwarehouse
advanced dog house #dog #dog_house #futer #house #wes #woofy
3dwarehouse
free

3D Cartoon Character - Woofie
...t might be a useful contribution to the warehouse. a finding that deserved some polishing, a better ambience and further sharing.
3dwarehouse
free

1951 ford kustom
...1951 ford kustom
3dwarehouse
original by 'woofi' on 'gta classics'
Medusa
3ddd
$1

Medusa
...medusa
3ddd
medusa white 890031 osgona
medusa
3ddd
free

MEDUSA
...dusa. моя авторская работа.
высота - 1930 мм.
полигонов - 55к.
нога светильника готова под дополнительные итерации сглаживания.
design_connected
$10

Medusa
...medusa
designconnected
casamania by frezza medusa computer generated 3d model. designed by gamfratesi design studio.
3d_ocean
$5

Medusa Ring
...medusa ring
3docean
jewellery medusa ring
medusa ring obj and 3dm file format.
turbosquid
$50

Medusa
...
turbosquid
royalty free 3d model medusa for download as ztl on turbosquid: 3d models for games, architecture, videos. (1426043)
turbosquid
$5

MEDUSA
...
turbosquid
royalty free 3d model medusa for download as 3dm on turbosquid: 3d models for games, architecture, videos. (1320854)
3ddd
$1

Medusa Tisettanta
...medusa tisettanta
3ddd
tisettanta
стул medusa tisettanta
3d_export
$25

Medusa
...medusa
3dexport
3ddd
$1

ПУФ MEDUSA
...пуф medusa
3ddd
пуф
пуф medusa голубойhttp://elpaso-studio.ru/myagkaya-mebel/2899-puf-medusa-goluboy.html
turbosquid
$25

Medusa
... available on turbo squid, the world's leading provider of digital 3d models for visualization, films, television, and games.
Chandelier
3d_export
$15

Chandelier
...chandelier
3dexport
chandelier
3d_export
$10

chandelier
...chandelier
3dexport
chandelier
3d_export
$10

chandelier
...chandelier
3dexport
chandelier
3d_export
$5

chandelier
...chandelier
3dexport
chandelier
3ddd
$1

chandelier
...chandelier
3ddd
chandelier
3ddd
free

Chandelier
...chandelier
3ddd
chandelier
3d_ocean
$7

chandelier
...chandelier
3docean
accessory acsesuar bulb chandelier decoration light
light, chandelier bulb
3ddd
$1

chandeliers
...chandeliers
3ddd
classic chandeliers for living room ...
3ddd
$1

chandelier
... , metal
ceiling chandelier can be used as a table lamp beside beds, mounted on ceiling
3ddd
$1

Chandelier
... ceiling light , lamp
3ds max 2012 and fbx 2009
chandelier: 28x121 cm