Thingiverse
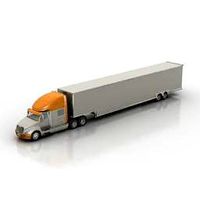
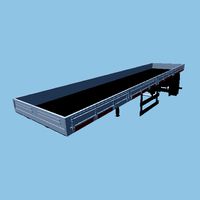
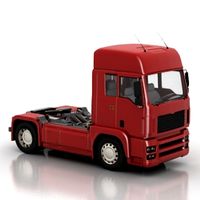
M.A.X. Truck - Mobile Launch Vehicle Trailer by ChisTompso
by Thingiverse
Last crawled date: 3 years, 3 months ago
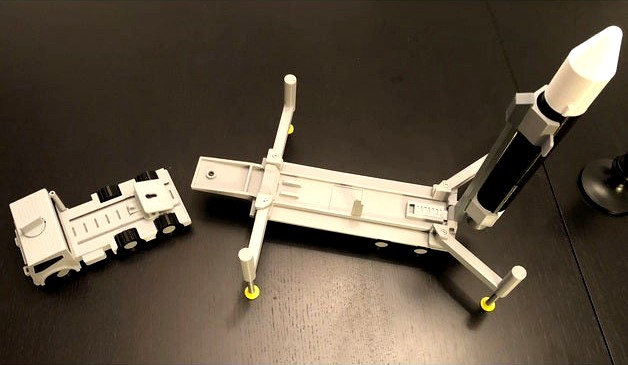
This small satellite mobile launcher is an add-on for the Trailer for the M.A.X. Truck Modular Toy Truck. It carries a New Falcantron rocket, which is designed by the aerospace corporation, The United Rocket Laboratory Alliance for Space Exploration That Likes Blue, originally founded by gazillionaire Jefflon Beckuno. Beckuno, having made his fortune designing fashionable vests for dachshunds, decided that rockets were far more interesting.
The New Falcantron uses the Merltherford-4 engine, with turbopumps that are powered by a team of daschunds running on a wheel while watching videos of Florida lizards. Don't worry, when each dachshund gets tired, they are "hot swapped", and parachute back to earth, where they receive a lot of treats. This dachshund power produces and VacuumISP of 900s!! Unmatched! It has the best ISP.. you've never seen ISP like this... folks, I was down at KSC the other day, and they said this is the best ISP ever... we have the best scientists... Thrust... well.. you don't even want to know.. it will break your brain. We're making full flow staged dachshund cycle great again, folks! OK, moving on to building this thing:
The truck and fifth wheel for towing the trailer can both be found here: https://www.thingiverse.com/thing:3214824
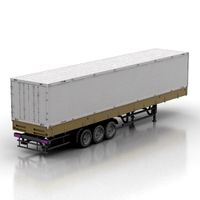
The Trailer can be found here: https://www.thingiverse.com/thing:4575547
Let's chat about sanding. A lot of these parts were intentionally designed to be tight. Why? For friction of course. Example: The rocket stages... held together by friction. Outriggers... friction keeps them from flopping around. You get the idea. I know nothing of your printer. They all print a little different. I can have you remove material, but I can't have you add it. So, you have been warned: Some parts that need friction might not fit when first printed... just sand them down a little. Every 3D hobbyist should have a good set of files, sanders, and knives for post-processing.
Another tip: The hydraulic legs have a twist-to-lock feature at the top and bottom of travel. You can either print them all the same, so they all twist to lock in the same direction, regardless of what side of the trailer they are on... OR... you can use the Mirror function that all slicer apps have to make opposing sets for left and right.
Glue: The caps of the hydraulic cylinders need to be glued on. The feet on the legs also need to be glued on. Doesn't really matter which you do first, but I recommend doing all of this gluing after you've installed the outriggers and the erector mount onto the trailer. This way, you can lower the legs to the ground from the trailer, providing an even plane (the ground beneath the trailer) for the feet to be glued evenly. The cradles for the rocket are also glued to the erector. I recommend that you, first, install the aft cradle onto the rocket, and then glue the cradles to the erector. This assures proper alignment between the forward and aft cradles. You also want to ensure that the raceway on the first stage (the long rectangular feature) is aligned with the stopper on the erector mount (that thing that sticks up in the center of the erector mount). Proper alignment of these features prevents forward travel of the rocket on the trailer while it is lowered.
Yet another tip: Be sure to install the slider lock on the erector mount before installing the erector, or you will have a bad time. Easy fix of course is to just take the erector off and start over. I mean, it's just a nut and bolt, so no need to panic if you screw this up.
A note about nuts and bolts: If you've built any of my stuff before, you know that I love M3 hardware for everything. You'll also know that I'm too lazy to specify which M3 length goes in each hole, and that I always provide an obligatory "just buy a set of miscellaneous M3 bolts". So... well, there it is.
D'Oh! Forgot more gluing... OK, so the rail-mount (the thing that holds the launcher to the rail slots on the trailer) has to be glued into place. This is a deviation from my previous M.A.X. Truck designs. The reason I did this was because it saves a lot of print time and material, and makes it easier to print the erector mount (you don't need a bunch of support material, that will just fail, causing print warp, and anger later). You're probably going to need to sand the edges for it to fit (see note about sanding). Make sure it fits nice and even with the bottom surface of the erector mount.
That's all I can think of for now. I'll update/edit as I think of more things. Feedback is always welcome for improvements. Yes, I know the satellite is lame. Thank you!
This will be my last M.A.X. Truck project for a while. I want to re-focus back on R/C vehicle projects. That said, I highly encourage others to develop more accessories for the M.A.X. Truck system. UPDATE: OK, OK. What a fool I was. The toddler runs the nest and dictates where engineering resources are directed. M.A.X. Truck Garbage Truck accessory coming next...
The New Falcantron uses the Merltherford-4 engine, with turbopumps that are powered by a team of daschunds running on a wheel while watching videos of Florida lizards. Don't worry, when each dachshund gets tired, they are "hot swapped", and parachute back to earth, where they receive a lot of treats. This dachshund power produces and VacuumISP of 900s!! Unmatched! It has the best ISP.. you've never seen ISP like this... folks, I was down at KSC the other day, and they said this is the best ISP ever... we have the best scientists... Thrust... well.. you don't even want to know.. it will break your brain. We're making full flow staged dachshund cycle great again, folks! OK, moving on to building this thing:
The truck and fifth wheel for towing the trailer can both be found here: https://www.thingiverse.com/thing:3214824
The Trailer can be found here: https://www.thingiverse.com/thing:4575547
Let's chat about sanding. A lot of these parts were intentionally designed to be tight. Why? For friction of course. Example: The rocket stages... held together by friction. Outriggers... friction keeps them from flopping around. You get the idea. I know nothing of your printer. They all print a little different. I can have you remove material, but I can't have you add it. So, you have been warned: Some parts that need friction might not fit when first printed... just sand them down a little. Every 3D hobbyist should have a good set of files, sanders, and knives for post-processing.
Another tip: The hydraulic legs have a twist-to-lock feature at the top and bottom of travel. You can either print them all the same, so they all twist to lock in the same direction, regardless of what side of the trailer they are on... OR... you can use the Mirror function that all slicer apps have to make opposing sets for left and right.
Glue: The caps of the hydraulic cylinders need to be glued on. The feet on the legs also need to be glued on. Doesn't really matter which you do first, but I recommend doing all of this gluing after you've installed the outriggers and the erector mount onto the trailer. This way, you can lower the legs to the ground from the trailer, providing an even plane (the ground beneath the trailer) for the feet to be glued evenly. The cradles for the rocket are also glued to the erector. I recommend that you, first, install the aft cradle onto the rocket, and then glue the cradles to the erector. This assures proper alignment between the forward and aft cradles. You also want to ensure that the raceway on the first stage (the long rectangular feature) is aligned with the stopper on the erector mount (that thing that sticks up in the center of the erector mount). Proper alignment of these features prevents forward travel of the rocket on the trailer while it is lowered.
Yet another tip: Be sure to install the slider lock on the erector mount before installing the erector, or you will have a bad time. Easy fix of course is to just take the erector off and start over. I mean, it's just a nut and bolt, so no need to panic if you screw this up.
A note about nuts and bolts: If you've built any of my stuff before, you know that I love M3 hardware for everything. You'll also know that I'm too lazy to specify which M3 length goes in each hole, and that I always provide an obligatory "just buy a set of miscellaneous M3 bolts". So... well, there it is.
D'Oh! Forgot more gluing... OK, so the rail-mount (the thing that holds the launcher to the rail slots on the trailer) has to be glued into place. This is a deviation from my previous M.A.X. Truck designs. The reason I did this was because it saves a lot of print time and material, and makes it easier to print the erector mount (you don't need a bunch of support material, that will just fail, causing print warp, and anger later). You're probably going to need to sand the edges for it to fit (see note about sanding). Make sure it fits nice and even with the bottom surface of the erector mount.
That's all I can think of for now. I'll update/edit as I think of more things. Feedback is always welcome for improvements. Yes, I know the satellite is lame. Thank you!
This will be my last M.A.X. Truck project for a while. I want to re-focus back on R/C vehicle projects. That said, I highly encourage others to develop more accessories for the M.A.X. Truck system. UPDATE: OK, OK. What a fool I was. The toddler runs the nest and dictates where engineering resources are directed. M.A.X. Truck Garbage Truck accessory coming next...
Similar models
thingiverse
free

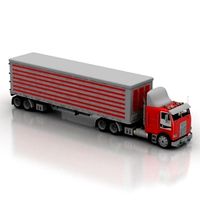
M.A.X. Truck - Trailer by ChisTompso
...his trailer:
rocket launcher https://www.thingiverse.com/thing:4626829
as always, let me know if you have any questions! enjoy!
thingiverse
free

Trailer for truck by gyebi
...on). you need to upscale the the trailer (bigger) or downscale the truck (print in 0.6 scale ratio) to fit these things together.
thingiverse
free

Flatpack Knife Drawer Organizer by MechMyLife
...ll fit together with friction, no gluing needed. if that doesn't suit you then print the side arms at 1 to 2 percent smaller.
thingiverse
free

Cell Phone Mount for 2014 RAM 1500 by rharding13
... don't need that part if you're pairing this with a phone cradle that has it built-in, like my samsung galaxy s10 cradle.
thingiverse
free

Rockets for E-Flight F4U-4 Corsair by tkwasny
...d glue the rockets to the mount. the mounts can be attache to the wing with magnets, double sided tape, or glued on permanently.
thingiverse
free

Galaxy Watch Rocket Dock by rhiannonl
... the need for the stand.
in the images below i post processed it by sanding it and spray painting it red with a high gloss paint.
thingiverse
free

Mandalorian Rocket Cradle
...e gauntlets already and want to add this to the top?
all i have done is simple sliced off the top of stormtrooperguys file.
enjoy
cg_trader
$3

flexi dachshund dog | 3D
...nd
it's ok to scale up, but i don't recommend scaling down.
support is needed under the head.
made with zbrush, fusion360
thingiverse
free

Bomb Cradle by Aslansmonkey
...radle i just stuck a piece of 1.75 filament through and melted down the ends with a heated x-acto knife to make rivets of a sort.
thingiverse
free

Blackmagic Design Micro Converter Mount by awildeone
... the middle thread is 1/4-20 so it would fit any standard camera mount, unless you have a 3/16 mount in which case i cant help :)
Chistompso
thingiverse
free

Caps For Do Nothing Machine by ChisTompso
... with a hammer to get them down the final 2 millimeters, which is good because they have a nice snug fit with no glue or threads.
thingiverse
free

Garden Flag Pole Keep by ChisTompso
...inal freecad files so you can tweak as needed for your use. it is designed to be tight on 7mm, with a notch to allow it to flex.
thingiverse
free

M.A.X. Truck - Front Bumper by ChisTompso
...ly sacrificial, protection going forward. time will tell... my wife thinks it looks like a mustache. i can't unsee it now.
thingiverse
free
M.A.X. Truck - Trailer by ChisTompso
...his trailer:
rocket launcher https://www.thingiverse.com/thing:4626829
as always, let me know if you have any questions! enjoy!
thingiverse
free

Yi Dome Camera Inverted Wall Mount by ChisTompso
...t;yicammount-singlepiece.stl."
you can use the same screws that the camera came with to attach the camera mount to the wall.
thingiverse
free

FPV Prototank with Turret by ChisTompso
...-you'll also need wire, solder, tweezers, soldering iron... you know... all of the basics for working with hobby electronics.
thingiverse
free

Solar-Powered RC Car with Hub-less Front Wheels by ChisTompso
...motor 9g rc robot helicopter airplane boat controls
*miscellaneous m3 screws, nuts, and washers + wire, solder, heat shrink, etc.
Launch
turbosquid
$200

Launched M58
... available on turbo squid, the world's leading provider of digital 3d models for visualization, films, television, and games.
turbosquid
$75

Launch Boat
... available on turbo squid, the world's leading provider of digital 3d models for visualization, films, television, and games.
turbosquid
$50

rocket launch
... available on turbo squid, the world's leading provider of digital 3d models for visualization, films, television, and games.
turbosquid
$5

Launch vehicle
...el launch vehicle for download as c4d, fbx, dae, obj, and dxf on turbosquid: 3d models for games, architecture, videos. (1660555)
3d_export
$65

rocket launching
...rocket launching
3dexport
simple rendering of the scene file
3d_export
$10

Launch 3D Model
...launch 3d model
3dexport
children's bed
launch 3d model zev79 21771 3dexport
3d_export
free

ekranoplan sea launch
...ekranoplan sea launch
3dexport
turbosquid
$30
Derelict Launch Gantry
...alty free 3d model derelict launch gantry for download as fbx on turbosquid: 3d models for games, architecture, videos. (1669952)
turbosquid
$25

Missile Launch Vehicle
...alty free 3d model missile launch vehicle for download as fbx on turbosquid: 3d models for games, architecture, videos. (1197968)
turbosquid
$20

stage launching procession
... free 3d model stage launching procession for download as max on turbosquid: 3d models for games, architecture, videos. (1581910)
Trailer
archibase_planet
free
Trailer
...ailer hindcarriage motorcycle trailer hind-carriage
trailer n070414 - 3d model (*.gsm+*.3ds+*.max) for exterior 3d visualization.
archibase_planet
free

Trailer
...iler forestry trailer hindcarriage hind-carriage
trailer forestry n260614 - 3d model (*.gsm+*.3ds) for exterior 3d visualization.
archibase_planet
free
Trailer
...trailer
archibase planet
trailer
trailer n260907 - 3d model (*.gsm+*.3ds) for interior 3d visualization.
archibase_planet
free
Trailer
...trailer
archibase planet
lorrry truck trailer
trailer n190609 - 3d model (*.3ds) for 3d visualization.
archibase_planet
free
Trailer
...archibase planet
trailer hind-carriage hindcarriage
box trailer 1 n120614 - 3d model (*.gsm+*.3ds) for exterior 3d visualization.
3ddd
$1
Trailer
...trailer
3ddd
trailer , трейлер
маленький та зручний торговий вагончик. текстури є.
3d_export
$5
an old trailer
...an old trailer
3dexport
an old trailer
3d_export
$5
Model of a trailer
...model of a trailer
3dexport
model of a trailer
turbosquid
$50

trailer
...turbosquid
royalty free 3d model trailer for download as c4d on turbosquid: 3d models for games, architecture, videos. (1643198)
turbosquid
$35

Trailer
...turbosquid
royalty free 3d model trailer for download as fbx on turbosquid: 3d models for games, architecture, videos. (1213660)
Mobile
3ddd
$1

Mobil Piu
...mobil piu
3ddd
mobil piu , капитоне
кровать mobil piu
turbosquid
$10
mobile
...urbosquid
royalty free 3d model mobile for download as blend on turbosquid: 3d models for games, architecture, videos. (1385101)
turbosquid
$1

Mobile
...uid
royalty free 3d model mobile for download as fbx and obj on turbosquid: 3d models for games, architecture, videos. (1607690)
3d_export
$5
Mobile Holder
...mobile holder
3dexport
new mobile holder
turbosquid
$55

Mobile
... available on turbo squid, the world's leading provider of digital 3d models for visualization, films, television, and games.
turbosquid
$20

Mobile
... available on turbo squid, the world's leading provider of digital 3d models for visualization, films, television, and games.
turbosquid
$20

mobile
... available on turbo squid, the world's leading provider of digital 3d models for visualization, films, television, and games.
turbosquid
$10

MOBILE
... available on turbo squid, the world's leading provider of digital 3d models for visualization, films, television, and games.
turbosquid
$9

mobile
... available on turbo squid, the world's leading provider of digital 3d models for visualization, films, television, and games.
turbosquid
$1

Mobile
... available on turbo squid, the world's leading provider of digital 3d models for visualization, films, television, and games.
Truck
3d_export
$8
truck
...truck
3dexport
truck
archibase_planet
free

Truck
...truck
archibase planet
truck truck crane car
truck toyota n071013 - 3d model (*.gsm+*.3ds) for exterior 3d visualization.
archibase_planet
free

Truck
...truck
archibase planet
truck lorry car
truck - 3d model (*.gsm+*.3ds) for exterior 3d visualization.
archibase_planet
free

Truck
...truck
archibase planet
truck lorry car
truck n260213 - 3d model (*.gsm+*.3ds) for exterior 3d visualization.
3d_export
$5
truck
...truck
3dexport
3d model of a truck, made for optimus prime!
3d_ocean
$19
Truck
...truck
3docean
four-wheel max truck
precision four-wheel drive truck with mud mask effect, the door can be opened
archibase_planet
free
Truck
...truck
archibase planet
truck car broken car lorry
truck broken - 3d model (*.gsm+*.3ds) for exterior 3d visualization.
archibase_planet
free
Truck
...truck
archibase planet
truck lorry autotruck
truck kenworth t600 n280113 - 3d model (*.gsm+*.3ds) for exterior 3d visualization.
archibase_planet
free
Truck
...
archibase planet
truck freightliner lorry car
truck freightliner n200314 - 3d model (*.gsm+*.3ds) for exterior 3d visualization.
archibase_planet
free
Truck
...truck
archibase planet
truck lorry autotruck
truck 4 eu n160614 - 3d model (*.gsm+*.3ds) for exterior 3d visualization.
Vehicle
3d_export
$30

Vehicle display
...vehicle display
3dexport
vehicle display consists of podium and vehicle cover no vehicle there is a veiled vehicle silhouette
turbosquid
$41

vehicle
... available on turbo squid, the world's leading provider of digital 3d models for visualization, films, television, and games.
turbosquid
$10

vehicle
... available on turbo squid, the world's leading provider of digital 3d models for visualization, films, television, and games.
3d_ocean
$40
Heavy vehicles
...el this model is created with 3ds max 2009 and content .max (3ds max), size: 7,65 mb this model can be used in any scene. enjoy !
3d_export
$6

Trailer Transporter Consignment Vehicle Turnover Vehicle
...trailer transporter consignment vehicle turnover vehicle
3dexport
trailer transporter consignment vehicle turnover vehicle
archive3d
free

Vehicle 3D Model
... sports and recreational vehicle n250714 - 3d model (*.gsm+*.3ds) for interior 3d visualization.
3d_export
$50
Vehicle 3D Model
...vehicle 3d model
3dexport
vehicle
vehicle 3d model fred-13 21262 3dexport
3d_export
$15
special vehicles
...special vehicles
3dexport
3d_export
$10
utility vehicle
...utility vehicle
3dexport
turbosquid
$9
Vehicles pack
...bosquid
royalty free 3d model vehicles pack for download as on turbosquid: 3d models for games, architecture, videos. (1635451)
M
turbosquid
$20
Stage M&M
... available on turbo squid, the world's leading provider of digital 3d models for visualization, films, television, and games.
3ddd
$1

bag m&m's
...bag m&m's
3ddd
bag m&m's
bag m&m;'s
3d_export
$35
iskander m
...iskander m
3dexport
iskander m 3d model
design_connected
$7
barstool m
...barstool m
designconnected
barstool m computer generated 3d model.
3ddd
free

CACTUS M
...cactus m
3ddd
cactus , lzf
настольный светильник cactus m
производитель lzf
design_connected
$13

Anfora M
...anfora m
designconnected
lzf anfora m computer generated 3d model. designed by herranz, miguel.
3ddd
$1
зеркало M Gastone
...зеркало m gastone
3ddd
зеркало m gastone
зеркало m gastone
design_connected
$16

Dogon M
...dogon m
designconnected
emmemobili dogon m chairs computer generated 3d model. designed by ferruccio laviani.
design_connected
$9
Sunlight M
...sunlight m
designconnected
bonacina pierantonio sunlight m computer generated 3d model. designed by bizzozzero, franco.
3ddd
$1

Karman / Norma-M
...arman , norma-m
http://www.karmanitalia.it/en/prodotto/norma-m/norma-m-ap640n/