Thingiverse
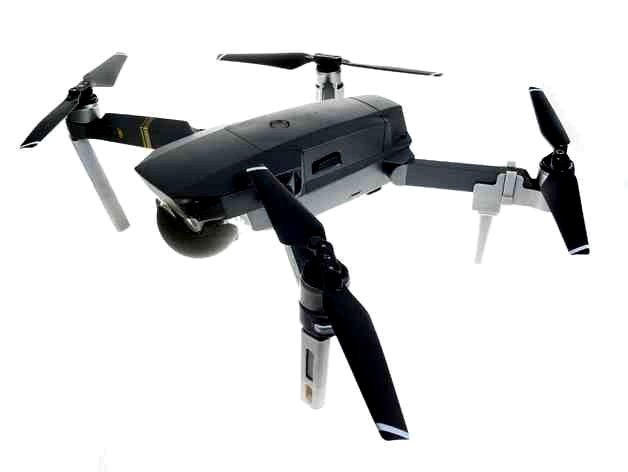
Mavic Pro Legs by SimPer123
by Thingiverse
Last crawled date: 3 years ago
DJI Mavic Pro Landing Gear
Suggest you keep checking back once a week as I will be uploading variations and tweaks regularly as I think of them or if design changes are made !
Update 15/06/2017 - Added Sand Pads
Update 16/06/2017 - Few duplicate STL files seemed to have uploaded. Fixed them now. Suggest anyone who downloaded prior to today, download again !
Update 19/06/2017 - Modified 30mm and 50mm front and rear legs "Sand" Pads
06/07/2017- Recommend change to rear leg bases print orientation
See bottom for more detail
Summary of parts;
Four versions of the front legs (Domed, Flat and two sizes of flat pads)
Four versions of the Rear Legs (Domed, Flat and two sizes of flat pads)
Only one set of the rear mounts are needed (L&R) as they accept dovetailed versions of the rear legs.
The screen shots from Simplify3D show the best orientation I found for the parts and the support material for the best quality print. The dovetails need to be parallel to the build plate for accuracy and fit.
Couple of cautions
If your slicer supports multiple processes, it is recommended when printing the dove tail legs that the dovetail + 2mm is printed at 100% infill for strength. I have included a picture to clarify. I use Simplify3D and this supports multiple processes/Infills. Not sure about other slicers. The balance can be 20-25% to save weight or print the whole object at 100% if desired or your slicer cannot vary the infill.
Support material is a MUST. Yes there is a lot, but for accuracy and print quality/strength the dovetails need to be on the build plate, so the supports need to be there for to support the dome printing. This results in the best dovetail and dome print quality.
Not sure of the accuracy of your printer, but you may need to do some sanding on the dovetails/domes. I use a Flash Forge Creator Pro with Flexion Extruder's and the fit was perfect. They are tight enough to hold securely but can be removed with care.
Tips
If you are finding it hard to remove or insert the dovetails legs, use some Windex or Iso Propyl Alcohol (IPA) to lubricate the Dove Tail joints when inserting or removing the legs. DO NOT FORCE or you risk snapping the dovetail off the leg.
The Dovetail bases can be left attached to the Mavic, but you will need to remove the legs if you have a custom case of course !
Design Notes
The rear leg mounts were designed to move the legs as close to the Mavic body to reduce torsional loading on the rear arm hinge on landing but still maintain stability on landing be it dirt, sand or grass etc.
Even though it would have been far easier to have the legs directly below the motors, I felt that this would put undue stress on the rear arms pivot points. There may be a V2 coming soon :)
Printing Notes
PLA was used and tested. ABS or other plastics could be used, but due the shrinkage you may have problems with the dovetails or fitting the parts to the Mavic. You could try to compensate for the shrinkage, but I foresee lots of wasted prints !
To Come
I will upload more photos in the next few days and different versions of the feet. One set I am working on is pivoting feet/skids at the bottom of the legs, but I need to test for oscillations that could be generated by the down wash of the props......
Since I purchased the combo kit, I have lots of bits and pieces floating around (Spare props, RC cables, Battery to USB convertors etc), so I am in the process of designing a box to hold all these parts so I don't lose them. If you are in the same dilemma, any suggestions for other compartments to add to the design would be welcome so please leave this in the comments !
Updates
15/06/2017
Added both Front and Rear legs with 30mm and 50mm pads more suitable for landing on fine dirt or sand (Or Snow ?). Added pictures showing recommended print orientation.
16/06/2017
Re-ordered the STL files to group front legs and then and rear legs one after the other
19/06/2017
Made changes at the join from the 30mm and 50mm pads to legs as I had the pads break away from the legs due to insufficient material joining the two. Much "Beefier" now !
06/07/2017
Recommend change to rear leg bases print orientation. This is due to the latches weakness and breaking where it meet the base structure since the strength only came from the layers. When printed in the new orientation, the join is much stronger since the filament is now printed perpendicular to the join i.e. The hinge point is now filament. Much stronger ! See the new pictures for a better explanation !
Similar models
thingiverse
free

Tamiya Racing Wing Mount for 54494 or 54688 by millldew123
...op fixing.
update-i have included a wing mount with a flat back so printing is easier. you just need supports for the 2 legs now.
thingiverse
free

Mavic by mwilmar rear arms w/ less supports by Hyprmtr
...e part were the supports would be. i opted to leave the landing leg off of the rear leg to make it look more like the real mavic.
thingiverse
free

DJI Mavic Mini Gear Extensions
... base layer.
the weight of the standard size in pla is 12 grams, sla at 13 grams, and the lite version in sla resin are 8 grams.
thingiverse
free

Mavic Pro Marco Polo Mount by Motley74
... version with the legs for those that use the extended landing gear. also added pics of my printed version attached to my mavic.
thingiverse
free

Zelda Crest without rear leg support. by AwesomeA
...erbot replicator without supports, until i removed the rear legs, this will now lay flat and be printable by just about anything.
thingiverse
free

IPad Mini 4 Holder Hood combo for Mavic Pro RC by SimPer123
...too well. moved the holder slot down by 5mm. this is v2.
24/06/2017
v3 shade holder with side shades added. not tested as yet.
thingiverse
free

Mavic Legs Mk2 by jvouillon
...a new version which doesn't block the sensor.
new version of the dji leg extender. all pieces can be printed without support.
thingiverse
free

50mm Centrifugal to 30mm Axial Adapter by kmccon
...al fan to a 30mm axial fan
i have not printed this yet, so if you see an issue, please let me know asap.
update: added fan files.
thingiverse
free

Rotary tool (Dremel) 50mm sanding pad - M4 by hirez99
...el) 50mm sanding pad - m4 by hirez99
thingiverse
this is my rotary tool (dremel) 50mm sanding pad.
i have used m4 screw+hex nut.
thingiverse
free

Airsoft M4/AR15 rear-wired buffer tube by ibruno26
...aterials, and heat resistance is recommended if you plan to use it in warm weather.
this is only for airsoft toys, not real guns!
Simper123
thingiverse
free

DJI Goggles Cable Clip by SimPer123
...23
thingiverse
dji goggle cable clip
description;
dji goggles cable retaining clip just in case you lose or break the original !
thingiverse
free

FlashForge Creator Pro Spool Holder for Jaycar Filament by SimPer123
...rent range of jaycar pla and abs spools as of june 2016.
dimensions of spool this suits. hole 55mm. depth 90mm. see picture 5.
thingiverse
free

FlashForge Creator Pro Spool Holder for Verbatim Filament by SimPer123
...m).
if you would like a design to suit your spools, let me know your spools hole diameter and spool thickness (see last picture).
thingiverse
free

DJI Spark RC Stick Guard by SimPer123
...uld not accept the height of the vertical support of the v2.
11/9/2017: changed font on the v2
capitalised text and changed font.
thingiverse
free
IPad Mini 4 Holder Hood combo for Mavic Pro RC by SimPer123
...too well. moved the holder slot down by 5mm. this is v2.
24/06/2017
v3 shade holder with side shades added. not tested as yet.
thingiverse
free

DJI Spark Stick Protection / remote Control Stick Guard by SRCDcenter
...spark drone, is a customized version of the user simper123 (https://www.thingiverse.com/thing:2455552). essentially, i just changed the fit a bit...
thingiverse
free

iPad Mini mount for Mavic Pro by Teejs
...allow for the mounting clamps on my unit) of simper123#39;s sun shield https://www.thingiverse.com/thing:2400257 to finish the...
Mavic
3d_export
$5

drone mavic
...drone mavic
3dexport
turbosquid
$49

Mavic DeeMax Wheelset
... available on turbo squid, the world's leading provider of digital 3d models for visualization, films, television, and games.
3d_export
$79

dji mavic 2
...ilable: 3dsmax 2012, 3ds, fbx, obj, c4d, dae, wrl<br>- vray and standar materials .max versions<br>thanks for reading
turbosquid
$1

DJI Mavic Pro Remote Controller Neck Strap Hanging Buckle Bracket Adapter
...ap hanging buckle bracket adapter for download as max and obj on turbosquid: 3d models for games, architecture, videos. (1200579)
3d_export
$149

high detailed of dji mavic 3
...ders need to be edited for the new studio for the final rendering. we tried to create a 3d model most similar to the real object!
3d_export
$5

camera holder for dji mavic pro
... camera, you will also need a standard 1/4-inch short screw. as well as two m3.5 x 5 screws (from the back cover of the computer)
3d_export
$29

dji mavic pro 2 zoom
...deling and texturing.<br>please font’t forget to rate this item if you liked him.<br>kind regards<br>owl3d team
3d_export
$99

dji collection
...inspire 1 and inspire 2<br>- dji phantom 4<br>- dji mavic pro<br>- this 3d model detailed enough for close-up renders<br>-...
thingiverse
free

MAVIC PRO LANDING GEAR (not mavic 2)
...mavic pro landing gear (not mavic 2)
thingiverse
9g light weight extended landing gear for your mavic pro
thingiverse
free

dji mavic by shura2000
...dji mavic by shura2000
thingiverse
dji mavic
Legs
3d_ocean
$10

Furniture Legs
...furniture legs
3docean
furniture furniture legs leg legs metal leg
furniture legs,legs,
archibase_planet
free

Leggings
...eggings
archibase planet
leggings gaiters gaiter clothes
leggings n140713 - 3d model (*.gsm+*.3ds) for interior 3d visualization.
3d_ocean
$4

Chicken legs
...chicken legs
3docean
3ds arman3dg chicken chicken legs games legs low max poly
chicken legs…
turbosquid
$1

legging
...ng
turbosquid
royalty free 3d model legging for download as on turbosquid: 3d models for games, architecture, videos. (1569799)
3d_export
$25

table leg
...table leg
3dexport
table leg with ram
turbosquid
$19

Leg
... available on turbo squid, the world's leading provider of digital 3d models for visualization, films, television, and games.
3d_export
$5

lion leg
...lion leg
3dexport
3d lion leg for cabinet
3d_export
$5

table leg
...table leg
3dexport
table leg for wood milling machine
3ddd
$1

Leg Exercise
...leg exercise
3ddd
тренажер
leg exercise equipment fitness
3d_export
$5

two-legged hook
...two-legged hook
3dexport
two-legged hook
Pro
turbosquid
$29

Pro
...ree 3d model mac pro for download as obj, c4d, fbx, and blend on turbosquid: 3d models for games, architecture, videos. (1505782)
turbosquid
$15

Apple Mac Pro and Pro Display
...ee 3d model apple mac pro and pro display for download as max on turbosquid: 3d models for games, architecture, videos. (1417078)
3d_export
$5

iphone 13 pro max and pro
...3 pro max and 13 pro the model is made in four colors (graphite, gold, silver, and blue), all of which are attached in the files.
3d_export
free

sapphire pro
...sapphire pro
3dexport
sapphire pro 3d printer head mask
3d_export
$4

macbook pro
...macbook pro
3dexport
macbook pro 13" inch 2020 years model
3ddd
free

GentleLase Pro
... syneron , candela
gentlelase pro аппарат для лазерной эпиляции
turbosquid
$25

PRO frame
...rbosquid
royalty free 3d model pro frame for download as max on turbosquid: 3d models for games, architecture, videos. (1148329)
turbosquid
$5

Alien pro
...osquid
royalty free 3d model alien pro for download as blend on turbosquid: 3d models for games, architecture, videos. (1678446)
turbosquid
$5

iphone11 pro
...uid
royalty free 3d model iphone11 pro for download as blend on turbosquid: 3d models for games, architecture, videos. (1562707)
3ddd
$1

Mac Pro (appel)
...mac pro (appel)
3ddd
компьютер , apple
mac pro