Thingiverse

Makerfarm i3v X, Y & Z Limit Switch Covers by GeoDave
by Thingiverse
Last crawled date: 3 years, 1 month ago
8/7/2018 Update
Updated the X-axis limit switch to clear the M8 Lead screw Nut mount
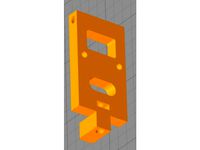
I wanted to cover the solder conections to the X-axis limit switch. I had used this idea on the MPCNC build, so I just modified it to work with the i3v. I made a cover for Y & Z axis while I was at it..
For the Z-axis cover make sure you have at least 29.5mm from the frame of the limit switch to the wooden nema17 mount. My height may be different than yours. I am using a titan extruder now & my X-carriage is narrower. For the original carriage or wider carriage you may loose a couple of mm's width with the X-axis cover.
When changing the Z-axis limit switch I homed the Z-axis before turning the printer off so I would have a better idea of what height to locate the Z-axis limit switch cover bracket. I inserted a small allen wrench in the V-Slot to keep the t-nut from falling out as shown in the 4th photo. After I installed each part, I double checked the wires to make sure the solder joints were not touching any other metal & the wires did not get caught under the M5 screw head.
There is an openscad source & STL for each of the 3 axis covers. The X-axis also has a mirrored copy if you are using the limit switch on the opposite side. There are also 2 STL files that used for reference in the X-axis cover openscad file to show how the x-carriage hits the X-axis limit switch.
Updated the X-axis limit switch to clear the M8 Lead screw Nut mount
I wanted to cover the solder conections to the X-axis limit switch. I had used this idea on the MPCNC build, so I just modified it to work with the i3v. I made a cover for Y & Z axis while I was at it..
For the Z-axis cover make sure you have at least 29.5mm from the frame of the limit switch to the wooden nema17 mount. My height may be different than yours. I am using a titan extruder now & my X-carriage is narrower. For the original carriage or wider carriage you may loose a couple of mm's width with the X-axis cover.
When changing the Z-axis limit switch I homed the Z-axis before turning the printer off so I would have a better idea of what height to locate the Z-axis limit switch cover bracket. I inserted a small allen wrench in the V-Slot to keep the t-nut from falling out as shown in the 4th photo. After I installed each part, I double checked the wires to make sure the solder joints were not touching any other metal & the wires did not get caught under the M5 screw head.
There is an openscad source & STL for each of the 3 axis covers. The X-axis also has a mirrored copy if you are using the limit switch on the opposite side. There are also 2 STL files that used for reference in the X-axis cover openscad file to show how the x-carriage hits the X-axis limit switch.
Similar models
thingiverse
free

Shapeoko 2 limit switch bundle by NitramDeofrab
... z axis. z and x are mods of design by zorlack and lordmundi.
there is one mount for each axis. for y and z two mirrored version.
thingiverse
free

AM8 Limit switch mounting brackets by edsimmons
...xis movement.
you can download the stl files and print with your choice of tools, or grab both openscad files and edit as needed.
thingiverse
free

TEVO Turantula Z axis limit switch (minimal) by limwenyao
...erfectly (on my first try, with no z banding :d)
1 x limit switch
2 x m2 x 16 bolt
1 x m3 x 20 bolt
2 x m4 x 10 bolt
2 x m4 t nut
thingiverse
free

Anet A6 Z-axis limit switch adjuster by Henkolizer
... all fit. also the mounting holes of the limit switch are too small. i used a 1,5mm drill to make the screws fit.
happy printing!
thingiverse
free

Tronxy X1 Y-Axis Limit Switch Mount by simonwilson
...s for mounting the switch to this printed part and uses an m4 screw and t-nut for attaching the mounting bracket to the extrusion
thingiverse
free

FT-5 Limit Switch Mounts by tauscnc
...t as it is of a terrible design.
the block for the z axis is just superglued to the melamine as is the x axis one (to the head).
thingiverse
free
Nereus Z Adjustment by testfly
...when the locknut is turned the screw turns to adjust the limit switch as the adjustment screw sits on the oem limit switch mount.
thingiverse
free

Creality limit switch mount (press fit design) by raymaclabs
... designed this to work with the micro swiss direct drive carriage. if you are using a different carriage you may need to modify.
thingiverse
free

QUBD Two Up Limit Switch Brackets by smerrett79
...es use of the pulley mod hardware with a couple of extra screws. i'll provide instructions if anyone asks how i mounted this.
thingiverse
free

Tevo Tornado X polly cover with limit extended for ikea mirror by XapaPrime
...crews for the new cover and switch. every thing will be the same, except for the limit switch, that will be moved forward by 5mm.
Geodave
thingiverse
free
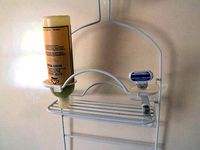
Shower Caddy accessory holder by GeoDave
... upside down on out shower caddy. i did this a few months back, but changed the design recently to make it stay in place better.
thingiverse
free

Wood Bracket with Wire Clip by GeoDave
...be either at 0 or 90 degrees to wood bracket. i included the openscad & dxf files if you want to adjust this to other sizes.
thingiverse
free
Gimbal Spinner by GeoDave
...elow 24mm for the inside width clearance distance or below 54mm for the gimbal distance. i will take a look at fixing that soon.
thingiverse
free
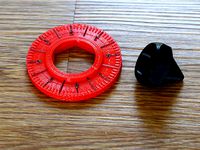
Spinning Top with Thumbwheel by GeoDave
... works.
https://youtu.be/fpaissfvmqm
here is the openscad source file for the thumbwheelhttps://www.thingiverse.com/thing:2407027
thingiverse
free
Parametric Shaft Coupler by GeoDave
... - m3x14mm bolts & locknuts for the 5mm to 5mm that is shown printed in yellow petg.
you can also open this in the customizer
thingiverse
free
Thumbwheel for a Jack Screw by GeoDave
...ese parts, i realized this might make a good spinning top. here is a link to that top. https://www.thingiverse.com/thing:2407034
thingiverse
free
Remix of Meade Autostar holder for LXD75/LX90 mount by GeoDave
... added 1mm extra around the holes.
i used 2 - m3x16mm screws with locknuts & printed at 40% infill with esun silver pla pro.
thingiverse
free
Parametric Tapered Spacer by GeoDave
... the larger diameter against the wheels & they did not roll at all. the 2nd & 3rd photo should show what i mean by this.
thingiverse
free
A Very Customizable Funnel by GeoDave
...gs in the openscad script.
i changed the hook_xx variable names to a more appropriate eye_xx names after a friend mentioned this.
thingiverse
free
Parametric Honeycomb containers by GeoDave
...file to varie the size of them based on 8 variables. since making this, i have made a number of containers for various purposes.
I3V
thingiverse
free

Makerfarm i3v Knob by thecomputerdewd
...makerfarm i3v knob by thecomputerdewd
thingiverse
made this for my makerfarm prusa i3v 10".
thingiverse
free

MakerFarm i3v Bed Clips by PrototypeProfessor
...makerfarm i3v bed clips by prototypeprofessor
thingiverse
https://youtu.be/joaz8nnzsv0
i3v maker farm
thingiverse
free

i3V X clamp by adamfilip
...sal vslot plate.
hole spacing is 40.64mm
using on a modified makerfarm i3v 12"
made for gt2 belt
freecad file also provided
thingiverse
free

Makerfarm Prusa i3v Knob by BigBadBison
...sa i3v knob by bigbadbison
thingiverse
i made this knob for the makerfarm i3v, although it should work on a variety of printers.
thingiverse
free

Prusa i3v bed corners by scurrg
...currg
thingiverse
this is for the makerfarm 8" prusa i3v with the aluminum bed upgrade.
allows for one tool bed levelling.
thingiverse
free

Makerfarm i3v control knob by benlew
...y benlew
thingiverse
this fits on my makerfarm i3v, should also fit any other printer with the reprap discount smart controller.
thingiverse
free

i3v MakerBricks (Indian riprap of MakerFarm by tskamath
...arm by tskamath
thingiverse
my modification to makerbricks i3v, to ensure the use of the 3d printer is enjoyable and not a pain.
thingiverse
free

Prusa i3v y-bed belt bracket by shawnkhang
...prusa i3v y-bed belt bracket by shawnkhang
thingiverse
prusa i3v y-bed belt bracket.
thingiverse
free

Knob for MakerFarm Prusa i3v by acdawg
... on the lcd for the makerfarm prusa i3v.
update
shortened knob overall to keep the knob from interfering with button pressing.
thingiverse
free

i3v Filament Holder by PeteyPub
... work on any printer since the design is pretty standard.
one bolt connection in the center... 8mm rod through the top..
enjoy...
Makerfarm
thingiverse
free
Makerfarm i3v Knob by thecomputerdewd
...makerfarm i3v knob by thecomputerdewd
thingiverse
made this for my makerfarm prusa i3v 10".
thingiverse
free

makerfarm mountingplate for the e3d v6 by Gizmo999
...makerfarm mountingplate for the e3d v6 by gizmo999
thingiverse
e3d v6 mounting plate for the makerfarm
thingiverse
free

Makerfarm Relay Box for vslot by rhcgoat
...makerfarm relay box for vslot by rhcgoat
thingiverse
makerfarm relay box with mounts and cover
m5 mounts
thingiverse
free

Makerfarm Pegasus Hemera Mount
...nt
thingiverse
easy mount for the e3d hemera tp makerfarm pegasus 12".
this is version 1 and i will be making changes to it
thingiverse
free

Pulley for Makerfarm Prusa by BadLoki
...se
remixed pulley to fit onto a makerfarm prusa i3. download the rest of the parts from http://www.thingiverse.com/thing:444591
thingiverse
free

Cablechain Terminals for MakerFarm i3 by rodrigolocateli
...in terminals for makerfarm i3 by rodrigolocateli
thingiverse
simple pieces to fix a cable chain to makerfarm i3 using tie wraps.
thingiverse
free
Makerfarm Prusa i3v Knob by BigBadBison
...sa i3v knob by bigbadbison
thingiverse
i made this knob for the makerfarm i3v, although it should work on a variety of printers.
thingiverse
free

MakerFarm E3D Inductive Sensor Mount by Mortorojo
...makerfarm e3d inductive sensor mount by mortorojo
thingiverse
an inductive sensor mount for makerfarm i3v
wip
thingiverse
free

Makerfarm prusa i3 fan mount by nicolaas
...makerfarm prusa i3 fan mount by nicolaas
thingiverse
a fan mount for the makerfarm prusa i3 that is all wood
thingiverse
free
Makerfarm i3v control knob by benlew
...y benlew
thingiverse
this fits on my makerfarm i3v, should also fit any other printer with the reprap discount smart controller.
Limit
3ddd
free

Curations Limited
...curations limited
3ddd
curations limited
curations limited
3ddd
$1

Curations Limited
...rations limited
3ddd
curations limited , барный
барный стул по мотивам curations limited
3ddd
free

Curations Limited
...ed , стеллаж
полки, стол и зеркало от curations limited с текстурами и материалами v-ray
3d_export
$5

plastic limit knob
...plastic limit knob
3dexport
plastic limit knob
3d_export
$5

machine limit knob
...machine limit knob
3dexport
machine limit knob
3ddd
free

Curations Limited
...абажуром из хлопка. ножка, напоминающая вазу, выполнена из выдувного стекла, основание – из латуни.
размеры, см: 69х36 (диаметр).
turbosquid
$39

set15 - No limits
... available on turbo squid, the world's leading provider of digital 3d models for visualization, films, television, and games.
3ddd
free

Curations Limited Lauran
...нд: curations limited. размеры, см: 110х95х99 см.http://360.ru/goods/0/0/0/107996/ - ссылка на описание данного кресла.
design_connected
$25

Chester - Limited Edition
...nnected
established & sons chester - limited edition computer generated 3d model. designed by future systems, amanda levete.
3ddd
$1
KROKEN LIMITED EDITION
...d
rochebobois
autumn/winter collections 2012 rochebobois paris
kroken limited edition armchairhttp://m.roche-bobois.com
Switch
archibase_planet
free
Switch
...switch
archibase planet
switch cluster switch
light switch 1 - 3d model for interior 3d visualization.
archibase_planet
free
Switch
...switch
archibase planet
switches switch
switch 1 - 3d model (*.gsm+*.3ds) for interior 3d visualization.
archibase_planet
free
Switch
...switch
archibase planet
closer button switch cluster switch
switch - 3d model (*.3ds) for interior 3d visualization.
archibase_planet
free
Switch
...switch
archibase planet
switch closer
light switch 2 - 3d model for interior 3d visualization.
archibase_planet
free
Switch
...switch
archibase planet
closer button switch
switch n300808 - 3d model (*.gsm+*.3ds) for interior 3d visualization
archibase_planet
free
Switch
...switch
archibase planet
closer button switch
switch n141108 - 3d model (*.gsm+*.3ds) for interior 3d visualization.
archibase_planet
free

Switch
...switch
archibase planet
cluster switch closer
switch n260609 - 3d model (*.gsm+*.3ds) for interior 3d visualization.
archibase_planet
free

Switch
...switch
archibase planet
button switch closer
switch 2 - 3d model (*.gsm+*.3ds) for interior 3d visualization.
archibase_planet
free

Switch
...switch
archibase planet
button switch closer
switch n070510 - 3d model (*.gsm+*.3ds) for interior 3d visualization.
3d_export
$5

switch
...switch
3dexport
3d model of a low-poly switch
Z
3d_export
$5

nissan z
...nissan z
3dexport
nissan z
3ddd
$1

Vase Z
...vase z
3ddd
vase z
3ddd
$1

полотенцесушить Z
...полотенцесушить z
3ddd
полотенцесушитель
полотенцесушить z
design_connected
free

Z-Chair
...z-chair
designconnected
free 3d model of z-chair designed by karman, aleksei.
design_connected
$11

Z Lamp
...z lamp
designconnected
phillips z lamp computer generated 3d model. designed by kalff, louis.
3d_export
$5

Dragon balls z
...dragon balls z
3dexport
dragon ball z
turbosquid
$20

Fighter Z
...
turbosquid
royalty free 3d model fighter z for download as on turbosquid: 3d models for games, architecture, videos. (1292563)
turbosquid
$9

Pen Z
...pen z
turbosquid
free 3d model pen z for download as obj on turbosquid: 3d models for games, architecture, videos. (1686775)
turbosquid
free

z chair
...z chair
turbosquid
free 3d model z chair for download as max on turbosquid: 3d models for games, architecture, videos. (1410230)
turbosquid
$5

Letter Z
...urbosquid
royalty free 3d model letter z for download as max on turbosquid: 3d models for games, architecture, videos. (1408540)
Covers
archibase_planet
free

Cover
...cover
archibase planet
cover place setting
cover n170807 - 3d model for interior 3d visualization.
3ddd
$1
cover
...cover
3ddd
ковер , круглый
cover decor
archibase_planet
free

Cover
...cover
archibase planet
cover place setting setting
servis-cafe1930 - 3d model for interior 3d visualization.
turbosquid
free
Coverings
...rings
turbosquid
free 3d model coverings for download as dwg on turbosquid: 3d models for games, architecture, videos. (1279391)
3d_export
$5
plug cover
...plug cover
3dexport
plug cover
turbosquid
$25
Covers
... available on turbo squid, the world's leading provider of digital 3d models for visualization, films, television, and games.
3d_export
$10
manhole cover
...manhole cover
3dexport
manhole cover gost, stl, step
turbosquid
$5

Street Gas Cover Manhole Cover
... available on turbo squid, the world's leading provider of digital 3d models for visualization, films, television, and games.
3ddd
free
Bed cover
...bed cover
3ddd
постельное белье
very useful bed cover
3d_export
$5
cpu cover
...cpu cover
3dexport
cpu cover, cpu box, sheet metal container
Y
turbosquid
$1

Tetera y Galletas y Caf
... available on turbo squid, the world's leading provider of digital 3d models for visualization, films, television, and games.
3ddd
$1

Смеситель Y-CON
...смеситель y-con
3ddd
смеситель , y-con
смеситель y-con
3ddd
$1

Y-Chair
...y-chair
3ddd
tom dixon
y-chair designed by tom dixon,
3ds max + obj, corona
3ddd
$1

Y Chair compilation
....net/products/us/y-chair-sled-base
y chair swivel basehttp://www.tomdixon.net/products/us/y-chair-swivel-base
turbosquid
$190

Y-8
...y-8
turbosquid
royalty free 3d model y-8 for download as max on turbosquid: 3d models for games, architecture, videos. (1658891)
turbosquid
$7

Bench Y
...turbosquid
royalty free 3d model bench y for download as obj on turbosquid: 3d models for games, architecture, videos. (1488746)
turbosquid
$15

bonePile Y
...oyalty free 3d model bonepile y for download as blend and obj on turbosquid: 3d models for games, architecture, videos. (1546374)
turbosquid
$7

Y for Yarn
...d
royalty free 3d model y for yarn model for download as max on turbosquid: 3d models for games, architecture, videos. (1699732)
turbosquid
$2

FONT Y
...quid
royalty free 3d model font y for download as ma and obj on turbosquid: 3d models for games, architecture, videos. (1549457)
3ddd
$1

WOOD-y
...wood-y
3ddd
wooden guy