Thingiverse

Loches Z Axis Upgrade for MakerGear Prusa Mendel by Lochemage
by Thingiverse
Last crawled date: 3 years ago
Update May 20, 2012:
Uploaded a new X-Carriage Endstop holder that is designed to attach and give clearance with the triangle frame at the very top.
Update May 13, 2012:
Added a new X-Carriage version that requires no support. It assumes you can bridge well and requires you to cut excess material at the end. Note: I have not actually printed it as of yet, so I can't be sure it all works properly.
Update May 12, 2012:
Here is a video of me printing the Pink Panther Woman http://www.thingiverse.com/thing:1216 at full size (147.535mm tall).
http://youtu.be/c93jLzPYmBQ
Goals:
Increase the Z Axis Build Range.
Modify Plastic Parts only and re-use the current Vitamins.
Comments:
So many plastic parts have been modified, I'm not sure if I should consider this an upgrade or a full blown new printer version.
It's possible that this change isn't limited to the MakerGear Prusa, but I will leave that to you.
I had a few issues with the X and Z endstops and had to jury-rig my own solutions. Perhaps I will design some new mounts for these.
Summary:
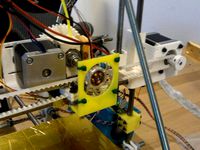
My original build area was about 80mm, I came across a print that required more height so I decided to try and design my own modification that would give it to me. Looking at my printer, I noticed a few areas that could possibly be improved, so I went to work! My new and improved build height is now 150mm!
Problems and Solutions:
Problem 01: The rear mounted X axis belt collided with the threaded rod on the triangle frame vertex assembly. This resulted in a clearance issue when raising the nozzle.
To fix this, I had to consider a new location to mount the belt. I chose to utilize the space just underneath the X track rods as that space is already used by the extruder nozzle.
Problem 02: A good amount of rod space on the Z axis ends up being un-used. The motor mount blocks the Z axis from going beyond the two threaded rods on the top of the printer.
To fix this, I extended the upper frame vertex piece so that it raised the two top rods a good distance. This in turn also raised the Z axis rods so I also extended to lower Z bar clamps to compensate. This worked because the space taken up by the lower clamps was previously un-used rod space anyway.
Problem 03: My current extruder mount caused a clearance issue because the side mounted motor would go underneath the upper frame vertex. Since my new vertex still blocks this, a new extruder mount was required.
To fix this, I designed a derivitive extruder mount that was essentially the same as the one I was using except the motor protrudes from the rear instead. Since I previously moved the X axis belt, there was no issue with the motor colliding with it. You can find this derivitive here: http://www.thingiverse.com/thing:22395.
Problem 04: I found it difficult to tighten the X track rods in place without causing the X carriage to bind.
To fix this, I changed it from using the tension screws (on the bottom of each X-end) to just having some clamps on the rods themselves. The clamps prevent the rods from sliding out, but it's still ok if they slide a little bit, they don't need to be tightly locked. One of the rods is in a hole that does not give it room to 'wiggle', this gives it the stability it needs so the nozzle doesn't move around in the Y direction. The other rod is in a slightly elongated hole which provides the track with the 'play' needed to keep the carriage from binding. I've found that this modification works well and causes no noticable change in print quality.
Uploaded a new X-Carriage Endstop holder that is designed to attach and give clearance with the triangle frame at the very top.
Update May 13, 2012:
Added a new X-Carriage version that requires no support. It assumes you can bridge well and requires you to cut excess material at the end. Note: I have not actually printed it as of yet, so I can't be sure it all works properly.
Update May 12, 2012:
Here is a video of me printing the Pink Panther Woman http://www.thingiverse.com/thing:1216 at full size (147.535mm tall).
http://youtu.be/c93jLzPYmBQ
Goals:
Increase the Z Axis Build Range.
Modify Plastic Parts only and re-use the current Vitamins.
Comments:
So many plastic parts have been modified, I'm not sure if I should consider this an upgrade or a full blown new printer version.
It's possible that this change isn't limited to the MakerGear Prusa, but I will leave that to you.
I had a few issues with the X and Z endstops and had to jury-rig my own solutions. Perhaps I will design some new mounts for these.
Summary:
My original build area was about 80mm, I came across a print that required more height so I decided to try and design my own modification that would give it to me. Looking at my printer, I noticed a few areas that could possibly be improved, so I went to work! My new and improved build height is now 150mm!
Problems and Solutions:
Problem 01: The rear mounted X axis belt collided with the threaded rod on the triangle frame vertex assembly. This resulted in a clearance issue when raising the nozzle.
To fix this, I had to consider a new location to mount the belt. I chose to utilize the space just underneath the X track rods as that space is already used by the extruder nozzle.
Problem 02: A good amount of rod space on the Z axis ends up being un-used. The motor mount blocks the Z axis from going beyond the two threaded rods on the top of the printer.
To fix this, I extended the upper frame vertex piece so that it raised the two top rods a good distance. This in turn also raised the Z axis rods so I also extended to lower Z bar clamps to compensate. This worked because the space taken up by the lower clamps was previously un-used rod space anyway.
Problem 03: My current extruder mount caused a clearance issue because the side mounted motor would go underneath the upper frame vertex. Since my new vertex still blocks this, a new extruder mount was required.
To fix this, I designed a derivitive extruder mount that was essentially the same as the one I was using except the motor protrudes from the rear instead. Since I previously moved the X axis belt, there was no issue with the motor colliding with it. You can find this derivitive here: http://www.thingiverse.com/thing:22395.
Problem 04: I found it difficult to tighten the X track rods in place without causing the X carriage to bind.
To fix this, I changed it from using the tension screws (on the bottom of each X-end) to just having some clamps on the rods themselves. The clamps prevent the rods from sliding out, but it's still ok if they slide a little bit, they don't need to be tightly locked. One of the rods is in a hole that does not give it room to 'wiggle', this gives it the stability it needs so the nozzle doesn't move around in the Y direction. The other rod is in a slightly elongated hole which provides the track with the 'play' needed to keep the carriage from binding. I've found that this modification works well and causes no noticable change in print quality.
Similar models
grabcad
free

Extruder Clearance Kit for Prusa
...use a lifted x carriage on my lulzbot which effectively lowers my x ends on my z axis rods, giving me more travel at the top end.
thingiverse
free

Ender 3 - Z axis bracket
... where i shifted mount for extruder motor so there is much more space between filament going into extruder and z-axis lead screw.
thingiverse
free

Nema23 integrated Prusa Z with Vertex and rod clamp by PlanoRepRap
...andard" -- the same as with a nema 17 design.
still working on a printed coupler. but any nema23 to 8mm coupler should work.
thingiverse
free
RepRap Prusa extruder fan mount by maakit
...riage and extruder in abs.
so i designed a simple mounting plate for a 4cm fan which bolts on to the bottom of the x-belt clamps.
thingiverse
free

Vulcan 400 xy rotation bracket by finallygotregistered
...l), and lift and rotate. before re-attaching slip out your t-nuts if preassembly and slide in new ones on the sides of the 3030.
thingiverse
free

Z Axis Motor Mount for Voxelab Aquila by MDHR
...coming version but they will fit with some persuasion. it looks melted to fix clearance issues. plus i think it looks kinda cool.
thingiverse
free

Reprappro Mendel E3D Mount by plexer
...nt 1d and the top and bottom piezo clamp pieces.
pictures and resting results to come once i receive my kit from precision piezo.
thingiverse
free

Printrbot Dual Extruder Carriage and Mount V2 for Linear Bearings by kojo-jojo
...illow bushings. 1 pillow bushing is still required for under the mount for the new axis.
use this with my x axis 3 rod addons.
thingiverse
free

Prusa z Axis mount by FlatBadger
...rom here to mount onto the x axis motor on my prusa i3 mk2.5 using the parts i'd already printed.
it wobbles a lot less now.
thingiverse
free

Ender 3 Extruder to PSU Mount
...an issue i was having with the z axis skipping steps on occasion. that said, there is no guarantee that this will fix that issue.
Lochemage
thingiverse
free

MOVES Plaque by Lochemage
...es plaque by lochemage
thingiverse
this is a simple little plaquei made for a 3d printing demonstration at the school i work at.
thingiverse
free

BlockBot v2 by Lochemage
...blockbot v2 by lochemage
thingiverse
i cleaned up the original stls so they would print correctly and added pin joints.
thingiverse
free

Sanding Block by Lochemage
... is a sanding block based off of a design i've seen before as a child. it's meant to have medium precision for crafting.
thingiverse
free

Screen Door Wheel by Lochemage
... replacement wheel for a sliding screen door. as you can see from the picture, mine was quite worn out and ready to be replaced.
thingiverse
free

Flip-up Helmet Replacement Lever by Lochemage
...lmet replacement lever by lochemage
thingiverse
a friend of mine broke a lever on his motorcycle helmet, so i offered to fix it.
thingiverse
free

Train Track Cross Joint by Lochemage
...is a design my friend wanted me to print for his son. this is a cross joint to connect two sets of tracks that cross each-other.
thingiverse
free

6 month old baby girl scan by Lochemage
...aby girl scan by lochemage
thingiverse
i used 123d catch to take a scan of my 6 month old daughter emily while she was sleeping.
thingiverse
free

Rubiks Void Cube with Built in Patterns by Lochemage
... of having to use paint or stickers.
the picture shows a cube that was printed and then each piece was bathed in acetone vapor.
thingiverse
free

Rubiks cube for the blind (using original Rubiks core) by Lochemage
...his is a version of the rubiks cube for the blind that uses the core from an original rubiks cube instead of a fully printed one.
thingiverse
free

RC Power Switch Mount by Lochemage
...ting around the house, i always lose them.
you can mount this on either side of the switch, the remote just snaps in.
enjoy.
Loches
turbosquid
$25

Loch Ness Monster
... available on turbo squid, the world's leading provider of digital 3d models for visualization, films, television, and games.
turbosquid
$200

lochness monster 3ds+text
... available on turbo squid, the world's leading provider of digital 3d models for visualization, films, television, and games.
turbosquid
$10

loch ness ladle spoon
... available on turbo squid, the world's leading provider of digital 3d models for visualization, films, television, and games.
3ddd
free

joerger Acubo 3 loch
...joerger acubo 3 loch
3ddd
joerger , смеситель
коллекция acubo
артикул 621.30.300
virtual_land
free

Loch Duich
...loch duich
virtualland
thingiverse
free

Loch Ness Monster
...loch ness monster
thingiverse
loch ness monster
thingiverse
free

Loch Ness Monster Desk Model with Loch Stand by markthorpe
... stand by markthorpe
thingiverse
the loch ness monster.
the stand is a satellite mapped model of the loch (squeezed down a bit).
3dbaza
$2

Lochness Cupboard (343287)
...lochness cupboard (343287)
3dbaza
lochness cupboard 3d model
sketchfab
$13

Castle Loch, Scotland
...maben castle lies at the southern end of the loch.
wikipedia.org - castle loch, scotland - buy royalty free 3d model by libanciel
3dbaza
$2

Lochness Large Cabinet (343288)
...lochness large cabinet (343288)
3dbaza
lochness large cabinet 3d model
Makergear
thingiverse
free

MakerGear M2 faceplate by TimEdwards
...frame and holds itself in place.
the makergear logo is presumed to be a trademark of makergear, inc., http://www.makergear.com.
thingiverse
free

spacer for Makergear X-Carriage by mic
...spacer for makergear x-carriage by mic
thingiverse
spacer for makergear x-carriage
thingiverse
free

bioprinter for makergear M2 by goldengrape
...for makergear m2 by goldengrape
thingiverse
remix fromhttps://3dprint.nih.gov/discover/3dpx-008366
try to modify my makergear m2
thingiverse
free

Modified Y-stage by MakerGear
...ified y-stage used for the makergear heated build platform. these files may be helpful for botters using or waiting on their hbp.
thingiverse
free

Makergear M2 Fan Bracket by Werner
...makergear m2 fan bracket by werner
thingiverse
makergear m2 fan bracket for use with fan shroud thing:69327
thingiverse
free

MakerGear HotEnd by RaD
...makergear hotend by rad
thingiverse
it helps you to build new mendel90 model.
thingiverse
free
Makergear Z Axis Knob by Aydelott
...makergear z axis knob by aydelott
thingiverse
makergear z axis knob press in steel when the abs is still a little warm
thingiverse
free

Makergear M2 Filament guide by Werner
...ent guide by werner
thingiverse
slightly optimised 3mm filament guide for makergear m2
with provision for 2. mount for small fan
thingiverse
free

Fan Shroud (MakerGear M2) by JohnShawDesign
...by johnshawdesign
thingiverse
tested fan shroud for makergear m2. centers air flow for better overhangs and more direct cooling.
thingiverse
free

MakerGear M2 Tool Holder by wschleter
...thingiverse
a compact toolholder for a makergear m2. mounts to the frame using two existing holes. freecad source file included.
Mendel
thingiverse
free

Mendel Foot with pad for Alloy Mendel by maza250
...d for alloy mendel by maza250
thingiverse
40 mm high corner foot with base pad for use with 30x30mm extrusion - in alloy mendel.
thingiverse
free

Rigid Prusa mendel/mendel Bar clamp by wakalics
...iverse
original prusa mendel bar clamp is so weak.
i remade the bar clamp by idea from sells mendel.
www.wakalics.blogspot.kr
thingiverse
free

Mendel Squashfeet by superdoek
...mendel squashfeet by superdoek
thingiverse
shoes for your mendel (original vertex)
thingiverse
free

RepRap Mendel Stabilizer by g0nz00
...tabilizer by g0nz00
thingiverse
a stabilizer for reprap mendel, i use it for a bigger version of the reprappro tricolour mendel.
thingiverse
free

Fan Prusa Mendel by Rafertech
...fan prusa mendel by rafertech
thingiverse
fan prusa mendel.
thingiverse
free

Mendel Inspired Snowflake by flintols
...mendel inspired snowflake by flintols
thingiverse
holiday fun with mendel corners!
thingiverse
free

Tweezer Holder for Mendel (or Prusa Mendel) by MakerCubed
...opping mine, so if there's a spot for it, it won't get lost.
it's parametric in openscad to set it for left or right.
thingiverse
free

Fan holder - Mendel by rafaellsi
...fan holder - mendel by rafaellsi
thingiverse
experimental for 40x40mm fan - mendel reprappro
thingiverse
free

Mendel Feet by tonokip
...mendel feet by tonokip
thingiverse
thingiverse
free

Mendel Z tensioner by timschmidt
...rse
openscad remake of mendel's z tensioner. part of the mendel openscad re-work being done here: thingiverse.com/thing:3118
Upgrade
turbosquid
$15

Upgraded Glock
...e 3d model upgraded glock for download as obj, fbx, and blend on turbosquid: 3d models for games, architecture, videos. (1185950)
3ddd
$1

Calligaris / UPGRADE
...calligaris / upgrade
3ddd
calligaris
c материалом
3d_export
free

cz upgrade
...cz upgrade
3dexport
https://www.buymeacoffee.com/mestrezen3d https://linktr.ee/mestrezen3
turbosquid
$80

Custer Tank upgrade
... available on turbo squid, the world's leading provider of digital 3d models for visualization, films, television, and games.
turbosquid
$39

Domestos 1 upgrade
... available on turbo squid, the world's leading provider of digital 3d models for visualization, films, television, and games.
3d_export
$10

Upgraded tea cup
...upgraded tea cup
3dexport
a cup with an unusual design and a unique shape for a more enjoyable tea experience
3d_export
$8

dixy outlander classic style upgraded poplar wood lounge chair
...utlander classic style upgraded poplar wood lounge chair
3dexport
dixy outlander classic style upgraded poplar wood lounge chair
turbosquid
free

AK-12 + Upgrades low-poly 3D model
...ow-poly 3d model for download as fbx, blend, and unitypackage on turbosquid: 3d models for games, architecture, videos. (1501145)
evermotion
$700

Upgrade from V-ray 1.5 to 3.5 for 3ds max
...here is no need to purchase a new dongle - your current dongles will be reprogrammed to carry v-ray 3. evermotion 3d models shop.
evermotion
$300

Upgrade from V-Ray 2.0 to V-ray 3.5 for 3ds Max
... interface (gui) for editing settings on one machine and one render node for rendering on one machine. evermotion 3d models shop.
Prusa
turbosquid
$2

Frame Filament Guide Clip-On for Prusa Mk3
...rame filament guide clip-on for prusa mk3 for download as stl on turbosquid: 3d models for games, architecture, videos. (1634730)
3d_export
free

prusa i3 mk3s laser mount for opt lasers
...to learn more about the blue laser technology that conceived the cutting and engraving laser heads from opt lasers, please visit:
turbosquid
free

Prusa small printer adapter holder
...er for download as ipt, skp, dwg, dxf, fbx, ige, obj, and stl on turbosquid: 3d models for games, architecture, videos. (1642936)
3d_export
$30

geisha by jonathan adler
...** i did a 3d printing test in the prusa software, you can find it among the attached images.<br>exchange:<br>.blend...
thingiverse
free

Prusa without Prusa (rc2) by madless
...prusa without prusa (rc2) by madless
thingiverse
just the main part of prusa rc2 faceshield, without writing.
enjoy :)
thingiverse
free

Prusa by acejbc
...prusa by acejbc
thingiverse
prusa knob info
m3 8mm screw
thingiverse
free

Prusa house
...prusa house
thingiverse
how prusa house could look like...
thingiverse
free

Prusa Mk2 "Fake Prusa" LCD cover by anraf1001
...r by anraf1001
thingiverse
version of prusa's lcd cover with "fake prusa" instead of "original prusa"
thingiverse
free

Prusa stabilizator by gutiueugen
...prusa stabilizator by gutiueugen
thingiverse
prusa stabilizator
thingiverse
free

Keychain Prusa by rbarbalho
...keychain prusa by rbarbalho
thingiverse
keychain with text prusa.
Axis
3ddd
$1

Мария Axis
...
3ddd
кухня , классическая , axis
модель кухни.
3d_export
$22

Axis robot 6-axis robotic arm
...ing parts drawings, standard parts purchased parts list, can be produced directly according to the drawings, welcome to download!
3ddd
free

Versatile Axis
...ddd
nexus , плитка
http://bvtileandstone.com/ceramic-porcelain/versatile-axis/
3d_export
$19

robot 2 axis
...robot 2 axis
3dexport
robot 2 axis
turbosquid
$40

Axis R5F
... available on turbo squid, the world's leading provider of digital 3d models for visualization, films, television, and games.
turbosquid
$40

Axis S5F
... available on turbo squid, the world's leading provider of digital 3d models for visualization, films, television, and games.
turbosquid
$30

Axis Athlon
... available on turbo squid, the world's leading provider of digital 3d models for visualization, films, television, and games.
turbosquid
$10

Linear Axis
... available on turbo squid, the world's leading provider of digital 3d models for visualization, films, television, and games.
3d_export
$15

drawing axis
...drawing axis
3dexport
simple rendering of the scene file
3ddd
$1

versatile axis ARC
...versatile axis arc
3ddd
versatile , плитка
versatile axis arc red dot design award
Z
3d_export
$5

nissan z
...nissan z
3dexport
nissan z
3ddd
$1

Vase Z
...vase z
3ddd
vase z
3ddd
$1

полотенцесушить Z
...полотенцесушить z
3ddd
полотенцесушитель
полотенцесушить z
design_connected
free

Z-Chair
...z-chair
designconnected
free 3d model of z-chair designed by karman, aleksei.
design_connected
$11

Z Lamp
...z lamp
designconnected
phillips z lamp computer generated 3d model. designed by kalff, louis.
3d_export
$5

Dragon balls z
...dragon balls z
3dexport
dragon ball z
turbosquid
$20

Fighter Z
...
turbosquid
royalty free 3d model fighter z for download as on turbosquid: 3d models for games, architecture, videos. (1292563)
turbosquid
$9

Pen Z
...pen z
turbosquid
free 3d model pen z for download as obj on turbosquid: 3d models for games, architecture, videos. (1686775)
turbosquid
free

z chair
...z chair
turbosquid
free 3d model z chair for download as max on turbosquid: 3d models for games, architecture, videos. (1410230)
turbosquid
$5

Letter Z
...urbosquid
royalty free 3d model letter z for download as max on turbosquid: 3d models for games, architecture, videos. (1408540)