Thingiverse
Lithophane Lamp v4/v3 by GrkMangas
by Thingiverse
Last crawled date: 4 years, 4 months ago
Heads up!
Anyone changing the size of the lithphanes should be careful. If you make a lithophane of 100x100mm with 2mm border, then you need to change the parameters so the length of the litholength is set to 96mm. This is because the formula takes 96mm and adds 2 x lithophaneborder then adds 2 x tolerance. So overall it will be... 96mm + 2 x 2mm + 2 x 0.2mm = 100.4mm between the posts. If I see people struggling, I will try to change the formulate to something easier.
Update
Releasing V4 updated filed. Some changes are a cosmetic changes. The changes where done to help hide the seam caused by the joining of the lid and base. The chamfered edges help smooth the transition and make the split look sort of a design feature.
I have also gotten rid of the tabs on top as some users have reported that they can break off. Instead of the tabs, pins will be used to join the top and bottom. This was also done as well so that if you want you could use magnets instead of the pins. The magnets are really strong and hold the lid in place nicely! The screws are just M5 bolts about 8mm long. Make sure they are magnetic. I believe I'm just using 8mm magnets
For the most part, all the previous settings will work.
I'll be slowly working on the description as I am pressed on time. Things will slowly phase out from the old design to the new design :
Description
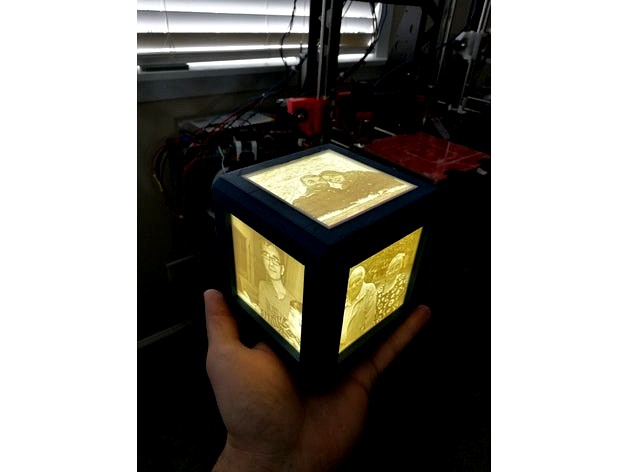
Lithophane are great gifts to give to family and friends. They are a great way to show meaningful pictures to everyone in a clever way. When unlit, you can barely see the pictures hidden in the plastic, but with some background light, those images pop out and convoy sentimental pictures that have been chosen. I wanted to design something that not only showed those pictures, but that also looked good as well when not lit.
This is the 3rd iteration of my design. I have another iteration which I am working on that will be released in a while.
Information
The box is meant to hold lithophane pictures of 75mm x 75mm x 3mm.
There is a 2mm border added to hold the pictures in place. I have posted pictures of the settings needed. The site used to create the lithophanes is..http://3dp.rocks/lithophane/
Please use the settings I have provided as they are a best fit.
Overall, the default tolerance added to the box is 0.4mm. This allows stuff to fit nicely and can help assembly parts with minor defects. They should slide in smoothly and be taken out smoothly with the tolerances added in there. Please do not force the lithophanes in the box, you do not want to break off the posts. If you are seeing fit issues, shave off some of the sides with a knife as there can be excess material on the sides. If not, you may have to reprint the lithospheres a tad bit thinner/smaller
I have provided a bit of a space in the hole on the lid where the posts fit in. This is so you may add glue in the hole to permanently seal it in place. You do not have to glue it in if you don't want. The one I made fits nicely and holds the lid in place.
The mounting spaces for G9 are set to 17mm in the model and for G4, it is 12mm. Please let me know if you need this changed. Thank you
Tips
When you are getting ready to solder everything, I suggest adding flux to the LED strip pads before you tape them to the walls. This will help you later on when you need to solder the wires in place.
You do not have to tape the LED strips to the walls if you do not want to. They will work just as fine on the base. The LED on the walls help illuminate the lithophanes better tho.
You do not have to use LED strips if you don't want to. Circular LED rings work just as fine as well.Glue or tape it to the bottom and you are set.
Make sure to shave off excess materials off your lithophanes. Since the base is normally squished, you will have a small edge sticking out, just cut it off with a knife or a razor. Just be careful cutting off the excess material.
For the Fusion 360 files, if you go to parameters setting, you will notice that the variable Lithophanelength is set to 71mm and that the border is set to 2mm. This is done because the overall length of the cutouts is lithophanelength(71mm) + lithophaneborder(2mm)*2 + tolerance(.4mm). That equals 75.4mm altogether. This means that if you want a box that can fit 100mm lithophane, you will need to set the lithophanelength to 96mm.
Supplies Used
5.5 x 2.1mm Barrel Power Female DC Power Cable Jake Adapter Connector Plug 12Vhttp://a.co/jgTRSzb
LED Flexible Light Strip, 12Vhttp://a.co/30JdIr0
DC12V 1A UL-Listed Switching Power Supply Adapterhttp://a.co/5i3uWh4
22 Gage wirehttp://a.co/atwRThq
8mm Magnets
These are the stuff I used to make these. You do not have to use them. I only posted these to show you the type of supplies you will need.
Suggestions
If you have any suggestions or would like me to revise something for you, please let me know so I can work on it. I do need dimensions tho so I can change some things around. I won't be doing them all, but if it's a pretty common suggestion, I will be happy to upload a new version.
Anyone changing the size of the lithphanes should be careful. If you make a lithophane of 100x100mm with 2mm border, then you need to change the parameters so the length of the litholength is set to 96mm. This is because the formula takes 96mm and adds 2 x lithophaneborder then adds 2 x tolerance. So overall it will be... 96mm + 2 x 2mm + 2 x 0.2mm = 100.4mm between the posts. If I see people struggling, I will try to change the formulate to something easier.
Update
Releasing V4 updated filed. Some changes are a cosmetic changes. The changes where done to help hide the seam caused by the joining of the lid and base. The chamfered edges help smooth the transition and make the split look sort of a design feature.
I have also gotten rid of the tabs on top as some users have reported that they can break off. Instead of the tabs, pins will be used to join the top and bottom. This was also done as well so that if you want you could use magnets instead of the pins. The magnets are really strong and hold the lid in place nicely! The screws are just M5 bolts about 8mm long. Make sure they are magnetic. I believe I'm just using 8mm magnets
For the most part, all the previous settings will work.
I'll be slowly working on the description as I am pressed on time. Things will slowly phase out from the old design to the new design :
Description
Lithophane are great gifts to give to family and friends. They are a great way to show meaningful pictures to everyone in a clever way. When unlit, you can barely see the pictures hidden in the plastic, but with some background light, those images pop out and convoy sentimental pictures that have been chosen. I wanted to design something that not only showed those pictures, but that also looked good as well when not lit.
This is the 3rd iteration of my design. I have another iteration which I am working on that will be released in a while.
Information
The box is meant to hold lithophane pictures of 75mm x 75mm x 3mm.
There is a 2mm border added to hold the pictures in place. I have posted pictures of the settings needed. The site used to create the lithophanes is..http://3dp.rocks/lithophane/
Please use the settings I have provided as they are a best fit.
Overall, the default tolerance added to the box is 0.4mm. This allows stuff to fit nicely and can help assembly parts with minor defects. They should slide in smoothly and be taken out smoothly with the tolerances added in there. Please do not force the lithophanes in the box, you do not want to break off the posts. If you are seeing fit issues, shave off some of the sides with a knife as there can be excess material on the sides. If not, you may have to reprint the lithospheres a tad bit thinner/smaller
I have provided a bit of a space in the hole on the lid where the posts fit in. This is so you may add glue in the hole to permanently seal it in place. You do not have to glue it in if you don't want. The one I made fits nicely and holds the lid in place.
The mounting spaces for G9 are set to 17mm in the model and for G4, it is 12mm. Please let me know if you need this changed. Thank you
Tips
When you are getting ready to solder everything, I suggest adding flux to the LED strip pads before you tape them to the walls. This will help you later on when you need to solder the wires in place.
You do not have to tape the LED strips to the walls if you do not want to. They will work just as fine on the base. The LED on the walls help illuminate the lithophanes better tho.
You do not have to use LED strips if you don't want to. Circular LED rings work just as fine as well.Glue or tape it to the bottom and you are set.
Make sure to shave off excess materials off your lithophanes. Since the base is normally squished, you will have a small edge sticking out, just cut it off with a knife or a razor. Just be careful cutting off the excess material.
For the Fusion 360 files, if you go to parameters setting, you will notice that the variable Lithophanelength is set to 71mm and that the border is set to 2mm. This is done because the overall length of the cutouts is lithophanelength(71mm) + lithophaneborder(2mm)*2 + tolerance(.4mm). That equals 75.4mm altogether. This means that if you want a box that can fit 100mm lithophane, you will need to set the lithophanelength to 96mm.
Supplies Used
5.5 x 2.1mm Barrel Power Female DC Power Cable Jake Adapter Connector Plug 12Vhttp://a.co/jgTRSzb
LED Flexible Light Strip, 12Vhttp://a.co/30JdIr0
DC12V 1A UL-Listed Switching Power Supply Adapterhttp://a.co/5i3uWh4
22 Gage wirehttp://a.co/atwRThq
8mm Magnets
These are the stuff I used to make these. You do not have to use them. I only posted these to show you the type of supplies you will need.
Suggestions
If you have any suggestions or would like me to revise something for you, please let me know so I can work on it. I do need dimensions tho so I can change some things around. I won't be doing them all, but if it's a pretty common suggestion, I will be happy to upload a new version.