GrabCAD

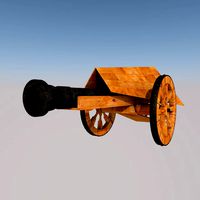
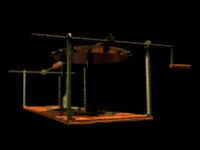
Leonardo Da Vinci Catapult
by GrabCAD
Last crawled date: 1 year, 11 months ago
This is my entry for the "Da Vinci Gear Challenge".
Link to the Creation: http://members.iinet.net.au/~rmine/Leonardo.html
Printing method used: FDM
3D Printer: Utlimaker 2
Material: M-ABS & Ninjaflex 3mm
Nozzle diameter: 0,4mm
Layer height: 0,2mm
Print time: ~45 hours
Post-processing:
- some pieces don't need support for print, others need.
- no tools or glue needed because of the "carpentery" joints.
- I have chosen this Catapult, because I did exactly the same a months weeks ago, but it was not 3D Printable a this time. So I changed everything.
- First I scalled it down to 7 meters to 500mm. But I've tried to keep the proportion and make it sturdy.
- Then all the joints were made so that the whole structure is sturdy. I asked my father for some Carpentery joints.
- Naturally I have let some tolerances for the joints, for that I used the equation system in Solidworks, so that it is easily changeable. Now the tolerance is 0,4mm.
Is it Printable ?
- I've printed the whole Catapult with my 3D Printer. For that, I used M-ABS, I bought some recently. And I was impressed how sturdy it is !
-So all parts can be easily printed with an FDM printer.
Update 14/05: Last Update, the Catapulte works ! To prove it, a little video of the catapult shooting a 9.5 mm ABS ball. It goes quite far I think !
Update 08/05: As I said yesterday, I've printed the Ninjaflex core of the upper arm (Part T2). But it doesn't work because of the shape of T2, I have to cut a slide away (see picture). I will print the newer part, and see if it works. I've also updated the Zip files of the functionnal catapult.
Update 07/05: I've added the Ladder that Leonardo DaVinci made to load the catapult with projectiles. I will also print the ninjaflex inlay and the ladder tomorrow (08/05).
Update 01/05: I've printed the arm, and winch. And it works !! The catapult shoots litlle 9.5mm balls 2-3 meters away ! But the arm is not finished, I've just printed the outer part out of ABS, I will print Wednesday the Ninjaflex part (inner core).
Update 30/04: I did a 6th version of part T2, but a special one.. the outside of Part T2 will be printed in ABS (1.5 mm widht) and the inner core in Ninjaflex ! I think this is gonna be the best solution, so that the Catapult is functionnal. The part can be seen in the folder "Part T_Simulation" - " Part T Flexible Core".
Update 27/04: Little update, I did 5 different versions of part T2: I did a test with 10N, 20N, and some of them 50N to see if they will bend/break.
Update 26/04: I did some simulation with 4 different types of Arms (Part T2) to see what kind of modification I have to make: Make a groove in the arm, make it smaller, bigger...
Update 24/04: The "Catapult Functionnal" zip file has been updated.
I've Printed A1-A2-B1-B2-D-E-F-G-H-I-J-K-L-M-N-O-P-Q, it's looking pretty good so far, I will adjust some parts in the next days.
Update 23/04: - Part T is now in 2 seperate pieces: T1-T2. Special Feature, the Original piece (T) was already bend, so it was not functionnal.. but now Part T2 is straight and fixed with a Scarf Joint to part T1 so that you can "charge the catapult ! And a big slot is carved into Part T2, so that the part won't break !
- I've zipped the two different version of the Catapult: the first one is "Catapult Not Functionnal), the seconde one "Catapult Functionnal"
Update 17/04: Part K-L-M-N are now printed, you can see the picture in "Cura Test Print", the fit is great and the ultimaker 2 did a great job !
Update 16/04: I added some pictures of some pieces that I will print, to show how it fits together. (Part G-H-I-J)
Update 16/04: I have Printed the parts G-H-I-J with an Ultimaker 2 using Neofill ABS. I used fast printing settings, but with a 0.4mm tolerance, it's a nice fit.
Pictures of the print are in the "Cura test prints" folder
I also added: Part A-B-C Splitt in two seperate pieces, so that they are printable.
The joint that I use for the Parts split in half is in the folder "Part A-B-C in seperate pieces".
STL, IGES and SW Files are included in the ZIP.
During the next Weeks, I will print the parts and show how it prints.
Thank you Stratasys for bringing up this challenge !
I hope you enjoy it !
Leave a "♥"
Similar models
thingiverse
free

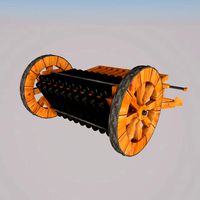
Leonardo Da Vinci Catapult by Alexis67
...e catapult works perfectly ! it shoots the small 3d printed balls 9 foot away or 3 meters ( which is quite impressive i think !).
thingiverse
free

Ninjaflex / Flexible Filament Adapter for Duplicator i3 V2 by ninjaplatypus
... speed at 60% with a 325% first layer height on buildtak. also i changed the infill overlap which was 15% on my settings to 30 %.
thingiverse
free

Assembled catapult without support by Genapart
...e: the trigger and the arm are more resistant.
07/01/17
new update: increased of the 4 trigger axes to make them easier to print.
thingiverse
free

Printable Catapult by NoobMaker
...i\'ve modified the design some. hopefully this will scale and print ok, i don\'t have any way to test it at the present.
thingiverse
free

Garmin Edge 800/1000 bike mount by Goose_A340
...ause they don't fit. get the right set.
latest update: a version for 25 mm handlebars (just the handlebar parts were updated)
thingiverse
free

Kid Boo Easy to print by Santy777
... splitted it in 4 parts (legs, body, arm dx and arm sn);
i've also upgraded the body part with some useful supports,
enjoy ;)
thingiverse
free

Bike Helmet Mirror Ball Joint by MinersC
...ole of the larger piece, and since i use abs a little acetone fuses them together. seems to fit better and provide more strength.
thingiverse
free

Neslon Refit 1/1700 by kscalemodels
... make easier to print
update 04-11-2019 how did i forget to include a part? don't know but here's the round bit mid ships
thingiverse
free
![The Ultimate Catapult, almost. [Seej] by roguemat](/t/806478.jpg)
The Ultimate Catapult, almost. [Seej] by roguemat
...#39;ve done things right. i've also included the sketchupfile so you guys can have your way with it. and a zip of everything.
thingiverse
free

Ball Joint Fan mount for Printrbot Simple by adamxcarey
... replaced that cup joint with the bigger one. i've also included a 'middle piece' of 2x ball joint to extend the arm.
Catapult
3d_export
$5

medieval catapult
...medieval catapult
3dexport
this is a catapult
turbosquid
$30

Catapult
...turbosquid
royalty free 3d model catapult for download as ma on turbosquid: 3d models for games, architecture, videos. (1266660)
turbosquid
$11

Catapult
...urbosquid
royalty free 3d model catapult for download as max on turbosquid: 3d models for games, architecture, videos. (1491788)
turbosquid
free

catapult
...urbosquid
royalty free 3d model catapult for download as c4d on turbosquid: 3d models for games, architecture, videos. (1381505)
turbosquid
$10

Catapult
...d
royalty free 3d model catapult for download as max and obj on turbosquid: 3d models for games, architecture, videos. (1409408)
turbosquid
$85

Catapult
...alty free 3d model catapult for download as 3ds, fbx, and obj on turbosquid: 3d models for games, architecture, videos. (1610894)
turbosquid
$5

Catapult
...alty free 3d model catapult for download as 3ds, max, and fbx on turbosquid: 3d models for games, architecture, videos. (1309806)
turbosquid
$40

Catapult
...free 3d model catapult for download as 3ds, obj, 3dm, and skp on turbosquid: 3d models for games, architecture, videos. (1270846)
turbosquid
$15

Catapult
...free 3d model catapult for download as fbx, obj, dae, and stl on turbosquid: 3d models for games, architecture, videos. (1608939)
turbosquid
$55

Catapult
...3d model catapult for download as 3ds, obj, fbx, 3dm, and skp on turbosquid: 3d models for games, architecture, videos. (1338352)
Leonardo
3ddd
$1

Leonardo it.
...leonardo it.
3ddd
дверь
leonardo it. дверь
3ddd
free

Leonardo Halmar
...leonardo halmar
3ddd
leonardo halmar , стул
кресло руководителя leonardo halmar
design_connected
$13

Leonardo
...leonardo
designconnected
santa & cole leonardo pendant lights computer generated 3d model. designed by antoni arola.
3ddd
$1

Leonardo
...leonardo
3ddd
leonardo
кухня леонардо
fbx - сгладить фасады и мойку
общее кол.полигонов около 320 000
turbosquid
$10

Leonardo
...alty free 3d model leonardo for download as max, max, and obj on turbosquid: 3d models for games, architecture, videos. (1537039)
3ddd
$1

GIROFLEX / LEONARDO
...giroflex / leonardo
3ddd
giroflex , кресло
офисное кресло leonardo фабрика giroflex
3ddd
$1

Bellavista Leonardo
... кофейный , круглый
кофейный столик bellavista leonardo
3ddd
$1

ASNAGHI INTERIORS LEONARDO
... leonardo , барный
стул для бара
asnaghi interiors leonardo
60 200 poly
3ddd
$1
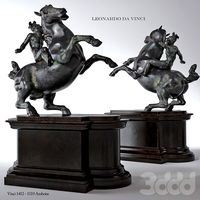
leonardo da vinci
...leonardo da vinci
3ddd
всадник , лошадь
leonardo da vinci
turbosquid
$15

Leonardo chair
...uid
royalty free 3d model leonardo chair for download as max on turbosquid: 3d models for games, architecture, videos. (1422679)
Vinci
3d_export
$9

clcok vinci
...clcok vinci
3dexport
clcok vinci
3ddd
$1
willisau vinci chair
...willisau vinci chair
3ddd
willisau , vinci
vinci chair from willisau ag.
design_connected
$13
Vinci chair
...vinci chair
designconnected
willisau vinci chair computer generated 3d model. designed by ballendat, martin.
3ddd
$1

BOVA-комод-vinci
...bova-комод-vinci
3ddd
bova , комод
bova-комод-vinci
3ddd
$1
leonardo da vinci
...leonardo da vinci
3ddd
всадник , лошадь
leonardo da vinci
3d_export
$25
a - leonardo da vinci
...a - leonardo da vinci
3dexport
a - leonardo da vinci<br>antiquity
turbosquid
$10

Pouf Vinci
...ty free 3d model pouf vinci for download as max, obj, and fbx on turbosquid: 3d models for games, architecture, videos. (1507069)
turbosquid
$30
Da Vinci
... available on turbo squid, the world's leading provider of digital 3d models for visualization, films, television, and games.
3d_export
$25
machine- leonardo da vinci
...machine- leonardo da vinci
3dexport
machine- leonardo da vinci
3d_export
$25

mortar - leonardo da vinci
...mortar - leonardo da vinci
3dexport
mortar - leonardo da vinci
Da
3ddd
$1

Luce da Vivere
...luce da vivere
3ddd
luce da vivere
luce da vivere mary 387/6+3
3ddd
$1

Luce da Vivere
...luce da vivere
3ddd
luce da vivere
luce da vivere
cristalline 494/12 rosso/cromo
turbosquid
$6

Cabinet DA
...ty free 3d model cabinet da for download as max, fbx, and obj on turbosquid: 3d models for games, architecture, videos. (1637312)
turbosquid
$6
Bookcase DA
... free 3d model bookcase da for download as max, fbx, and obj on turbosquid: 3d models for games, architecture, videos. (1639996)
turbosquid
$5
Wardrobe DA
...y free 3d model wardrobe da for download as max, fbx, and obj on turbosquid: 3d models for games, architecture, videos. (1661117)
turbosquid
$5
Partition DA
... free 3d model partition da for download as max, fbx, and obj on turbosquid: 3d models for games, architecture, videos. (1640359)
3ddd
$1
Ecstacity_LAMPADA DA TERRA
...ecstacity_lampada da terra
3ddd
ecstacity
торшер ecstacity_lampada da terra
3ddd
$1
leonardo da vinci
...leonardo da vinci
3ddd
всадник , лошадь
leonardo da vinci
turbosquid
$60

DA-ExoticWeapons
... available on turbo squid, the world's leading provider of digital 3d models for visualization, films, television, and games.
turbosquid
$32
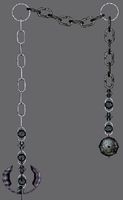
DA-SpikedChainMace
... available on turbo squid, the world's leading provider of digital 3d models for visualization, films, television, and games.