Thingiverse
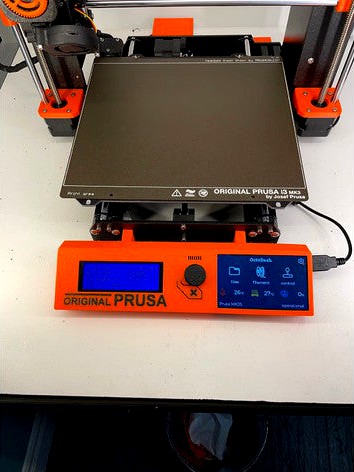
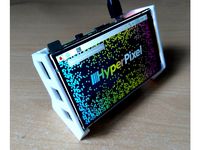
LCD + Hyperpixel 4" touchscreen cover for Prusa MK3/S/+ by puckpuck
by Thingiverse
Last crawled date: 3 years, 3 months ago
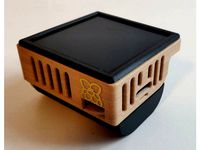
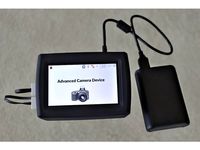
LCD cover that works with the awesome Hyperpixel 4" touchscreen.
No fitment issues from other similar covers.
This is for: MK3/MK3S/MK3S+
Letters stl is also included if you want to make this a multi color print.
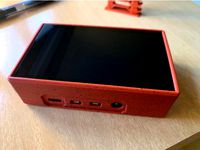
The RPi + Hyperpixel screen will slide it properly, not too snug. The cover itself is centered properly for an MK3S. The angle of the cover maximizes gets as close to the original as possible, keeping clearance with the surface blow, and still allows the default knob (and custom ones) to have proper clearance with the print bed.
This cover does require you to solder power onto your RPi. Honestly if you are going to power the Hyperpixel 4" screen + a camera + cpu fan + Octoprint, you are risking it by going in with a USB connector, even one with 18 gauge wires. As such I recommend you solder 18 gauge wires onto the solder pads on your RPi, and wire those into a reliable 5V power source with at least 3 amps. See included picture for which solder pads to use. VCC=PP1/PP2. Ground=PP3/4/5/6
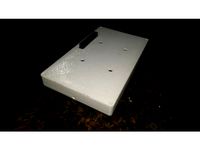
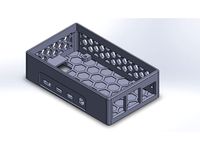
The main LCD mounts using the same screws and method as the original. I started with Prusa .step files for the LCD cover. You can hack away with the included Fusion 360 design if you like.
Though it will still work if you don't do this, I highly recommend you also trim the headphone jack on your RPi, since it sticks out more than anything else, and that 2mm matters. You won't be connecting headphones to this, so it shouldn't be an issue. Using a knife, score around the headphone jack, then snip it off with some wire cutters. I included pictures to show this.
For anyone asking, yes you can run a FanShim with a Hyperpixel 4". The key to doing this is to disable the fan's LED and button by specifying the --noled --nobutton command line options as part of the install-service script for the fan. I ran with just a heat sink and would get an occasional heat warning. Since installing the fan I've had no issues, even inside my enclosure.
Printing both the Letters and LCD cover multi-color using PrusaSlicer
Add the LCD Cover.stl
Add the Letters.stl
Select just Letters, and change the Position: x=175.85, y=76.75
Select both the Letters and LCD cover, make sure you have them both selected, and do the following moves in this order: rotate-Z=325, translate-X=4, translate-y=6. The values will reset to 0 after you do each one. Once done the part should now show as green and "printable" in PrusaSlicer
Since we rotated the part by -35 degrees, we should set offset the infill angle accordingly to minimize any gaps along the perimeter. As such set infill angle to: 10
Supports from build plate only (for the mounts)
Set extruders for each part
Slice and check the first 1-2 layers to make sure the letters are lined up perfectly. You may need to go back to step 2, and change y= by .25mm.
Printing just the cover
After adding the cover, rotate-Z=325
Offset X by 4 and Y by 6 and the part should show green on the bed for printing.
Since we rotated the part by -35 degrees, we should set offset the infill angle accordingly to minimize any gaps along the perimeter. As such set infill angle to: 10
Supports from build plate only (for the mounts)
Slice and print
Layer Height = 0.2mm
No fitment issues from other similar covers.
This is for: MK3/MK3S/MK3S+
Letters stl is also included if you want to make this a multi color print.
The RPi + Hyperpixel screen will slide it properly, not too snug. The cover itself is centered properly for an MK3S. The angle of the cover maximizes gets as close to the original as possible, keeping clearance with the surface blow, and still allows the default knob (and custom ones) to have proper clearance with the print bed.
This cover does require you to solder power onto your RPi. Honestly if you are going to power the Hyperpixel 4" screen + a camera + cpu fan + Octoprint, you are risking it by going in with a USB connector, even one with 18 gauge wires. As such I recommend you solder 18 gauge wires onto the solder pads on your RPi, and wire those into a reliable 5V power source with at least 3 amps. See included picture for which solder pads to use. VCC=PP1/PP2. Ground=PP3/4/5/6
The main LCD mounts using the same screws and method as the original. I started with Prusa .step files for the LCD cover. You can hack away with the included Fusion 360 design if you like.
Though it will still work if you don't do this, I highly recommend you also trim the headphone jack on your RPi, since it sticks out more than anything else, and that 2mm matters. You won't be connecting headphones to this, so it shouldn't be an issue. Using a knife, score around the headphone jack, then snip it off with some wire cutters. I included pictures to show this.
For anyone asking, yes you can run a FanShim with a Hyperpixel 4". The key to doing this is to disable the fan's LED and button by specifying the --noled --nobutton command line options as part of the install-service script for the fan. I ran with just a heat sink and would get an occasional heat warning. Since installing the fan I've had no issues, even inside my enclosure.
Printing both the Letters and LCD cover multi-color using PrusaSlicer
Add the LCD Cover.stl
Add the Letters.stl
Select just Letters, and change the Position: x=175.85, y=76.75
Select both the Letters and LCD cover, make sure you have them both selected, and do the following moves in this order: rotate-Z=325, translate-X=4, translate-y=6. The values will reset to 0 after you do each one. Once done the part should now show as green and "printable" in PrusaSlicer
Since we rotated the part by -35 degrees, we should set offset the infill angle accordingly to minimize any gaps along the perimeter. As such set infill angle to: 10
Supports from build plate only (for the mounts)
Set extruders for each part
Slice and check the first 1-2 layers to make sure the letters are lined up perfectly. You may need to go back to step 2, and change y= by .25mm.
Printing just the cover
After adding the cover, rotate-Z=325
Offset X by 4 and Y by 6 and the part should show green on the bed for printing.
Since we rotated the part by -35 degrees, we should set offset the infill angle accordingly to minimize any gaps along the perimeter. As such set infill angle to: 10
Supports from build plate only (for the mounts)
Slice and print
Layer Height = 0.2mm
Similar models
thingiverse
free
Control Panel for Hyperpixel 4" Touchscreen + LCD + Raspberry Pi4 for Octoprint and OctoDash Prusa MK3s+ 4.0 by paycraft
...rg/prints/47153-lcd-hyperpixel-4-touchscreen-cover
malolo's snap fit case pi4 case: https://www.thingiverse.com/thing:3723561
thingiverse
free

5" HDMI LCD Waveshare RPI Case by flos88
...by flos88
thingiverse
i started to design the front cover.
after the test print is successful i start with the base (45° angle).
thingiverse
free
Hyperpixel Touch Screen Mount plate for MK3S by Kondor2004
...berry pi 4b case (with prusa mk3s bracket)"
all credit goes to him for creating a nice case for raspberry pi 4b. thank you!
thingiverse
free
Displays holder HyperPixel 4.0 w RB + Prusa LCD ( Prusa i3 MK3s ) by JuroH
...rse
stand alone holder for 2 displays
hyperpixel 4.0 touch screen with raspberry 4 ( high resolution display )
prusa lcd display
thingiverse
free

Headphone Stand by Worti2
...o turn it in the right angle and you have to set "build plate adhesion" to "none".
have a lot of fun with it.
thingiverse
free
Mobile Raspberry Pi 4b, Touchscreen, Battery by joewhite7
...exchange the versions dependent of hdmi available or not.
using two 18650 batteries, battery life is about 6 hours for streaming.
thingiverse
free
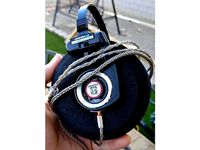
Koss KSC-75 Ultra Mod by rklm
...the ksc-75 driver inside the grado g cushion pads (similary to the kph-30i ultra mod). which files should i...
thingiverse
free
LCD 4" by gespin7342
...lcd 4" by gespin7342
thingiverse
4inch rpi lcd (a) https://www.waveshare.com/4inch-rpi-lcd-a.htm
thingiverse
free

Artillery Part cooling fan for Prusa MK3 or bear upgrade by Mateomcg
...ering and spade. star may need minor sanding but should push fit into the space tightly and not need anything else to secure it.
thingiverse
free
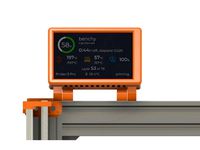
Hyperpixel 4 + RPI 3B - Bear upgrade by tomasf71
... - bear upgrade
it is designed to use https://www.thingiverse.com/thing:3050607 for attaching to 20x40 v-slot aluminum extrusion.
Hyperpixel
thingiverse
free
Raspberry Pi Hyperpixel Stand by major_tomm
...and for a raspberry pi and pimoroni hyperpixel 4.0
this is very much work in progress, i can't guarantee it will fit your pi.
thingiverse
free
HyperPixel 4.0 Pi 4 Case *BETA*
...for a raspberry pi 2-3 version here: https://www.thingiverse.com/thing:3153767
i've also provided the solidworks design file.
thingiverse
free
Hyperpixel 4 + RPI 3B - Bear upgrade by tomasf71
... - bear upgrade
it is designed to use https://www.thingiverse.com/thing:3050607 for attaching to 20x40 v-slot aluminum extrusion.
thingiverse
free
Raspberry Pi 400 - HyperPixel 4.0 mount by jwktje
...ove all supports after printing to get a good fit on the pi. especially underneath the screen.
i used this screen and this cable
thingiverse
free
Hyperpixel Touch Screen Mount plate for MK3S by Kondor2004
...berry pi 4b case (with prusa mk3s bracket)"
all credit goes to him for creating a nice case for raspberry pi 4b. thank you!
thingiverse
free

Hyperpixel 4 Square Raspberry 3 A+ Case
...e display or use longer ones, 2,5 x 10mm in my case.
i've updated files with a less holes and a no holes version of the case.
thingiverse
free
Hyperpixel 4.0 Pi 4 Model B Case
...or any modeling software for that matter), so it no doubt could stand to be cleaned up, but it works well enough for my purposes.
thingiverse
free
Displays holder HyperPixel 4.0 w RB + Prusa LCD ( Prusa i3 MK3s ) by JuroH
...rse
stand alone holder for 2 displays
hyperpixel 4.0 touch screen with raspberry 4 ( high resolution display )
prusa lcd display
thingiverse
free
Control Panel for Hyperpixel 4" Touchscreen + LCD + Raspberry Pi4 for Octoprint and OctoDash Prusa MK3s+ 4.0 by paycraft
...rg/prints/47153-lcd-hyperpixel-4-touchscreen-cover
malolo's snap fit case pi4 case: https://www.thingiverse.com/thing:3723561
thingiverse
free
HyperPixel Raspberry Pi NAS by Multimedia4Linux
...ousings has been fixed
x500-1000 rev. 04 (2020-12-03)
alternativ mounting solution for the casing top part added (part x500-1211)
Touchscreen
3d_ocean
$10

Touchscreen Phone
...r stand alone renderings. the button as well as speaker on the front are modelled for added realism and depth for those tight ...
turbosquid
$2

Touchscreen Kiosk
... available on turbo squid, the world's leading provider of digital 3d models for visualization, films, television, and games.
3d_export
$35
TF 700 Tablet PC 10 in touchscreen 3D Model
...export
universal tablet pc 10 in touchscreen android notebook
tf 700 tablet pc 10 in touchscreen 3d model plasticv 80776 3dexport
3d_ocean
$10

Sleek Touchscreen Smart Phone
... of multi-touch smart phone designs. the small details such as the buttons, camera lens, speaker and other components have bee...
3ddd
$1
Celular Samsung
...3ddd телефон , samsung samsung s5230 mid level full touchscreen ...
3d_export
$30
LG arena 3D Model
...arena 3d model 3dexport lg km900 arena phone mobile touchscreen lg arena 3d model s.e.3ddd 26566...
3d_export
$30

SONY Xperia Tablet 3D Model
...xperia tablet 3d model 3dexport sony xperia tablet android touchscreen sony xperia tablet 3d model barbarosa222 58716...
3d_export
$15

Iphone Black 3D Model
...black 3d model 3dexport phone electronics iphone cellphone smartphone touchscreen touch screen iphone black 3d model ryleyswan 81168...
3d_export
$40

Google Nexus One 3D Model
...3d model 3dexport google nexus one phone mobile cellular touchscreen google nexus one 3d model h1studio 21421...
3d_export
$45
HTC Flyer Tablet 3D Model
...htc flyer tablet 3d model 3dexport touchscreen tablet htc 3d model 3ds max phone htc flyer...
Mk3
turbosquid
$50

cention mk3
...ty free 3d model cention mk3 for download as ma, obj, and fbx on turbosquid: 3d models for games, architecture, videos. (1454148)
turbosquid
$129

MK3 Tank
... available on turbo squid, the world's leading provider of digital 3d models for visualization, films, television, and games.
turbosquid
$100

Toyota Supra MK3
... available on turbo squid, the world's leading provider of digital 3d models for visualization, films, television, and games.
turbosquid
$44

cention mk3 low poly
...d model cention mk3 low poly for download as ma, obj, and fbx on turbosquid: 3d models for games, architecture, videos. (1454666)
turbosquid
$30

Challenger I Mk3 Falcon
... available on turbo squid, the world's leading provider of digital 3d models for visualization, films, television, and games.
turbosquid
$10

American Frag hand grenade MK3
...free 3d model american frag hand grenade mk3 for download as on turbosquid: 3d models for games, architecture, videos. (1393624)
turbosquid
$20

Mk3 US Navy Combat Knife
...ty free 3d model mk3 us navy combat knife for download as fbx on turbosquid: 3d models for games, architecture, videos. (1172791)
3d_export
$29

Ford Fiesta MK3 Modified 3D Model
...7 tumerfx mtumer mehmet t?mer 1993 1995 1996 wrc special modifed modifiye
ford fiesta mk3 modified 3d model mtumer 30698 3dexport
3d_export
$99

Toyota Supra Mk3 19861993 3D Model
...ort fast coupe japan 1986 1987 1988 1989 1990 1991 1992 1993 tuning turbo
toyota supra mk3 19861993 3d model squir 62530 3dexport
turbosquid
$5

Timothy Oulton Mars Chair MK3
...on mars chair mk3 for download as 3ds, max, obj, fbx, and dae on turbosquid: 3d models for games, architecture, videos. (1209782)
Lcd
turbosquid
$20

lcd
... available on turbo squid, the world's leading provider of digital 3d models for visualization, films, television, and games.
turbosquid
$15

LCD
... available on turbo squid, the world's leading provider of digital 3d models for visualization, films, television, and games.
turbosquid
$10

LCD
... available on turbo squid, the world's leading provider of digital 3d models for visualization, films, television, and games.
turbosquid
$10

LCD
... available on turbo squid, the world's leading provider of digital 3d models for visualization, films, television, and games.
turbosquid
$2

lcd
... available on turbo squid, the world's leading provider of digital 3d models for visualization, films, television, and games.
turbosquid
$1

lcd
... available on turbo squid, the world's leading provider of digital 3d models for visualization, films, television, and games.
turbosquid
free
lcd
... available on turbo squid, the world's leading provider of digital 3d models for visualization, films, television, and games.
turbosquid
free

LCD
... available on turbo squid, the world's leading provider of digital 3d models for visualization, films, television, and games.
3ddd
$1
Noti Lcd Sofa
...noti lcd sofa
3ddd
noti , lcd
3d model of noti lcd sofa
3d_ocean
$7

Lcd tube wall
...hrome electronic electronic lcd tv videowall
lcd tube wall you can put in the lcd your own texture or movie in it and animate it.
Prusa
turbosquid
$2

Frame Filament Guide Clip-On for Prusa Mk3
...rame filament guide clip-on for prusa mk3 for download as stl on turbosquid: 3d models for games, architecture, videos. (1634730)
3d_export
free

prusa i3 mk3s laser mount for opt lasers
...to learn more about the blue laser technology that conceived the cutting and engraving laser heads from opt lasers, please visit:
turbosquid
free

Prusa small printer adapter holder
...er for download as ipt, skp, dwg, dxf, fbx, ige, obj, and stl on turbosquid: 3d models for games, architecture, videos. (1642936)
3d_export
$30

geisha by jonathan adler
...** i did a 3d printing test in the prusa software, you can find it among the attached images.<br>exchange:<br>.blend...
thingiverse
free

Prusa without Prusa (rc2) by madless
...prusa without prusa (rc2) by madless
thingiverse
just the main part of prusa rc2 faceshield, without writing.
enjoy :)
thingiverse
free

Prusa by acejbc
...prusa by acejbc
thingiverse
prusa knob info
m3 8mm screw
thingiverse
free

Prusa house
...prusa house
thingiverse
how prusa house could look like...
thingiverse
free

Prusa Mk2 "Fake Prusa" LCD cover by anraf1001
...r by anraf1001
thingiverse
version of prusa's lcd cover with "fake prusa" instead of "original prusa"
thingiverse
free

Prusa stabilizator by gutiueugen
...prusa stabilizator by gutiueugen
thingiverse
prusa stabilizator
thingiverse
free

Keychain Prusa by rbarbalho
...keychain prusa by rbarbalho
thingiverse
keychain with text prusa.
Cover
archibase_planet
free

Cover
...cover
archibase planet
cover place setting
cover n170807 - 3d model for interior 3d visualization.
3ddd
$1
cover
...cover
3ddd
ковер , круглый
cover decor
archibase_planet
free

Cover
...cover
archibase planet
cover place setting setting
servis-cafe1930 - 3d model for interior 3d visualization.
turbosquid
free
Coverings
...rings
turbosquid
free 3d model coverings for download as dwg on turbosquid: 3d models for games, architecture, videos. (1279391)
3d_export
$5
plug cover
...plug cover
3dexport
plug cover
turbosquid
$25
Covers
... available on turbo squid, the world's leading provider of digital 3d models for visualization, films, television, and games.
3d_export
$10
manhole cover
...manhole cover
3dexport
manhole cover gost, stl, step
turbosquid
$5

Street Gas Cover Manhole Cover
... available on turbo squid, the world's leading provider of digital 3d models for visualization, films, television, and games.
3ddd
free

Bed cover
...bed cover
3ddd
постельное белье
very useful bed cover
3d_export
$5
cpu cover
...cpu cover
3dexport
cpu cover, cpu box, sheet metal container
4
turbosquid
$9

Office Chair 4-4
... available on turbo squid, the world's leading provider of digital 3d models for visualization, films, television, and games.
3d_export
$5

doors- 4
...doors- 4
3dexport
doors 4
3d_export
$5

hinge 4
...hinge 4
3dexport
hinge 4
3ddd
$1

Штора №4
...штора №4
3ddd
штора №4
3d_export
free

playstation 4
...playstation 4
3dexport
playstation 4
3ddd
$1

nexus 4
...nexus 4
3ddd
lg , телефон
nexus 4
3ddd
$1

4 Poufs
...4 poufs
3ddd
пуф
4 soft poufs
turbosquid
$12

Calligraphic Digit 4 Number 4
...hic digit 4 number 4 for download as max, obj, fbx, and blend on turbosquid: 3d models for games, architecture, videos. (1389332)
3ddd
$1

Dauphin 4+
...dauphin 4+
3ddd
кресло
dauphin 4+ конференц кресло
3ddd
$1

iPhone 4
...
3ddd
apple , iphone , телефон
модель iphone 4.