Thingiverse

Laser Spindle Attachment. by GremlinRC
by Thingiverse
Last crawled date: 3 years ago
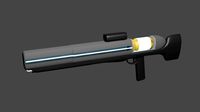
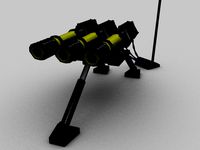
Following on from my drag knife spindle attachement, I wanted a similar mechanism for attaching my laser (3.5W) to my spindle using a ring clamp. The spindle is an 80mm 2.2kW water cooled spindle and the ring attaches to the collar (narrower and black) at the bottom of the spindle.
I also needed a hood which serves two purposes. It helps direct the airflow from the cooling fan onto the cut/engrave point which helps clear any smoke and helps prevent burning along the edge of the cut. In truth it does not work nearly as good as a high power airjet right in at the cut but it's better than just the fan blowing over the cooling fins. The second purpose is to act as a shroud and helps stop laser light from bouncing all over the place. Let me be clear !!!THIS DOES NOT REMOVE THE NEED FOR THE CORRECT SAFETY GLASSES!!! when using lasers. The hood should just slide fit over the heatsink.
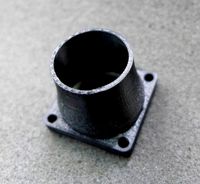
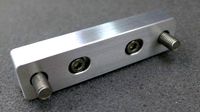
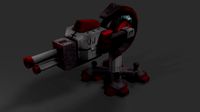
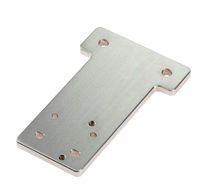
I also included some brackets to hold the driver board. Before printing you need to check your lasers dimensions to see that this will fit. Mine is 40mm x 40mm. The heatsink is 52mm from base to the start of the fan. Many of the commonly available laser diode modules of this power will have similar dimensions. The hole spacing on the rear plate should be 20mm x 40mm There may be a fifth hole on yours which you dont need to use.
The driver board bracket fits a board with a heat sink width of 47mm. You need to print two of these. This whole package allows me to quickly switch between using my laser and other tools and indeed the spindle itself very quickly. The ring locks in place with an M5 nut and bolt, Just hand tighten.
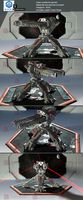
Lastly a great addition you can add to your laser setup is an airjet right in at the cut point. I've included a pic of mine which is simply a small metal tube bent and zip tied to the hood. Its attached via some silicone tubing to my airbrush compressor. Be sure to crush the end of the tube tight to increase the airflow speed out the end. To illustrate the difference I attach another pic showing the difference air-assist makes.
Hope you find some of this useful.
I also needed a hood which serves two purposes. It helps direct the airflow from the cooling fan onto the cut/engrave point which helps clear any smoke and helps prevent burning along the edge of the cut. In truth it does not work nearly as good as a high power airjet right in at the cut but it's better than just the fan blowing over the cooling fins. The second purpose is to act as a shroud and helps stop laser light from bouncing all over the place. Let me be clear !!!THIS DOES NOT REMOVE THE NEED FOR THE CORRECT SAFETY GLASSES!!! when using lasers. The hood should just slide fit over the heatsink.
I also included some brackets to hold the driver board. Before printing you need to check your lasers dimensions to see that this will fit. Mine is 40mm x 40mm. The heatsink is 52mm from base to the start of the fan. Many of the commonly available laser diode modules of this power will have similar dimensions. The hole spacing on the rear plate should be 20mm x 40mm There may be a fifth hole on yours which you dont need to use.
The driver board bracket fits a board with a heat sink width of 47mm. You need to print two of these. This whole package allows me to quickly switch between using my laser and other tools and indeed the spindle itself very quickly. The ring locks in place with an M5 nut and bolt, Just hand tighten.
Lastly a great addition you can add to your laser setup is an airjet right in at the cut point. I've included a pic of mine which is simply a small metal tube bent and zip tied to the hood. Its attached via some silicone tubing to my airbrush compressor. Be sure to crush the end of the tube tight to increase the airflow speed out the end. To illustrate the difference I attach another pic showing the difference air-assist makes.
Hope you find some of this useful.
Similar models
thingiverse
free

Hiprecy LEO Dual 40mm Fan Mount
... stepper driver heatsinks. i use 12v fans wired in parallel to a buck converter connected to the same output as the original fan.
thingiverse
free

Anycubic Trigorilla 50mm turbo fan mount for stepper drivers cooling
...inks (those for raspberry pi are fine): on the processor (14x14x5mm heatsink) and on the four mosfets (8x8x5mm heatsinks).
enjoy!
thingiverse
free

SKR V1.3 stepper drivers cooling fan duct for 40mm axial fan
...ial fans static pressure allowing the airflow going through the pressure losses generated by the heatsinks and the tunnel itself.
thingiverse
free

MKS Board Cover for 80mm Fan by Dustys_Corner
...an.
you might not even need bolts to attach the fan (snug fit), in which case it can be popped off for quick access to the board.
thingiverse
free

ASUS Tinker Board Case with 40mm Fan by raspberrycoulis
...atsink supplied with the tinker board, additional clearance is required for the case lid to fit with the fan attached underneath.
thingiverse
free

40mm fan duct for stepper motors by Orseeny
... hot and i quickly put 40mm fans to fix it. however the y axis fan is also cooling the hotbed. this would help to channel airflow
thingiverse
free

Mounts for JTech Photonics 2.8W Laser 3D Printer Upgrade Kit by Nathan720
...rom jtech:
http://jtechphotonics.com/?product=new-2-8w-laser-and-2-5amp-safety-compliant-driver-kit-with-us-style-power-adapter
thingiverse
free

CNC 3018 500w spindle upgraded fan
...pgraded fan
thingiverse
this is an upgraded fan for 500w spindle, which helps to keep it cool. much more airflow coming through.
thingiverse
free

Cooling fan 40mm support for MKS Gen L board by CreoTek
... upload your makes and photos !
facebook : https://www.facebook.com/creoteklab/instagram : https://www.instagram.com/creotek_lab/
thingiverse
free

MKS Gen 1.4 Dual 40mm Fan Bracket by maxstier
...at i could easily remove if i needed to get at my board. this bracket is designed to hang on long 3mm screw mounts on the board.
Gremlinrc
thingiverse
free

Spring Cups for Wanhao Duplicator i3 by GremlinRC
...inrc
thingiverse
spring cups for the wanhao duplicator i3. for 8mm springs. i found others but they did not fit my 8mm springs.
thingiverse
free

Drag Knife Spindle Attachment. by GremlinRC
...lade. i use cambam for creating toolpaths and there is a python script for creating the orientation moves which works very well.
Spindle
3d_export
$5

simple spindle
...simple spindle
3dexport
simple spindle
design_connected
$7
Spindle shade
...spindle shade
designconnected
rothschild&bickers spindle shade computer generated 3d model.
design_connected
$9

Spindle Table
...spindle table
designconnected
ligne roset spindle table computer generated 3d model. designed by ascalon, brad.
design_connected
free

Spindle Clock
...spindle clock
designconnected
vitra spindle clock free models computer generated 3d model. designed by george nelson.
turbosquid
$10

Spindle Table
... available on turbo squid, the world's leading provider of digital 3d models for visualization, films, television, and games.
turbosquid
$9

Spindle-chair
... available on turbo squid, the world's leading provider of digital 3d models for visualization, films, television, and games.
turbosquid
$9

DVD Spindle
... available on turbo squid, the world's leading provider of digital 3d models for visualization, films, television, and games.
3d_export
$15

Spike Spindle 3D Model
...s procession spindled spindling spiking spearing spear document bill hole paperwork
spike spindle 3d model firdz3d 90192 3dexport
turbosquid
$15

Nelson Spindle Clock
... available on turbo squid, the world's leading provider of digital 3d models for visualization, films, television, and games.
turbosquid
$2

Vitra Spindle Clock
... available on turbo squid, the world's leading provider of digital 3d models for visualization, films, television, and games.
Laser
3d_export
$5
laser
...laser
3dexport
a 3d laser
3d_export
free
cnc 3dp laser nozzle for 2w laser opt lasers
...logy that gave birth to cutting and engraving laser heads this laser nozzle was designed for, read the article in the link below:
3d_export
free
cnc laser mount opt lasers
...eive the engraving and cutting laser heads this cnc machine laser mount was designed for, read the article on the following page:
turbosquid
$20

Laser
... available on turbo squid, the world's leading provider of digital 3d models for visualization, films, television, and games.
turbosquid
$15
Laser
... available on turbo squid, the world's leading provider of digital 3d models for visualization, films, television, and games.
turbosquid
$3
Laser
... available on turbo squid, the world's leading provider of digital 3d models for visualization, films, television, and games.
3d_export
$5

laser sword
...laser sword
3dexport
it is a blue laser sword with a metal frame
3d_ocean
$19
Laser Turret
...be used in any sf type of game, especially in tower defense games. - laser turret: 3025 polygons - props: 270 polygons - textu...
3d_export
free
workbee cnc laser mount for opt lasers
...the specifications of engraving and cutting laser heads this mount was designed for, please take a look at the following website:
3d_export
free

shapeoko cnc laser mount for opt lasers
...ind out the opportunities that adding a cutting and engraving laser head to your cnc can bring, take a look at the website below:
Attachment
turbosquid
$20
M4A1 + Attachements
... available on turbo squid, the world's leading provider of digital 3d models for visualization, films, television, and games.
turbosquid
$19

Attached House
... available on turbo squid, the world's leading provider of digital 3d models for visualization, films, television, and games.
turbosquid
$15
Attache case
... available on turbo squid, the world's leading provider of digital 3d models for visualization, films, television, and games.
cg_studio
$75

Attached House3d model
...d model
cgstudio
.3ds .fbx .max .obj - attached house 3d model, royalty free license available, instant download after purchase.
turbosquid
$2

M416 AR with attachments
... model m416 ar with attachments for download as blend and fbx on turbosquid: 3d models for games, architecture, videos. (1614294)
turbosquid
$10

M16A2 with M203 Attachment
... available on turbo squid, the world's leading provider of digital 3d models for visualization, films, television, and games.
turbosquid
$3

bench attached to greenery
... available on turbo squid, the world's leading provider of digital 3d models for visualization, films, television, and games.
turbosquid
$3

Modern 1911 with Attachments
... available on turbo squid, the world's leading provider of digital 3d models for visualization, films, television, and games.
3d_export
$8
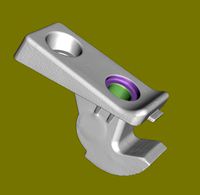
Mercedes Sprinter sun visor attachment
...mercedes sprinter sun visor attachment
3dexport
mercedes sprinter sun visor attachment
turbosquid
$14
Residential building with attached shop
...l residential building with attached shop for download as max on turbosquid: 3d models for games, architecture, videos. (1482935)