Thingiverse
Lack Enclosure by rakeyser
by Thingiverse
Last crawled date: 3 years ago
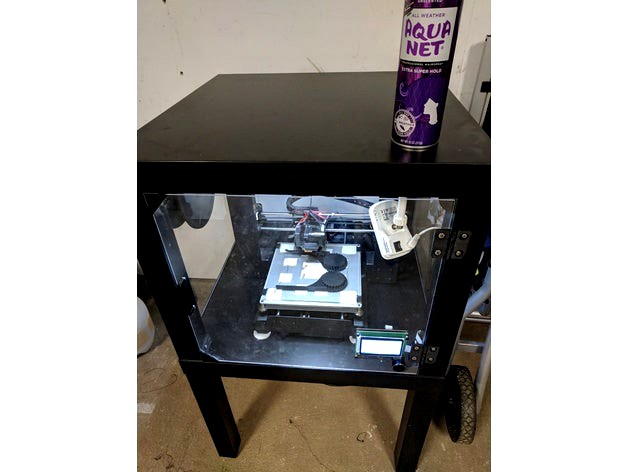
As so many others have done first, here is my rendition of the Lack Enclosure for my Monoprice Maker Select V2. This enclosure can be customized to fit many printers out there. The enclosed area is slightly larger than 17.5"W x 17.5"D x 15.5"H. I used a Dremel Tool to modify the Plexiglas walls and door to accommodate my spool holder (2nd picture), my printer controls, and a hole for my printer wires to exit the back of the enclosure. The power supply, printer controller, and my raspberry pi are mounted underneath the enclosure in a plastic bin (3rd picture).
PARTS LIST
Printed Parts
-Top_Back_Brackets.stl (2x)
-Top_Front_Left_Brackets.stl (1x)
-Top_Front_Right_Brackets.stl (1x)
-Bottom_Back_Brackets.stl (2x)
-Bottom_Front_Left_Brackets.stl (1x)
-Bottom_Front_Right_Brackets.stl (1x)
-Filament_Tube_without_Sensor.stl (1x)
-Door_Corner.stl (2x)
-Door_Handle.stl (1x)
-Thing: 1083876 (2x)
Purchased Parts
-Lack Side Tables (2x)
-Plexiglas - .118 thick cut to 15.5"x17.25" (4x)
-Screws - #8 x 3/4" (24-32x)
-Magnets 0.33"D x .125 thick (I found at Hobby Lobby) (4x)
NOTES:
-Magnets are inserted into the door corners (one in each of the 2) and the remaining two magnets are hot glued behind the corresponding door bumps.
-For my printer I removed the electronic components from the steel casing it came in (voiding any warranty I may have had) and mounted most of them underneath the enclosure, except the screen which is mounted in the door.
MORE DETAILS COMING SOON
-I also mounted a light inside the enclosure running a wire from my power supply (12V) to a switch i mounted on the left wall then running up to an Angel Eye.
Similar models
thingiverse
free

3D printer enclosure by Fabrik872
...hingebottom.stl
2x hingewasher.stl
2x magnetbackcover.stl
2x magnetglassbackcover.stl
2x magnetglassfrontcover.stl
20x washer.stl
thingiverse
free

IKEA Lack Power Supply Mount by karnschi
...ea lack power supply mount by karnschi
thingiverse
i designed a power supply mount for the bottom side of my ikea lack enclosure
thingiverse
free

Power supply holder by Ardrake
...power supply holder by ardrake
thingiverse
used 2 of these to attach my power supply underneath my lack enclosure.
thingiverse
free

plexiglas mounting corners for MendelMax 1.5 by wassi
...eeds (and add or remove the middlemount2part pieces).
the font which i used is from here http://www.thingiverse.com/thing:22730
thingiverse
free

Meanwell RS-25-X Power Supply Mounting Bracket by brywithay
...withay
thingiverse
i designed this simple thing to mount a meanwell rs-25-5 to the bottom of my lack table 3d printer enclosure.
thingiverse
free

Ikea Lack Prusa Enclosure Alternative round magnet door knob by Rvd11t
...https://www.prusaprinters.org/cheap-simple-3d-printer-enclosure. i did not have any rectangular magnets but alot of round magnets
thingiverse
free

Lack PowerSupply Mount by niget2002
...seem to really add much heat to the enclosure.
you will need 4 of the power supply mounts and one of each of the other two parts.
thingiverse
free

Geeetech A10 Power Supply Mounting Bracket by brywithay
...ywithay
thingiverse
i designed this simple thing to mount my geeetech a10 power supply to the bottom of my lack table enclosure.
thingiverse
free

C270 Webcam Magnetic Mount by Varuka
...lack enclosure. uses 6x20mm magnets, same as used in the prusa lack enclosure for the doors. please ignore my loose led wire. :d
thingiverse
free

IKEA Lack: Extender, Enclosure, Spacer, Hinges - DrCamarell 2020 by DrCamarell
... you need 16 mounts.
there are special parts for filament adaptions and the power cable.
i hope you like it! share your makes =)
Rakeyser
thingiverse
free

Tetris L & T Earrings by rakeyser
...t with no supports standing upright. included are the sketchup model, and the .stl files for both and each earring individually.
thingiverse
free

M6 Nozzle Variety Pack Holder by rakeyser
....co/9rudzdz
found out that they don't fit my printer, but wanted to create a holder for them so that i didn't loose them.
thingiverse
free

MicroUSB Cable Curve by rakeyser
...to fit this specific cable found on adafruit.com, but i assume that it will be somewhat universal (especially with some scaling).
thingiverse
free

MP Select Mini Tablet Stand by rakeyser
...inted on the mp mini, so no need to find a larger printer to print this tablet stand.
let me know your thoughts in the comments.
thingiverse
free

Robotic Mop (Inexpensive) by rakeyser
...uino uno $10.90
-ir sensors $9.99
-scrap piece of plexiglass & velcro to mount mop pads
-usb battery pack (not yet selected)
thingiverse
free

Over Ear Headset Mic Clip by rakeyser
...ike.
this is the latest revision of the design and it seems to be working well for my personal needs. let me know your comments.
thingiverse
free

MP Mini Select Bed Mount for Camera by rakeyser
...is to mount a raspberry pi zero w with zero spy camera to run octoprint for my mp select mini. pi zero case and arm coming soon.
thingiverse
free

MP Select Mini Z-Spacer 2-5mm by rakeyser
...up for the mp select mini and put it on the parts labeled *-l.stl. if you need any additional sizes, let me know in the comments
thingiverse
free

MP Select Mini Kindle Fire Stand by rakeyser
... accessory for (as it currently needs to be printed on a larger printer)
comment if you have any suggestions to better the design
Lack
3d_export
$5

LACK LACK Coffee table white 90x55 cm IKEA
..., white, 90x55 cm ikea<br>https://www.ikea.com/ru/ru/p/lack-lakk-zhurnalnyy-stol-belyy-50449907/?ysclid=l8zshj49w6656165430
turbosquid
$4

Ikea Lack
... available on turbo squid, the world's leading provider of digital 3d models for visualization, films, television, and games.
3ddd
$1

IKEA Lack Coffee Table
... кофейный
ikea lack coffee tablehttp://www.ikea.com/gb/en/catalog/products/00104291
turbosquid
$5

IKEA Lack Table
...ack table for download as blend, blend, unitypackage, and fbx on turbosquid: 3d models for games, architecture, videos. (1623135)
turbosquid
$10

Ikea Lack Set
... available on turbo squid, the world's leading provider of digital 3d models for visualization, films, television, and games.
turbosquid
$3

IKEA Lack Library
... available on turbo squid, the world's leading provider of digital 3d models for visualization, films, television, and games.
turbosquid
$1

IKEA LACK TABLE
... available on turbo squid, the world's leading provider of digital 3d models for visualization, films, television, and games.
turbosquid
free

IKEA Lack Shelf
... available on turbo squid, the world's leading provider of digital 3d models for visualization, films, television, and games.
turbosquid
$9

Ikea Table 5 Lack
... available on turbo squid, the world's leading provider of digital 3d models for visualization, films, television, and games.
turbosquid
$5

IKEA Lack Side Table
... available on turbo squid, the world's leading provider of digital 3d models for visualization, films, television, and games.
Enclosure
3d_export
free

electrical enclosure
...l enclosure where electrical devices like (relays, contactors, busbars ) are kept in order to protect from hazardous environment.
turbosquid
$100

GPU Enclosure
...yalty free 3d model gpu enclosure for download as obj and stl on turbosquid: 3d models for games, architecture, videos. (1381061)
3d_export
$5

Electrical Enclosure
...ed. also has tower lights attaced on the top.<br>file format that are available:<br>.step<br>.obj<br>.stl
archive3d
free

Enclosure 3D Model
...closure 3d model
archive3d
shower enclosure-acquarius- 3d model for interior 3d visualization.
archive3d
free

Enclosure 3D Model
...enclosure 3d model
archive3d
shower enclosure-omega- 3d model for interior 3d visualization.
archive3d
free

Enclosure 3D Model
...enclosure 3d model
archive3d
shower enclosure-vega - 3d model for interior 3d visualization.
archive3d
free

Enclosure 3D Model
...enclosure 3d model
archive3d
shower enclosure-zenith - 3d model for interior 3d visualization.
turbosquid
$20

shower enclosure
... available on turbo squid, the world's leading provider of digital 3d models for visualization, films, television, and games.
turbosquid
$14

Dumpster Enclosure
... available on turbo squid, the world's leading provider of digital 3d models for visualization, films, television, and games.
turbosquid
$25

3d printer enclosure
... model 3d printer enclosure for download as ipt, skp, and fbx on turbosquid: 3d models for games, architecture, videos. (1634310)