Thingiverse

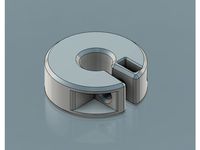
Kyosho Blizzard FR Dual 540 Transmission
by Thingiverse
Last crawled date: 4 years, 3 months ago
Kyosho Blizzard FR Dual 540 Motor Transmission
* Works with SR, FR and FR 2.0 versions for sure, maybe others **
NOT compatible with the standard plow lifting mechanism
Compatible with my modded plow : https://www.thingiverse.com/thing:4097561
The only cutting required is the battery "box", the rest can be put back in if you ever need to.
Both motors run in the same direction, meaning you CAN use timed motors and both will run forward when going forward. This is why one side has 1 additional gear.
I made FR and RR variant depending if your transmission is at the front or the rear. Standard is at the front but you can reverse the body to get the transmission at the rear (I prefer it at the rear myself, it counter-balances my custom plow weight nicely)
The FR and RR (front or rear) variant is made for Counter-Clockwise turning motors. So if you have Clockwise motors and your gearbox is at the rear, you actually want the FR variant.(Most stock brushed motors are CCW)
The gears go from MOD1.5 to MOD1 to 32Pitch, should be plenty strong for brushed motors, use Brushless at your own risk.
Non-printed parts required :
(10x) 3x8x4 bearings
(2x) 5x11x4 bearings
(4x) 5x10x4 bearings
(4x) M3x30 bolts (Button or Socket head)
(1x) M3x30 bolt ("Flat" (Conical) head)
(5x) M3x8 or M3x10 bolts ("Flat" (Conical) head)
(2x) M3x25 bolts (Button head)
(4x) M3x10 bolts
(2x) M3x8 bolts
(7x) M3 nuts (Nylock recommended)
(2x) M3 nuts (Regular, for the locking collars)
(10x) M3 washers
(2x) 11 to 14 Teeth 32 Pitch Pinion gears for your motors
Notes :
35T Motors give a good mix of speed and torque per my testings.
Original Ratio is 5.06:1 , this modified one is 4.6:1 so a little faster than stock.
Use the washers to space each gear that has a bearing, 2 washers per gear.
Don't overtighten the 5x gear bolts, the gears need to be loose.
Make sure there is no gap in the gear teeth when slicing/printing, play with your line width until you get a complete fill, otherwise they will probably fail quickly.
Using PETG or better yet Nylon for the gears is suggested, although i made mine in eSun PLA+ and they work. Use some lubricant on the gears for best longevity and less noise. Make sure your lubricant doesn't affect your plastic type (Regular grease can make some plastics brittle, I used "Fluid Film" but you can also use Lithium based grease for plastic).
Instructions :
Remove stock transmission, remove cross pins on the shaft.
Snip off the battery "box" that is in the way of the motor
Remove all the plow mechanism including the chrome metal tube at the front
Remove both shaft from their support part, remove the one bushing per side and replace with the 2x 5x10x4 bearings on each side.
Reinsert one shaft completely and the other only part-way.
Insert the stock locking collars into the output gears, remove the stock locking screw from the collar and use 2x M3x10 bolts instead to lock the gear on the collar and then lock the collar on the shaft
Assemble both gearboxes using the screws, nuts, washers, motors and 5x11x4 bearings
Slide the first gearbox onto the fully inserted shaft, lock it in place using the collars (the one inside the output gear and the printed one)
Insert the second shaft fully while also inserting the remaining gearbox on it and the printed locking collar. Lock everything in place.
Make sure everything's pretty square and mark the holes for drilling through the floor pan on the underside and on the front/rear angled part. Screw everything in place, make sure the gears turn easily
Similar models
thingiverse
free

MOFO Baja Spurless front motor mount and transmission, servo mount, skid, 4x4 trans, 6x6 or 8x8 trans and rear frame brace by MotorforwardRC
...bearings are axial trans output 8x16x5 bearings and 5x14x5 bearings check facebook @mofoxrc mofo rc motor forward rc for help
grabcad
free

Shaft Clamp
...pplications, most notably motors and gearboxes. the collars are used as mechanical stops, locating components, and bearing faces.
thingiverse
free

Tactic TTX300 steering angle increaser by MasteroFlego
...riginal coarse thread screw.
using the 3x8mm screws, attach the cover.
install original steering wheel with the last 3x5mm screw.
thingiverse
free

Duplicator i3 y-axis NEMA motor mount by GreyDay
...lt).
loosen the right guide rail.
bolt the motor to the mount (i used m3x35 and m3x10 and washer).
reattach the right guide rail.
grabcad
free

Fan Gearbox
...g.
install the selection gear and shaft in the new housing.
apply grease to the gears and wear surfaces.
re-assemble.
thingiverse
free
Z Rod Collar- 8mm Collar (M3 Screw) by phesketh01
...integrated spacer. this prints without supports and removed the need for a washer.
the model uses a small m3 screw and an m3 nut.
3dwarehouse
free

Insert bearing with self-locking collar on...inner ring ES200 serie shaft Ø: 12 mm
...aft ø: 12 mm
3dwarehouse
es200 bearing insert with locking collar #ball_bearing_inserts #bearing_units #es201g2 #snr #traceparts
grabcad
free

Dual Clutch Transmission , Gearbox , Transmission , Clutch , Gear , Shaft
...aft
grabcad
dual clutch transmission , gearbox , transmission , clutch , gear , shaft
synchronizer and sliding sleeve by alex y.
thingiverse
free

Locking Shaft Collar VEX by philipyoungblood
...f you use the smallest screw, it will have proper clearance to turn. make sure it is fully inserted so it does not jam.
enjoy.
thingiverse
free

Gearbox for turbo oven style coffee roaster by techwit
...tepper motor.
i used an arduino nano to run a a4988 stepper driver that drove the stepper motor.
hope this is helpful for someone
Blizzard
turbosquid
$29

Wheel Alutec Blizzard
... available on turbo squid, the world's leading provider of digital 3d models for visualization, films, television, and games.
3ddd
$1

Диван Cirrus и торшер Blizzard
... blizzard
http://proroom.ru/catalog/catalog_11_6209_7341/?i=2 http://proroom.ru/catalog/divany_15880/
3d_export
$36

Umbrella 3D Model
...umbrellas drop water wet puddle dry storm wheather snow blizzard down pour raining umbrella 3d model rophaaa 22159...
3d_export
$19

Hydralisk 3D Model
...hydralisk 3d model 3dexport hydralisk starcrat star craft blizzard protoss zerg terran swarm hydra character fantasy high poly...
3d_export
$10

Snowflake 3D Model
...seasonal winter cold cool water symbol xmas frost snowfall blizzard snowflake 3d model firdz3d 90791...
3d_ocean
$15
Prototype Mobile Game Set - Creature : Zombie_2
...prototype mobile game set - creature : zombie_2 3docean blizzard creature dark diablo dungeon games high quality indoor lowpoly...
3d_ocean
$15

Prototype Mobile Game Set - Creature : Zombie_1
...mobile game set - creature : zombie_1 3docean bat blizzard creature dark diablo dungeon games high quality indoor lowpoly...
3d_ocean
$15

Prototype Mobile Game Set - Creature : Skeleton
...prototype mobile game set - creature : skeleton 3docean blizzard creature dark diablo dungeon games high quality indoor lowpoly...
3d_ocean
$10
Prototype Mobile Game Set - Creature : Spider_2
...prototype mobile game set - creature : spider_2 3docean blizzard creature dark diablo dungeon games high quality indoor lowpoly...
3d_ocean
$8

Prototype Mobile Game Set - Creature : Spider_1
...prototype mobile game set - creature : spider_1 3docean blizzard creature dark diablo dungeon games high quality indoor lowpoly...
Kyosho
thingiverse
free

kyosho caliber30 90Tgear by kosuyoung
...kyosho caliber30 90tgear by kosuyoung
thingiverse
kyosho caliber30 90tgear
thingiverse
free

Kyosho Blizzard front bumper
...kyosho blizzard front bumper
thingiverse
front bumper for kyosho blizzard. bolt on.
thingiverse
free

KYOSHO BIKE RATIATOR by mickyteng
...kyosho bike ratiator by mickyteng
thingiverse
kyosho 1/8 rc motorcycle
thingiverse
free

Kyosho H plate by Locti
...kyosho h plate by locti
thingiverse
back h plate for a kyosho mini car.
thingiverse
free

Kyosho axxe shock support
...kyosho axxe shock support
thingiverse
shock support for kyosho ez series sandmaster and axxe.
thingiverse
free

Kyosho RB6 Rear Wheel
...kyosho rb6 rear wheel
thingiverse
rear wheel for a kyosho rb6 1/10th scale 2wd buggy
thingiverse
free

Kyosho Trail King Step by Elguss
...kyosho trail king step by elguss
thingiverse
kyosho trail king step !
thingiverse
free

Kyosho Trail King Step by Elguss
...kyosho trail king step by elguss
thingiverse
step for kyosho trail king.
thingiverse
free

KYOSHO BIKE Forks Spacer by mickyteng
...kyosho bike forks spacer by mickyteng
thingiverse
kyosho 1/8 rc motorcycle
thingiverse
free

KYOSHO BIKE GEARBOX Spacer by mickyteng
...kyosho bike gearbox spacer by mickyteng
thingiverse
kyosho 1/8 rc motorcycle
540
turbosquid
$30

BelAZ 540
...lty free 3d model belaz 540 for download as max, obj, and fbx on turbosquid: 3d models for games, architecture, videos. (1482389)
turbosquid
$10

Microsoft Lumia 540
... available on turbo squid, the world's leading provider of digital 3d models for visualization, films, television, and games.
3d_export
$20

mercedes benz 540 roadster 1936
...mercedes benz 540 roadster 1936
3dexport
mercedes benz 540 roadster 1936
3d_export
$30

Lg optimus gt 540 3D Model
...lg optimus gt 540 3d model
3dexport
lg optimus gt 540 cell phone gsm
lg optimus gt 540 3d model sashocoppy 51509 3dexport
turbosquid
$60

Roadster 540 k Mercedes
...dster 540 k mercedes for download as blend, dae, fbx, and obj on turbosquid: 3d models for games, architecture, videos. (1710574)
turbosquid
$35

lg optimus gt 540
... available on turbo squid, the world's leading provider of digital 3d models for visualization, films, television, and games.
turbosquid
$10

Microsoft Lumia 540 Orange
... available on turbo squid, the world's leading provider of digital 3d models for visualization, films, television, and games.
turbosquid
$10

Microsoft Lumia 540 Black
... available on turbo squid, the world's leading provider of digital 3d models for visualization, films, television, and games.
turbosquid
$10

Microsoft Lumia 540 Orange
... available on turbo squid, the world's leading provider of digital 3d models for visualization, films, television, and games.
3d_export
$60

Architecture 540 3D Model
...lege campus max street landscape commercial building medical hospital offices
architecture 540 3d model lotusmodel 48675 3dexport
Transmission
3d_export
$5
transmission gearbox
...transmission gearbox
3dexport
transmission gearbox
archibase_planet
free
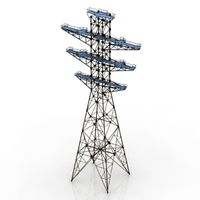
Transmission tower
...lectricity pylon lattice tower framework tower
transmission tower n121015 - 3d model (*.gsm+*.3ds) for exterior 3d visualization.
turbosquid
$5

Lasvit TRANSMISSION
... available on turbo squid, the world's leading provider of digital 3d models for visualization, films, television, and games.
design_connected
$13

Transmission Sculpture Chandelier
...ture chandelier
designconnected
lasvit transmission sculpture chandelier computer generated 3d model. designed by studio deform.
turbosquid
$25

TRANSMISSION FULL OUTOMATIC
...ee 3d model transmission full outomatic for download as sldas on turbosquid: 3d models for games, architecture, videos. (1331288)
archive3d
free

Transmission tower 3D Model
...mework tower
transmission tower n121015 - 3d model (*.gsm+*.3ds) for exterior 3d visualization.
3d_export
free

tinket planetary transmission
...tinket planetary transmission
3dexport
3ddd
$1

Lasvit Transmission Торшер
...ry angle. glass parts are joined by heat, creating individual elements that become one material and one body.
приятных рендеров)
3ddd
$1
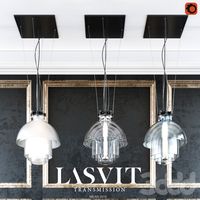
Lasvit Transmission люстры
...ry angle. glass parts are joined by heat, creating individual elements that become one material and one body.
приятных рендеров)
turbosquid
$15

Electrical transmission tower
... available on turbo squid, the world's leading provider of digital 3d models for visualization, films, television, and games.
Fr
turbosquid
$25

FR-F2
...quid
royalty free 3d model fr-f2 for download as fbx and obj on turbosquid: 3d models for games, architecture, videos. (1563954)
3ddd
$1

Freech,FR-D3022C
...freech,fr-d3022c
3ddd
freech , стол
freech,fr-d3022c
3ddd
$1

FR Mundial
...fr mundial
3ddd
смеситель
смеситель
turbosquid
free

kitchen fr
...ee 3d model kitchen fr for download as 3ds, max, obj, and fbx on turbosquid: 3d models for games, architecture, videos. (1444246)
turbosquid
$35

FR aBistro3
... available on turbo squid, the world's leading provider of digital 3d models for visualization, films, television, and games.
turbosquid
$20

stol FR
... available on turbo squid, the world's leading provider of digital 3d models for visualization, films, television, and games.
turbosquid
$20

FR aChair04
... available on turbo squid, the world's leading provider of digital 3d models for visualization, films, television, and games.
turbosquid
$20

FR aTable09
... available on turbo squid, the world's leading provider of digital 3d models for visualization, films, television, and games.
turbosquid
$20

FR bCabinet07
... available on turbo squid, the world's leading provider of digital 3d models for visualization, films, television, and games.
turbosquid
$20

FR aTable13
... available on turbo squid, the world's leading provider of digital 3d models for visualization, films, television, and games.
Dual
turbosquid
free

Dual Pistols
...ls
turbosquid
free 3d model dual pistols for download as fbx on turbosquid: 3d models for games, architecture, videos. (1320360)
turbosquid
$2

Dual Axe
...urbosquid
royalty free 3d model dual axe for download as fbx on turbosquid: 3d models for games, architecture, videos. (1332372)
turbosquid
$10

Dual Lesaths
... available on turbo squid, the world's leading provider of digital 3d models for visualization, films, television, and games.
3ddd
$1

плитка Dual Bianco (Испания)
...й плитки venis dual (испания). технические качества: устойчивость к стирания, отличная геометрия, отсутствие проблем при укладке.
turbosquid
$35

Dual Mesh Fonts
...ree 3d model dual mesh fonts for download as ma, obj, and fbx on turbosquid: 3d models for games, architecture, videos. (1352989)
turbosquid
$29

Dual Flask with Bungs
...del dual flask with bungs for download as obj, fbx, and blend on turbosquid: 3d models for games, architecture, videos. (1210512)
turbosquid
$19

Dual Socket Plug
...3d model dual socket plug for download as obj, fbx, and blend on turbosquid: 3d models for games, architecture, videos. (1303912)
turbosquid
$13

Dual Adjustable Pulley
... available on turbo squid, the world's leading provider of digital 3d models for visualization, films, television, and games.
turbosquid
$10

Amoi N809 Dual
... available on turbo squid, the world's leading provider of digital 3d models for visualization, films, television, and games.
turbosquid
$5

Dual Turret Tank
... available on turbo squid, the world's leading provider of digital 3d models for visualization, films, television, and games.