Thingiverse
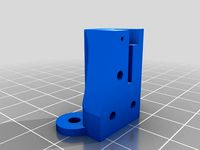
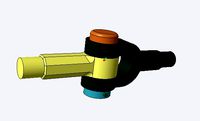
Kossel Mini Magnetic Ball Joint End Effector Upgrade by Chimes_Industries
by Thingiverse
Last crawled date: 3 years ago
First off, let me please ask that if you like these designs and find them useful please do like, follow and share my content. And if you have any ideas or concepts to modify the content I would love to hear!
UPDATE (28/10/2017): I have added this part https://www.thingiverse.com/thing:2611279 to my Thingiverse Page for those who wish to convert their roller carriage style Kossel printer to magnetic joints.
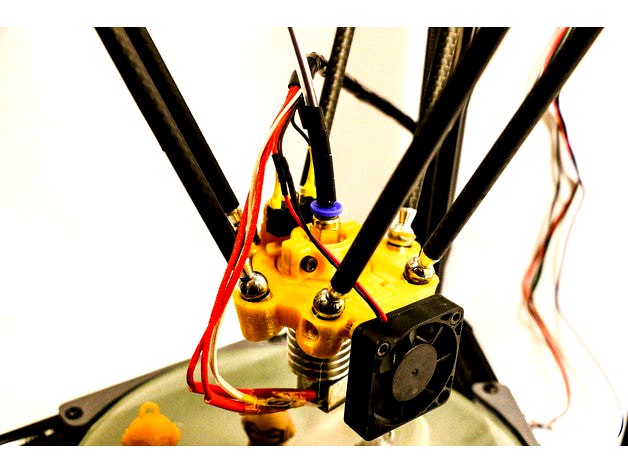
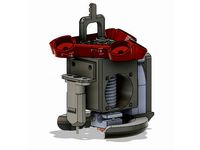
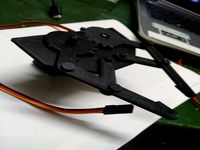
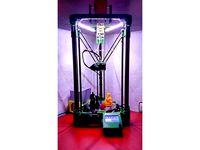
This is a magnetic ball joint upgrade for the Kossel Mini 3D printer range that use HIWIN style linear rails. The end effector is designed to use the e3d V6 style hotends as well as the various different clones that are available. This is a direct replacement to the rose/ball joint Micromake Kossel Mini sold by flsun.
The effector also allows for auto bed levelling using a limit switch and the nozzle as the means of detecting the bed surface location.
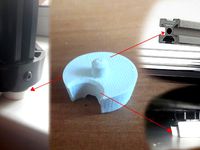
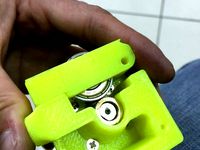
The kit can be assembled using a wide variety of parts, though has been designed around the use of 10mm magnetic ball joints.
The finishing parts for this upgrade can be purchased here http://www.chimesindustries.com/shop or the parts can be purchased from a variety of different online stores.
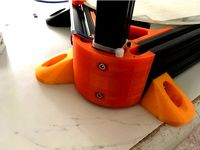
Print it, assemble it, try it out and let me know what you think! :) The increase in rigidity in using magnetic joints as well as linear guide rails on the Kossel printer designs really improves the print output and removes the 'slop' in the system.
I have added some images showing a possible part cooling setup for the magnetic joint setup. They can be seen here: https://www.thingiverse.com/thing:2364103 and here: https://www.thingiverse.com/thing:2364083 There are mounts for e3d V5 and V6 hotends (~23mm and ~25mm OD heatsink) and clone variants.
Also, if you do not have the ability to measure the length of the rods accurately to within tenths of a millimetre (0.1mm) then you may find this print helpful: https://www.thingiverse.com/thing:2355506 The pieces can be mounted to a piece of open beam aluminium extrusion ( e.g. one of your delta printer towers) and then each rod placed in the jig, adjusted to length and then fastened. This will ensure your rods are the same length and you do not experience any disconnects during printing and operation.
UPDATE (28/10/2017): I have added this part https://www.thingiverse.com/thing:2611279 to my Thingiverse Page for those who wish to convert their roller carriage style Kossel printer to magnetic joints.
This is a magnetic ball joint upgrade for the Kossel Mini 3D printer range that use HIWIN style linear rails. The end effector is designed to use the e3d V6 style hotends as well as the various different clones that are available. This is a direct replacement to the rose/ball joint Micromake Kossel Mini sold by flsun.
The effector also allows for auto bed levelling using a limit switch and the nozzle as the means of detecting the bed surface location.
The kit can be assembled using a wide variety of parts, though has been designed around the use of 10mm magnetic ball joints.
The finishing parts for this upgrade can be purchased here http://www.chimesindustries.com/shop or the parts can be purchased from a variety of different online stores.
Print it, assemble it, try it out and let me know what you think! :) The increase in rigidity in using magnetic joints as well as linear guide rails on the Kossel printer designs really improves the print output and removes the 'slop' in the system.
I have added some images showing a possible part cooling setup for the magnetic joint setup. They can be seen here: https://www.thingiverse.com/thing:2364103 and here: https://www.thingiverse.com/thing:2364083 There are mounts for e3d V5 and V6 hotends (~23mm and ~25mm OD heatsink) and clone variants.
Also, if you do not have the ability to measure the length of the rods accurately to within tenths of a millimetre (0.1mm) then you may find this print helpful: https://www.thingiverse.com/thing:2355506 The pieces can be mounted to a piece of open beam aluminium extrusion ( e.g. one of your delta printer towers) and then each rod placed in the jig, adjusted to length and then fastened. This will ensure your rods are the same length and you do not experience any disconnects during printing and operation.
Similar models
thingiverse
free

E3D 30mm Fan for autolevel effector by abriggs12
...fit as the effector includes a zprobe in a similar manner to http://www.thingiverse.com/thing:868258 this is a remix of http://www.thingiverse.com/thing:340312...
thingiverse
free

Delta Effector w. Magnetic joints for E3D V6 by robkar
...d-looking, and with magnetic joints for minimal backlash.
here is the complete printer: http://www.thingiverse.com/thing:923830
thingiverse
free

Magnetic detachable autolevel z - probe for Kossel Mini effector with E3D v6 hotend by mechanicsnail
...ad file included. can be used with kossel mini openscad sources from github to render complete effector + hotend + probe picture.
thingiverse
free

mini kossel JT magnetic effector plate by davejavu123
...or plate by davejavu123
thingiverse
this works with the 30mm fan (thing:948319) and the mini kossel magnetic ball joint and rods
thingiverse
free

Geeetech Rostock301 magnetic effector upgrade by t_schatz
...cal magnets (top one countersunk).
the groove mount for the e3d v6lite hotend can be screwed to the effector for extra stiffness.
thingiverse
free

E3D v6 hotend complete mount (with groove) for Kossel mini 3D printer by gtrick90
... http://www.thingiverse.com/thing:653184
printed in pla, no single issue till now
https://www.youtube.com/watch?v=fjo8avcbbei
thingiverse
free

Effector and plates by Lykle
... of course you need 3 batwings.
this is used with brian's magnetic ball conversion. http://www.thingiverse.com/thing:883347
thingiverse
free

Magnetic Joint Carriage for Kossel Mini by cffellows
...ge provides the capability of building a kossel mini with magnetic ball joints using the magnetic effector from the cerberus pup.
thingiverse
free

Kossel Magetic Effector for E3D V6 Volcano by Canyonazo
...nd the magnetic carriages used of this assembly on that link
assembly not tested during printing yet. any feedback is apreciated.
thingiverse
free

The effector for E3D V6 by born_to_kill
... effector for e3d v6
and 15 mm magnets
distance between magnets 50 mm
carriage take here https://www.thingiverse.com/thing:496689
Chimes
turbosquid
$24

Chimes
...quid
royalty free 3d model chimes for download as ma and obj on turbosquid: 3d models for games, architecture, videos. (1520001)
turbosquid
$20

Chimes
... available on turbo squid, the world's leading provider of digital 3d models for visualization, films, television, and games.
turbosquid
$12

Bamboo Chimes
...quid
royalty free 3d model bamboo chimes for download as max on turbosquid: 3d models for games, architecture, videos. (1596529)
turbosquid
$10

Wind chimes
...osquid
royalty free 3d model wind chimes for download as max on turbosquid: 3d models for games, architecture, videos. (1278265)
turbosquid
$50

Star Chimes
... available on turbo squid, the world's leading provider of digital 3d models for visualization, films, television, and games.
turbosquid
$10

Wind Chimes
... available on turbo squid, the world's leading provider of digital 3d models for visualization, films, television, and games.
3d_export
$65

Wind chimes
...wind chimes
3dexport
simple rendering of the scene file
3d_export
$65

wind chimes
...wind chimes
3dexport
simple rendering of the scene file
turbosquid
free

Wind chimes 1
... available on turbo squid, the world's leading provider of digital 3d models for visualization, films, television, and games.
3d_export
$10

Furin - Wind Chimes
...n - wind chimes - gltf<br>- ten materials<br>- one texture: 2048x2048<br>enjoy the product and leave a comment.
Effector
3d_ocean
$5

Radial Sound Effector
...e spheres will expand with your song. fully customisable, change the color, the size of the spheres or even put in different s...
3d_ocean
$12
3D Customizable Puzzle Set (16x10)
...mograph compatible (you can effect the pieces with mograph effector) - included also a non-mograph version with...
thingiverse
free
Effector by olo2000pm
...effector by olo2000pm
thingiverse
effector
thingiverse
free
CERAMBOT-Effector
...cerambot-effector
thingiverse
cerambot-effector
thingiverse
free

modulize effector by candyasdf
...ulize effector by candyasdf
thingiverse
mount things on effector with m3 screws
effector radius : 25.4mm
rod arm distance : 40mm
thingiverse
free
Delta Effector by zavier
...delta effector by zavier
thingiverse
delta effector with radial fan 50 and bltouch
thingiverse
free
D810 Effector by WhiteTiger13
...d810 effector by whitetiger13
thingiverse
this is d810 effector for d810 without autocalibration, and also cap for it.
thingiverse
free
Effector for Delta Printer
...effector for delta printer
thingiverse
effector for delta printer (3 color)
using diamond hotend
thingiverse
free
Delta effector magnetic by fpassos
...delta effector magnetic by fpassos
thingiverse
effector for e3dv6 hotend. i needed put the spheres (10mm) on the effector.
thingiverse
free
End Effector Gripper
...end effector gripper
thingiverse
end effector gripper
for a robotic arm
uses mg995 servo motor
Kossel
thingiverse
free
kossel bottom by keisukelin
...kossel bottom by keisukelin
thingiverse
kossel bottom
thingiverse
free
Leg for kossel by exelon
...leg for kossel by exelon
thingiverse
leg for kossel
thingiverse
free
Extruder for kossel by spencer_chen7
...extruder for kossel by spencer_chen7
thingiverse
extruder for kossel
thingiverse
free
Kossel parts by breezer83
...kossel parts by breezer83
thingiverse
kossel parts
thingiverse
free

Anycubic Kossel PID calibration
...ir mount:
kossel raspberry camera ir mount
extruder pid calibration.
simple extruder temperature calibration of your 3d printer.
thingiverse
free

Kossel Medium by flux83
...kossel medium by flux83
thingiverse
vertex for upgraded kossel mini
thingiverse
free
Kossel Mini by salesmendesandre
...kossel mini by salesmendesandre
thingiverse
custom kossel mini
frame 20x20
thingiverse
free

leg for kossel by ionulet
...leg for kossel by ionulet
thingiverse
leg for kossel with channel for end- stop cables
thingiverse
free

Optical Endstops Mounts for Kossel (with Better Kossel carriages) by dellfer
...stops on the anycubic kossel with better kossel carriages by codefreak https://www.thingiverse.com/thing:2501337
more precission
thingiverse
free
kossel??????? by wangrui19890704
...kossel??????? by wangrui19890704
thingiverse
??2020?2060???
Upgrade
turbosquid
$15

Upgraded Glock
...e 3d model upgraded glock for download as obj, fbx, and blend on turbosquid: 3d models for games, architecture, videos. (1185950)
3ddd
$1

Calligaris / UPGRADE
...calligaris / upgrade
3ddd
calligaris
c материалом
3d_export
free

cz upgrade
...cz upgrade
3dexport
https://www.buymeacoffee.com/mestrezen3d https://linktr.ee/mestrezen3
turbosquid
$80

Custer Tank upgrade
... available on turbo squid, the world's leading provider of digital 3d models for visualization, films, television, and games.
turbosquid
$39

Domestos 1 upgrade
... available on turbo squid, the world's leading provider of digital 3d models for visualization, films, television, and games.
3d_export
$10

Upgraded tea cup
...upgraded tea cup
3dexport
a cup with an unusual design and a unique shape for a more enjoyable tea experience
3d_export
$8

dixy outlander classic style upgraded poplar wood lounge chair
...utlander classic style upgraded poplar wood lounge chair
3dexport
dixy outlander classic style upgraded poplar wood lounge chair
turbosquid
free

AK-12 + Upgrades low-poly 3D model
...ow-poly 3d model for download as fbx, blend, and unitypackage on turbosquid: 3d models for games, architecture, videos. (1501145)
evermotion
$700

Upgrade from V-ray 1.5 to 3.5 for 3ds max
...here is no need to purchase a new dongle - your current dongles will be reprogrammed to carry v-ray 3. evermotion 3d models shop.
evermotion
$300

Upgrade from V-Ray 2.0 to V-ray 3.5 for 3ds Max
... interface (gui) for editing settings on one machine and one render node for rendering on one machine. evermotion 3d models shop.
Joint
turbosquid
$5

Joint
...turbosquid
royalty free 3d model joint for download as blend on turbosquid: 3d models for games, architecture, videos. (1179882)
3d_export
$5
joint handle
...joint handle
3dexport
joint handle
3d_export
$5
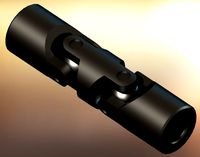
knuckle joint
...knuckle joint
3dexport
this is a 3d model of knuckle joint
3d_export
$5

Knuckle Joint
...knuckle joint
3dexport
industry use knuckle joint
3ddd
$1
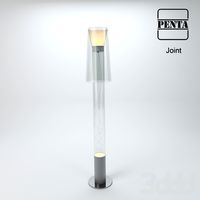
PENTA Joint
...penta joint
3ddd
penta
http://www.lampcommerce.com/en/catalogue/brands/penta-light/joint-floor-lamp
turbosquid
$49

Joint | Project
...squid
royalty free 3d model joint | project for download as on turbosquid: 3d models for games, architecture, videos. (1297983)
turbosquid
$10

universal joint
...squid
royalty free 3d model univresal joint for download as on turbosquid: 3d models for games, architecture, videos. (1309400)
turbosquid
$15

Joint Ashtray
...squid
royalty free 3d model joint ashtray for download as ma on turbosquid: 3d models for games, architecture, videos. (1199702)
turbosquid
$5

Unrolled joint
...e 3d model unrolled joint for download as blend, obj, and stl on turbosquid: 3d models for games, architecture, videos. (1577889)
3d_export
$5
Cardan Joint 3D Model
...cardan joint 3d model
3dexport
cardan joint
cardan joint 3d model fau 71171 3dexport
Magnetic
3d_ocean
$2

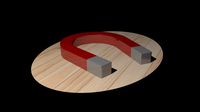
Magnet
...magnet 3docean 3d 3ds max electric magnet magnetic magnetism max model polygon realistic tesla magnet created in...
turbosquid
$6
Magnet
...
turbosquid
royalty free 3d model magnet for download as obj on turbosquid: 3d models for games, architecture, videos. (1548733)
turbosquid
$6

magnet
...uid
royalty free 3d model magnet for download as 3dm and max on turbosquid: 3d models for games, architecture, videos. (1670606)
turbosquid
$1

Magnet
...y free 3d model magnet for download as 3ds, max, obj, and fbx on turbosquid: 3d models for games, architecture, videos. (1215037)
turbosquid
$7

Magnet
...agnet for download as blend, unitypackage, fbx, gltf, and obj on turbosquid: 3d models for games, architecture, videos. (1576588)
3d_export
$5

magnetic knife holder
...magnetic knife holder
3dexport
ordinary magnetic knife holder
archive3d
free

Fridge magnet 3D Model
...3d model archive3d refrigerator magnet fridge magnet magnet toy magnetic s n280712 - 3d model (*.3ds) for interior 3d...
turbosquid
$35

Magnetic butterflies
...alty free 3d model magnetic butterflies for download as blend on turbosquid: 3d models for games, architecture, videos. (1315792)
turbosquid
$2
Magnetic Board
...quid
royalty free 3d model magnetic board for download as ma on turbosquid: 3d models for games, architecture, videos. (1264141)
turbosquid
$977
Magnetic Lego
...oyalty free 3d model magnetic lego for download as ma and obj on turbosquid: 3d models for games, architecture, videos. (1142761)
Ball
turbosquid
$5

Ball on a Ball
...uid
royalty free 3d model ball on a ball for download as obj on turbosquid: 3d models for games, architecture, videos. (1484719)
archibase_planet
free

Ball
...ball
archibase planet
ball golf ball
ball - 3d model (*.gsm+*.3ds) for 3d visualization.
3d_export
$5

ball
...ball
3dexport
ball
archibase_planet
free

Ball
...ball
archibase planet
ball football soccer ball
ball n100714 - 3d model (*.gsm+*.3ds+*.max) for exterior 3d visualization.
3d_export
$5

ball
...ball
3dexport
soccer ball
archibase_planet
free

Ball
...ball
archibase planet
ball football
ball n100914 - 3d model (*.gsm+*.3ds+*.max) for 3d visualization.
3d_ocean
$5
Snooker Balls
... set balls snooker snooker balls white ball yellow ball
set snooker balls format include : .c4d .3ds .obj build in cinema 4d r13
3d_export
free

ball
...ball
3dexport
this is 3d model ball's
3d_ocean
$2

Soccer Ball
...soccer ball
3docean
ball red and yellow ball red ball soccer ball
a gorgeous red and yellow seamless soccer ball
3d_ocean
$5

Billard Balls
...low poly billiard balls. numbering from 1 to 15 plus the cue ball. each of the balls excluding the cue ball has a 4k texture map.
Mini
turbosquid
$10

Mini Mini Luceplan
...
royalty free 3d model mini mini luceplan for download as max on turbosquid: 3d models for games, architecture, videos. (1227359)
3d_ocean
$39

Mini Cooper
...mini cooper
3docean
cabrioler cooper mini
mini cooper cabrioler
3d_export
$30

Mini lathe
...mini lathe
3dexport
mini lathe
3d_export
$5

mini mouse
...mini mouse
3dexport
mini mouse
3d_export
$5

mini house
...mini house
3dexport
mini house
3d_export
free

Mini Mecha
...mini mecha
3dexport
concept of mini mecha
3d_ocean
$20

Mini Gun
...mini gun
3docean
gatling gun gun machine gun mini gun weapon
model of a mini gatling gun.
3ddd
free

Herve mini
... кофейный , herve
http://www.mobiliavenanti.it/ru/products/hervè-mini
3d_export
$5

mini wall
...mini wall
3dexport
mini wall for living room
3d_export
$5

mini bank
...mini bank
3dexport
mini bank 3d model
Industries
design_connected
$13
Industrial
...industrial
designconnected
dreizehngrad industrial computer generated 3d model.
3ddd
free

Industrial chair
...industrial chair
3ddd
industrial
industrial chair
3d_export
$5
industrial furniture - industrial table 01
...industrial furniture - industrial table 01
3dexport
"industrial table 01"
3ddd
free

Industrial table
...дустриальный , кофейный , стол
industrial table
3ddd
$1

L-Industry
...l-industry
3ddd
l-industry
промышленные светильники l-industry . диаметр × высота 320х492мм
3d_export
$5

industrial machine
...industrial machine
3dexport
industrial machine
3d_export
$5

industrial oven
...industrial oven
3dexport
industrial oven
3d_export
$5
industrial wheel
...industrial wheel
3dexport
industrial wheel
3ddd
$1
REFLECTOR INDUSTRIAL
...reflector industrial
3ddd
reflector industrial
3ddd
$1
Industrial light
...industrial light
3ddd
grange
industrial light.
End
archibase_planet
free

Cigarettes end
...d
archibase planet
cigarettes end cigarette stub cigar-butt
cigarette-end - 3d model (*.gsm+*.3ds) for interior 3d visualization.
3d_export
$5
end table
...end table
3dexport
end table 3d model dimensions:(w)60cm×(d)60cm×(h)56cm
3d_export
$5
end table
...end table
3dexport
end table 3d model dimensions:(w)60cm×(d)60cm×(h)56cm
turbosquid
$10
End Table
...rbosquid
royalty free 3d model end table for download as max on turbosquid: 3d models for games, architecture, videos. (1570610)
turbosquid
$5

End Table
...urbosquid
royalty free 3d model end table for download as ma on turbosquid: 3d models for games, architecture, videos. (1622809)
turbosquid
$3
End Table
...rbosquid
royalty free 3d model end table for download as fbx on turbosquid: 3d models for games, architecture, videos. (1315115)
3d_export
$5

rope end ring
...rope end ring
3dexport
rope end ring
turbosquid
$2

End Tables
...
royalty free 3d model end tables for download as max and obj on turbosquid: 3d models for games, architecture, videos. (1706896)
turbosquid
$14
End Table
...lty free 3d model end table for download as max, obj, and fbx on turbosquid: 3d models for games, architecture, videos. (1403051)
turbosquid
$12

End Table
...lty free 3d model end table for download as max, obj, and fbx on turbosquid: 3d models for games, architecture, videos. (1574707)