Thingiverse
Kossel Mini Flying extruder inc new E3D Titan Version by DjDemonD
by Thingiverse
Last crawled date: 3 years ago
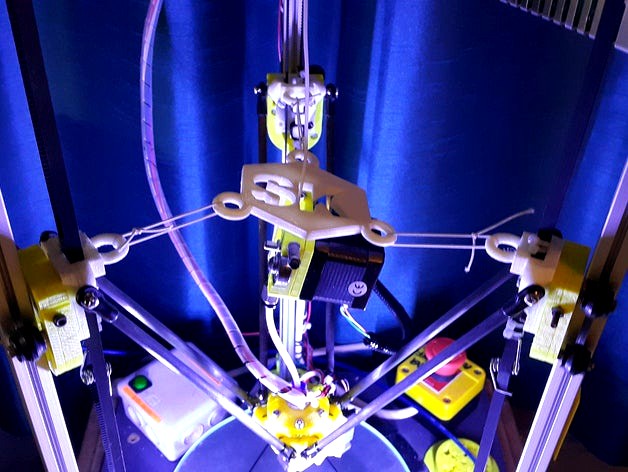
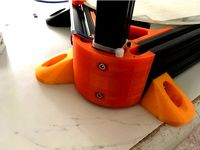
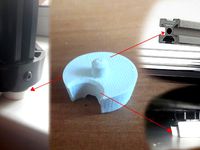
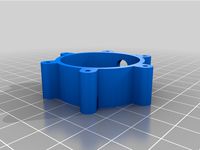
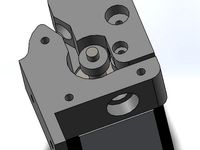
4-5-16 - New version available for e3d titan extruder. This can be run (if you're using 1.75mm filament) from a 20mm "pancake" nema 17 so the total extruder and flying bracket is only 250g. The old version with a standard 40mm nema 17 and lightweight extruder was 395g!
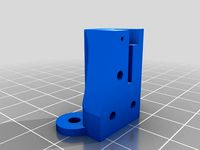
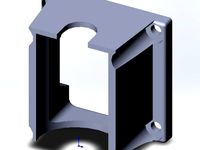
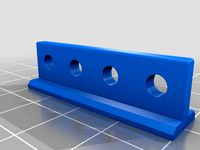
UPDATED - There are two carriages, one with the flying extruder loop fixed to it and standard belt clips. The other has quick release belt clips and moves the loop to fix on the top using the upper two bolts which hold the carriage onto the slides. Its only 2mm so the standard bolts should still work.
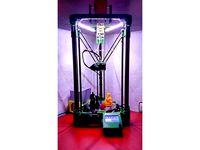
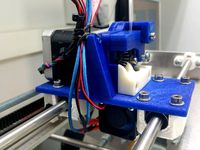
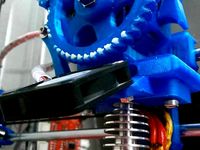
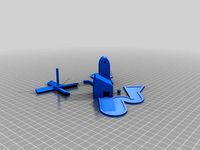
I made a flying extruder for a Kossel Mini Delta printer. Replace the carriages with these parts and string them to the extruder mount with some elastic material, I am using sewing elastic at present, but apparently modelling balloons work or silicone straps etc... Allow just enough tension to hold the extruder mount up, with extruder attached, centred between your three carriages. The additional parts to hold the elastic do make restringing the belts a little fiddly but I presume it's not something you are going to do very often.
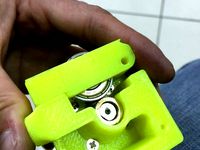
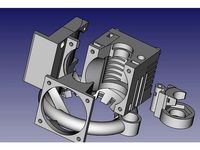
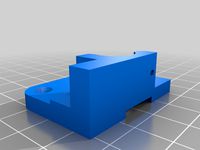
This has been designed for this extruder (http://www.thingiverse.com/thing:275593) but the file is public on tinkercad so feel free to alter it to fit whatever extruder you have (https://tinkercad.com/things/dJ0MpmOgcXt). The editable version of the titan flying extruder bracket is here (https://www.tinkercad.com/things/jYfQ3kHzbqz-djdemond-kossel-flying-extruder-e3d-titan-version). Aim to send the filament straight down the centre of the mount to the effector/hot end. In the photo the version I printed has my initials in the centre of the mount as a weight saving device and path for the filament to use, but in this version I have just left a large hole which should allow the filament path to be unhindered whatever extruder you are using.
Attach the extruder to the effector/hot end with a bowden tube, which will now be somewhere between 4-6 times shorter than it was before, giving you hugely improved filament control, and adjust your retraction settings to be a little less aggressive I am now using 2mm at 150mm/s instead of 5mm at 100 mm/s. UPDATED - A small amount of downwards tension on the bowden tube helps so its not too long - too much bouncing around of flying extruder, or too short - too much tension on the elastics.
Despite this setup and the extruder now adding considerable mass to the carriages this is only fully affects the inertia of z direction moves and not in a way that seems to affect print quality, x and y direction moves are only marginally affected as the mount can swivel around relatively freely, so don't overdo the elastics, or have too short a bowden tube. Might be worth reducing your acceleration and xy jerk by 10% if it seems to be causing your corners to print less well than before.
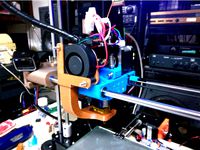
Update 02-06-16 I recently changed to an effector where most of the hot end is above the effector. As such the bowden tube using the titan flying bracket was too short to be flexible enough to function, so I made an inverted version for putting the extruder above the flying bracket to allow a slightly longer tube.
UPDATED - There are two carriages, one with the flying extruder loop fixed to it and standard belt clips. The other has quick release belt clips and moves the loop to fix on the top using the upper two bolts which hold the carriage onto the slides. Its only 2mm so the standard bolts should still work.
I made a flying extruder for a Kossel Mini Delta printer. Replace the carriages with these parts and string them to the extruder mount with some elastic material, I am using sewing elastic at present, but apparently modelling balloons work or silicone straps etc... Allow just enough tension to hold the extruder mount up, with extruder attached, centred between your three carriages. The additional parts to hold the elastic do make restringing the belts a little fiddly but I presume it's not something you are going to do very often.
This has been designed for this extruder (http://www.thingiverse.com/thing:275593) but the file is public on tinkercad so feel free to alter it to fit whatever extruder you have (https://tinkercad.com/things/dJ0MpmOgcXt). The editable version of the titan flying extruder bracket is here (https://www.tinkercad.com/things/jYfQ3kHzbqz-djdemond-kossel-flying-extruder-e3d-titan-version). Aim to send the filament straight down the centre of the mount to the effector/hot end. In the photo the version I printed has my initials in the centre of the mount as a weight saving device and path for the filament to use, but in this version I have just left a large hole which should allow the filament path to be unhindered whatever extruder you are using.
Attach the extruder to the effector/hot end with a bowden tube, which will now be somewhere between 4-6 times shorter than it was before, giving you hugely improved filament control, and adjust your retraction settings to be a little less aggressive I am now using 2mm at 150mm/s instead of 5mm at 100 mm/s. UPDATED - A small amount of downwards tension on the bowden tube helps so its not too long - too much bouncing around of flying extruder, or too short - too much tension on the elastics.
Despite this setup and the extruder now adding considerable mass to the carriages this is only fully affects the inertia of z direction moves and not in a way that seems to affect print quality, x and y direction moves are only marginally affected as the mount can swivel around relatively freely, so don't overdo the elastics, or have too short a bowden tube. Might be worth reducing your acceleration and xy jerk by 10% if it seems to be causing your corners to print less well than before.
Update 02-06-16 I recently changed to an effector where most of the hot end is above the effector. As such the bowden tube using the titan flying bracket was too short to be flexible enough to function, so I made an inverted version for putting the extruder above the flying bracket to allow a slightly longer tube.
Similar models
thingiverse
free

Titan Lightweight Flying Extruder Mount by 3d4uandme
...s centre of gravity (exact point depends on your stepper size/weight).
titan cover needs to be semi-built but loose to get it on.
thingiverse
free

Anycubic Kossel Extruder Top Rail Bracket Long by Mangosniper
... a bit more down to make the bowden tube shorter and to create some space between the extruder and my top mounted filament guide.
thingiverse
free

kossel effector with zprobe bracket by rattus911
...zprobe bracket by rattus911
thingiverse
kossel effector with zprobe bracket. i made this to fit e3d extruder and makerbot switch
thingiverse
free

Mini Kossel Effector Modified for E3D (Bowden) Hotend by ianlee74
...effector part for the mini kossel that was originally built for use with a jhead so that it could work with an e3d bowden hotend.
thingiverse
free

E3d V6 1.75mm Bowden hotend Bracket for MK2 short travel (there is newer version now holes for left or right) by RobMitshi
...ks, main bracket and added a clamp.
a full instuctable is at:
http://www.instructables.com/id/3d-printer-extruderhot-end-upgrade/
thingiverse
free

flying extruder mount for bmg
...unt will have the same center point for ptfe tube as the effector
if you want to help me create more stuff you can buy me a coffe
thingiverse
free

Kossel / Delta E3D Titan Clone Flying Extruder Mount by jharmn
...key-bak, mine is sort of rigged up at the moment.
provide a mount for the carriages; i used a leftover part from another project.
thingiverse
free

E3D Titan direct drive extruder for Ultimaker 2 by AnthonyB
...den pfte as a feeder line to the extruder.
apart from the titan mount all other parts are per pg35l direct drive extruder design.
thingiverse
free
Anet A6 E3D V6 X Carriage Direct Drive and/or Bowden (Final) by chekcian
...d.
for fan duct, new fan bracket and proximity sensor bracket. please get them here :-
https://www.thingiverse.com/thing:2341588
thingiverse
free

Tevo Tarantula E3DV6 Bowden Mount With BedLeveling mount by dave032285
...d v6 hot end, same as other carriage i posted but with a belt tensioner on one end. and a proximity sensor mount for bed leveling
Djdemond
thingiverse
free
50mm Towball cover Hitch Cap by DjDemonD
...50mm towball cover hitch cap by djdemond
thingiverse
cover for 50mm towball.
thingiverse
free
Duet3D Smarteffector Nimble Mount DjDemonD Remix by DjDemonD
...ess sensitive. you also need to consider the orientation of the large nut to you heatsink when assembling the hotend into the se.
thingiverse
free

Brio Wooden Train Tunnel by DjDemonD
...valley etc.. multiple units can be joined to make a longer tunnel. 80mm diameter so even fairly large trains can make it through.
thingiverse
free

Bowden pushfit locking ring for clone titan and y-splitter by DjDemonD
...for clone titan and y-splitter by djdemond
thingiverse
locking clip for trianglelabs clone titan and y-splitter bowden fittings.
thingiverse
free
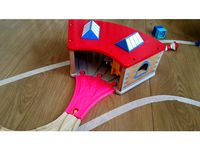
3-Way Approach for Brio Thomas Engine Shed by DjDemonD
...ond
thingiverse
i bought one of these engine sheds but didn't have the approach track which is a custom piece so i made one.
thingiverse
free

Precision Piezo - 27mm and 20mm Piezo Disc drill guide. by DjDemonD
... djdemond
thingiverse
drilling guide for piezo discs to centre your drill.
see youtube video here: https://youtu.be/ms1fd0v5z68
thingiverse
free

Mechanical Z Endstop for DjDemonD/AndreasL Dual z axis smartrapcore alu by DjDemonD
...babystep z on the first print and used m206 to enter the home offset. (nb. if the nozzle was 1mm too high the m206 z would be 1.)
thingiverse
free

Paper Towel Holder Strengthened Remix by DjDemonD
...t to allow for the strengthening braces. since altering it, it works perfectly in fact i am even using some as spool holders too.
thingiverse
free
Sensor Test Rig by DjDemonD
...aver. i am not going to provide full build instructions, if you cannot figure out how to build it, should you be testing sensors?
thingiverse
free

Technics 1200 Turntable with spinning record by DjDemonD
... fits over a 5mm motor shaft and spins as my printer prints.
just bond it all together after assembly with superglue or acetone.
Inc
thingiverse
free

Mike-Monsters Inc. by RedSpider3dp
...mike-monsters inc. by redspider3dp
thingiverse
mike-monsters inc.
thingiverse
free

Monsters Inc cookie cutter
...monsters inc cookie cutter
thingiverse
monster inc cookie cutter
thingiverse
free

Clé Monster Inc - Key Monster Inc by MrGamming14
... a creation make by me a fan of disneyland park and fan of walt disney
i have upload a lot of other key on my profil, so go check
thingiverse
free

HDL INc. by sarzilly
...hdl inc. by sarzilly
thingiverse
hdl logo
thingiverse
free

Monsters Inc. by SuperClam
...let those monsters know that you are willing to support their power
consumption needs.
screaming or laughing its all up to you.
thingiverse
free

Kettenspanner Fixie Inc. Hero // Chain tensioner Fixie Inc. Hero by dbreunig
...c. hero.
braucht zwei m4-schrauben und -muttern.
//
chain tensioner for fixie inc. hero. needs two additional m4 screws and nuts.
thingiverse
free

DYMOXOD Inc. by vladicxjo
...dymoxod inc. by vladicxjo
thingiverse
dymoxod: bo3m und1v1d3d
design by ratt
thingiverse
free

Gosling Inc. by AlexStormND
...stormndhttps://cults3d.com/en/users/alexstormndhttps://www.thingiverse.com/alexstormnd/designshttps://www.artstation.com/alexslon
thingiverse
free

Monsters, Inc. Boo's Door by Liang0108
...monsters, inc. boo's door by liang0108
thingiverse
monsters, inc. boo's door model.
thingiverse
free

monsters inc ornament by flabbergasted
...re is a total of three inserts; the m, the eye, and a circle border. the total ornament is three inches wide and half inch thick.
Titan
thingiverse
free

Titanic by Ludamega
...titanic by ludamega
thingiverse
titanic
thingiverse
free

Titanic by banana04
...titanic by banana04
thingiverse
titanic
thingiverse
free

titanic by dooley123
...titanic by dooley123
thingiverse
titanic model
thingiverse
free

The Titanic by dannydunlap
...the titanic by dannydunlap
thingiverse
this is a ship, but we called it the titanic.
thingiverse
free

Crazy Titan
...crazy titan
thingiverse
crazy titan
left rotation
attack type
thingiverse
free

Titan Glyphs by ProfAdam
...titan glyphs by profadam
thingiverse
titan glyphs for your own titanic models
thingiverse
free

Attack on titan Armored Titan Mask by HunteOfficia1
...ard steel blades of vertical maneuvering equipment when struck and withstanding the colossus titan's explosive transformation
thingiverse
free

model titanic by sagandbag2012
...model titanic by sagandbag2012
thingiverse
model titanic
thingiverse
free

Titanic 1 by Oversands
...titanic 1 by oversands
thingiverse
titanic v1
thingiverse
free

Titans Tower by MelerineTechnologies
... tower by melerinetechnologies
thingiverse
a modern rendition of titans tower from the teen titans television series and comics.
Kossel
thingiverse
free
kossel bottom by keisukelin
...kossel bottom by keisukelin
thingiverse
kossel bottom
thingiverse
free
Leg for kossel by exelon
...leg for kossel by exelon
thingiverse
leg for kossel
thingiverse
free
Extruder for kossel by spencer_chen7
...extruder for kossel by spencer_chen7
thingiverse
extruder for kossel
thingiverse
free
Kossel parts by breezer83
...kossel parts by breezer83
thingiverse
kossel parts
thingiverse
free

Anycubic Kossel PID calibration
...ir mount:
kossel raspberry camera ir mount
extruder pid calibration.
simple extruder temperature calibration of your 3d printer.
thingiverse
free

Kossel Medium by flux83
...kossel medium by flux83
thingiverse
vertex for upgraded kossel mini
thingiverse
free
Kossel Mini by salesmendesandre
...kossel mini by salesmendesandre
thingiverse
custom kossel mini
frame 20x20
thingiverse
free

leg for kossel by ionulet
...leg for kossel by ionulet
thingiverse
leg for kossel with channel for end- stop cables
thingiverse
free

Optical Endstops Mounts for Kossel (with Better Kossel carriages) by dellfer
...stops on the anycubic kossel with better kossel carriages by codefreak https://www.thingiverse.com/thing:2501337
more precission
thingiverse
free
kossel??????? by wangrui19890704
...kossel??????? by wangrui19890704
thingiverse
??2020?2060???
Flying
thingiverse
free

Fly by Alajaz
...fly by alajaz
thingiverse
fly..
thingiverse
free

CIRCUS (not flying)
...circus (not flying)
thingiverse
circus (not flying)
thingiverse
free

Flying Scotsman
...flying scotsman
thingiverse
an updated version of the flying scotsman, as it is now running on the british mainline.
thingiverse
free

Fly base
...fly base thingiverse basic supports for showing flying creatures on your game...
thingiverse
free

fly killer by sarginson84
...fly killer by sarginson84
thingiverse
fly killer
thingiverse
free

the flying dutchman by Syzguru11
...the flying dutchman by syzguru11
thingiverse
the flying dutchman
thingiverse
free

fly / fliege by Syzguru11
...fly / fliege by syzguru11
thingiverse
fly fliege
thingiverse
free

DINO FLY by 3dplaymaker
...dino fly by 3dplaymaker
thingiverse
dino fly
thingiverse
free

flying dragon by schneck007
...flying dragon by schneck007
thingiverse
a flying dragon
thingiverse
free

flying disc by trloutz
...flying disc by trloutz
thingiverse
flying disc
E3D
thingiverse
free

E3D fan Duck adapted for e3D mount by tambu22
...e3d fan duck adapted for e3d mount by tambu22
thingiverse
just try to adapt it to e3d mount
thingiverse
free
Extruder for E3D by xtopolx
...extruder for e3d by xtopolx
thingiverse
extruder for e3d
thingiverse
free
E3D mount by crota
...e3d mount by crota
thingiverse
e3d mount
thingiverse
free

UNI 3D E3D
...uni 3d e3d
thingiverse
e3d for uni 3d
thingiverse
free

Nozzle Holder E3D 8x / Düsenhalter E3D 8x by Walkabout77
...nozzle holder e3d 8x / düsenhalter e3d 8x by walkabout77
thingiverse
nozzle holder e3d 8x
thingiverse
free
E3D Support by Mamath
...e3d support by mamath
thingiverse
integrate e3d heat, for 40mm fan
thingiverse
free

E3d Cyclop and E3d Chimera by TanManGuy
... modeled up the cyclop and chimera
if looking for a fan shroud for it
(check this out- http://www.thingiverse.com/thing:614803)
thingiverse
free
E3D by alex16
...e3d by alex16
thingiverse
enclosure cooling e2d
thingiverse
free

3D model E3D V6 extruder
...3d model e3d v6 extruder.
e3d v6 radiator
e3d v6 volcano nozzle
e3d v6 heat break
e3d v6 heater block
e3d v6 volcano heater block
thingiverse
free

E3D Hemera Model
...e3d hemera model
thingiverse
official mounting cad for designing your own custom mounts for the e3d hemera.
Mini
thingiverse
free
mini castle mini mini golf by EdisonM
...mini castle mini mini golf by edisonm
thingiverse
play able with ball and putter in the "mini mini golf" model
thingiverse
free
Mini Clothesline - Mini Tendal
...mini clothesline - mini tendal
thingiverse
mini clothesline
mini tendal
thingiverse
free
mini mini golf by EdisonM
...mini mini golf by edisonm
thingiverse
actually playable mini mini golf course with putter and ball
thingiverse
free

Mini Schleuder / Mini Slingshot by Ju5tMak3
...mini schleuder / mini slingshot by ju5tmak3
thingiverse
mini schleuder / mini slingshot
have fun
thingiverse
free
mini bomba (mini pump) by neemiasmiranda
...mini bomba (mini pump) by neemiasmiranda
thingiverse
mini bomba
thingiverse
free

MINI by shteffs
...mini by shteffs
thingiverse
mini
thingiverse
free
Mini wrist, Mini poignet by Aleoduc74
...mini wrist, mini poignet by aleoduc74
thingiverse
mini poignet pour vitre ou petit meuble.
thingiverse
free

Mini Bat
...mini bat
thingiverse
mini bats.
thingiverse
free
Mini-Windeisen
...mini-windeisen
thingiverse
mini-windeisen
thingiverse
free

Mini cadeira
...mini cadeira
thingiverse
mini cadeira
Extruder
thingiverse
free
Extruder
...extruder
thingiverse
extruder for 3dprinter
thingiverse
free

Linear extrude, rotation extrude by jtirado
...linear extrude, rotation extrude by jtirado
thingiverse
linear extrude, rotation extrude
thingiverse
free

extruder by brunoschoofs
...extruder by brunoschoofs
thingiverse
extruder
thingiverse
free
Extruder Catcher/Extruder Holder by Verdandi
...extruder catcher/extruder holder by verdandi
thingiverse
for holding extruder.
thx for clicking
designed on sketch up
thingiverse
free

extruder by nekro
...extruder by nekro
thingiverse
cooler extruder
thingiverse
free

Extruder by DViktor
...extruder by dviktor
thingiverse
extruder with three fans (1 unmanaged extruder and 2 managed to product) fans 20x20x10
thingiverse
free

Extruder Knob
...extruder knob
thingiverse
yet another extruder knob.
thingiverse
free
Extruder by ImHuman
...extruder by imhuman
thingiverse
my first extruder. my design.
thingiverse
free

BMG extruder
...bmg extruder
thingiverse
bmg extruder model : step, wrl, stl
thingiverse
free

Bowden Extruder
...bowden extruder
thingiverse
i have created bowden extruder for flsun delta 3d printer.
New
thingiverse
free

New by 3DBOXPRINTING
...new by 3dboxprinting
thingiverse
new to start a new week, a new thing.
have a nice week!
thingiverse
free

New by EvgDem
...new by evgdem
thingiverse
new
thingiverse
free

New Whig
...new whig
thingiverse
new whig party
thingiverse
free

5/8x24 new new by KevinIhle
...5/8x24 new new by kevinihle
thingiverse
5/8x24 thread
thingiverse
free

new strife
...new strife
thingiverse
fixed posed models of the new strife model from darksiders genesis
thingiverse
free

New Tsurikawa by shopbymara
...new tsurikawa by shopbymara
thingiverse
new
thingiverse
free

New pyramid by aegreenart624785
...new pyramid by aegreenart624785
thingiverse
new
thingiverse
free

New Lay
...new lay
thingiverse
my most popular model is lay
here is a new version i hope it is
as liked as her predecessor
thingiverse
free

new roller by justinbarrera14
...new roller by justinbarrera14
thingiverse
roller new
thingiverse
free

death (new) by Syzguru11
...death (new) by syzguru11
thingiverse
death (new)
Version
thingiverse
free

Shocker Hand Final Version.. New Full version !! ...KEYCHAIN Version Final by marc_1988
... by marc_1988
thingiverse
now 2 versions !! .... new full....
keychain version of shocker hand final
print,share, and have fun.
thingiverse
free

beafy version by Bemothelaiemo
...beafy version by bemothelaiemo
thingiverse
beafy version for fanless psu
thingiverse
free

Pumpkin Version 2
...pumpkin version 2
thingiverse
version 2 of my pumpkin.
thingiverse
free

Poro (Ekko version)
...poro (ekko version)
thingiverse
warlock3dmodels poro, but as an ekko version.
thingiverse
free

Better version by AlexMaker816
...better version by alexmaker816
thingiverse
better version of heart box
thingiverse
free

lite version by Mitche11S
...lite version by mitche11s
thingiverse
i built this model by analogy with the simplified version.
thingiverse
free

5015Blowerduct Inverted version
...5015blowerduct inverted version
thingiverse
inverted version of 5015blowerduct.
the spacer is used to prevent deflection.
thingiverse
free

Repaired version by Snake83
...repaired version by snake83
thingiverse
repaired version of the a https://www.thingiverse.com/thing:841122/#comments
thingiverse
free

thicker version by Finch666
...thicker version by finch666
thingiverse
thicker version, my original got warped under tension.
thingiverse
free

2016 version by totof60
...2016 version by totof60
thingiverse
just add the 2016 version
from http://www.thingiverse.com/thing:193755