Thingiverse

Kossel based magnetic effector + self-locking carriages (10 mm magnets) by docpayce
by Thingiverse
Last crawled date: 3 years ago
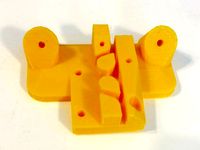
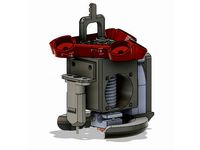
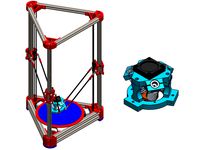
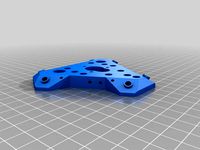
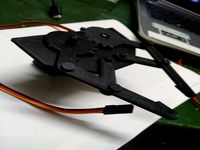
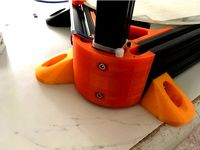
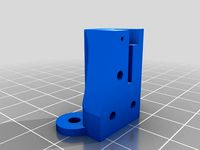
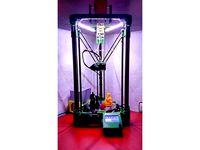
I wanted to upgrade my Folger Tech. Kossel 2020 to magnetic rods, but found that most solutions on thingiverse either use steel ball studs on the effector (which I dislike a bit) or redesign the effector/carriages in such a huge way that I could not use all the Kossel-compatible accessories I already printed out (magnetic z-probe, fan mount and alike). So I took the very base Kossel carriage (self-locking type) and effector and JUST made it accepting cylinder shaped magnets. Everything else is as close to the original Kossel design as possible. In fact, the .scad files should even be compatible to JCRocholls github Kossel (https://github.com/jcrocholl/kossel).
I hope this helps others! :)
About the magnets:
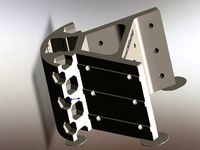
The STL's are designed to accept cylinder-shaped magnets with 10 mm diameter and 5 mm height (the hole, which accepts the magnets, is 4 mm deep). Be sure to get axially magnetized magnets, NOT diametral ones (those are magnetized perpendicular to the rotational axis). I prefer the ones with ~4 mm bore diameter, as they give the best compromise between holding force and inhibition of sideways movement.
The magnets are angled at 31° (that was ideal for my setup) and have a separation of 45 mm. If you want change any of these parameters (in addition to Delta_effector_offset, hotend_radii etc), pls check out the .scad's. Should be pretty self-explanatory.
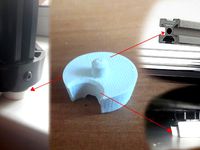
Update May 4th 2016: Added .stl's of the cups for mounting the steel balls to the carbon rods. Designed for 10 mm diameter balls and 6 mm diameter rods.
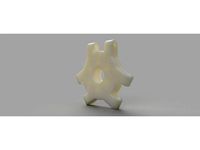
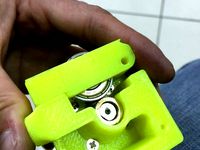
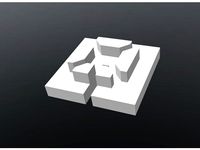
Update May 12th 2016: Up to now I wasn't very happy with the way, the magnetic cups on the effector printed (bunny ear syndrom). But on the other hand I didn't want them to print with a completely flat bottom, as that would make the inserting of a magnet a pure torture (for both you and the effector). I came up with a pretty easy solution: There is a vise helper now, which attaches to the effector magnet cups during prying in the magnets. Easy solution, works VERY well. If you downloaded the files before May 12th, pls redownload. The new version of the effector + vise helper is much better imho.
Update May 24th 2016: There is now also a version to accomodate for magnets with 12 mm diameter, check it out: http://www.thingiverse.com/thing:1584513
I hope this helps others! :)
About the magnets:
The STL's are designed to accept cylinder-shaped magnets with 10 mm diameter and 5 mm height (the hole, which accepts the magnets, is 4 mm deep). Be sure to get axially magnetized magnets, NOT diametral ones (those are magnetized perpendicular to the rotational axis). I prefer the ones with ~4 mm bore diameter, as they give the best compromise between holding force and inhibition of sideways movement.
The magnets are angled at 31° (that was ideal for my setup) and have a separation of 45 mm. If you want change any of these parameters (in addition to Delta_effector_offset, hotend_radii etc), pls check out the .scad's. Should be pretty self-explanatory.
Update May 4th 2016: Added .stl's of the cups for mounting the steel balls to the carbon rods. Designed for 10 mm diameter balls and 6 mm diameter rods.
Update May 12th 2016: Up to now I wasn't very happy with the way, the magnetic cups on the effector printed (bunny ear syndrom). But on the other hand I didn't want them to print with a completely flat bottom, as that would make the inserting of a magnet a pure torture (for both you and the effector). I came up with a pretty easy solution: There is a vise helper now, which attaches to the effector magnet cups during prying in the magnets. Easy solution, works VERY well. If you downloaded the files before May 12th, pls redownload. The new version of the effector + vise helper is much better imho.
Update May 24th 2016: There is now also a version to accomodate for magnets with 12 mm diameter, check it out: http://www.thingiverse.com/thing:1584513
Similar models
thingiverse
free
Kossel Magnetic ball stud carriage by wittmason
... here as well). this is designed to work with hayden huntleys effector or the effector i remixed magnetic effector e3d compatible
thingiverse
free

Kossel based magnetic effector + self-locking carriages (12 mm magnets) by docpayce
...203) for magnets with 12 mm diameter. for all further description/printing instructions etc. pls check out the real thing. :) ty.
thingiverse
free

Delta magnetic effector and carriage with smaller ball holes by Olooki3D
...diameter to accept his ball studs.
link for haydn huntley's mag rods and ball studs.http://www.thingiverse.com/thing:299263
thingiverse
free

Magnetic Joint Carriage for Kossel Mini by cffellows
...ge provides the capability of building a kossel mini with magnetic ball joints using the magnetic effector from the cerberus pup.
thingiverse
free

Rostock reused effector and carriage magnetic solution by kakbit
...ue gun to attach the magnets
i reused the m3 screws and nuts to mount the magnet and ball holders, that earlier mounted the rods.
thingiverse
free

mini kossel JT effector ballend by davejavu123
...by davejavu123
thingiverse
for use with the jt magnetic effector and rods and carriage
not 3d printable
machine out of steel
thingiverse
free

Kossel Effector for Generic Chinese All Metal Hotend by tailoffloof
...pload it when i get a chance.
ball joint space = 40mm
delta effector offset = 24mm
mounting radius = 12.5mm
hotend radius = 8.1mm
thingiverse
free

mini kossel JT magnetic effector plate by davejavu123
...or plate by davejavu123
thingiverse
this works with the 30mm fan (thing:948319) and the mini kossel magnetic ball joint and rods
thingiverse
free

Magnetic Kossel effector with ring pushfit connector by lenoxjoseph
...studded magnetic ball arms.
if modifying further, make sure that the kossel configuration scad is present in the same directory.
thingiverse
free

magnetic ball mini kossel carriage by davejavu123
...l mini kossel carriage by davejavu123
thingiverse
for use with my magnetic rod ends and ball joint w/ my mini kossel effectorjt
Docpayce
thingiverse
free

Wanhao Duplicator i3 (MIDDLE) Dampeners for docpayce Dampeners with AzzA's Z Braces by teknikk7
...ay by adding additional dampeners under the center frame.
to be used in conjunction with http://www.thingiverse.com/thing:1572655
thingiverse
free

Makerbot / Big Tree Tech Endstop .scad by docpayce
...ns. watch out: some versions of this endstop do have the connector on the opposite side. just mirror the .scad if thats the case.
thingiverse
free

Spare pin for Ikea BESTA shelf by docpayce
... .stl file (not the flat side down on the bed) with supports enabled. this way, the maximum sitffness will be according to needs.
thingiverse
free
Kossel based magnetic effector + self-locking carriages (12 mm magnets) by docpayce
...203) for magnets with 12 mm diameter. for all further description/printing instructions etc. pls check out the real thing. :) ty.
thingiverse
free

Kossel PSU standoff (Folger Tech. and compatible) by docpayce
...for the psu. it pushes the psu out of the way by 40 mm. built pretty sturdy.
needs: 8x m4x12 screws, 4x m4 t-nuts for both sides.
thingiverse
free

Snowstock Delta bracket for 40 mm distant extrusions (e.g. Kossel) by docpayce
...ase (https://www.thingiverse.com/thing:213852) in place.
instead of 30 mm, the distance between the holes is 40 mm now.
have fun!
thingiverse
free

Universal, customizable nut and bearing holder / 90° adapter by docpayce
...) or nuts (6-sided)
center- or endpiece
variable thickness, diameter etc.
there may come more if people are interested. have fun!
thingiverse
free

Post-modernistic-pre-futural-or-so *complete* shower head with handle by docpayce
...on shown on the photos is a slightly older one. the new one is slimmer -- therefore imho sexier -- and uses less material (~75%).
thingiverse
free

Combined width & horizontal size compensation calibration part by docpayce
... a bit, but not crazy). if they don't fit yet, further increase wall thickness compensation a bit.
hope that helps, have fun!
thingiverse
free

Edge glass bed clamps for Kossel, Rostock & Co. by docpayce
...ations of ~6 kelvin over the bed surface (@ 60°c). though, this did not influence the printing in any significant way for me yet.
Effector
3d_ocean
$5

Radial Sound Effector
...e spheres will expand with your song. fully customisable, change the color, the size of the spheres or even put in different s...
3d_ocean
$12
3D Customizable Puzzle Set (16x10)
...mograph compatible (you can effect the pieces with mograph effector) - included also a non-mograph version with...
thingiverse
free
Effector by olo2000pm
...effector by olo2000pm
thingiverse
effector
thingiverse
free
CERAMBOT-Effector
...cerambot-effector
thingiverse
cerambot-effector
thingiverse
free

modulize effector by candyasdf
...ulize effector by candyasdf
thingiverse
mount things on effector with m3 screws
effector radius : 25.4mm
rod arm distance : 40mm
thingiverse
free
Delta Effector by zavier
...delta effector by zavier
thingiverse
delta effector with radial fan 50 and bltouch
thingiverse
free
D810 Effector by WhiteTiger13
...d810 effector by whitetiger13
thingiverse
this is d810 effector for d810 without autocalibration, and also cap for it.
thingiverse
free
Effector for Delta Printer
...effector for delta printer
thingiverse
effector for delta printer (3 color)
using diamond hotend
thingiverse
free
Delta effector magnetic by fpassos
...delta effector magnetic by fpassos
thingiverse
effector for e3dv6 hotend. i needed put the spheres (10mm) on the effector.
thingiverse
free
End Effector Gripper
...end effector gripper
thingiverse
end effector gripper
for a robotic arm
uses mg995 servo motor
Kossel
thingiverse
free
kossel bottom by keisukelin
...kossel bottom by keisukelin
thingiverse
kossel bottom
thingiverse
free
Leg for kossel by exelon
...leg for kossel by exelon
thingiverse
leg for kossel
thingiverse
free
Extruder for kossel by spencer_chen7
...extruder for kossel by spencer_chen7
thingiverse
extruder for kossel
thingiverse
free
Kossel parts by breezer83
...kossel parts by breezer83
thingiverse
kossel parts
thingiverse
free

Anycubic Kossel PID calibration
...ir mount:
kossel raspberry camera ir mount
extruder pid calibration.
simple extruder temperature calibration of your 3d printer.
thingiverse
free

Kossel Medium by flux83
...kossel medium by flux83
thingiverse
vertex for upgraded kossel mini
thingiverse
free
Kossel Mini by salesmendesandre
...kossel mini by salesmendesandre
thingiverse
custom kossel mini
frame 20x20
thingiverse
free
leg for kossel by ionulet
...leg for kossel by ionulet
thingiverse
leg for kossel with channel for end- stop cables
thingiverse
free

Optical Endstops Mounts for Kossel (with Better Kossel carriages) by dellfer
...stops on the anycubic kossel with better kossel carriages by codefreak https://www.thingiverse.com/thing:2501337
more precission
thingiverse
free
kossel??????? by wangrui19890704
...kossel??????? by wangrui19890704
thingiverse
??2020?2060???
Carriages
archibase_planet
free

Carriage
...arriage
archibase planet
perambulator baby carriage pram
carriage n250908 - 3d model (*.gsm+*.3ds) for interior 3d visualization.
3d_export
free

carriage
...carriage
3dexport
old fashion carriage model, more files here:
turbosquid
$140

Carriage
...urbosquid
royalty free 3d model carriage for download as max on turbosquid: 3d models for games, architecture, videos. (1482052)
turbosquid
$25

Carriage
...urbosquid
royalty free 3d model carriage for download as max on turbosquid: 3d models for games, architecture, videos. (1285944)
3d_export
free

carriage
...carriage
3dexport
game cart
3d_ocean
$15

Barrel Carriage
...ieval oak old transport wheels wine wood
this model contains a barrel and a carriage. it is a medieval type of wood oak carriage.
turbosquid
$40

Carriage
...ty free 3d model carriage for download as obj, fbx, and blend on turbosquid: 3d models for games, architecture, videos. (1290094)
turbosquid
free

Carriage
...yalty free 3d model carriage for download as ma, obj, and fbx on turbosquid: 3d models for games, architecture, videos. (1239157)
3d_export
$5

Medieval carriage
...medieval carriage
3dexport
medieval carriage in fairy style
turbosquid
$58

Carriage
...d model carriage with scene for download as max, obj, and fbx on turbosquid: 3d models for games, architecture, videos. (1276262)
Self
3ddd
$1
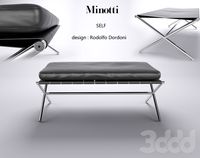
Self
... банкетка
каталог minotti 2010модель selfдизайнер rodolfo dordoniш\д\в 60\120\42
3ddd
$1

Minotti Self
...minotti self
3ddd
minotti
банкетка minotti self
3ddd
$1
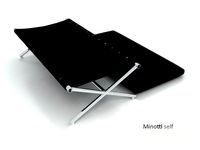
Minotti Self
...minotti self
3ddd
minotti , self
текстуры и материалы прилагаются.
3ddd
$1
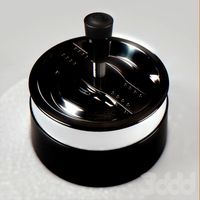
Self cleaning ashtrays
...self cleaning ashtrays
3ddd
пепельница
self cleaning ashtrays
turbosquid
$15
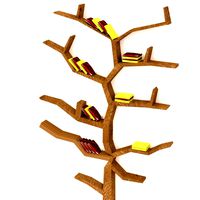
Book self
...
royalty free 3d model book self for download as max and fbx on turbosquid: 3d models for games, architecture, videos. (1502520)
3d_export
free
self-tapping screw
...self-tapping screw
3dexport
self-tapping screw 55 мм
turbosquid
$12

Book Self
...lty free 3d model book self for download as max, obj, and fbx on turbosquid: 3d models for games, architecture, videos. (1473695)
turbosquid
$4
Self with Desk
...d model self with desk for download as 3ds, max, obj, and fbx on turbosquid: 3d models for games, architecture, videos. (1511139)
turbosquid
$2

Book Self
...ree 3d model book self for download as max, fbx, 3ds, and obj on turbosquid: 3d models for games, architecture, videos. (1544366)
turbosquid
$2

Book self
...ree 3d model book self for download as 3ds, max, fbx, and dwg on turbosquid: 3d models for games, architecture, videos. (1300384)
Magnets
3d_ocean
$2

Magnet
...
3docean
3d 3ds max electric magnet magnetic magnetism max model polygon realistic tesla
magnet created in 3ds max by umurdesign.
turbosquid
$6
Magnet
...
turbosquid
royalty free 3d model magnet for download as obj on turbosquid: 3d models for games, architecture, videos. (1548733)
turbosquid
$6

magnet
...uid
royalty free 3d model magnet for download as 3dm and max on turbosquid: 3d models for games, architecture, videos. (1670606)
turbosquid
$1

Magnet
...y free 3d model magnet for download as 3ds, max, obj, and fbx on turbosquid: 3d models for games, architecture, videos. (1215037)
turbosquid
$7

Magnet
...agnet for download as blend, unitypackage, fbx, gltf, and obj on turbosquid: 3d models for games, architecture, videos. (1576588)
3d_export
$5

magnetic knife holder
...magnetic knife holder
3dexport
ordinary magnetic knife holder
archive3d
free

Fridge magnet 3D Model
...t fridge magnet magnet
toy magnetic s n280712 - 3d model (*.3ds) for interior 3d visualization.
turbosquid
$35

Magnetic butterflies
...alty free 3d model magnetic butterflies for download as blend on turbosquid: 3d models for games, architecture, videos. (1315792)
turbosquid
$2
Magnetic Board
...quid
royalty free 3d model magnetic board for download as ma on turbosquid: 3d models for games, architecture, videos. (1264141)
turbosquid
$977
Magnetic Lego
...oyalty free 3d model magnetic lego for download as ma and obj on turbosquid: 3d models for games, architecture, videos. (1142761)
Magnetic
3d_ocean
$2
Magnet
...magnet 3docean 3d 3ds max electric magnet magnetic magnetism max model polygon realistic tesla magnet created in...
turbosquid
$6
Magnet
...
turbosquid
royalty free 3d model magnet for download as obj on turbosquid: 3d models for games, architecture, videos. (1548733)
turbosquid
$6
magnet
...uid
royalty free 3d model magnet for download as 3dm and max on turbosquid: 3d models for games, architecture, videos. (1670606)
turbosquid
$1
Magnet
...y free 3d model magnet for download as 3ds, max, obj, and fbx on turbosquid: 3d models for games, architecture, videos. (1215037)
turbosquid
$7
Magnet
...agnet for download as blend, unitypackage, fbx, gltf, and obj on turbosquid: 3d models for games, architecture, videos. (1576588)
3d_export
$5
magnetic knife holder
...magnetic knife holder
3dexport
ordinary magnetic knife holder
archive3d
free
Fridge magnet 3D Model
...3d model archive3d refrigerator magnet fridge magnet magnet toy magnetic s n280712 - 3d model (*.3ds) for interior 3d...
turbosquid
$35
Magnetic butterflies
...alty free 3d model magnetic butterflies for download as blend on turbosquid: 3d models for games, architecture, videos. (1315792)
turbosquid
$2
Magnetic Board
...quid
royalty free 3d model magnetic board for download as ma on turbosquid: 3d models for games, architecture, videos. (1264141)
turbosquid
$977
Magnetic Lego
...oyalty free 3d model magnetic lego for download as ma and obj on turbosquid: 3d models for games, architecture, videos. (1142761)
Locking
turbosquid
$1

Lock
...ck
turbosquid
royalty free 3d model lock for download as fbx on turbosquid: 3d models for games, architecture, videos. (1286851)
3d_export
$5

lock handle
...lock handle
3dexport
lock handle
3d_export
$5
hinged lock
...hinged lock
3dexport
hinged lock
turbosquid
$1
Lock Box with combination lock
...ee 3d model lock box for download as 3ds, obj, fbx, and blend on turbosquid: 3d models for games, architecture, videos. (1215494)
turbosquid
$2
Lock
...
royalty free 3d model lock for download as max, obj, and fbx on turbosquid: 3d models for games, architecture, videos. (1452660)
turbosquid
$35

Lock
... available on turbo squid, the world's leading provider of digital 3d models for visualization, films, television, and games.
turbosquid
$24

lock
... available on turbo squid, the world's leading provider of digital 3d models for visualization, films, television, and games.
turbosquid
$10

Lock
... available on turbo squid, the world's leading provider of digital 3d models for visualization, films, television, and games.
turbosquid
$6

Lock
... available on turbo squid, the world's leading provider of digital 3d models for visualization, films, television, and games.
turbosquid
$4
Lock
... available on turbo squid, the world's leading provider of digital 3d models for visualization, films, television, and games.
10
turbosquid
$25

10
... available on turbo squid, the world's leading provider of digital 3d models for visualization, films, television, and games.
turbosquid
$10

a-10
... available on turbo squid, the world's leading provider of digital 3d models for visualization, films, television, and games.
3ddd
$1

EX 10
...ex 10
3ddd
samsung , фотоаппарат
ex 10
3ddd
$1

Bed 10
...bed 10
3ddd
постельное белье
bed 10
evermotion
$25

Scene 10 Archinteriors vol. 10
...dering design interior
take a look at textured and shadered visualization scene ready to be rendered.. evermotion 3d models shop.
3ddd
$1

Curtains 10
...curtains 10
3ddd
curtains 10
3ds max 2011,fbx + textures
polys: 100355
3ddd
free

PLANTS 10
...plants 10
3ddd
цветок , горшок
plants 10,, with 3 different color planter boxes
turbosquid
$24

Chandelier MD 89310-10+10 Osgona
... chandelier md 89310-10+10 osgona for download as max and fbx on turbosquid: 3d models for games, architecture, videos. (1218762)
design_connected
$29

Nuvola 10
...nuvola 10
designconnected
gervasoni nuvola 10 computer generated 3d model. designed by navone, paola.
design_connected
$22

Kilt 10
...kilt 10
designconnected
zanotta kilt 10 computer generated 3d model. designed by progetti, emaf.
Mm
3ddd
$1

MM Lampadari
...mm lampadari
3ddd
mm lampadari
mm lampadari
бра
люстра
3ddd
$1

MM lampadari
...mm lampadari
3ddd
mm lampadari
lampa mm lampadari,art.
3ddd
$1

MM lampadari
...mm lampadari
3ddd
mm lampadari
lustra mm lampadari,art.
3ddd
free

MM lampadari
...mm lampadari
3ddd
mm lampadari
bra mm lampadari,art.
3ddd
$1

MM Lampadari
...mm lampadari
3ddd
mm lampadari
люстра от фабрики mm lamparadi.арт:7032/8 размеры:а (d 72 x h37 см)
3ddd
$1

MM Lampadari
...mm lampadari
3ddd
lampadari
mm lampadari, 5972/12+6 1700x1800h
3ddd
$1

MM Lampadari
...mm lampadari
3ddd
mm lampadari
настольная лампа (высота - 52 см)
3ddd
$1

MM Lampadari
...mm lampadari
3ddd
mm lampadari
бра от фабрики mm lamparadi.арт:. 7032/a1 размеры:(l 16 x h 27 x sp 27 см)
3ddd
$1

MM Lampadari
...mm lampadari
3ddd
mm lampadari
люстра с рассеивателем из стекла
и позолоты и металлической арматурой
3ddd
$1

MM LAMPADARI 6578
...mm lampadari 6578
3ddd
mm lampadari
торшер mm lampadari 6578/lt3+1 v2172
Based
archibase_planet
free
Base
...base
archibase planet
base column column base
base 1 - 3d model (*.gsm+*.3ds) for interior 3d visualization.
archibase_planet
free
Base
...base
archibase planet
base column base column
base 5 - 3d model (*.gsm+*.3ds) for interior 3d visualization.
archibase_planet
free
Base
...base
archibase planet
base column column base
base 7 - 3d model (*.gsm+*.3ds) for interior 3d visualization.
archibase_planet
free
Base
...base
archibase planet
base column column base
base 2 - 3d model (*.gsm+*.3ds) for interior 3d visualization.
archibase_planet
free
Base
...base
archibase planet
base column column base
base 3 - 3d model (*.gsm+*.3ds) for interior 3d visualization.
archibase_planet
free
Base
...base
archibase planet
base column column base
base 4 - 3d model (*.gsm+*.3ds) for interior 3d visualization.
archibase_planet
free
Base
...base
archibase planet
base column base column
base 6 - 3d model (*.gsm+*.3ds) for interior 3d visualization.
archibase_planet
free
Base
...base
archibase planet
foundation base
column base ionic - 3d model (*.gsm+*.3ds) for interior 3d visualization.
archibase_planet
free
Base
...base
archibase planet
foundation base
column base tuscan - 3d model (*.gsm+*.3ds) for interior 3d visualization.
design_connected
$18
Base
...base
designconnected
tom dixon base computer generated 3d model. designed by dixon, tom.