Thingiverse
Korbanth DV6 Lightsaber Chassis by ScarletImpaler
by Thingiverse
Last crawled date: 4 years, 4 months ago
Korbanth "DV6" Darth Vader RotJ Lightsaber Chassis.
Sorry its nothing too flashy, I remixed the entire thing from a Graflex 2.0 chassis I found here, and did so to hold standard lightsaber electronics in the DV6 (as it was designed for an Arduino w/ string blade). Its definitely different from most chassis systems out there, and it got kind of ugly from weird things NetFabb did to it, but I think it will work fine.
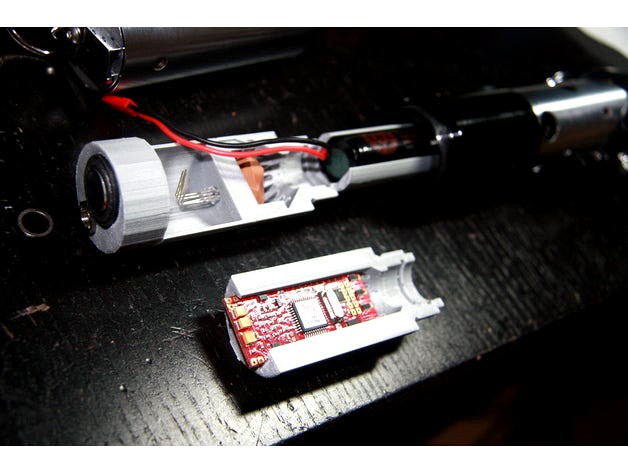
THIS IS A TWO-PART CHASSIS!
You'll need to print the Main file and then the file thats associated with your soundboard. If you order this, 3D Hubs will automatically fill your cart with all the files. That means if you want to use a NBv3 in your DV6, you will need remove the NEC and the CF/PC versions from the cart. You should only see the Main and NBv3 parts left, and then order those.
Despite it's looks, it holds everything one could want in a saber. Your standard 18650 battery, most soundboards, speaker. On top that, a Switchcraft recharge port, Crystal Chamber with a hole to mount a 5mm accent LED.
Everything is fairly self-explanatory with it, but there are a few important things to note:
-Soundboards might need a bit of force to get in, but its a nice and tight grip to keep it in place. Be very careful of the wiring, and organize your wires to come out of the main opening or through the channel.
-30 gauge wire is needed for the switches and LED.
-I figure the order of install should be: Accent LED, recharge port, and then speaker. It doesn't matter the order for other parts.
-I found it easier to remove the chassis once the grip section was screwed off from the switch section. The chassis is really nice and tight, and couldn't pull it out through the pommel. In all honesty, you'll probably never remove the chassis once it installs. Even if you need to make a fix, you'll could pull it out just a bit to separate the soundboard piece, unless the battery failed or something (which is why you don't get bad off-brand batteries).
-With that in mind, planning to access the chassis by removing the grip section will result is less wiring that goes past the 18650. In turn, reduce the amount of wiring you have to cram in under the LED unit. Which is a real good thing.
Uploaded stream of DV6 build, using this chassis: https://youtu.be/UVfZkG1-ao4
Give a like to my FB page for weekly live-stream lightsaber builds, cosplay, props, and whatever else I want to post about: https://www.facebook.com/thescarletimpaler/
Update Log:
25 Feb 2017:
-Uploaded a new NEC version. It now has a wire channel underneath the board. This will be for other variants.
-Just started the test print for the Nano Biscotte V3 variant and the Crystal Focus and Petit Crouton variant. Sorry, I don't think I will able to adapt the Color Extender board for this chassis.
26 Feb 2017:
-Test fits for Nano Biscotte v3 and Petit Crouton/Crystal Focus were good to go. Their files are uploaded.
Sorry its nothing too flashy, I remixed the entire thing from a Graflex 2.0 chassis I found here, and did so to hold standard lightsaber electronics in the DV6 (as it was designed for an Arduino w/ string blade). Its definitely different from most chassis systems out there, and it got kind of ugly from weird things NetFabb did to it, but I think it will work fine.
THIS IS A TWO-PART CHASSIS!
You'll need to print the Main file and then the file thats associated with your soundboard. If you order this, 3D Hubs will automatically fill your cart with all the files. That means if you want to use a NBv3 in your DV6, you will need remove the NEC and the CF/PC versions from the cart. You should only see the Main and NBv3 parts left, and then order those.
Despite it's looks, it holds everything one could want in a saber. Your standard 18650 battery, most soundboards, speaker. On top that, a Switchcraft recharge port, Crystal Chamber with a hole to mount a 5mm accent LED.
Everything is fairly self-explanatory with it, but there are a few important things to note:
-Soundboards might need a bit of force to get in, but its a nice and tight grip to keep it in place. Be very careful of the wiring, and organize your wires to come out of the main opening or through the channel.
-30 gauge wire is needed for the switches and LED.
-I figure the order of install should be: Accent LED, recharge port, and then speaker. It doesn't matter the order for other parts.
-I found it easier to remove the chassis once the grip section was screwed off from the switch section. The chassis is really nice and tight, and couldn't pull it out through the pommel. In all honesty, you'll probably never remove the chassis once it installs. Even if you need to make a fix, you'll could pull it out just a bit to separate the soundboard piece, unless the battery failed or something (which is why you don't get bad off-brand batteries).
-With that in mind, planning to access the chassis by removing the grip section will result is less wiring that goes past the 18650. In turn, reduce the amount of wiring you have to cram in under the LED unit. Which is a real good thing.
Uploaded stream of DV6 build, using this chassis: https://youtu.be/UVfZkG1-ao4
Give a like to my FB page for weekly live-stream lightsaber builds, cosplay, props, and whatever else I want to post about: https://www.facebook.com/thescarletimpaler/
Update Log:
25 Feb 2017:
-Uploaded a new NEC version. It now has a wire channel underneath the board. This will be for other variants.
-Just started the test print for the Nano Biscotte V3 variant and the Crystal Focus and Petit Crouton variant. Sorry, I don't think I will able to adapt the Color Extender board for this chassis.
26 Feb 2017:
-Test fits for Nano Biscotte v3 and Petit Crouton/Crystal Focus were good to go. Their files are uploaded.