Thingiverse
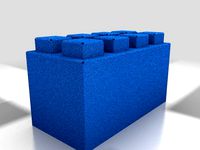
Kiolia's Double Bowden-Cooled Lightweight Kossel Effector for Trick Laser 3/8" Barbells by Kiolia
by Thingiverse
Last crawled date: 3 years, 1 month ago
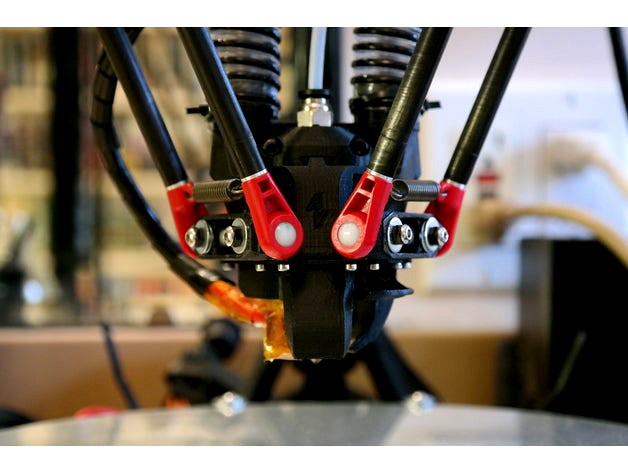
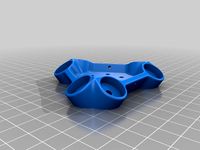
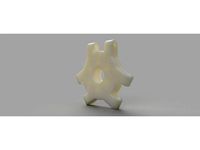
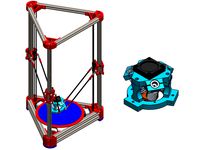
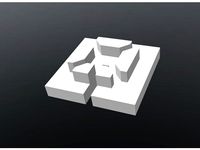
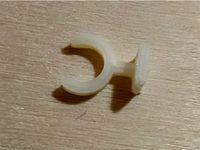
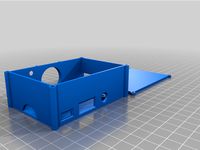
When I found out about Trick Laser's nifty ball-cup Kossel arms with plastic barbells to guarantee arm spacing and reduce joint lash (see http://www.tricklaser.com/), I was immediately intrigued, but I needed an effector to use them with -- and since I also got intrigued by the idea of Bowden cooling my hot end at about the same time, I had to design my own effector. This is the result. The photos don't really do it justice, sadly -- my fault for loving black PLA so much, I suppose -- but in this designer's opinion it looks flippin' rad, especially because it's so compact.
IMPORTANT: this is designed as a replacement for the stock effector of an Anycubic Linear Kossel XL, which comes with what appears to be an E3D V5 clone hot end. The hot end lock fits 16mm OD with a 11.9mm OD x 5.7mm tall channel, and the design is sized to expect 51.25mm (-1/+whatever) from the top of the heat break down to the top of the heating block. I don't know if this'll fit an E3D V6 or not, but I'll probably get a different hot end eventually and update the files to include options for that, as well. I'm intrigued by the new Pico that's coming out, for example.
ALSO IMPORTANT: embarrassingly, although all individual parts of the main structure are solid components in SketchUp, I could not get the final outer shell to solid up for export. I found and fixed a few very minor issues with the final component but couldn't for the life of me track down the issue; either way, though, it slices fine for me in Cura 3.2.0. I'm counting this as a work in progress anyway because I suspect I could clean up and expand the internal airways more, and the hot end lock is VERY hard to get off -- it could use a slot for inserting a screwdriver.
Anyway: How does it work? Quite well!
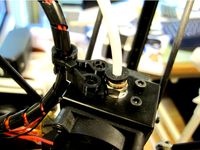
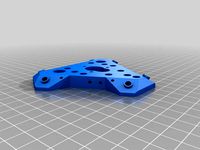
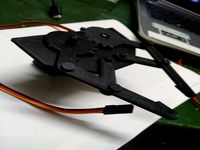
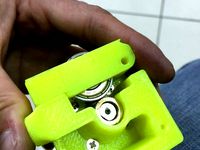
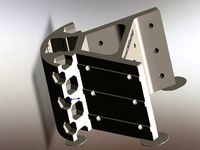
Design: This is a very rigid design, and geared toward quality at the expense of build height and, to a lesser degree, durability at the expense of weight. The hot end lock has a nice wedge feature that locks the front of it into the main structure as it's tightened on, so the hot end is very rigid once mounted. I purposely designed it to let the hot end protrude from the bottom to try to get the CoG more in line with the plane of the arm joints to reduce effector tilt at high accelerations, although I'm pretty sure it's still riding high. Combined with the lash-free Trick Laser arms (with fully-constrained barbells, of course), this is producing very nice prints so far.
5.12.18 UPDATE: I have now run about 100 meters of filament through the new setup, and it continues to work fine, with no signs of fatigue, loosening, or chafing on the cooling tubes, and I'm getting really excellent print quality across the board. Until I go to a flying extruder or remote-drive setup, I'm constrained to a perimeter speed of about 35mm/s at .2 layer height before filament flow through my long, long bowden becomes an issue, but I'm now running travels at 300mm/s at 6000mm/s^2 and so far I think there's still room to speed those up. Whee!
Weight: It's a massive improvement over the stock effector that came with my Anycubic Kossel XL (at least a 75g savings; without the hot end or barbells mounted the whole thing seems to come in around 50g, but I don't have a digital scale to get a proper read on this). The weight reduction has done wonders for ringing and overshoot artifacts. It's probably not the lightest effector ever, but I doubt there's anything out there as light as this with dual cooling fans.
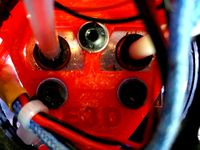
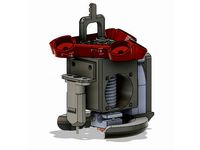
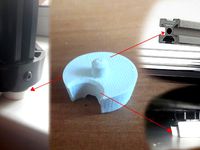
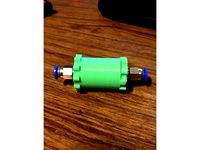
Cooling: Holy cow, this might be the best part. With 19mm cPAP tubing to provide remote cooling from some more powerful blowers, the improvement in part cooling is incredible. Even at worse-case cooling angles from the small nozzle, overhangs don't really start to fall apart until over 70 degrees at .2 layer height and 80 degrees at .1. I included some before/after pictures for the cooling nozzles, which gave the original cooling setup some trouble even at .1 layer height. Both bowden cooling tubes feed into internal air channels that split the airflow into 1/3 and 2/3rds. For the hot end cooling side, the larger feed blows across the bottom fins of the heat break, while the smaller feed maintains a vortex around the internal chamber; this can cool the hot end from 205C to 60C between 5 and 15% faster than the original on-effector cooling fan even at moderate input airflows, so I'm counting it as "probably better than before". For the part cooling side, the larger feed is pumped into a small nozzle aimed directly at the hot end's output, while the smaller feed is channeled around the front to a wider nozzle intended for general part cooling. This seems to strike a good balance for bridging and overhangs, and is substantially better for small parts than the original setup. The only downside for bowden cooling that I've detected so far is that the little blowers I've got are freakin' LOUD when fighting this pressure head, but I'm planning to seek out some bigger, quieter ones.
I experimented with supercharging the cooling by ganging and stacking two fans on each bowden and seeing how deep into water they could still blow bubbles -- with interesting results, specifically:
-- Side-by-side blowers produce little or no pressure head improvement;
-- Stacking blowers (output to input) produces something approaching double the pressure head improvement (my rough experiments showed about 85% improvement, but I think more sealing would have helped);
-- Stacking small blowers against 3' of cPAP tubing and some nozzles makes them VERY loud; and
-- Most importantly of all, one blower is almost as good as stacking two identical ones for bowden cooling, at least in terms of cooling the hot end; I measured only a 7 second improvement for 205C to 60C cooldown going from 2 .36A blowers to 1. This is especially good news considering stacking 2 .36 blowers on the part cooling circuit blew the mosfet when I ramped the PWM to 255. I'm not sure why the gain is so slight from stacking blowers when they clearly showed a nearly linear boost in pressure head performance; they might have made more difference on the part cooling, where the nozzles probably give more of a restriction to fight against, but I'd need to figure out a setup that won't burn out my board to experiment more.
I do plan to change to bigger, quieter blowers at some point, and if I get any interesting data I'll try to remember to update this space.
6.8.18 NOTE: I'm currently using these homebrew compressor fans: https://www.thingiverse.com/thing:2951796 -- They're definitely not as powerful as the .36A cheapie blowers I was using, but man are they more tolerable in the noise department. A .2A version of my compressor (with a .13A booster fan) on the hotend cooling side has proved more than adequate; a .3A version, unboosted, is working for the part cooling side, but it's not achieving the superior overhang support of the nasty-loud cheapie blowers. I plan to try boosting that side with a higher-amp case fan tapped straight into my power supply once I work out the speed control.
Durability: This design is pretty much brand-new, but I've been running it for about 20 hours of printing now and so far it's doing fine. So far I've only ever printed PLA, so I can't speak to the thermal performance if you wanted to use this for printing anything needing really hot temperatures, but the internal cooling seems to be excellent, and as long as your heater block is insulated there shouldn't be much heat transfer into the effector itself. If you're worried you could print the hot end cooling duct out of something suitable for higher temps, but the only real risk to my mind would be if the hot end cooling bowden tube detached while printing, or developed a bad tear. The cPAP tubing I got seems to be tough stuff but I'm going to be keeping a close eye on mine for wear and tear, and I'm expecting it to be a consumable part to be replaced on a schedule, much like the filament bowden tubing.
Accessories:
This goes nicely with the carriages I designed for the Trick Laser barbells: https://www.thingiverse.com/thing:2884626
I designed this double cPAP tubing clamp to help keep the tubes upright and keep them vertical for entry into the effector so their mass has the least impact on accelerations: https://www.thingiverse.com/thing:2884997
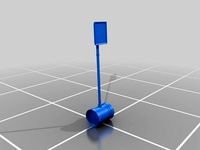
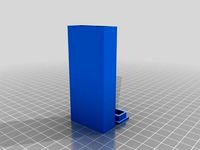
I designed this retraction arm set that helps lift the tubes by the tubing clamp (but these are possibly a silly complication; bungees would probably work just as well, but they wouldn't look as cool): https://www.thingiverse.com/thing:2885014
Marlin configuration help:
This has an exactly 26 mm effector offset.
Stuff to print:
1 Effector
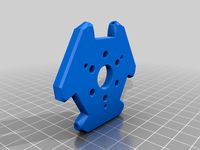
3 barbell lock bars
1 hot end lock
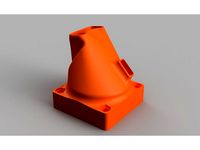
1 hot end cooling shroud
1 sharp nozzle*
1 wide nozzle*
* You can mix and match these if you want to experiment; by default, the sharp nozzle is on the high-flow port and the wide nozzle is on the lower-flow port, but they SHOULD be reversible, so you could mirror one or both to try swapping them or using the same kind on both ports. You also might need to scale them taller or shorter depending on the height of your heater block + nozzle to ensure they're aimed properly.
Components and BOM:
1 set Trick Laser 3/8" barbells and arms that work with them. The 300mm arms Trick Laser currently offers (since they don't do custom lengths at the moment) are really too long for an Anycubic Kossel XL (which uses 27s or 28s stock, I think) so you lose some build height, but I think there are other arms that also work with the barbells if you really care about build height. I don't.
1 stock Anycubic Linear Kossel XL hot end or equivalent (again, I think it's an E3D V5 clone, but I can't prove it).
6' of 19mm cPAP tubing (I used "blackout" cPAP tubing; check Amazon)
A double blower setup to feed the air (I'd post my design but I think it leaves too much to be desired).
I would STRONGLY recommend insulating your heater block for this effector, unless you want to make the lower shroud out of something besides PLA. I used a cotton facial pad and some Kapton tape for mine and it's doing fine.
6x M3x12 bolts for the barbells
6x 10mm x 1mm washers for the barbells
8x M3 nuts (2 for the hot end lock, 6 for the barbells)
2x M3x16 bolts for the hot end lock (you might need 20s or 22s to actually get the lock onto the hot end, since it's a very tight fit, but then you can swap them out)
10x M2x5 bolts for the lower shroud and cooling nozzles.
2x zip ties for the tubing.
And hey, if you use this or remix it to support other hot ends or arm types, a tip would be super-rad. This was a TON of work to design/engineer and a TON of stress to actually manufacture and mount, especially the bowden cooling -- I found out the limits of a Trigorilla's fan drivers* the hard way, for example :)
* Specifically, I now know driving 2 .36 amp blowers on one PWM fan circuit will blow the mosfet; I now also know that you can swap fan pins 7 and 9 to drive your part cooling off the FAN_1 pins. If you're curious or whatever.
IMPORTANT: this is designed as a replacement for the stock effector of an Anycubic Linear Kossel XL, which comes with what appears to be an E3D V5 clone hot end. The hot end lock fits 16mm OD with a 11.9mm OD x 5.7mm tall channel, and the design is sized to expect 51.25mm (-1/+whatever) from the top of the heat break down to the top of the heating block. I don't know if this'll fit an E3D V6 or not, but I'll probably get a different hot end eventually and update the files to include options for that, as well. I'm intrigued by the new Pico that's coming out, for example.
ALSO IMPORTANT: embarrassingly, although all individual parts of the main structure are solid components in SketchUp, I could not get the final outer shell to solid up for export. I found and fixed a few very minor issues with the final component but couldn't for the life of me track down the issue; either way, though, it slices fine for me in Cura 3.2.0. I'm counting this as a work in progress anyway because I suspect I could clean up and expand the internal airways more, and the hot end lock is VERY hard to get off -- it could use a slot for inserting a screwdriver.
Anyway: How does it work? Quite well!
Design: This is a very rigid design, and geared toward quality at the expense of build height and, to a lesser degree, durability at the expense of weight. The hot end lock has a nice wedge feature that locks the front of it into the main structure as it's tightened on, so the hot end is very rigid once mounted. I purposely designed it to let the hot end protrude from the bottom to try to get the CoG more in line with the plane of the arm joints to reduce effector tilt at high accelerations, although I'm pretty sure it's still riding high. Combined with the lash-free Trick Laser arms (with fully-constrained barbells, of course), this is producing very nice prints so far.
5.12.18 UPDATE: I have now run about 100 meters of filament through the new setup, and it continues to work fine, with no signs of fatigue, loosening, or chafing on the cooling tubes, and I'm getting really excellent print quality across the board. Until I go to a flying extruder or remote-drive setup, I'm constrained to a perimeter speed of about 35mm/s at .2 layer height before filament flow through my long, long bowden becomes an issue, but I'm now running travels at 300mm/s at 6000mm/s^2 and so far I think there's still room to speed those up. Whee!
Weight: It's a massive improvement over the stock effector that came with my Anycubic Kossel XL (at least a 75g savings; without the hot end or barbells mounted the whole thing seems to come in around 50g, but I don't have a digital scale to get a proper read on this). The weight reduction has done wonders for ringing and overshoot artifacts. It's probably not the lightest effector ever, but I doubt there's anything out there as light as this with dual cooling fans.
Cooling: Holy cow, this might be the best part. With 19mm cPAP tubing to provide remote cooling from some more powerful blowers, the improvement in part cooling is incredible. Even at worse-case cooling angles from the small nozzle, overhangs don't really start to fall apart until over 70 degrees at .2 layer height and 80 degrees at .1. I included some before/after pictures for the cooling nozzles, which gave the original cooling setup some trouble even at .1 layer height. Both bowden cooling tubes feed into internal air channels that split the airflow into 1/3 and 2/3rds. For the hot end cooling side, the larger feed blows across the bottom fins of the heat break, while the smaller feed maintains a vortex around the internal chamber; this can cool the hot end from 205C to 60C between 5 and 15% faster than the original on-effector cooling fan even at moderate input airflows, so I'm counting it as "probably better than before". For the part cooling side, the larger feed is pumped into a small nozzle aimed directly at the hot end's output, while the smaller feed is channeled around the front to a wider nozzle intended for general part cooling. This seems to strike a good balance for bridging and overhangs, and is substantially better for small parts than the original setup. The only downside for bowden cooling that I've detected so far is that the little blowers I've got are freakin' LOUD when fighting this pressure head, but I'm planning to seek out some bigger, quieter ones.
I experimented with supercharging the cooling by ganging and stacking two fans on each bowden and seeing how deep into water they could still blow bubbles -- with interesting results, specifically:
-- Side-by-side blowers produce little or no pressure head improvement;
-- Stacking blowers (output to input) produces something approaching double the pressure head improvement (my rough experiments showed about 85% improvement, but I think more sealing would have helped);
-- Stacking small blowers against 3' of cPAP tubing and some nozzles makes them VERY loud; and
-- Most importantly of all, one blower is almost as good as stacking two identical ones for bowden cooling, at least in terms of cooling the hot end; I measured only a 7 second improvement for 205C to 60C cooldown going from 2 .36A blowers to 1. This is especially good news considering stacking 2 .36 blowers on the part cooling circuit blew the mosfet when I ramped the PWM to 255. I'm not sure why the gain is so slight from stacking blowers when they clearly showed a nearly linear boost in pressure head performance; they might have made more difference on the part cooling, where the nozzles probably give more of a restriction to fight against, but I'd need to figure out a setup that won't burn out my board to experiment more.
I do plan to change to bigger, quieter blowers at some point, and if I get any interesting data I'll try to remember to update this space.
6.8.18 NOTE: I'm currently using these homebrew compressor fans: https://www.thingiverse.com/thing:2951796 -- They're definitely not as powerful as the .36A cheapie blowers I was using, but man are they more tolerable in the noise department. A .2A version of my compressor (with a .13A booster fan) on the hotend cooling side has proved more than adequate; a .3A version, unboosted, is working for the part cooling side, but it's not achieving the superior overhang support of the nasty-loud cheapie blowers. I plan to try boosting that side with a higher-amp case fan tapped straight into my power supply once I work out the speed control.
Durability: This design is pretty much brand-new, but I've been running it for about 20 hours of printing now and so far it's doing fine. So far I've only ever printed PLA, so I can't speak to the thermal performance if you wanted to use this for printing anything needing really hot temperatures, but the internal cooling seems to be excellent, and as long as your heater block is insulated there shouldn't be much heat transfer into the effector itself. If you're worried you could print the hot end cooling duct out of something suitable for higher temps, but the only real risk to my mind would be if the hot end cooling bowden tube detached while printing, or developed a bad tear. The cPAP tubing I got seems to be tough stuff but I'm going to be keeping a close eye on mine for wear and tear, and I'm expecting it to be a consumable part to be replaced on a schedule, much like the filament bowden tubing.
Accessories:
This goes nicely with the carriages I designed for the Trick Laser barbells: https://www.thingiverse.com/thing:2884626
I designed this double cPAP tubing clamp to help keep the tubes upright and keep them vertical for entry into the effector so their mass has the least impact on accelerations: https://www.thingiverse.com/thing:2884997
I designed this retraction arm set that helps lift the tubes by the tubing clamp (but these are possibly a silly complication; bungees would probably work just as well, but they wouldn't look as cool): https://www.thingiverse.com/thing:2885014
Marlin configuration help:
This has an exactly 26 mm effector offset.
Stuff to print:
1 Effector
3 barbell lock bars
1 hot end lock
1 hot end cooling shroud
1 sharp nozzle*
1 wide nozzle*
* You can mix and match these if you want to experiment; by default, the sharp nozzle is on the high-flow port and the wide nozzle is on the lower-flow port, but they SHOULD be reversible, so you could mirror one or both to try swapping them or using the same kind on both ports. You also might need to scale them taller or shorter depending on the height of your heater block + nozzle to ensure they're aimed properly.
Components and BOM:
1 set Trick Laser 3/8" barbells and arms that work with them. The 300mm arms Trick Laser currently offers (since they don't do custom lengths at the moment) are really too long for an Anycubic Kossel XL (which uses 27s or 28s stock, I think) so you lose some build height, but I think there are other arms that also work with the barbells if you really care about build height. I don't.
1 stock Anycubic Linear Kossel XL hot end or equivalent (again, I think it's an E3D V5 clone, but I can't prove it).
6' of 19mm cPAP tubing (I used "blackout" cPAP tubing; check Amazon)
A double blower setup to feed the air (I'd post my design but I think it leaves too much to be desired).
I would STRONGLY recommend insulating your heater block for this effector, unless you want to make the lower shroud out of something besides PLA. I used a cotton facial pad and some Kapton tape for mine and it's doing fine.
6x M3x12 bolts for the barbells
6x 10mm x 1mm washers for the barbells
8x M3 nuts (2 for the hot end lock, 6 for the barbells)
2x M3x16 bolts for the hot end lock (you might need 20s or 22s to actually get the lock onto the hot end, since it's a very tight fit, but then you can swap them out)
10x M2x5 bolts for the lower shroud and cooling nozzles.
2x zip ties for the tubing.
And hey, if you use this or remix it to support other hot ends or arm types, a tip would be super-rad. This was a TON of work to design/engineer and a TON of stress to actually manufacture and mount, especially the bowden cooling -- I found out the limits of a Trigorilla's fan drivers* the hard way, for example :)
* Specifically, I now know driving 2 .36 amp blowers on one PWM fan circuit will blow the mosfet; I now also know that you can swap fan pins 7 and 9 to drive your part cooling off the FAN_1 pins. If you're curious or whatever.
Similar models
thingiverse
free

Clamp Bar for double 19mm cPAP Tubing by Kiolia
...erse.com/thing:2884959
you'll need zip ties to hold the clamps together.
includes 4 6mm holes for mounting or tying to stuff.
thingiverse
free

Kossel Cooling Tube by DigitalMediaTechnologies
... kossel cooling tube designed for the 10.5mm effector for non-jhead hot ends. simply use 2 m3 screws to mount it on the effector.
thingiverse
free

Kossel effector for diamond hot end by pma
...ul 40mm cooling fan. this effector is still work in progress and not test yet.
add v2 for 50mm cooling fan, and increase z high.
thingiverse
free

Nozzle cooling for kossel XL by budtsb
...er parts are supported by an angled slope of max 45 degrees. i've printed it in pet. but should work in pla or abs as well.
thingiverse
free

Overhung Blower for Haydn Huntley Magnetic Effector w/ modified Effector by candicemakes
...e as i make further revisions i would deem this setup to no longer be experimental and to instead be fully functional and usable.
thingiverse
free
E3D Chimera/Cyclops mount for Rostock MAX by 626Pilot
...able management (removed one wire clip and took the tang out of the other), and added some stiffening strakes to the top surface.
thingiverse
free

Mini Kossel Part Cooling Fan by oliasmage
...
i wanted a print cooling fan for my mini kossel that used a squirrel cage fan mounted above the effector. this is my solution.
thingiverse
free
Ubis 13S Blower Fan Shroud by iClint
...ing fins on the hot end.
additionally a small indent has been added to the shrouds main opening to accomodate the larger hot end.
thingiverse
free

Single E3D hot end holder for Geeetech Pro printer by chrismolloy
...g of a ten pin aviation connector to facilitate easy swapping of heads. i use a regular extruder to do flexible filament prints.
thingiverse
free

Effector Anycubic Kossel for Chimera E3D by VitaliySh
...blower radial cooling fans
effector print - petg.
nozle fan injector print - abs.
but unfortunately the print area is decreasing.
Kiolia
thingiverse
free

2020 OpenBeam Cable Clip by Kiolia
...le clip for 2020 openbeam. there are probably many like it, but this one is mine. it has a slight relief carved out of one end.
thingiverse
free

Silica Container for Top Mount Dry Box by Kiolia
...t should work for spools up to 60mm internal diameter (or just don't stick it in a spool -- that'll work too, of course).
thingiverse
free
Clamp Bar for double 19mm cPAP Tubing by Kiolia
...erse.com/thing:2884959
you'll need zip ties to hold the clamps together.
includes 4 6mm holes for mounting or tying to stuff.
thingiverse
free

Universal Adjustable Belt Tensioner by Kiolia
... hand while pulling on the zip tie with the other.
sized for 6mm belts, but can easily be scaled as needed for other belt widths.
thingiverse
free

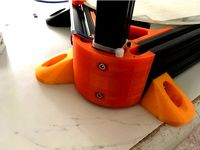
Kossel 2020 Corner Reinforcement by Kiolia
...e: https://www.thingiverse.com/thing:2941886
10/24/18 note: and spreader arms for that: https://www.thingiverse.com/thing:3173546
thingiverse
free

Articulated Filament Guide 2020 for Openbeam by Kiolia
... one more short over what's shown in the pictures to create a more evenly constrained arc through the 180 degrees down-to-up.
thingiverse
free

Bowden Tube Through-Wall Fitting For 12" Round Drybox by Kiolia
...ing. i also had to ream out the holes in the part a little to get a good fit on the tubing, but better too small than too large!
thingiverse
free
Wire Strain Relief for Anycubic Kossel XL Print Head by Kiolia
...be sure i had enough threads engaged since on the anycubic these screws are what hold the hotend into the overall head assembly.
thingiverse
free

Kossel Linear Lower Cover by Kobebrain
...tower reinforcemet easy to remove for corner reinforcement by kiolia ...
thingiverse
free

Retractor / Lift Spring Arms 15-40cm reach by Kiolia
...ook pretty neat compared to a piece of bungee. beefier versions would probably look hella rad as supports for a flying extruder.
Barbells
thingiverse
free

Barbell Lock
...barbell lock
thingiverse
barbell lock
to lock your barbell up!
thingiverse
free

Barbell Handle
...barbell handle thingiverse extension for barbells making a handle on it's...
thingiverse
free

Barbell clip by Kintall
...by kintall thingiverse barbell clip! it's a clip... for barbells ...
thingiverse
free

Barbell by NotAJoke
...barbell by notajoke
thingiverse
this is a 45 lb barbell which goes with the weight lifting bar.
thingiverse
free

Barbell by meltzner
...barbell by meltzner
thingiverse
finger barbell for those working on pinky strength. recommended print with supports and a brim.
thingiverse
free

Barbell Cover by Moercstar
...oercstar
thingiverse
created this cover for my barbell
prefents to scratch the floor
outer edges stops the barbell from rolling
thingiverse
free

Barbell holder by Socialbit
...barbell holder by socialbit
thingiverse
keeps your barbell right in place.
thingiverse
free

Barbell Hanger | CAP Barbell | Weight Organizer by FrothyFetus
...just a simple yet sturdy means of hanging your barbells (unweighted) and keeping things tidy in your home gym...
thingiverse
free

Best Coach Barbell Plate
...best coach barbell plate
thingiverse
best coach barbell plate.
thingiverse
free

Barbell Holder by pregananant
...e
this is a two-piece barbell holder. i used felt pads to protect the floor.
the diameter of the weights in the picture is 15cm.
Effector
thingiverse
free
Effector by olo2000pm
...effector by olo2000pm
thingiverse
effector
thingiverse
free
CERAMBOT-Effector
...cerambot-effector
thingiverse
cerambot-effector
thingiverse
free

modulize effector by candyasdf
...ulize effector by candyasdf
thingiverse
mount things on effector with m3 screws
effector radius : 25.4mm
rod arm distance : 40mm
thingiverse
free
Delta Effector by zavier
...delta effector by zavier
thingiverse
delta effector with radial fan 50 and bltouch
thingiverse
free
D810 Effector by WhiteTiger13
...d810 effector by whitetiger13
thingiverse
this is d810 effector for d810 without autocalibration, and also cap for it.
thingiverse
free
Effector for Delta Printer
...effector for delta printer
thingiverse
effector for delta printer (3 color)
using diamond hotend
thingiverse
free
Delta effector magnetic by fpassos
...delta effector magnetic by fpassos
thingiverse
effector for e3dv6 hotend. i needed put the spheres (10mm) on the effector.
thingiverse
free
End Effector Gripper
...end effector gripper
thingiverse
end effector gripper
for a robotic arm
uses mg995 servo motor
thingiverse
free

connector fisheye effector by allen_g30
...connector fisheye effector by allen_g30
thingiverse
connector fisheye effector
thingiverse
free

Effector tdr Marçal by Macle
...effector tdr marçal by macle
thingiverse
effector tdr marçal
Trick
thingiverse
free

Coin Trick by finfin123123
...coin trick by finfin123123
thingiverse
magic trick.
thingiverse
free

Magic Trick by Luciogc
...magic trick by luciogc
thingiverse
a great magic trick that i made. really simple to learn!
thingiverse
free

Trick or Treat - Halloween
...our window.
added another design: trick or drink for the adult crowd.
run the first layer at 75% speed seems to work best for me.
thingiverse
free

eye trick / caesarfroombehind by Syzguru11
...eye trick / caesarfroombehind by syzguru11
thingiverse
eye trick / caesarfroombehind
thingiverse
free

OpenSCAD tricks and modules by peteruithoven
..., grid layout module, bolt connection, complexroundsquare, ellipsepart, roundedsquare
most of these tricks relate to 2d drawing.
thingiverse
free

Trick or Treat Coaster by Lazerwiz
...trick or treat coaster by lazerwiz
thingiverse
another trick or treat coaster
thingiverse
free

Trick Rocket #1 by nichutchinson1
...trick rocket #1 by nichutchinson1
thingiverse
rocket designed to do tricks in the air.
thingiverse
free

Trick Rocket #2 by nichutchinson1
...trick rocket #2 by nichutchinson1
thingiverse
another rocket designed to do tricks.
thingiverse
free

Trick Or Treat by Alajaz
...trick or treat by alajaz
thingiverse
easy print.
thingiverse
free

Basic Trick Rocket by dbrown09
...basic trick rocket by dbrown09
thingiverse
basic rocket to do some tricks in the air
Lightweight
thingiverse
free

Lightweight Phone stand by Maverick1701
...lightweight phone stand by maverick1701
thingiverse
a lightweight phone stand i made.
thingiverse
free

Lightweight Maintenance Enclosure by Smprgumbi
...weight maintenance enclosure by smprgumbi
thingiverse
low res model of a military lightweight maintenance enclosure, or lme tent
thingiverse
free

lightweight 26cm light cover by krlehnardt
...lightweight 26cm light cover by krlehnardt
thingiverse
lightweight cover
thingiverse
free

bebop lightweight radiating base by mming1106
...bebop lightweight radiating base by mming1106
thingiverse
lightweight radiating base
thingiverse
free

Vape Holder Lightweight remix by mac190
...vape holder lightweight remix by mac190
thingiverse
lightweight remix of https://www.thingiverse.com/thing:2034257.
thingiverse
free

Lightweight tent peg / spike by Jaimon
...lightweight tent peg / spike by jaimon
thingiverse
a lightweight tent spike that is printable without any support!
thingiverse
free

Lightweight Herb Grinder by kylewetton
...
a lightweight, minimal design to ensure a quick 30 minute (or under) print! works great, 40mm diameter, stands about 15mm tall.
thingiverse
free

120mm fan grill lightweight Stern
...120mm fan grill lightweight stern
thingiverse
this is lightweight grill for 120mm fan.
all thin parts are about 1mm.
thingiverse
free

Lightweight canopee by Danotech
...lightweight canopee by danotech
thingiverse
lightweigt canopee fot tiny whoop.
resin printer recommended for this one
thingiverse
free

Lightweight Master Spool by Eoghan_ODuffy
... masterspool design. it only uses about 80g of filament.
spool needs to be tapped with an m6 hole and assembled using 3 m6 screws
Kossel
thingiverse
free
kossel bottom by keisukelin
...kossel bottom by keisukelin
thingiverse
kossel bottom
thingiverse
free
Leg for kossel by exelon
...leg for kossel by exelon
thingiverse
leg for kossel
thingiverse
free
Extruder for kossel by spencer_chen7
...extruder for kossel by spencer_chen7
thingiverse
extruder for kossel
thingiverse
free
Kossel parts by breezer83
...kossel parts by breezer83
thingiverse
kossel parts
thingiverse
free

Anycubic Kossel PID calibration
...ir mount:
kossel raspberry camera ir mount
extruder pid calibration.
simple extruder temperature calibration of your 3d printer.
thingiverse
free

Kossel Medium by flux83
...kossel medium by flux83
thingiverse
vertex for upgraded kossel mini
thingiverse
free
Kossel Mini by salesmendesandre
...kossel mini by salesmendesandre
thingiverse
custom kossel mini
frame 20x20
thingiverse
free
leg for kossel by ionulet
...leg for kossel by ionulet
thingiverse
leg for kossel with channel for end- stop cables
thingiverse
free

Optical Endstops Mounts for Kossel (with Better Kossel carriages) by dellfer
...stops on the anycubic kossel with better kossel carriages by codefreak https://www.thingiverse.com/thing:2501337
more precission
thingiverse
free
kossel??????? by wangrui19890704
...kossel??????? by wangrui19890704
thingiverse
??2020?2060???
Bowden
thingiverse
free
Remix Compact Bowden extruder - m6 bowden couplers and bowden tube pass-through
...ouplers and bowden tube pass-through
thingiverse
remix compact bowden extruder - m6 bowden couplers and bowden tube pass-through
thingiverse
free

Bowden Extruder
...bowden extruder
thingiverse
i have created bowden extruder for flsun delta 3d printer.
thingiverse
free

bowden 3mm by spee_D
...bowden 3mm by spee_d
thingiverse
for bowden 3mm
thingiverse
free
Bowden Tube Cutter
...bowden tube cutter
thingiverse
bowden tube cutter
thingiverse
free
Customizable Bowden Clip
...customizable bowden clip
thingiverse
customizable bowden clip
thingiverse
free
Bowden Oiler by fcheshire
...bowden oiler by fcheshire
thingiverse
inline bowden oiler
thingiverse
free

Bowden adapter by helkaroui
...bowden adapter by helkaroui
thingiverse
this is a fixed bowden adapter
thingiverse
free

Adventure3 Bowden Clip
...adventure3 bowden clip
thingiverse
adventure3 bowden clip
thingiverse
free

Bowden clip by 3dBORG
...bowden clip by 3dborg
thingiverse
for the cr6 se bowden clip
thingiverse
free

Bowden Adapter by leitenmu
...bowden adapter by leitenmu
thingiverse
bowden adapter for rostock printer
Laser
thingiverse
free

Laser
...laser
thingiverse
first version of a bracket with a clamp to hold a laser.
thingiverse
free

3D Laser Scanner 9mm laser, 12mm laser by Taurus82
...3d laser scanner 9mm laser, 12mm laser by taurus82
thingiverse
happy printing!
happy scanning!
thingiverse
free

"lasers" - art deco laser bits by jimjimjimmyjim
..."lasers" - art deco laser bits by jimjimjimmyjim
thingiverse
"lasers" - art deco laser bits
thingiverse
free

laser gun
...laser gun
thingiverse
basic laser gun model
thingiverse
free

K40 Laser Cut - GuideLine Laser by VINCE27M
...deline laser by vince27m
thingiverse
support modifié pour intégrer des lasers pour pointer l'emplacement de la gravure laser
thingiverse
free

Laser module mount for pocket laser engraver by Ewooks
...laser module mount for pocket laser engraver by ewooks
thingiverse
laser module mount for my pocket laser engraver
thingiverse
free

Laser level by dental2016
...laser level by dental2016
thingiverse
laser level with 12mm diameter red laser
thingiverse
free

NEJE Laser Engraver - Laser Mount Extender by brettcarroll
...e placed closer to the bed.
designed for use on the neje dk 5 laser engraver, but should work on all neje laser engraver/cutters.
thingiverse
free

Eleksmaker Laser BackPlate
... have a different laser fitted on this but dose work for eleksmaker laser as well. this is so you can move laser up and down easy
thingiverse
free

Laser Mount for 33mm Square Laser by TypicalTitan
...t for 33mm square laser by typicaltitan
thingiverse
modular holder for laser head for diy cnc 3 axis engraver machine on amazon.
Double
thingiverse
free

Double Double by Adamkling524
...double double by adamkling524
thingiverse
toil and trouble
thingiverse
free

The Double by willdelphia
...the double by willdelphia
thingiverse
the double
thingiverse
free
the double by willdelphia
...the double by willdelphia
thingiverse
the double
thingiverse
free

double pipe
...double pipe
thingiverse
double pipe
thingiverse
free

Double Gear
...double gear
thingiverse
double gear by using solid work
thingiverse
free

double DNS by gyorgyattila
...double dns by gyorgyattila
thingiverse
double dns
thingiverse
free

Double Infinity by charlesstines
...double infinity by charlesstines
thingiverse
double infinity
thingiverse
free
Double container by speedtwin69
...double container by speedtwin69
thingiverse
double container
thingiverse
free

Double infinity by nevitdilmen
...double infinity by nevitdilmen
thingiverse
double infinity
thingiverse
free

Double flower by nevitdilmen
...double flower by nevitdilmen
thingiverse
double flower
Cooled
thingiverse
free

cool
...cool
thingiverse
cool
thingiverse
free

cool by cool128000
...cool by cool128000
thingiverse
cool
thingiverse
free

cool by cool128000
...cool by cool128000
thingiverse
cool
thingiverse
free

cool by GenericStudentss
...cool by genericstudentss
thingiverse
cool
thingiverse
free

School is cool
...school is cool
thingiverse
school is cool
thingiverse
free

cool by Xangar
...cool by xangar
thingiverse
looks cool
thingiverse
free

cool by swag
...cool by swag
thingiverse
cool beans
thingiverse
free

Cooling by GryZZli
...ling by gryzzli
thingiverse
cool on a cooling tunnel. by narrowing the funnel get the rush of air that is dispersed at the exit.
thingiverse
free

suitcase is cool by beonline
...suitcase is cool by beonline
thingiverse
suitcase is cool
suitcase is cool
suitcase is cool
suitcase is cool
suitcase is cool
thingiverse
free

Cool Lamborghini
...cool lamborghini
thingiverse
this is such a cool design!!! please like!
8
thingiverse
free

1/8 to 8/32
...1/8 to 8/32
thingiverse
adapter for 1/8'' to 8/32'' without screw-thread.
thingiverse
free

8 by lawless34
...8 by lawless34
thingiverse
8
thingiverse
free

Tutorial #8
...tutorial #8
thingiverse
tutorial #8
thingiverse
free

Coupling 5/8 and 3/8 by fsadak
...coupling 5/8 and 3/8 by fsadak
thingiverse
two size coupling. 5/8 for nema 17 and 3/8 for nema 14.
thingiverse
free

BB-8
...bb-8
thingiverse
bb-8 model, moderate detail.
thingiverse
free

Pages 5-8(7/8 revised) by MattBubernak
...pages 5-8(7/8 revised) by mattbubernak
thingiverse
pages 5-8, we revised 7 and 8!
thingiverse
free

8 марта by shura2000
...8 марта by shura2000
thingiverse
8 марта
8 march
thingiverse
free

support 8 clefs usb - 8 usb stand
...support 8 clefs usb - 8 usb stand
thingiverse
support pour 8 clefs usb.
stand fot 8 usb keys
thingiverse
free

support 8 clefs usb - stand for 8 usb
...support 8 clefs usb - stand for 8 usb
thingiverse
support rond pour 8 clefs usb
round stand for 8 usb keys
thingiverse
free

8 Ball by TheInsideMan
...the same time. then i just push the 8 into the space on the 8 ball and then you are left with an 8 ball as shown in the pictures!
3
thingiverse
free
Raspberry 3 and 3+ case
...raspberry 3 and 3+ case
thingiverse
case for raspberry 3 and 3+ wit fan
thingiverse
free
Cube Dissection Puzzle/ Model for 3^3 + 4^3 +5^3 = 6^3 by lgbu
...: oxford university press. (p. 203). the authors gave credit to a solution in eureka, the magazine of the cambridge archimedeans.
thingiverse
free
Makeblock Aluminum Pieces 3*3/3*9
...makeblock aluminum pieces 3*3/3*9
thingiverse
makeblock pieces 3x3 and 3x9 recreated for 3d printing
thingiverse
free
Floss 3 Lite - lollipop 3
...floss 3 lite - lollipop 3
thingiverse
antenna mount for floss 3 lite.
thingiverse
free
3 by obstacledaddy
...3 by obstacledaddy
thingiverse
3
thingiverse
free

????????? ??? ??????? 3 ?? by Rigel
...????????? ??? ??????? 3 ?? by rigel
thingiverse
????????? ??? ??????? 3 ??
thingiverse
free
oloid 3
...oloid 3
thingiverse
oloid 3
thingiverse
free

A stand 3
...a stand 3
thingiverse
a stand 3.
thingiverse
free

Tischlampe #3
...tischlampe #3
thingiverse
tischlampe #3
thingiverse
free
3/8 to 3/4 grommet by quikniq
...3/8 to 3/4 grommet by quikniq
thingiverse
3/8" to 3/4" grommet.