Thingiverse
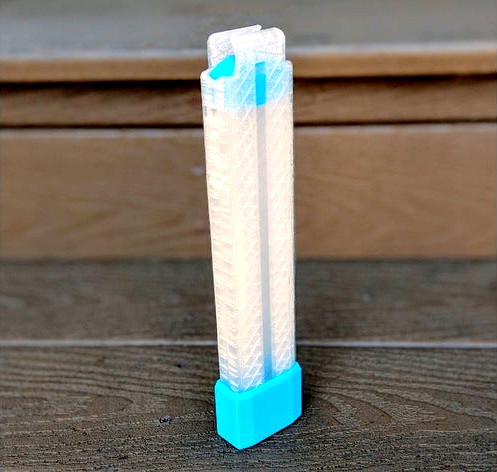
KaThanha Mags v3.1 by Thanhtacles
by Thingiverse
Last crawled date: 3 years ago
[11/7/2019] Updated to version 3; it has many of the same upgrade features present in Thanhos and Thanhlonv2.
This is a modular, disassemblable, tool-less, glue-less, screwless, half-dart mag based on the Katana platform. Utilizes a constant-tension coil spring, provided courtesy of Foamblast. They are also compatible with any traditional half dart magazine box spring (just make sure you glue in the base).
If you like any of my designs, please leave a tip it really helps a bunch, thanks!
ASSEMBLY:
2x KaThanha Body
1x KaThanhaThanhlon Follower
1x KaThanha Sleeve
1x FoamBlast Drum Spring
SUPPORTS:
None, but recommended for unupgraded cooling. Only do supports from build plate, and only for overhanging bevels
QUALITY SETTINGS:
Between .21 to .3 layer height, .4 to .5 line width. >15% support density, ample cooling, at least two bottom layers (crisscrossing line orientation), at least two top/bottom layers (cross-crossing)
NOTABLE FEATURES:
"Knurling":
These mags feature a type of pseudo knurling/guide-rail pattern on the inside walls to help smoothen feeding. The biggest reason friction builds up from inserting too many darts is because they rub on the inside walls; changing the grain orientation on the surface that makes contact with the darts into being parallel with the movement of the darts makes a profound difference.
These tiny lines tricks your slicer into making the print grain parallel to dart travel. It's very important to play around with your slice settings and in/decrement them by .01 so that they render, and with only your very top layer should have the vertical lines. This feature helps control the top wall print orientation on a multitude of setups without complications of having to manually mess with wall orientation settings.
Antisheering Dovetails:
Locking tabs now feature friction fitting concave and convex grooves along the sides to help lock in the dove tails and protect against sheering motion.
Second mag catch slot:
There is a secondary lower mag slot that's in-line with Hasbro's mag release position. Intended for when you can just shorten your blaster and ditch the adapter. Meaker MK15 e.g.
Jungling:
You can stick the mags end-to-end and "jungle" them through the ExtensionSleeve.
Membrane Window
Initial few layers on the central channel creates preview window, utilizing the translucency of fully fused bottom layers. Put at least two layers criss-crossing diagonally for the best rigidity and transparency. This doubles as rigidity to protect from the walls flexing inward and jamming the follower (which is a problem in actual Jet katanas).
Vase Mode
Using the Spiralize Outer Controur option or "vase mode", you can slice the included sleeve files labeled vasemode (OPTIONAL) in order to get super clean low profile vases. Super fast to print, beautiful, and surprisingly durable.
TROUBLESHOOTING TIPS:
If sleeve too tight:
Likely sagging, or the detents are rough, or bulged; this will wear over use. Or, the mag is too wide, and your Z is different than the file. You can insert one half of a body into a sleeve to check if it's a z tolerance or a xy tolerance
Expanded capacity jams:
When using the extension sleeves to increase capacity, manually inspect inside wall of the mag to make sure there are no burs (especially the interface edge where mag bodies contact each other), the path of the follower's nub should be smooth and uninterrupted. Sandpaper is your friend, do a quick wipe to make sure the inner walls isn't grainy.
Dovetails Too Loose
If the dovetails are too loose, you can use a lighter to warp the ends downward so they contact.
Bottom base sleeve too loose
Boil the base sleeve for 10 seconds; your print will contract by a few microns in the xy
Fitting spring in
Sometimes drum springs will be concave outward and the sharp edge will catch against the walls, resulting in difficulty fitting them into the spring rest. You can easily just crease the tab inward so it doesn't catch against the back wall
In case the spring rest sags too much during the bridging, such that you can't insert the tab of the spring through; just gently melt that bridge with a lighter and press it up with a toothpick.
Too tight for adapter
Printed adapters will often vary with dimension because they're tighter and shrink more. To compensate, you can shrink one half by as much as <2% Z (or onelayer) and they'll still click together, and gravity drop better.
Similar models
thingiverse
free

Kathanha d-mag - short dart drum magazine (Katana) by H_Run
...mple) for this.
v2: (29.03.20)
reinforced spring holder
added fillet to the catch, so it can be released on catches without lever
thingiverse
free

KaThanha Mag for the MHP15 by dkdavid721_3DK
...nds capacity to 14 darts and fits flush with the end of the mhp15 grip.
print 2, assemble as you would the original kathanha mag.
thingiverse
free

CS-X Mags by Thanhtacles
...lue them if you're going wild and printing your own 22s. the screw ports for the internal bumper use any hasbro (10mm) screw.
thingiverse
free

Thanhlon d-mag - short dart drum magazine (Talon) by H_Run
...his.
changelog:
v2: (27.03.20)
reinforced spring holder
added fillet to the catch, so it can be released on catches without lever
thingiverse
free

Nerf Safire Magazine for Half Length Darts - 12 round
...a bit of force, but not snap.
-- changelog --
1/19/2020 - follower modified so that top compresses final dart against the prongs.
thingiverse
free

Thanhlon d-mag small version - short dart drum magazine (Talon) by H_Run
...his.
changelog:
v2: (27.03.20)
reinforced spring holder
added fillet to the catch, so it can be released on catches without lever
thingiverse
free

Nerf full to half dart mag spring bend guide by J_yang
...azines, though, i'm going to investigate if it's possible to convert the vorpal or thanhlon mags for compression springs.
thingiverse
free

Adventurer Mags: Half Dart Mags By Vulkan for Nerf by Vu1k4n
...m of the tab (0.1 mm in total).
update 12: added a new thick follower for those who have issues with the normal follower tilting.
thingiverse
free

Tal.0/short dart Spring - 3D printed spring for Tal.0 half dart mag by LucSkyr0b
...ed detail.
i used petg but pla should work fine
don't forget to remove the bottom layer in the slicer or it doesn't work.
thingiverse
free

AR Mag Holder by sgish
...ng at the range. if you dont care for stacking, you can lower part .125" to remove the feet and then you wont need supports.
Kathanha
thingiverse
free
KaThanha Mag for the MHP15 by dkdavid721_3DK
...nds capacity to 14 darts and fits flush with the end of the mhp15 grip.
print 2, assemble as you would the original kathanha mag.
thingiverse
free
Kathanha d-mag - short dart drum magazine (Katana) by H_Run
...mple) for this.
v2: (29.03.20)
reinforced spring holder
added fillet to the catch, so it can be released on catches without lever
thingiverse
free

Thanhos Mags
...an elaboration on my previous two mags thanhlon and kathanha now with more printability, rigidity, features, and improved overall...
thingiverse
free

Vorpal Mag 18 Round Back Plate - With Thin Membrane Window by 44sunsets
...inspired by the thin translucent follower channel on the kathanha mag. requirement: this means you should print this part...
thingiverse
free

NERF Meaker Mk 15 "Streaker" by MeakerVI
...grip frame to allow use of spring in trigger. kathanha magwell.zip: requires the use of the kathanha mags by...
Thanhtacles
thingiverse
free

half length dart cutter originaly by Thanhtacles flipped for easy printing
...half length dart cutter originaly by thanhtacles flipped for easy printing
thingiverse
oringinaly by thanhtacles
thingiverse
free

Kalium Mags v1.0 by Thanhtacles
...ses 2 m2.6 nerf screws taken from any blaster.
the name: kalium is the latin for potassium (k). bananas; potassium; k; kalium.
thingiverse
free
CS-X Mags by Thanhtacles
...lue them if you're going wild and printing your own 22s. the screw ports for the internal bumper use any hasbro (10mm) screw.
thingiverse
free

Replacement Sentinel U-Loop by Thanhtacles
...usage. the current model is slightly slightly scaled up to account for abs print shrinking. tested up to 12kg and holding on abs.
thingiverse
free

Replacement BuzzBee Blaster Catch Hook by Thanhtacles
...rod guide for which the plunger rod slides in, so you may have to do some sanding on the top and bottom sides to fit accordingly.
thingiverse
free

Thangles v1.1 by Thanhtacles
... smoother movement gliding. body and lid folders reorganized.
[2021-04-07] added minor change to the step file too, now uploaded.
thingiverse
free
NERF Meaker Mk 15 "Streaker" by MeakerVI
...on kuryaka's kit, new short kathanha magwell based on thanhtacles#39; printable 'katana'-style mags, new magwell adapter for above mags...
Mags
turbosquid
free

mags
... available on turbo squid, the world's leading provider of digital 3d models for visualization, films, television, and games.
design_connected
$11

Soft Mag
...soft mag
designconnected
ligne roset soft mag computer generated 3d model. designed by ruyant, frederic.
turbosquid
$4

MAG-7
...quid
royalty free 3d model mag-7 for download as c4d and fbx on turbosquid: 3d models for games, architecture, videos. (1262605)
turbosquid
$15

Mag Wheel
... available on turbo squid, the world's leading provider of digital 3d models for visualization, films, television, and games.
turbosquid
free

box mag
... available on turbo squid, the world's leading provider of digital 3d models for visualization, films, television, and games.
3d_ocean
$18

Calligaris Mag Collection
...cts set textured
calligaris mag collection – all models 4 materials included: - black - white - wood - turtledove obj + max files
turbosquid
$8

Lapua Mag bullet
...
royalty free 3d model lapua mag bullet for download as blend on turbosquid: 3d models for games, architecture, videos. (1423136)
turbosquid
$20

Purple Mag Light
... available on turbo squid, the world's leading provider of digital 3d models for visualization, films, television, and games.
turbosquid
$10

mag pouch with ammo
...g pouch with ammo for download as max, max, obj, max, and fbx on turbosquid: 3d models for games, architecture, videos. (1691499)
turbosquid
$2

MAG Oil jar
... available on turbo squid, the world's leading provider of digital 3d models for visualization, films, television, and games.
V3
3d_export
$5

Poison-v3
...poison-v3
3dexport
poison-v3
3ddd
$1

Curtain v3
...curtain v3
3ddd
полупрозрачная штора v3
turbosquid
free

v3
... available on turbo squid, the world's leading provider of digital 3d models for visualization, films, television, and games.
3d_export
$5
potato v3
...potato v3
3dexport
turbosquid
$2

Bitcoin v3
...
royalty free 3d model bitcoin v3 for download as c4d and prj on turbosquid: 3d models for games, architecture, videos. (1182845)
turbosquid
$10
Wheel V3S
...e 3d model wheel v3s for download as 3ds, obj, fbx, and blend on turbosquid: 3d models for games, architecture, videos. (1344250)
turbosquid
$6
surfboard V3
...e 3d model surfboard v3 for download as ma, max, obj, and fbx on turbosquid: 3d models for games, architecture, videos. (1168641)
turbosquid
$30

Droid V3
... available on turbo squid, the world's leading provider of digital 3d models for visualization, films, television, and games.
turbosquid
$19

MOTO V3
... available on turbo squid, the world's leading provider of digital 3d models for visualization, films, television, and games.
turbosquid
$10

Lipstick v3
... available on turbo squid, the world's leading provider of digital 3d models for visualization, films, television, and games.
1
turbosquid
$15

ring 1+1
... available on turbo squid, the world's leading provider of digital 3d models for visualization, films, television, and games.
turbosquid
$10

chair(1)(1)
... available on turbo squid, the world's leading provider of digital 3d models for visualization, films, television, and games.
turbosquid
$8

Chair(1)(1)
... available on turbo squid, the world's leading provider of digital 3d models for visualization, films, television, and games.
turbosquid
$2

RING 1(1)
... available on turbo squid, the world's leading provider of digital 3d models for visualization, films, television, and games.
turbosquid
$1

Table 1(1)
... available on turbo squid, the world's leading provider of digital 3d models for visualization, films, television, and games.
turbosquid
$1

house 1(1)
... available on turbo squid, the world's leading provider of digital 3d models for visualization, films, television, and games.
turbosquid
$59

Formula 1(1)
...lty free 3d model formula 1 for download as max, fbx, and obj on turbosquid: 3d models for games, architecture, videos. (1567088)
design_connected
$11

No 1
...no 1
designconnected
sibast no 1 computer generated 3d model. designed by sibast, helge.
turbosquid
$2

desert house(1)(1)
...3d model desert house(1)(1) for download as 3ds, max, and obj on turbosquid: 3d models for games, architecture, videos. (1055095)
turbosquid
$50
door 1 darkwood 1
... available on turbo squid, the world's leading provider of digital 3d models for visualization, films, television, and games.