Thingiverse
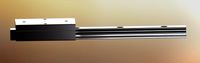
K40 linear rail upgrade by xile6
by Thingiverse
Last crawled date: 2 years, 11 months ago
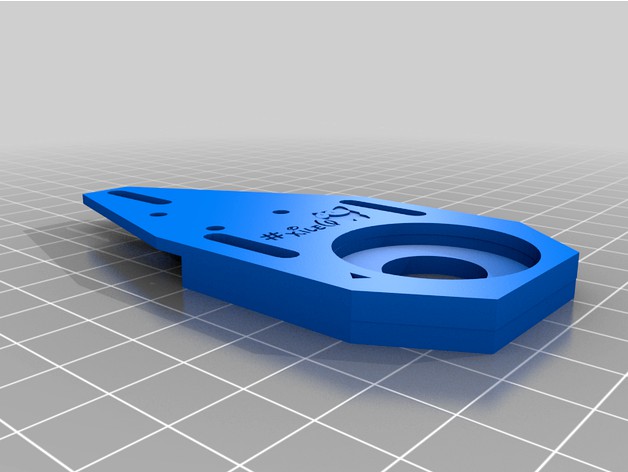
This is a simple linear rail upgrade for the K40 laser cutter.
I was tired of the wheels giving wavy lines and none smooth movement. I came up with this.
The linear rail i choice sits about 5mm higher then the stock k40 metal head holder.
This setup adds the linear rail and drops the lens back down. So the focus length should be unchanged.
Mirror 3 will be a tad higher tho, about 3mm.
Part list:
MGH9 H Linear rail 400mm long
3mm acrylic sheet
3d printed files (petg, abs or asa)
m3 screws (3x 6mm, 5x12mm (12 to 16mm)
m3 washer 5x
m3 drill bit and a good drill.
m3 nut 2x
super glue (not 100% needed)
Files :
Laser head holder - acrylic
2mm spacer - 3d printed
Carriage - acrylic
5mm spacer - 3d printed
Linear rail center tool - 3d print
Rail center tool 2x - 3d printed
One piece - untested all 3d printed.
Start by downloading and cutting/printing all the files.
Glue the 3d printed 2mm spacer to the acrylic lase head holder. Clamp down and let dry. (not 100% needed but helps keep it in place)
Time to disassemble your laser head.
This step is only needed to align mirror 3 faster if your already aligned.
Put tape over your mirror 3.
Move the laser to the bottom right of the machine.
Do a light test fire so it will mark the center.
Remove the laser head and set it aside. Keep the tape on it.
You will be left with just the metal lens holder bolted to the wheel carriage.
Center it. Then remove the 3 screws holding it.
Put the linear rail on the stock k40 railing.
Use the 3d printed tool to center the linear rail. Once your happy with the placement drill a hole throw one of the linear holes. Normally just 1 on each end will do.
Put a m3 screw in the holes and then put a nut on the bottom. Tighten down the screws. MAKE sure the linear rail still moves smoothly. IF not its possible your k40 rail isnt 100% flat and you’re bending your smooth rail. Your either need a shim or to loosen the screw to make the rail flat.
Get the glued together laser head holder and 2mm spacer.
Place the "carriage" on top of this. Hold it together or use tape.
Place it on top of the linear rail and screw in the 3 screws (6mm with washer)
Then lightly screw in the front 2 screw on the wheel carriage.
Add the 5mm spacer between the two carriages and tighten it with a m3 screw.
It should all be together and move as one piece.
Loosen the wheel carriage's wheels and pull them out.
Now you’re ready to line your laser back up.
Slide the laser head back/forward to line it up with mirror 2.
Do a light test fire and adjust it back/forward until your dot is line up horizontally.
Its fine if its lower your need to adjust your mirror 2 higher.
IF you want the red dot or drag chain, check my other files.
if you really like this, feel free to donate :D
https://www.buymeacoffee.com/F7OvV6j
https://www.paypal.com/donate?hosted_button_id=XGS7KT52TP3G6
amazon link for linear rail i ordered.https://www.amazon.com/gp/product/B07ZJNML2Y/ref=ppx_yo_dt_b_asin_title_o02_s00?ie=UTF8&psc=1
Similar models
thingiverse
free

K40 Laser Head holder by Disconnector
... so far it's working great. the carriage connections to the laser are m3 and the bolts to hold the laser head itself are m5.
thingiverse
free

FSL Hobby 5th gen - X carriage for mini-v slot by elmerohueso
...ge so it can be read by the optical sensor
adjust all eccentric nuts (including on the y axis), belt tension, and mirrors
profit!
thingiverse
free

Lid/Cover Switch Mount for K40 Laser by erpel09
...mm.
print as l form with the screw holes on the build plate.
i used this micro switch:https://www.amazon.de/gp/product/b00bxhn0j2
thingiverse
free
Beam Combiner for K40 Laser by erpel09
...he center
put a piece of thermal paper on mirror 2, fire your laser and use the 4 m2 screws to adjust the position of the red dot
thingiverse
free

K40 Chinese Laser Cutter Lens Carriage Spacer Screw Holder by yuxin
....
the hex holes are (very) slightly loose to compensate for 3d printer oozing. the 123d files are also uploaded for adjustments.
thingiverse
free

Self Centering Drill and Marking Guide by Bob68
... items up to 100mm or larger with two sets of spacers. the drill guide needs a washer of each size stuck in the hole for drilling
thingiverse
free

k40 printed helpers by jorgerobles
...sed a dremel trio to drill the holders (m3 x 12, beveled head).
this thing will expand with various parts for k40 optimizations.
thingiverse
free

Laserpointer holder by Al2002
...3 4cm schraube!
this is a simple holder for a laser pointer on the k40 co2 laser.
only one m3 nut and one m3 4cm screw is needed!
thingiverse
free

K40 Laser MGH12 Rail on X axis modification with Air Assist
...mgh12 on x axis modification with airassist
you need
1 x mgh12 400mm
2 x m3 enter nut
ca.20 x m3 * 8 screw
1 x m3 screw tap
thingiverse
free

BD-1Back panel (Laser cut)
...elp install into the back of the head.
designed to fit the bd-1 remix model from rafkep https://www.thingiverse.com/thing:3997308
Xile6
thingiverse
free

Joycon holder by xile6
....
the xile6 logo is to be the back.
update 2-13-18
added another version with rounded front edge and nintendo logo on the front.
thingiverse
free

UM2 Scraper Holder by xile6
...verse
made this in tinercad. something simple to hold my scraper.
scraper used link herehttps://www.thingiverse.com/thing:610272
thingiverse
free

raspberry Pi Zero Case with logo by xile6
...raspberry pi zero case with logo by xile6
thingiverse
this is a remix i simply added the raspberry pi logo to the top lid.
thingiverse
free

E3D Cyclops / chimera effector by xile6
...y xile6
thingiverse
simply remixed my own effector to make it bigger. for better rod end spacing.
also inlarge the bowden holes.
thingiverse
free

Ultimaker 2 raspberry pi camera by xile6
...hingiverse
fix the holes by editing it in tinkercad. save as stl.
prints fine in cura and s3d. no support need print as drop in.
thingiverse
free

Breath of the Wild Guardian Sword by xile6
...the big parts down for it would fit my ultimaker 2.
its not the best as i plastic welded the cut parts together.
but work for me.
thingiverse
free

MK3s+ Palette 2 adapter by xile6
...a member for the mosaic palette 2 facebook page.
i do know have a mk3s+ so please print and test and let me know so i can adjust.
thingiverse
free

PS move VR controller stand by xile6
...controller holder, for my ps vr system.
this works just great for me. hope others will like it also.
feel freebuy me a cup of tea
thingiverse
free

Kossel Rod Jig by xile6
...ame.
picture is my carbon rods ,which im replacing because they crack, but have metal ones on the way. thats why i made this jig.
thingiverse
free

Destiny Ghost Small with pins by xile6
...es.
print the parts then a few pins at a time with different x/y scaling until you get one that fits.
mines fit good at 6.7mm x/y
K40
turbosquid
$9

Jaipur Rugs K40
... available on turbo squid, the world's leading provider of digital 3d models for visualization, films, television, and games.
3ddd
$1

FONTEALTA K40-S
...fontealta k40-s
3ddd
смеситель , fontealta
sink mixer withswivel spout, in inox steel
3ddd
$1

FONTEALTA K40-F
...fontealta k40-f
3ddd
смеситель , fontealta
sink mixer withswivel spout, in inox steel
turbosquid
$22

XIAOMI REDMI K40 PRO
...o for download as blend, blend, blend, fbx, dae, obj, and stl on turbosquid: 3d models for games, architecture, videos. (1697685)
turbosquid
$15

Marcel Breuer K40 Sofa Table
... available on turbo squid, the world's leading provider of digital 3d models for visualization, films, television, and games.
3d_export
$22

xiaomi redmi k40 pro
...e so that the exported files (.dae, .stl, .usdc, .obj and .fbx) is ok please tell me in private message if you have any problems.
3d_export
$30

xiaomi redmi k40 gaming 2021
...reviews is made with lux core render free add-on render p.s .: priority - produced in blender program builds -** blender 2.92.0**
3d_export
$5
Chevy k20 3D Model
...chevy k20 3d model 3dexport chevy k20 k30 k40 k50 k5 blazer pickup dodge ford rims wheels tires...
thingiverse
free

K40 BigDesk (170x265m)
...k40 bigdesk (170x265m)
thingiverse
a bigdesk for the k40
in progress....
thingiverse
free

K40 handle by rafaljot
...k40 handle by rafaljot
thingiverse
handle for k40 co2 laser.
Upgrade
turbosquid
$15

Upgraded Glock
...e 3d model upgraded glock for download as obj, fbx, and blend on turbosquid: 3d models for games, architecture, videos. (1185950)
3ddd
$1

Calligaris / UPGRADE
...calligaris / upgrade
3ddd
calligaris
c материалом
3d_export
free

cz upgrade
...cz upgrade
3dexport
https://www.buymeacoffee.com/mestrezen3d https://linktr.ee/mestrezen3
turbosquid
$80

Custer Tank upgrade
... available on turbo squid, the world's leading provider of digital 3d models for visualization, films, television, and games.
turbosquid
$39

Domestos 1 upgrade
... available on turbo squid, the world's leading provider of digital 3d models for visualization, films, television, and games.
3d_export
$10

Upgraded tea cup
...upgraded tea cup
3dexport
a cup with an unusual design and a unique shape for a more enjoyable tea experience
3d_export
$8

dixy outlander classic style upgraded poplar wood lounge chair
...utlander classic style upgraded poplar wood lounge chair
3dexport
dixy outlander classic style upgraded poplar wood lounge chair
turbosquid
free

AK-12 + Upgrades low-poly 3D model
...ow-poly 3d model for download as fbx, blend, and unitypackage on turbosquid: 3d models for games, architecture, videos. (1501145)
evermotion
$700

Upgrade from V-ray 1.5 to 3.5 for 3ds max
...here is no need to purchase a new dongle - your current dongles will be reprogrammed to carry v-ray 3. evermotion 3d models shop.
evermotion
$300

Upgrade from V-Ray 2.0 to V-ray 3.5 for 3ds Max
... interface (gui) for editing settings on one machine and one render node for rendering on one machine. evermotion 3d models shop.
Linear
3ddd
$1
Linear Diffusers
...linear diffusers
3ddd
диффузор
set of linear diffusers for ceiling.
design_connected
$27
Linear Sofa
...linear sofa
designconnected
scp linear sofa computer generated 3d model.
design_connected
$18

Atlantis linear
...atlantis linear
designconnected
terzani atlantis linear pendant lights computer generated 3d model. designed by barlas baylar.
3d_export
$5
light linear unit
...light linear unit
3dexport
light linear unit
turbosquid
$5
Linear Actuator
...
royalty free 3d model linear actuator for download as blend on turbosquid: 3d models for games, architecture, videos. (1589061)
turbosquid
$29
Linear panel
...oyalty free 3d model linear panel for download as max and obj on turbosquid: 3d models for games, architecture, videos. (1391254)
turbosquid
$12
Linear Chandelier
...y free 3d model linear chandelier for download as max and obj on turbosquid: 3d models for games, architecture, videos. (1574289)
turbosquid
$10

Grohe Lineare
... available on turbo squid, the world's leading provider of digital 3d models for visualization, films, television, and games.
turbosquid
$10

Linear Axis
... available on turbo squid, the world's leading provider of digital 3d models for visualization, films, television, and games.
3d_export
$5
Linear Unit 3D Model
...linear unit 3d model
3dexport
linear unit force torque velocity
linear unit 3d model fau 71218 3dexport
Rail
3d_ocean
$5
rails
...rails
3docean
old rails rails sleepers
old rails
archibase_planet
free
Rail
...chibase planet
rail railing handrail guard-rail
rail forged fence n310814 - 3d model (*.gsm+*.3ds) for exterior 3d visualization.
archibase_planet
free
Rail
...rail
archibase planet
handrail railing guard-rail
rail n220914 - 3d model (*.gsm+*.3ds) for interior 3d visualization.
archibase_planet
free
Rail
...rail
archibase planet
railing hand-rail banisters
rail n130309 - 3d model (*.gsm+*.3ds) for interior 3d visualization.
archibase_planet
free
Rail
...rail
archibase planet
railing hand-rail banisters
rail n270510 - 3d model (*.gsm+*.3ds) for interior 3d visualization.
archibase_planet
free
Railing
...
archibase planet
railing handrail fence guard-rail
railing n140314 - 3d model (*.gsm+*.3ds+*.max) for exterior 3d visualization.
archibase_planet
free

Railing
...railing
archibase planet
railing
railing- 3d model (*.gsm+*.3ds) for interior 3d visualization.
archibase_planet
free
Railing
...railing
archibase planet
railing enclosure barrier
light railing - 3d model for interior 3d visualization.
archibase_planet
free
Rail
...rail
archibase planet
metal railing
rail n280608 - 3d model (*.gsm+*.3ds) for interior 3d visualization.
archibase_planet
free
Railing
...railing
archibase planet
railing kitchen ware
railing 1 - 3d model (*.gsm+*.3ds) for interior 3d visualization.