Thingiverse
JP-440 Custom RepRap by hpiz
by Thingiverse
Last crawled date: 3 years ago
Prologue
I have always dreamed of the idea of additive manufacturing ever since I saw Jurrasic Park 3 (terrible movie) and it's printed velociraptor vocal chambers. I hoped one day I would be able to print parts in my basement.
Fast forward 15 years and I buy my first 3d printer, a CR-10. After no more than a month of owning it I knew I would want another. The thing was, I wanted it to be an involving experience that would teach me a bunch of things along the way. Enter the idea of designing my own 3d printer, from scratch.
Reality
For those who intend to follow my project as I did at the size I did, be warned. It will not be cheap. For smaller sizes I don't think the price would drop far enough to justify not buying an off the shelf model. This is really intended for larger format printers and those who want to learn how 3d printers are built and work.
This project is not for the faint of heart and a deep understanding of mechanics, materials and technology goes a long way.
For those who are not looking to reproduce my printer, feel free to browse the parts list to see if there is something useful for your custom setup. If your design is based off of 2020 extrusion I may have some goodies for you.
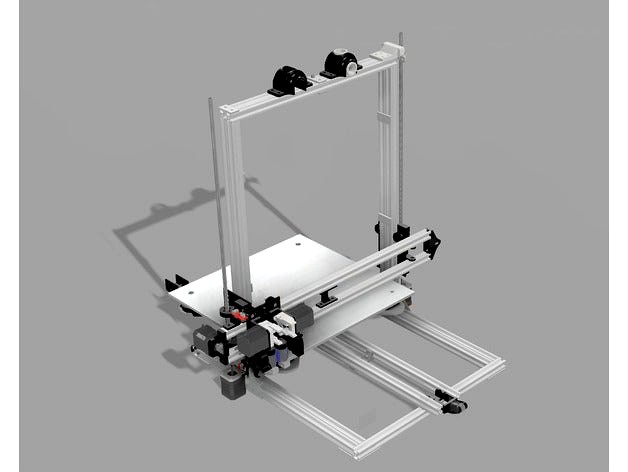
When I designed this thing I didn't put enough room for the head and so the printable area came out to somewhere around 375x375X375. The height would be higher with the uploaded top bearing mounts because mine is currently using an older version that restricts build volume.
I would expect a build volume of 375x375x400 easily maybe 410 on the z.
Purchased Parts
In the files is the parts list spreadsheet. It lists all the items I purchased for my printer and the prices I paid along with a link to each item's listing. Briefly, you will need to buy all the electronics; steppers, hotends, endstops, bed heaters, controller, fans, etc. You will also need the framing (bunch of 2020 aluminum) and hardware to assemble.
Printed Parts
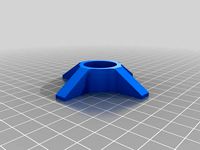
Most of a printer is not printed, but we print where we can. Briefly the printed parts include things like; the head assembly, the filament mounting bracket, x and y axis alignment/structural brackets, all stepper mounts, and the extruder grippers.
Design
My design is inspired by the likes of the CR-10, Anet A8, Prusa i3, and the Tevo Tarantula. It is a Y-bed Z&X-head layout. Dual Z and dual extrusion. From my selected parts,
I went with a 600w 12v bed setup that heats up in <5mins.
I went with the Duet3D board for the controller but really any compatible controller should work.
I went with E3D V6 clones so if you diverge head bracket modifications will be required
I went with ethernet cable for the cabling of the printer. This keeps things tidy.
I am in no way claiming this is a perfect design, or a "better" one. It is simply my take and what I could make with the experience I have. It does not print flawlessly but it works more than well enough.
Dual spool filament holder made of PVC on the top
The hardest part of the entire project is probably the bed carriage. It took me a solid 5-6 hours to cut and grind a sheet of 1/4 inch aluminum, I would recommend going thinner on the bed than I did but this is as thin a carriage I would want.
Don't use the second leadscrew nut spot on the X-Axis adapter as it is not in alignment and is a poor design all around. I'm only using the top one and the bottom one is empty just the lead screw going through it. I plan on redesigning that entire adapter part.
Also to come, I plan on creating a mounting adapter for a Dremel 4000 to be mounted to the head for light-duty CNC routing, as well as throwing on a laser module for laser engraving. Should be fun.
Tools Required
Dremel/Grinder
Miter Saw or some way to cut sheet aluminum
Wiring Tools (Soldering iron, strippers, cutters, etc)
Hex key set
Zip Ties
5mm,3mm, and 4mm Taps
Drill and bits
Calipers
Still to come!
Full assembly instructions
Videos of my printer at work
Constantly refining design (input/criticism welcome)
I have always dreamed of the idea of additive manufacturing ever since I saw Jurrasic Park 3 (terrible movie) and it's printed velociraptor vocal chambers. I hoped one day I would be able to print parts in my basement.
Fast forward 15 years and I buy my first 3d printer, a CR-10. After no more than a month of owning it I knew I would want another. The thing was, I wanted it to be an involving experience that would teach me a bunch of things along the way. Enter the idea of designing my own 3d printer, from scratch.
Reality
For those who intend to follow my project as I did at the size I did, be warned. It will not be cheap. For smaller sizes I don't think the price would drop far enough to justify not buying an off the shelf model. This is really intended for larger format printers and those who want to learn how 3d printers are built and work.
This project is not for the faint of heart and a deep understanding of mechanics, materials and technology goes a long way.
For those who are not looking to reproduce my printer, feel free to browse the parts list to see if there is something useful for your custom setup. If your design is based off of 2020 extrusion I may have some goodies for you.
When I designed this thing I didn't put enough room for the head and so the printable area came out to somewhere around 375x375X375. The height would be higher with the uploaded top bearing mounts because mine is currently using an older version that restricts build volume.
I would expect a build volume of 375x375x400 easily maybe 410 on the z.
Purchased Parts
In the files is the parts list spreadsheet. It lists all the items I purchased for my printer and the prices I paid along with a link to each item's listing. Briefly, you will need to buy all the electronics; steppers, hotends, endstops, bed heaters, controller, fans, etc. You will also need the framing (bunch of 2020 aluminum) and hardware to assemble.
Printed Parts
Most of a printer is not printed, but we print where we can. Briefly the printed parts include things like; the head assembly, the filament mounting bracket, x and y axis alignment/structural brackets, all stepper mounts, and the extruder grippers.
Design
My design is inspired by the likes of the CR-10, Anet A8, Prusa i3, and the Tevo Tarantula. It is a Y-bed Z&X-head layout. Dual Z and dual extrusion. From my selected parts,
I went with a 600w 12v bed setup that heats up in <5mins.
I went with the Duet3D board for the controller but really any compatible controller should work.
I went with E3D V6 clones so if you diverge head bracket modifications will be required
I went with ethernet cable for the cabling of the printer. This keeps things tidy.
I am in no way claiming this is a perfect design, or a "better" one. It is simply my take and what I could make with the experience I have. It does not print flawlessly but it works more than well enough.
Dual spool filament holder made of PVC on the top
The hardest part of the entire project is probably the bed carriage. It took me a solid 5-6 hours to cut and grind a sheet of 1/4 inch aluminum, I would recommend going thinner on the bed than I did but this is as thin a carriage I would want.
Don't use the second leadscrew nut spot on the X-Axis adapter as it is not in alignment and is a poor design all around. I'm only using the top one and the bottom one is empty just the lead screw going through it. I plan on redesigning that entire adapter part.
Also to come, I plan on creating a mounting adapter for a Dremel 4000 to be mounted to the head for light-duty CNC routing, as well as throwing on a laser module for laser engraving. Should be fun.
Tools Required
Dremel/Grinder
Miter Saw or some way to cut sheet aluminum
Wiring Tools (Soldering iron, strippers, cutters, etc)
Hex key set
Zip Ties
5mm,3mm, and 4mm Taps
Drill and bits
Calipers
Still to come!
Full assembly instructions
Videos of my printer at work
Constantly refining design (input/criticism welcome)
Similar models
thingiverse
free

Tevo Tarantula Adjustable Z End Stop - Left by darknz
...e lower left bracket
notes
i did not use the z_nut_mount for my dual-z, i'm using the stock tevo dual z mount on the z-gantry
thingiverse
free

Creality CR10 Logitech C525 mount by Refugeek
... connectors from the original designs, but that would require more supports for printing + adding a screw to combine both parts).
thingiverse
free

Ender_3_V2_Belt_Tensioner_Covers_with_Plus_Minus by blchristian
...s include yellow bed leveling springs and an aluminum dual gear extruder. this is the first thing i have uploaded to thingiverse.
grabcad
free

Ender 3 Pro Dual Z Power Supply Bracket
...rovided brackets did not work for me so i designed this bracket, test printed and made a few small revisions to the shared model.
thingiverse
free

Ender 3 / Pro Dual Z Bracket by pemergency
...m/thing:4619622
there is always a space for improvement, so if you have any suggestions please let me know in a comments, thanks.
thingiverse
free

Sensor Socket for LJC18A3-H-Z/BX by wolffm
...u can make yourself from 5mm thick aluminum.
i'm adding the drawings for the aluminum part to this design probably next week.
thingiverse
free

Bed leveling sensor by oxarrogantxo
...rom the heat sink and attached my mounting bracket in place of them. this allows for a firm and stable mount for easy adjustment.
thingiverse
free

Dremel Holder
... my video, i designed this bracket for my 3d printer to be able to mount a dremel to it which was then used to create pcb etches.
thingiverse
free

Geeetech I3 pro 8mm Acrylic Filament Holder and Mount by msmith358
...ets.
update: i've included a flat base for those who just want to place their filament holder on a desktop or side surface.
thingiverse
free

Filament Runout Sensor by Low_Frequency
... case around it
additional hardware used:
4x m3x10
4x m3x12
8x m3 nuts
some wire
solder
dupont connectors
shrink wrap
ptfe tubing
Hpiz
thingiverse
free

Flappy Owl by hpiz
...flappy owl by hpiz
thingiverse
just a cute little owl.
keychain version included.
thingiverse
free

Headphone Wall Mount by hpiz
...headphone wall mount by hpiz
thingiverse
2.5mm holes
thingiverse
free

2020 Filament Guide by hpiz
...2020 filament guide by hpiz
thingiverse
simple, and fast.
thingiverse
free

Flexi Dactyl - Articulating Pterodactyl by hpiz
...flexi dactyl - articulating pterodactyl by hpiz
thingiverse
yafa (yet another flexible animal) dino-style
thingiverse
free

(Improved) Wahl #20 Hair Clipper Guide by hpiz
...is large. it may be enormous but it works.
i finally got around to making it better with more guides and less space between them.
thingiverse
free

Shark-ticulator / Flexi Shark by hpiz
...ult in a strong toy like endurance.
i wouldn't print lower than 0.15 layer height (without scaling) on account of the hinges.
thingiverse
free

Dremel 4000/3000 Dog Nail Trimmer Attachment by hpiz
...my dog. it has been confirmed to fit the 3000 as well. not sure about fit for other models. please let me know if you do. thanks.
thingiverse
free

CR-10 Filament Spool Airsoft Bearing by hpiz
... an id of greater than 53.2mm).
being a two bearing print it allows any width spool (assuming it fits on the stock spool holder).
thingiverse
free

Manual Leadscrew Crank (CR-10/Tevo/Prusa) by hpiz
...ith the cover plate for the z axis manual adjustment knob https://www.thingiverse.com/thing:2534990 and included the file for it.
thingiverse
free

Minecraft Castle Tower (cnjmc.org) by hpiz
...pports for base of top piece.
obviously print the middle and top twice for a full set.
server was: centralnj.dyndns.org,cnjmc.org
Jp
turbosquid
$5

Jp. Bridge
...turbosquid
royalty free 3d model jp. bridge for download as on turbosquid: 3d models for games, architecture, videos. (1332352)
turbosquid
$10

decor JP
... available on turbo squid, the world's leading provider of digital 3d models for visualization, films, television, and games.
3ddd
$1

decor JP
...decor jp
3ddd
decor lepnina gips гипс декор лепнина
резалась на чпу
3d_ocean
$29

Roland JP-8000 Synthesizer
...roland synthesizer
3d model of a roland jp-8000 synthesizer. the model is fully textured. all objects are grouped and separately.
3d_export
$24

Dekor JP 3D Model
...dekor jp 3d model
3dexport
dekor gips lepnina uzo узор лепнина гипс
dekor jp 3d model emmo 75711 3dexport
turbosquid
$7

JP Rocket Type3 Mk28
... model jp rocket type3 mk28 for download as xsi, fbx, and obj on turbosquid: 3d models for games, architecture, videos. (1523235)
3d_export
$5

JPS GARMIN NUVI 3760T 3D Model
...car satellite video device screen map mobile vray electronics droid cgozzie
jps garmin nuvi 3760t 3d model cgozzie 80867 3dexport
3d_export
$5

JPS GARMIN NUVI 1490 3D Model
... car satellite video device screen map mobile vray electronics droid cgozzie
jps garmin nuvi 1490 3d model cgozzie 80866 3dexport
humster3d
$75

3D model of Honda Odyssey G (JP) 2014
...ed 3d model of honda odyssey g (jp) 2014 in various file formats. all our 3d models were created maximally close to the original.
humster3d
$75

3D model of Toyota Hiace Passenger Van (JP) 1999
... of toyota hiace passenger van (jp) 1999 in various file formats. all our 3d models were created maximally close to the original.
440
3ddd
$1

Торус Стиль.Уголки art.440-440a
...торус стиль.уголки art.440-440a
3ddd
молдинг
торус стиль.уголки art.440-440a
turbosquid
$9

Sartory Rugs Nc-440
... available on turbo squid, the world's leading provider of digital 3d models for visualization, films, television, and games.
3d_export
$55

Condo 440 3D Model
...iture accessories complete full detailed photorealistic textures materials render ready
condo 440 3d model barmoon 42500 3dexport
3d_export
$60

Architecture 440 3D Model
...lege campus max street landscape commercial building medical hospital offices
architecture 440 3d model lotusmodel 48140 3dexport
3d_export
$100

3d building 440 3D Model
...metropolis street block detailed definition realistic skyscraper huge collection
3d building 440 3d model kanhtart 44479 3dexport
3d_export
$50

3D Home 440 3D Model
... chair furniture texture table lamp apartment rug carpet restaurant hotel sitting
3d home 440 3d model richard3015 46289 3dexport
3d_export
$99

Plymouth Road Runner 440 hardtop 1970 3D Model
...1969 1970 2-door hardtop coupe sport american us chrysler
plymouth road runner 440 hardtop 1970 3d model humster3d 82980 3dexport
3d_export
$20

2008 MAN TGX 18 440 by be fa 3D Model
... truck 2007 2010 road city low poly lowpoly game realtime cargo long
2008 man tgx 18 440 by be fa 3d model be_fast 30238 3dexport
cg_studio
$99

Plymouth Road Runner 440 hardtop 19703d model
... .max .mb .obj - plymouth road runner 440 hardtop 1970 3d model, royalty free license available, instant download after purchase.
humster3d
$15

Plymouth Road Runner 440 hardtop 1970 Blueprint
...70 blueprint 3d model in the format you need. all our 3d models was created on real car base and maximally close to the original.
Reprap
turbosquid
$1

Go Pro Balance Hand Wand Reprap
... available on turbo squid, the world's leading provider of digital 3d models for visualization, films, television, and games.
thingiverse
free
Reprap keychain by AndreasD
...reprap keychain by andreasd
thingiverse
a simple reprap logo keychain for the reprap lovers like me!
thingiverse
free

REPRAP CHASSIS by leonk
...reprap chassis by leonk
thingiverse
reprap chassis
thingiverse
free

COUPLER RepRap by leonk
...coupler reprap by leonk
thingiverse
coupler reprap
thingiverse
free

RepRap Switch by n3opl4n
...reprap switch by n3opl4n
thingiverse
switch for reprap prusa i2.
p-space hackerspace logo.
thingiverse
free
Reprap pendulum by mr_seeker
...ap pendulum by mr_seeker
thingiverse
its a pendulum in the shape of the reprap logo. it has a 1mm hole for putting a wire in it.
thingiverse
free

RepRap Ornament by redskinsjbs
...reprap ornament by redskinsjbs
thingiverse
i tried to make a teardrop shape ornament for the holiday season in honor of reprap
thingiverse
free
Spool holder reprap by mdnm
...spool holder reprap by mdnm
thingiverse
this is spool holder for reprap.
thingiverse
free

RepRap logo keyring by mrjohnc
...reprap logo keyring by mrjohnc
thingiverse
reprap logo keyring
thingiverse
free

REPRAP LEON K by leonk
...reprap leon k by leonk
thingiverse
reprap leon k
Custom
3ddd
free
Customized
...customized
3ddd
комод
customized, chest, cabinet
3d_export
$50
Custom motorcycle
...custom motorcycle
3dexport
custom motorcycle
3d_export
$21
Funko custom
...funko custom
3dexport
funko custom
turbosquid
$2

Customs
... available on turbo squid, the world's leading provider of digital 3d models for visualization, films, television, and games.
turbosquid
$2
Customs
... available on turbo squid, the world's leading provider of digital 3d models for visualization, films, television, and games.
turbosquid
$10
Custom Car
...turbosquid
royalty free 3d model custom car for download as on turbosquid: 3d models for games, architecture, videos. (1584212)
3d_export
$7
Custom glasses
...custom glasses
3dexport
3d custom glasses;<br>textured with non overlapping<br>rigged: yes
turbosquid
$80
Custom sportbike
...d
royalty free 3d model custom sportbike for download as fbx on turbosquid: 3d models for games, architecture, videos. (1313435)
turbosquid
$30
custom truck
...squid
royalty free 3d model custom truck for download as max on turbosquid: 3d models for games, architecture, videos. (1329357)
turbosquid
$10
custom alien
...squid
royalty free 3d model custom alien for download as fbx on turbosquid: 3d models for games, architecture, videos. (1244065)