Thingiverse
Jet Bellow - Ryobi & Arduino Powered EDF Blower by Andrew_Overby
by Thingiverse
Last crawled date: 4 years, 8 months ago
Format not displaying correctly? Try switching your browser to Chrome and pressing CTRL+Shift+R (Command+Shift+R on Mac) to clear the page's cache.
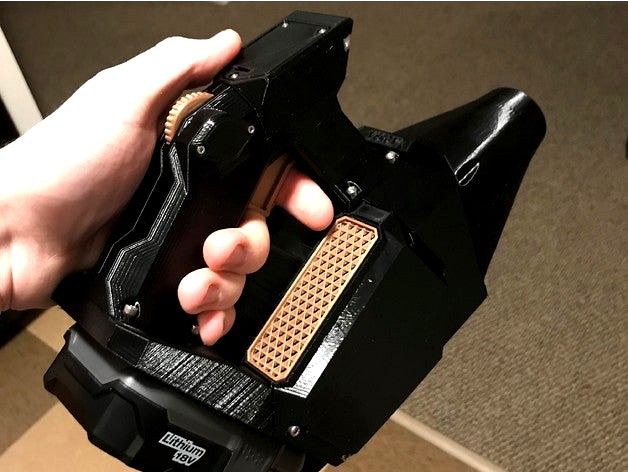
Background
In an attempt to design an end-use product through 3D printing and enhance my documentation skills, I created what I like to call a Jet Bellow. At the core, the device uses a 670W electric ducted fan (EDF) controlled by an Arduino Nano and powered by a Ryobi battery.
The idea was inspired through my dad, who was looking for a better way to supply sufficient air when starting or maintaining large fires. He liked the idea of a popular electric bellow on the market, but it proved to be very under powered and did not feel very durable.
This project incorporates many features that all contribute to a very unique design. A lot of the concepts were spawned off of a few too many beers (some of the features were not very necessary - some may call this "over-engineered"), but all humor aside, this project was a great learning experience, and am very happy with the result!
Below is a story behind some of the main features that the Jet Bellow has:
670W, 950g-Thrust EDF
In order to provide the most airflow possible, a common 40mm fan did not suffice. Because of this, I started to look in to more high-flow options. As a result, I stumbled upon the EDFs commonly used in RC airplanes. This provides more than enough airflow for any application. In fact, this device can rival most leaf blowers! The part that still boggles my mind is how this is not a super powerful EDF compared to other options available.
Arduino Nano
When initially sketching out this project, I did not think the complexity of a microcontroller would be needed. I had seen electronic speed controllers (ESCs) online and thought the 3 control wires were to use with a potentiometer. Without realizing this, I bought the ESC thinking it would be fast to setup. However, I quickly found these 3 wires were not to be controlled like a variable resistor, but rather a servo motor. Because of this, to generate the proper signal that controls the ESC, I went to an Arduino. This had its upsides and downsides. It makes the assembly more complicated, introducing code and added electronics, but it also gives high amounts of freedom on how the system is all tied together. To take full advantage of the microcontroller, I created LEDs that turn on whenever the trigger is activated and a sleep timer to make sure the user does not accidentally leave the device on for long periods of time. It was the little things like those that made this device one of a kind with potential that can be added through other users.
Ryobi P100 Series Battery
Since my dad was the client for this project, I wanted to make sure that the power source was easy to charge and attach to the device. Although the EDF systems typically run off of a LiPo battery setup, I did not have any luck finding options that would allow easy charging, interfacing, and durability. I felt like a LiPo would not stand up to the outdoor conditions and I needed an option that would survive a heavy beating. As a result, I decided to use a Ryobi drill battery and create a quick-connect/disconnect adapter to resemble their product line. It is practically fool-proof. The battery choice came solely from the many my dad has stockpiled in his garage. This way, he didn't need to purchase a new brand of one.
Now that you know a little bit more behind my motivation behind the idea and design, see if this project is right for you! I would be happy to answer any questions you have along the way and am happy to share this model with the open-source community! If you did decide you want to pursue creating a Jet Bellow, please begin in the "Get Started" section on this page.
Kind regards,
Andrew
See It in Action
Below are a couple of field tests I performed to verify the Jet Bellow's functionality. It worked great! I am very excited to see what other applications the community finds useful for this device!
Fire StartingLeaf Blowing
Getting Started
So you decided you want to make a Jet Bellow? Perfect! This project was a great learning experience for me and I hope that by sharing this with other makers, they can acquire knowledge from it as well.
This page is set up to run in sequential order, where steps should be performed in order as you scroll down the page. If there is any confusion or trouble performing or finding a task, please reach out to me via PM or in the "Comments" tab. I want to make this experience as easy as possible and have the project be enjoyable, not frustrating!
Before proceeding with this project, make sure that you have a set of "Heat Set Insert Installation Tips". This tip is to be placed on a soldering iron and used to press-fit knurled brass threaded bushings in to a 3D printed part using high heat. Of course, it is a good idea to have heat shrink and a good supply of solder as well for putting together the system's electronics. Other than that, all other components are included in the Bill of Materials.
Bill of Materials (BOM)
Two types of BOMs are available for this assembly. The first is a "flattened" BOM, which organizes the assembly by its individual parts. This is best to look at when placing orders and finding out what is needed. It assigns each component in the assembly an item number and a quantity so it is easy to see how many instances of a part exist in the entire model. The other option is an indented BOM. The purpose of this document is to show at the assembly level where certain parts belong. This is best to look at when building the Jet Bellow. Bill of Materials are also available in each PDF assembly drawing. All these files are located under the "Thing Files" tab for further detail.
When purchasing hardware such as the bolts and brass threaded inserts, understand the many options out there for buying these parts. There are plenty of kits available for both, but I specifically used McMaster for bolts since I only needed a few different lengths for this assembly and didn't want to purchase a set I wouldn't use. However, a set could be an option for someone who is looking to perform other projects in the future that will utilize those various bolt sizes. In addition to the bolts, when searching for the brass threaded inserts, simply type "Female Thread Knurl Nut Brass Threaded Insert" and you will find what you need! It appears that these are all fairly universal.
All in all, purchase only what you need!
Note: The flattened and indented BOMs belong to the top-level assembly and are assigned to part #100-1035 under the "Thing Files" tab.
Print Settings
Print settings with respect to each part are shown below. Each STL will import in to the proper print-orientation. Most of the parts share a common setting profile, where mainly the support options change between files.
100-1003
Quality: <= 0.2mm Layer Height
Shell: >= 2.0mm Wall Thickness
Infill: >= 25% Infill Density
Material: PLA or PETG (PETG preferred)
Speed: Dependent on printer capability - use what is best for your machine!
Support: Touching Build Plate
100-1005
Quality: <= 0.2mm Layer Height
Shell: >= 2.0mm Wall Thickness
Infill: >= 25% Infill Density
Material: PLA or PETG (PETG preferred)
Speed: Dependent on printer capability - use what is best for your machine!
Support: Touching Build Plate
100-1007
Quality: <= 0.2mm Layer Height
Shell: >= 2.0mm Wall Thickness
Infill: 100% Infill Density to scatter light evenly across the diffuser.
Material: White PLA or Transparent PETG (PETG preferred)
Speed: Dependent on printer capability - use what is best for your machine!
Support: None
100-1008
Quality: <= 0.2mm Layer Height
Shell: >= 2.0mm Wall Thickness
Infill: >= 25% Infill Density
Material: PLA or PETG (PETG preferred)
Speed: Dependent on printer capability - use what is best for your machine!
Support: None
100-1010
Quality: <= 0.2mm Layer Height
Shell: >= 2.0mm Wall Thickness
Infill: >= 25% Infill Density
Material: PLA or PETG (PETG preferred) - it is cool to print this part in an accent color!
Speed: Dependent on printer capability - use what is best for your machine!
Support: Touching Build Plate
100-1012
Quality: <= 0.2mm Layer Height
Shell: >= 2.0mm Wall Thickness
Infill: >= 25% Infill Density
Material: PLA or PETG (PETG preferred) - it is cool to print this part in an accent color!
Speed: Dependent on printer capability - use what is best for your machine!
Support: Touching Build Plate
100-1015
Quality: <= 0.2mm Layer Height
Shell: >= 2.0mm Wall Thickness
Infill: >= 25% Infill Density
Material: PLA or PETG (PETG preferred)
Speed: Dependent on printer capability - use what is best for your machine!
Support: Touching Build Plate
100-1017
Quality: <= 0.2mm Layer Height
Shell: >= 2.0mm Wall Thickness
Infill: >= 25% Infill Density
Material: PLA or PETG (PETG preferred) - it is cool to print this part in an accent color!
Speed: Dependent on printer capability - use what is best for your machine!
Support: Touching Build Plate
100-1018
Quality: <= 0.2mm Layer Height
Shell: >= 2.0mm Wall Thickness
Infill: >= 25% Infill Density
Material: PLA or PETG (PETG preferred)
Speed: Dependent on printer capability - use what is best for your machine!
Support: Touching Build Plate
100-1019
Quality: <= 0.2mm Layer Height
Shell: >= 2.0mm Wall Thickness
Infill: >= 25% Infill Density
Material: PLA or PETG (PETG preferred) - it is cool to print this part in an accent color!
Speed: Dependent on printer capability - use what is best for your machine!
Support: Touching Build Plate
100-1021
Quality: <= 0.2mm Layer Height
Shell: >= 2.0mm Wall Thickness
Infill: >= 25% Infill Density
Material: PLA or PETG (PETG preferred)
Speed: Dependent on printer capability - use what is best for your machine!
Support: Touching Build Plate. Use support blockers on this part! Only allow supports in the ESC housing.
100-1024
Quality: <= 0.2mm Layer Height
Shell: 1.0mm Wall Thickness, Top & Bottom Thickness set to 0
Infill: This is where you get to be creative! Choose any infill pattern and density you like. This will act as the Jet Bellow's "filter".
Material: PLA or PETG (PETG preferred)
Speed: Dependent on printer capability - use what is best for your machine!
Support: None
100-1025
Quality: <= 0.2mm Layer Height
Shell: >= 2.0mm Wall Thickness
Infill: >= 25% Infill Density
Material: PLA or PETG (PETG preferred)
Speed: Dependent on printer capability - use what is best for your machine!
Support: None
100-1027
Quality: <= 0.2mm Layer Height
Shell: >= 2.0mm Wall Thickness
Infill: >= 25% Infill Density
Material: PLA or PETG (PETG preferred)
Speed: Dependent on printer capability - use what is best for your machine!
Support: None
100-1029
Quality: <= 0.2mm Layer Height
Shell: >= 2.0mm Wall Thickness
Infill: >= 25% Infill Density
Material: PLA or PETG (PETG preferred)
Speed: Dependent on printer capability - use what is best for your machine!
Support: Touching Build Plate
100-1030
Quality: <= 0.2mm Layer Height
Shell: >= 2.0mm Wall Thickness
Infill: >= 25% Infill Density
Material: PLA or PETG (PETG preferred)
Speed: Dependent on printer capability - use what is best for your machine!
Support: Everywhere
100-1031
Quality: <= 0.2mm Layer Height
Shell: >= 2.0mm Wall Thickness
Infill: >= 25% Infill Density
Material: PLA or PETG (PETG preferred)
Speed: Dependent on printer capability - use what is best for your machine!
Support: Touching Build Plate
100-1032
Quality: <= 0.2mm Layer Height
Shell: >= 2.0mm Wall Thickness
Infill: >= 25% Infill Density
Material: PLA or PETG (PETG preferred)
Speed: Dependent on printer capability - use what is best for your machine!
Support: Everywhere
100-1033
Quality: <= 0.2mm Layer Height
Shell: >= 2.0mm Wall Thickness
Infill: >= 25% Infill Density
Material: PLA or PETG (PETG preferred)
Speed: Dependent on printer capability - use what is best for your machine!
Support: Everywhere
100-1034
Quality: <= 0.2mm Layer Height
Shell: >= 2.0mm Wall Thickness
Infill: >= 25% Infill Density
Material: PLA or PETG (PETG preferred)
Speed: Dependent on printer capability - use what is best for your machine!
Support: Everywhere
100-1036
Quality: <= 0.2mm Layer Height
Shell: >= 2.0mm Wall Thickness
Infill: >= 25% Infill Density
Material: PLA or PETG (PETG preferred)
Speed: Dependent on printer capability - use what is best for your machine!
Support: Touching Build Plate
100-1037
Quality: <= 0.2mm Layer Height
Shell: >= 2.0mm Wall Thickness
Infill: >= 25% Infill Density
Material: PLA or PETG (PETG preferred)
Speed: Dependent on printer capability - use what is best for your machine!
Support: Touching Build Plate
Assembly Instructions
Each assembly has a GIF provided to visually demonstrate how to build every sub-assembly of the Jet Bellow. For a detailed component list in each GIF, locate the assembly's PDF drawing found under the "Thing Files" tab. These contain a top-level BOM and better clarification for each item in the sub-assembly.
Wiring Diagram
For the system's electronics, please refer to the wiring diagram attached as a PDF in the "Thing Files" tab as "100-1035_Wiring_Diagram". Please note that there are still components that need to be added to the PCB modules (#100-1001 & #100-1013) that are not included in this diagram such as the LEDs, resistors, and screw terminals. Refer to the sub-assembly PDFs and GIFs for more detailed information.
Note: When testing the EDF, make sure that it is blowing air in the right direction. If this is not the case, simply switch any of the leads among the 3 lines going to the fan and this will fix the problem!
Code
The Arduino Nano script for the Jet Bellow is located under the "Thing Files" tab as "100-1035_Master_Program". There is only one library this file uses ("Servo.h"), which should be installed by default in the Arduino IDE. For those who are not experienced with Arduino, please see the following link for detailed tutorials on anything from working in the IDE to making an LED blink!
Special Thanks & Tip
I am very passionate about the open-source community that provides a means for anyone to make, create, and remix amazing files across the web. It is truly amazing what additive manufacturing has accomplished by delivering a fast and affordable means to manufacture parts. Better yet, the bright and driven community behind the tech makes it even easier for those interested to get involved! Each of my designs are made free of capital but my own. If you found this particular project useful, please consider leaving me a tip (you don't have to, but if you insist, a small donation would be greatly appreciated!). This will go towards funding future projects like these, so I can continue to share my designs with the community!