Thingiverse
JAW Delta Printer Kossel Mini Remix by JAW
by Thingiverse
Last crawled date: 3 years ago
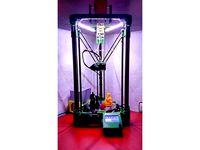
11/20/18: The Delta Printer is up and running, and it works quite well. I'll upload videos and a BOM for anyone who wants to construct their own very shortly.
This is running list of the ongoing delta parts I am creating/remixing for a custom 2020 Mini Kossel build running on the Duet Wifi and using 2020 profile extrusions from Robot Digg. This thing is a work in progress, and will be updated as I add parts and pictures to my build.
CURRENT LIST OF PARTS:
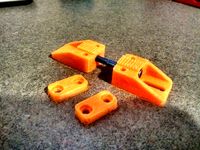
Vertices: These are remixed from Sneq. They are unique in that they better seat into standard v-slot profile to aid in creating a stiffer frame. They also feature cutouts that ease warp that happens when you print larger parts in ABS and PETG. Printed (2mm layer height, .4mm nozzle, no supports, PETG)
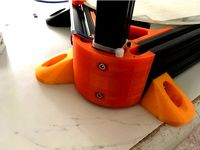
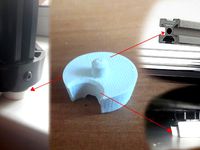
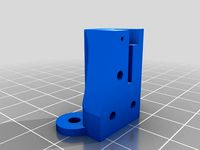
Upgraded Max Z Effector: This is a JAW original design. The effector was conceived with several goals in mind. Mainly, I wanted to create an effector for the popular E3D V6 hotend that would raise most of the part above the effector plane. This is desirable to two reasons. First, having the hotend closer to the effector plane increases print accuracy. This is because the hotend is like a pendulum hanging below the effector plane. Any movement or slop from the ball ends, arms, and rails of a delta printer is magnified the further it is from the effector plane (just like the pendulum of a clock swings a further distance the farther it is from its pivot point). By moving the hotend closer to the effector the print becomes less affected by small movements in the ball ends, rods, linear rails, or even vibration in the frame. Secondly, raising the hotend gives more print height. However, there is a tradeoff associated with raising the hotend above the effector; you have to increase the size of the effector to accommodate cooling fans, sensors, and the coldend while maintaining clearance for the parallel rods to move the effector to all areas of the printbed. If the effector becomes too large, you may end up losing x/y print area (negating any gains in z print area). This effector simultaneously raises the hotend while keeping the effector relatively small to maintain x and y print area (hence the need for 30mm fans). I strongly recomend printing in PETG or ABS or high temp PLA as the hotend cartridge will be in close proximity to the part (you may want to insulate the bottom of the effector as well). Printed (2mm layer height, .4mm nozzle, no supports, PETG)
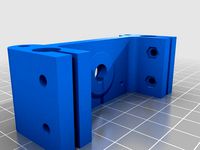
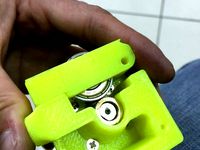
Carriage: Remixed from Boksbox, this carriage incorporates GT2 belt clips that lock the belt to the carriage rather than to itself. These clips have more plastic support than most of the carriages where the belt doubles over to lock into itself, making them less likely to crack the plastic under tension. The carriage also has an adjustable M3 screw at the top that triggers the x,y,z tower endstops. This is an easy way to adjust the printer to make sure it homes the effector in the center of the frame (it saves you from moving your endstops or adjusting the tower to accomplish the same result). Printed (2mm layer height, .4mm nozzle, no supports, PETG)
Endstops: An original JAW part, there is nothing really special here (at the moment anyways). I am not sure there is much to be innovated on with the endstops; however, I have seen a few people incorporate endstop holders with frame braces, and that is pretty cool! So. . . that might be an update coming very soon! Printed (2mm layer height, .4mm nozzle, no supports, PETG)
V-Slot Insert/T-Nut: This is another JAW original part. These are nothing too special, but I wanted to print these in groups of 10, and on end so no support is needed. I do plan on adding a drop-in nut holder soon, so stay tuned for that! Printed (Slow 25mm/sec speed, 2mm layer height, .4mm nozzle, no supports, PETG)
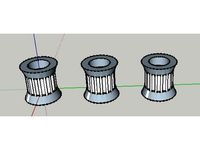
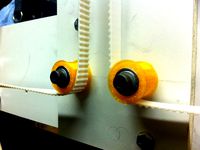
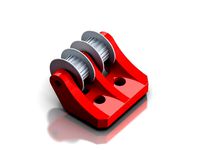
GT2 16T Idler Pulley: This is yet another JAW original. The part was created to work with 2 683zz bearings per idler pulley (6 in total). However, 16T metal idlers are a part that can be purchased, and buying them is honestly not much more than 6 bearings ($2 more on Amazon, plus they will be stronger). So I would recommend purchasing idler pulleys unless you have some 683zz bearings sitting on the shelf (which I do!). Printed (Slow 20mm/sec speed, 2mm layer height, .4mm nozzle, zig zag supports, PETG, print on end!)
PARTS COMING SOON!!!
-Extruder: I am working on a remix of the popular B-Struder. It will incorporate a bowden tube that runs all the way through the arm (however it will be cut where the bearing and MK8 hobbed gear meet). This will keep the filament from wearing away at the printed parts and it will keep still keep the filament path very tight to help reduce slope from the bowden setup. Almost all credit to tempo502, as the B-struder is already a great design. In addition to the through-bowden tube, I am adding some lever arms/grips that can be pinched to make filament loading and unloading easier. I am also considering tweaking the design to allow better access to the hobbed gear (just incase I need to clean up ground filament) and evaluating if I need to give the setup some type of mechanical advantage with the stepper motor I plan on using.
Frame braces: I am considering making frame braces, but am not sure they are necessary right now. Let me start by saying that the vertices I have used make my frame very stiff. I cannot detect any movement in the frame at all. However, all printers will have a frequency at which they resonate, and when the effector is making very small movements at this frequency this could become an issue that shows up in a print. I will also say that adding braces certainly wouldn't hurt anything, if anything they may just be a way to make the frame overbuilt (or better prepared for expansion). So I suspect that these will be coming soon!
Enclosure: I have a huge piece of acrylic glass sitting around and I am very interested in enclosing my mini kossel to improve print quality and reduce warping of certain thermoplastics like ABS. I have looked at a number of enclosures, and I think my inspiration may be taken from the one constructed by physics anonymous (go to YouTube and search 3D Printer Upgrade (Part 3)). Enclosing the printer will hopefully reduce warp as the heated bed heats the air in the chamber and reduces the effect of draft on the print. An enclosure would also keep dust off the linear bearings, and my cats away from a print in progress.
Dust covers for the bottom motors: These will help enclose the print area.
A power supply cover for my Meanwell powersupply to prevent shock.
UPDATES ON PROGRESS:
Update #1: I've been assembling my frame, and putting the vertices together with 10mm M3 screws is possible but very difficult with the current version of the vertices. I am updating the part to add a 1mm deep dimple around all the M3 frame holes to allow the bolt to reach deeper into the extrusion. If you have longer bolts (say 12mm M3's), then you would just add a washer or use the old files. I'll leave the old vertice files up, and label the new files with "new".
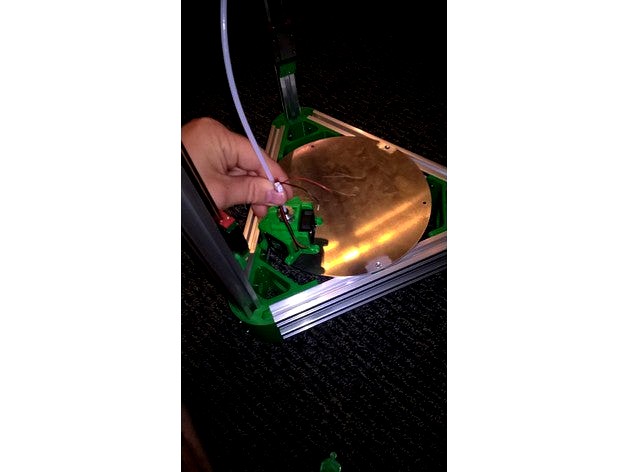
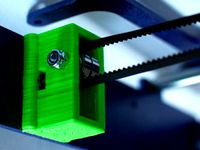
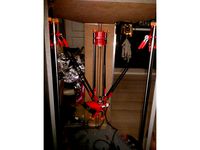
Update #2: I've been working on the effector recently. I updated all the.stl files associated with the effector (effector7, hotend clip, cooling duct). The design now includes ports for cord management for the fans, upgraded points for the parallel arm connections. I also added a few extra holes/hardpoints at the top of the effector to add a pcb board with connectors to easy wire fatigue and make swapping parts easier. Unfortunately my Printrbot is down due to wire fatigue issues with the z-probe, so I am not able to print until replacement parts arrive and are installed. In the meantime, I've added pictures of my build progress. The images show the vertices, endstops, and the effector. You can see in the image that the effector doesn't reduce the print area at all! Enjoy, and leave a comment if you need anything or have any questions.
Update #3: I have designed a 16 tooth GT2 idler pulley that uses x2 683zz bearings per pulley. All of the walls are at least .45mm, so I expect that it should print with a .4mm nozzle; however, my printer is still down, so be aware that this file may change.
Update #4: Printer is back up (I think). I have updated the effector with a better z-sensor holder. I settled on using the following inductive sensor: No. LJ12A3-4-Z/BY, PNP, 4mm, 6-36vDC.
This is running list of the ongoing delta parts I am creating/remixing for a custom 2020 Mini Kossel build running on the Duet Wifi and using 2020 profile extrusions from Robot Digg. This thing is a work in progress, and will be updated as I add parts and pictures to my build.
CURRENT LIST OF PARTS:
Vertices: These are remixed from Sneq. They are unique in that they better seat into standard v-slot profile to aid in creating a stiffer frame. They also feature cutouts that ease warp that happens when you print larger parts in ABS and PETG. Printed (2mm layer height, .4mm nozzle, no supports, PETG)
Upgraded Max Z Effector: This is a JAW original design. The effector was conceived with several goals in mind. Mainly, I wanted to create an effector for the popular E3D V6 hotend that would raise most of the part above the effector plane. This is desirable to two reasons. First, having the hotend closer to the effector plane increases print accuracy. This is because the hotend is like a pendulum hanging below the effector plane. Any movement or slop from the ball ends, arms, and rails of a delta printer is magnified the further it is from the effector plane (just like the pendulum of a clock swings a further distance the farther it is from its pivot point). By moving the hotend closer to the effector the print becomes less affected by small movements in the ball ends, rods, linear rails, or even vibration in the frame. Secondly, raising the hotend gives more print height. However, there is a tradeoff associated with raising the hotend above the effector; you have to increase the size of the effector to accommodate cooling fans, sensors, and the coldend while maintaining clearance for the parallel rods to move the effector to all areas of the printbed. If the effector becomes too large, you may end up losing x/y print area (negating any gains in z print area). This effector simultaneously raises the hotend while keeping the effector relatively small to maintain x and y print area (hence the need for 30mm fans). I strongly recomend printing in PETG or ABS or high temp PLA as the hotend cartridge will be in close proximity to the part (you may want to insulate the bottom of the effector as well). Printed (2mm layer height, .4mm nozzle, no supports, PETG)
Carriage: Remixed from Boksbox, this carriage incorporates GT2 belt clips that lock the belt to the carriage rather than to itself. These clips have more plastic support than most of the carriages where the belt doubles over to lock into itself, making them less likely to crack the plastic under tension. The carriage also has an adjustable M3 screw at the top that triggers the x,y,z tower endstops. This is an easy way to adjust the printer to make sure it homes the effector in the center of the frame (it saves you from moving your endstops or adjusting the tower to accomplish the same result). Printed (2mm layer height, .4mm nozzle, no supports, PETG)
Endstops: An original JAW part, there is nothing really special here (at the moment anyways). I am not sure there is much to be innovated on with the endstops; however, I have seen a few people incorporate endstop holders with frame braces, and that is pretty cool! So. . . that might be an update coming very soon! Printed (2mm layer height, .4mm nozzle, no supports, PETG)
V-Slot Insert/T-Nut: This is another JAW original part. These are nothing too special, but I wanted to print these in groups of 10, and on end so no support is needed. I do plan on adding a drop-in nut holder soon, so stay tuned for that! Printed (Slow 25mm/sec speed, 2mm layer height, .4mm nozzle, no supports, PETG)
GT2 16T Idler Pulley: This is yet another JAW original. The part was created to work with 2 683zz bearings per idler pulley (6 in total). However, 16T metal idlers are a part that can be purchased, and buying them is honestly not much more than 6 bearings ($2 more on Amazon, plus they will be stronger). So I would recommend purchasing idler pulleys unless you have some 683zz bearings sitting on the shelf (which I do!). Printed (Slow 20mm/sec speed, 2mm layer height, .4mm nozzle, zig zag supports, PETG, print on end!)
PARTS COMING SOON!!!
-Extruder: I am working on a remix of the popular B-Struder. It will incorporate a bowden tube that runs all the way through the arm (however it will be cut where the bearing and MK8 hobbed gear meet). This will keep the filament from wearing away at the printed parts and it will keep still keep the filament path very tight to help reduce slope from the bowden setup. Almost all credit to tempo502, as the B-struder is already a great design. In addition to the through-bowden tube, I am adding some lever arms/grips that can be pinched to make filament loading and unloading easier. I am also considering tweaking the design to allow better access to the hobbed gear (just incase I need to clean up ground filament) and evaluating if I need to give the setup some type of mechanical advantage with the stepper motor I plan on using.
Frame braces: I am considering making frame braces, but am not sure they are necessary right now. Let me start by saying that the vertices I have used make my frame very stiff. I cannot detect any movement in the frame at all. However, all printers will have a frequency at which they resonate, and when the effector is making very small movements at this frequency this could become an issue that shows up in a print. I will also say that adding braces certainly wouldn't hurt anything, if anything they may just be a way to make the frame overbuilt (or better prepared for expansion). So I suspect that these will be coming soon!
Enclosure: I have a huge piece of acrylic glass sitting around and I am very interested in enclosing my mini kossel to improve print quality and reduce warping of certain thermoplastics like ABS. I have looked at a number of enclosures, and I think my inspiration may be taken from the one constructed by physics anonymous (go to YouTube and search 3D Printer Upgrade (Part 3)). Enclosing the printer will hopefully reduce warp as the heated bed heats the air in the chamber and reduces the effect of draft on the print. An enclosure would also keep dust off the linear bearings, and my cats away from a print in progress.
Dust covers for the bottom motors: These will help enclose the print area.
A power supply cover for my Meanwell powersupply to prevent shock.
UPDATES ON PROGRESS:
Update #1: I've been assembling my frame, and putting the vertices together with 10mm M3 screws is possible but very difficult with the current version of the vertices. I am updating the part to add a 1mm deep dimple around all the M3 frame holes to allow the bolt to reach deeper into the extrusion. If you have longer bolts (say 12mm M3's), then you would just add a washer or use the old files. I'll leave the old vertice files up, and label the new files with "new".
Update #2: I've been working on the effector recently. I updated all the.stl files associated with the effector (effector7, hotend clip, cooling duct). The design now includes ports for cord management for the fans, upgraded points for the parallel arm connections. I also added a few extra holes/hardpoints at the top of the effector to add a pcb board with connectors to easy wire fatigue and make swapping parts easier. Unfortunately my Printrbot is down due to wire fatigue issues with the z-probe, so I am not able to print until replacement parts arrive and are installed. In the meantime, I've added pictures of my build progress. The images show the vertices, endstops, and the effector. You can see in the image that the effector doesn't reduce the print area at all! Enjoy, and leave a comment if you need anything or have any questions.
Update #3: I have designed a 16 tooth GT2 idler pulley that uses x2 683zz bearings per pulley. All of the walls are at least .45mm, so I expect that it should print with a .4mm nozzle; however, my printer is still down, so be aware that this file may change.
Update #4: Printer is back up (I think). I have updated the effector with a better z-sensor holder. I settled on using the following inductive sensor: No. LJ12A3-4-Z/BY, PNP, 4mm, 6-36vDC.
Similar models
thingiverse
free
16 tooth GT2 Idler Pulley for Kossel by JAW
...es 683zz bearings (3x7x3mm). each pulley has two bearing press fit into either side. these were designed for a kossel 3d printer.
thingiverse
free
Idler Pulley 16mm T5 608 Bearing by mswdev
...the timing belt stay on track and provides a change of direction . i have added some support that should be removed once printed.
thingiverse
free

MS-Delta Frame by Spaceman9105
...d. it will have an outo bed leveling function and rods will be connected with magnets. https://www.thingiverse.com/thing:2938171
thingiverse
free

Hypercube Evolution Mods by Syngenta
... parts:
x carriage with endstop mount ( no brass inserts)
stronger belt clamps
improved belt idler
motor mount with endstop mount
thingiverse
free
Updated Rostock Idler End for different ball bearing size by labidus
...t2 pulley with 16 teeth for example you need the new updated carriage that i uploaded and smaller ball bearing for the idler end.
thingiverse
free
XY IDLER for GT2 16T/20T Timing Pulleys | HYPERCUBE by PurchenZuPoden
...er-pulley-ptfe-tube-for-20161030-01/32759898481.html
12.05.17 update:
new 20t xy idler
bigger gap for 16t idler for less friction
thingiverse
free
Y-belt holder and tensioner for MK3/S - Gates 20T Idler by BMac1203
... frame, but that part didn't line-up with the stock mk3s part.
tested on my printer - this works with gates 20t idler pulley.
thingiverse
free
Prusa Steel 2.5 Y-axis idler (remix) by oloand
...inal "toolson" component.
the only necessary support is integrated in the .stl file. use a plier to cut it afterwards.
thingiverse
free
Delta 3D printer with belt tensionner by ka3ros
...h probe system with optical endstop and sg90 engaging system
i've put a model of the fully assembled hotend for the 3d viewer
thingiverse
free
Prusa i3 Updated Y Carriage by Terrapinmfg
...dated bed plate as well.
there is a stp file of the assembly as well as the .stl files for the printed parts and the bed plate.
Kossel
thingiverse
free
kossel bottom by keisukelin
...kossel bottom by keisukelin
thingiverse
kossel bottom
thingiverse
free
Leg for kossel by exelon
...leg for kossel by exelon
thingiverse
leg for kossel
thingiverse
free
Extruder for kossel by spencer_chen7
...extruder for kossel by spencer_chen7
thingiverse
extruder for kossel
thingiverse
free
Kossel parts by breezer83
...kossel parts by breezer83
thingiverse
kossel parts
thingiverse
free

Anycubic Kossel PID calibration
...ir mount:
kossel raspberry camera ir mount
extruder pid calibration.
simple extruder temperature calibration of your 3d printer.
thingiverse
free

Kossel Medium by flux83
...kossel medium by flux83
thingiverse
vertex for upgraded kossel mini
thingiverse
free
Kossel Mini by salesmendesandre
...kossel mini by salesmendesandre
thingiverse
custom kossel mini
frame 20x20
thingiverse
free
leg for kossel by ionulet
...leg for kossel by ionulet
thingiverse
leg for kossel with channel for end- stop cables
thingiverse
free

Optical Endstops Mounts for Kossel (with Better Kossel carriages) by dellfer
...stops on the anycubic kossel with better kossel carriages by codefreak https://www.thingiverse.com/thing:2501337
more precission
thingiverse
free
kossel??????? by wangrui19890704
...kossel??????? by wangrui19890704
thingiverse
??2020?2060???
Jaw
3d_export
$9

jaws
...jaws
3dexport
jaws 3d model. rigged
3d_export
$5

jaws of life
...jaws of life
3dexport
jaws of life, mated so you can move jaws.
turbosquid
$49
Jaw
...jaw
turbosquid
royalty free 3d model jaw for download as max on turbosquid: 3d models for games, architecture, videos. (1630683)
3d_export
$7
jaw crusher
...jaw crusher
3dexport
3d model of jaw crusher
turbosquid
free

Jaw
... available on turbo squid, the world's leading provider of digital 3d models for visualization, films, television, and games.
turbosquid
$27
Jaws Runner
...free 3d model jaws runner for download as obj, fbx, and blend on turbosquid: 3d models for games, architecture, videos. (1347511)
3d_export
$6
3-Jaw Bearing Puller
...3-jaw bearing puller
3dexport
3-jaw bearing puller, 3-jaw gear puller
turbosquid
$19

Jaws Bruce
... available on turbo squid, the world's leading provider of digital 3d models for visualization, films, television, and games.
turbosquid
$5
Human's jaw
...id
royalty free 3d model human's jaw for download as fbx on turbosquid: 3d models for games, architecture, videos. (1330690)
3d_export
$9
Jaw harp 3D Model
...dexport
harmonica jew harp jaw jew's music melody instrument 3d obj fbx max mentalray
jaw harp 3d model gizart 99939 3dexport
Delta
design_connected
$16
Delta
...delta
designconnected
arflex international spa delta computer generated 3d model. designed by koivisto, eero.
design_connected
$16

Delta
...delta
designconnected
lj lamps delta computer generated 3d model. designed by janowski-lenhart, sasha.
design_connected
$13
Delta
...delta
designconnected
emu group delta armchairs computer generated 3d model. designed by marin chiaramonte .
3ddd
$1

Delta Light
...delta light
3ddd
delta light , you-turn reo 3033
точечний светильник delta light
3ddd
$1
Blanco / delta
...blanco / delta
3ddd
blanco , мойка
мойка blanco delta со смесителем
3ddd
$1
Delta Light Spot
...delta light spot
3ddd
delta light
светильник фирмы delta light
3ddd
free
Bianchi Delta LVMDLT200100
...i delta lvmdlt200100
3ddd
bianchi delta , смеситель
смеситель bianchi delta lvmdlt200100
design_connected
free
Delta 190
...delta 190
designconnected
free 3d model of delta 190 by zanotta designed by progetti, emaf.
design_connected
$27
Delta 211
...delta 211
designconnected
zanotta delta 211 computer generated 3d model. designed by progetti, emaf.
design_connected
$27
Delta 234
...delta 234
designconnected
zanotta delta 234 computer generated 3d model. designed by progetti, emaf.
Mini
turbosquid
$10

Mini Mini Luceplan
...
royalty free 3d model mini mini luceplan for download as max on turbosquid: 3d models for games, architecture, videos. (1227359)
3d_ocean
$39

Mini Cooper
...mini cooper
3docean
cabrioler cooper mini
mini cooper cabrioler
3d_export
$30

Mini lathe
...mini lathe
3dexport
mini lathe
3d_export
$5

mini mouse
...mini mouse
3dexport
mini mouse
3d_export
$5

mini house
...mini house
3dexport
mini house
3d_export
free

Mini Mecha
...mini mecha
3dexport
concept of mini mecha
3d_ocean
$20

Mini Gun
...mini gun
3docean
gatling gun gun machine gun mini gun weapon
model of a mini gatling gun.
3ddd
free

Herve mini
... кофейный , herve
http://www.mobiliavenanti.it/ru/products/hervè-mini
3d_export
$5

mini wall
...mini wall
3dexport
mini wall for living room
3d_export
$5

mini bank
...mini bank
3dexport
mini bank 3d model
Remix
turbosquid
$5

MODA Collection Remix Chair
... available on turbo squid, the world's leading provider of digital 3d models for visualization, films, television, and games.
3d_export
$12

remix yamaha rm1x
...remix yamaha rm1x
3dexport
geometry triangles 15.2k vertices 7.6k pbr no textures 1 materials 1 uv layers yes
3d_ocean
$5

Vray fabric Kvadrat remix green - tileable
...th vray and 3dsmax. high-resolution texture images (2000×2000 px) file included: shader vray 2.40 texture image 3ds max 2011 file
turbosquid
$20

Gerrit Rietveld 1938 Zig Zag Chair Remix
... available on turbo squid, the world's leading provider of digital 3d models for visualization, films, television, and games.
3d_export
$10

multicolored remix parametric table furniture
... fbx, obj, mtl, archive with textures. the model has no glitches. render and materials - vray . without using plugins. good use!
3ddd
$1

Barovier&Toso / Manhattan Remix 7192
... 004293-142405
в коллекции есть люстры 7, 9, 12 рожковые. диаметр соответственный 1000, 1250, 1500 мм.
3ddd
$1

Muuto fiber chair
...grey/grey, dusty green/dusty green, nature/oak, natural white/oak upholstery options remix 183/black, remix 133/grey, remix 643/dusty red leather options black...
3ddd
$1

Barovier&Toso 7190-7195
...7190-7195 3ddd barovier&toso потолочнай люстра фабрики barovier&toso;, коллекция manhattan remix артикул 7190-7195. размеры в inches: 39"...
3d_export
$5

3D Locking Handle Weatherproof Storage Box Container
...handle weatherproof storage box container 3dexport new, improved and remixd! no screws required. print-in-place. weatherproof. parametric. 2 parts. easy...
cg_studio
$49

HTC One Mini 2 Amber Gold3d model
...cell phone mobile cellular super lcd touchscreen touch screen remix amber gold .max .obj .mb .lwo .fbx .c4d .3ds...
Printer
archibase_planet
free

Printer
...inter
archibase planet
printer laser printer pc equipment
printer n120614 - 3d model (*.gsm+*.3ds) for interior 3d visualization.
archibase_planet
free

Printer
...rchibase planet
laser printer office equipment computer equipment
printer - 3d model (*.gsm+*.3ds) for interior 3d visualization.
turbosquid
$100

Printer
...er
turbosquid
royalty free 3d model printer for download as on turbosquid: 3d models for games, architecture, videos. (1487819)
turbosquid
$3

Printer
...turbosquid
royalty free 3d model printer for download as max on turbosquid: 3d models for games, architecture, videos. (1670230)
turbosquid
$1

printer
...turbosquid
royalty free 3d model printer for download as max on turbosquid: 3d models for games, architecture, videos. (1595546)
turbosquid
$1

printer
...turbosquid
royalty free 3d model printer for download as max on turbosquid: 3d models for games, architecture, videos. (1595105)
turbosquid
$10

Printer
...id
royalty free 3d model printer for download as max and 3dm on turbosquid: 3d models for games, architecture, videos. (1607146)
turbosquid
$7

Printer
...royalty free 3d model printer for download as ma, ma, and obj on turbosquid: 3d models for games, architecture, videos. (1644580)
turbosquid
$30

Printer
... available on turbo squid, the world's leading provider of digital 3d models for visualization, films, television, and games.
turbosquid
$20

Printer
... available on turbo squid, the world's leading provider of digital 3d models for visualization, films, television, and games.