Thingiverse

J-Struder : 1.75mm Bowden Extruder For NEMA 17 Motor by junaling
by Thingiverse
Last crawled date: 3 years, 1 month ago
Update 2019-08-21 :
Version 4 guide: use collet and clip to secure bowden to guide, use genuine E3D 4mm bowden collet for 1.75mm filament, the clones are too big and will not fit
Update 2019-02-02 :
Version 3 guides : enlarged fitting hole radius by 0.1mm for easier mounting and to prevent cracking, added tensioner to guides to allow for spring tension adjustment, use 15mm or the stock 20mm spring, 2 tensioner length provided. If you prefer the fixed tension, continue using version 2
Update 2019-01-27 :
Version 2 base : minor tweak, use 8mm m3 lock bolt, added base with tube support
Update 2018-11-04 :
Version 2 guides : improvements to guides: minimize gap to optimize for flexible materials, use M4 nut to secure bearing
Update 2018-09-14 :
Version 1 : improvements on the base (retraction stabilizer and reinforcement) and guides (more room for gear, plunger, rounded edges)
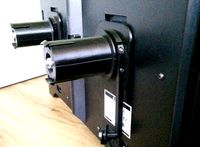
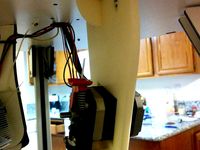
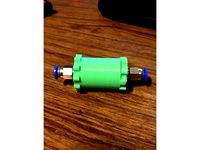
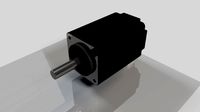
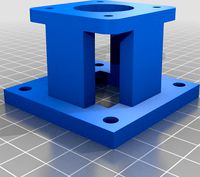
This design is inspired by SeeMeCMC EZR Struder, I had been using it for over a year on my CR-10 until it finally broke on me. This is designed for the NEMA 17 motor. The head of the knob when inserted between the spring base and the guide will hold the spring compressed when assembling and feeding/removing the filament.
3 options for the filament feed end:
1) Direct
2) Fitting
3) Bowden
4) Collet
The bearing, M4 lock washer and spring are from the stock CR-10 extruder.
Bearing is U604zz available here:https://www.reprap.me/creality-3d-cr-10-extruder-bearing-filament-pulley.htmlhttps://www.3dprima.com/parts/spare-parts/creality-3d/a-22668https://www.spool3d.ca/u604z-bearing
... also available from aliexpress
Alternative bearing is 694zz, 11mm od x 4mm id x 4mm thick.
Other hardware:
2x M3 20mm socket head cap hex bolt (through 3mm plate on CR-10)
2x M3 10mm socket head cap hex bolt (through 3mm plate on CR-10)
1x M3 8mm socket head cap hex bolt (for version 2 base)
1x M3 6mm socket head cap hex bolt (for version 1 base)
1x M3 nut
1x M4 10mm
1x M4 nut (for version 2+ guides)
1x PC4-M6 fitting, 2x when using "fitting" end
Print the base and guide at 0.12mm or higher, this requires your printer to be properly tuned, the gaps are 0.15mm on each side. Use ABS or PETG, PLA will work if you are not using an enclosure. 100% infill recommended for printing base
Assembly:
1) Insert M3 nut in base and screw in the M3 6mm bolt, don't tighten
2) Screw fitting(s) to the guide, push in a piece of bowden tube where applicable
3) Using the 10mm M4 bolt and lock washer, secure bearing to the guide
4) Slide assembled guide into base
5) Insert spring
6) Insert knob head between the spring base and guide to compress spring for easy assembly
7) Attach to motor/printer
Usage:
1) Loosen the M3 6mm lock bolt before pressing the spring
2) Press spring and insert the knob head between the spring base and guide gap
3) Unload or load filament
4) After loading filament, remove knob head between the spring base and guide
5) Tighten the M3 6mm lock bolt
https://youtu.be/GqlBTxhC-ZU
Version 4 guide: use collet and clip to secure bowden to guide, use genuine E3D 4mm bowden collet for 1.75mm filament, the clones are too big and will not fit
Update 2019-02-02 :
Version 3 guides : enlarged fitting hole radius by 0.1mm for easier mounting and to prevent cracking, added tensioner to guides to allow for spring tension adjustment, use 15mm or the stock 20mm spring, 2 tensioner length provided. If you prefer the fixed tension, continue using version 2
Update 2019-01-27 :
Version 2 base : minor tweak, use 8mm m3 lock bolt, added base with tube support
Update 2018-11-04 :
Version 2 guides : improvements to guides: minimize gap to optimize for flexible materials, use M4 nut to secure bearing
Update 2018-09-14 :
Version 1 : improvements on the base (retraction stabilizer and reinforcement) and guides (more room for gear, plunger, rounded edges)
This design is inspired by SeeMeCMC EZR Struder, I had been using it for over a year on my CR-10 until it finally broke on me. This is designed for the NEMA 17 motor. The head of the knob when inserted between the spring base and the guide will hold the spring compressed when assembling and feeding/removing the filament.
3 options for the filament feed end:
1) Direct
2) Fitting
3) Bowden
4) Collet
The bearing, M4 lock washer and spring are from the stock CR-10 extruder.
Bearing is U604zz available here:https://www.reprap.me/creality-3d-cr-10-extruder-bearing-filament-pulley.htmlhttps://www.3dprima.com/parts/spare-parts/creality-3d/a-22668https://www.spool3d.ca/u604z-bearing
... also available from aliexpress
Alternative bearing is 694zz, 11mm od x 4mm id x 4mm thick.
Other hardware:
2x M3 20mm socket head cap hex bolt (through 3mm plate on CR-10)
2x M3 10mm socket head cap hex bolt (through 3mm plate on CR-10)
1x M3 8mm socket head cap hex bolt (for version 2 base)
1x M3 6mm socket head cap hex bolt (for version 1 base)
1x M3 nut
1x M4 10mm
1x M4 nut (for version 2+ guides)
1x PC4-M6 fitting, 2x when using "fitting" end
Print the base and guide at 0.12mm or higher, this requires your printer to be properly tuned, the gaps are 0.15mm on each side. Use ABS or PETG, PLA will work if you are not using an enclosure. 100% infill recommended for printing base
Assembly:
1) Insert M3 nut in base and screw in the M3 6mm bolt, don't tighten
2) Screw fitting(s) to the guide, push in a piece of bowden tube where applicable
3) Using the 10mm M4 bolt and lock washer, secure bearing to the guide
4) Slide assembled guide into base
5) Insert spring
6) Insert knob head between the spring base and guide to compress spring for easy assembly
7) Attach to motor/printer
Usage:
1) Loosen the M3 6mm lock bolt before pressing the spring
2) Press spring and insert the knob head between the spring base and guide gap
3) Unload or load filament
4) After loading filament, remove knob head between the spring base and guide
5) Tighten the M3 6mm lock bolt
https://youtu.be/GqlBTxhC-ZU
Similar models
grabcad
free

Geared extruder v.3
... some m4 nuts and washers to adjust spring tension
~ 25mm spring
mk8 gear for driving filament
2x 625zz bearings
1x 608zz bearing
thingiverse
free

Compact Direct Drive Bowden Extruder by youssefaly97
...another version for 624 bearing or another drive gear please let me know.
future improvements might include ptfe filament guides.
thingiverse
free
Improved Filament Mount + Guide for Flashforge Creator Pro by Zwom
...om ruthex)
1x socket screw m4 x <16mm
for installation of filament guide to filament mount
2x nut m3
2x socket screw m3 x 8mm
thingiverse
free

KIS extruder - direct drive Nema 17 & Mk8 for 1.75 filament by Phil_Maddox
...ction on filament
update 5th apr 2015 > added a couple of simple bracket options which both require longer screws ( m3 x 25)
thingiverse
free

Spherical Bowden Filament Guide by yaikou
...sign that doesn't need a base and instead can be inserted into the v-slot rails, then rotated 90 degrees to lock it in place.
thingiverse
free

Hex-Key Knob for Hex-Head Nut / Bowden Filament-Tensioner Bolt by Davros66
...gh (inc hex)... but the fusion360 file is provided so you can customize it as per your requirements via parametric design.
enjoy.
thingiverse
free

Bearing Spool Holder by StephensEngineering
... spring or object with a 3mm inside diameter and an outside diameter not larger than 5mm, and about 3-10mm long
2x 623zz bearings
thingiverse
free

ZWO EAF Holder for Celestron Edge HD 9.25
...thread.
freecad source on my github
update
2019-12-08 version 2 add belt tensioner
2019-12-11 version 3 improved belt tension
thingiverse
free

Filament sensor by denmx
...t in 2 copyes.
connect wire to spring and insert it inside. put sphere at spring and connect two part of this gadget by m3 bolts
thingiverse
free
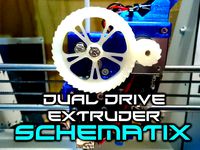
Schematix: Dual Drive Extruder (Fits E3D v6) by Schematix
....d 4mm o.d
springs (some experimentation may be required) however i use the following:
wire diameter: 0.7mm x 6mm o.d x 18mm long
Junaling
thingiverse
free

Eyewear Stand by junaling
...eyewear stand by junaling
thingiverse
:)
thingiverse
free

40x40 fan guards by junaling
...40x40 fan guards by junaling
thingiverse
40 mm fan guards remixed from :https://www.thingiverse.com/thing:1244751
thingiverse
free

Face Mask Strap Extender by junaling
...face mask strap extender by junaling
thingiverse
quick release face mask extender / adaptor.
print a pair with petg(recommended)
thingiverse
free

Spool Roler by junaling
...k screw
designed for these cases:https://www.thingiverse.com/thing:2767924https://www.thingiverse.com/thing:3737157
or standalone
thingiverse
free
Kindle Paperwhite Case by junaling
...g
thingiverse
updates:
2019-02-06 : version 3, case and cover
2018-05-31 : version 2
case and cover for kindle pw 3rd generation
thingiverse
free
Secure GT2 Belt End Clip by junaling
... gt2 belt end clip by junaling
thingiverse
alternative to the metal crimp for cr-10 belts and similar printers. use petg or abs.
thingiverse
free

CR-10 Extruder with tube support by junaling
...tead : https://www.thingiverse.com/thing:3070890 **
added bowden tube support, modified for flexible filament without tube insert
thingiverse
free

CR-10 Chain Under Carriage Mount (Junaling ) Remix by Key0nee
...mounts under the carriage as opposed to the top. eliminating the need for a different sized spacer or differing spring tensions.
thingiverse
free

CR-10 quick release dual 30mm part blower by junaling
...version of this thing please see:
https://www.thingiverse.com/thing:2473423
please post your comments, makes and etc. in there.
thingiverse
free

Cable chain / cable tie by junaling
...dated braces
update 2017-oct-29:
added cable braces
secure cables to the chain using 4 inch cable ties, prints without supports
Struder
thingiverse
free

Air-B-Struder by Barrocas
... 4.8mm zip-ties.
if you want to add a suspended counter-weight, just tie it to the zip-tie on top of the motor.
simple and easy.
thingiverse
free
EZ Struder Mount by Curt123
...lso need the same hardware you use for the stock mount and of course an ez struder from seemecnc. hope someone finds this useful.
thingiverse
free

Cable hanger - EZR STRUDER
...nder 3 withan ezr struder.
it just fits into the recesses of the top cover and allows the cables to run under the extruder lever.
thingiverse
free

Libro-Struder 2 by PCCLDideafactory
...f pinching action between a small set of rollers lets this mechanism grip and push filament with high power and without slipping.
thingiverse
free

CR6 SE Filament Guide for EZR Struder by zer0ss
...cr6 se filament guide for ezr struder by zer0ss
thingiverse
remixed the cprints cr 6 se filament guide to fit the ezr struder.
thingiverse
free

EZR Struder for the Hydro by Steve32060
...ezr struder for the hydro by steve32060
thingiverse
wanted to use my ezr...so i adapted a re-mix
thingiverse
free
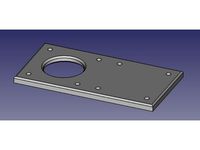
Ender 3 V2 EZR Struder adapter plate by Jomahu
...ender 3 v2 ezr struder adapter plate by jomahu
thingiverse
adapter plate to use seemecnc ezr struder in the ender 3 v2 printer.
thingiverse
free

Tinkey Struder by scottmayson
...ad body for j-head mk v-b and a minebea geared stepper motor. 215grams total weight.
designed for my delta printer - coming soon.
thingiverse
free

A-Struder remix - counterweight loop by mrtinkerer
...rer
thingiverse
remix of this by nebbianhttp://www.thingiverse.com/thing:1259941
added a place to attach a counterweight string.
thingiverse
free

SeeMeCNC EZR Struder Mount for 2020 i3 Clone by JT_Shop
...nt for the seemecnc ezr struder to mount to a 2020 vertical frame like the chinese i3 clone. the "nut" need 2 3mm nuts.
75Mm
cg_studio
$79

75mm Pak 97/383d model
...rld ww2 wwii
.obj .jpg .max .fbx .3ds - 75mm pak 97/38 3d model, royalty free license available, instant download after purchase.
3d_export
$79

75mm Pak 97-38 3D Model
... pak tank war weapon world
75mm pak 97-38 3d model download .c4d .max .obj .fbx .ma .lwo .3ds .3dm .stl graverino 108478 3dexport
3d_ocean
$79
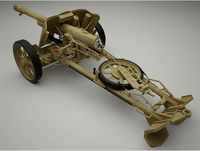
75mm Pak 97/38
...el originally created with 3ds max and rendered with vray the model is easy to modify, the main parts can be easily moved as i...
cg_studio
$149

M4A3 Sherman - 75mm - Mid production3d model
... .c4d .lwo .obj - m4a3 sherman - 75mm - mid production 3d model, royalty free license available, instant download after purchase.
cg_studio
$139
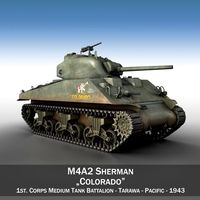
M4A2 Sherman - Colorado3d model
...m4a2 sherman colorado tank us marine corps pacific theatre 75mm m3 l/40 gun .c4d .obj .lwo .fbx .3ds -...
cg_studio
$139

M4A2 Sherman - Destroyer3d model
...m4a2 sherman destroyer tank us marine corps pacific theatre 75mm m3 l/40 gun .c4d .obj .lwo .fbx .3ds -...
cg_studio
$65

Pak 403d model
...pak 403d model cgstudio gun ww2 75mm artillery world war wwii 1943 army 1945 anti tank...
cg_studio
$125

Anti tank guns ww23d model
...anti tank guns ww23d model cgstudio gun ww2 75mm artillery wwii army 1945 antitank projectile weapon shell case...
3ddd
free

Indian vase
...311742 размеры: длинна маленькой вазы - 460mm, ширина - 75mm высота - 130mm длинна большой вазы - 600mm, ширина...
3d_export
$7
facemaskearloopweldingmachine
...the welding of one-time plane mask ear belt with 75mm standard ear band spacing. if you want to weld...
Bowden
turbosquid
$199

Vintage Ben Bowden Spacelander bike
... available on turbo squid, the world's leading provider of digital 3d models for visualization, films, television, and games.
3ddd
$1

Manooi Artica
...and pendants in various sizes and forms. suspension: galvanized bowden - dia. 1,5 mm. bulb: max 60 w -...
thingiverse
free
Remix Compact Bowden extruder - m6 bowden couplers and bowden tube pass-through
...ouplers and bowden tube pass-through
thingiverse
remix compact bowden extruder - m6 bowden couplers and bowden tube pass-through
thingiverse
free

Bowden Extruder
...bowden extruder
thingiverse
i have created bowden extruder for flsun delta 3d printer.
thingiverse
free

bowden 3mm by spee_D
...bowden 3mm by spee_d
thingiverse
for bowden 3mm
thingiverse
free
Bowden Tube Cutter
...bowden tube cutter
thingiverse
bowden tube cutter
thingiverse
free
Customizable Bowden Clip
...customizable bowden clip
thingiverse
customizable bowden clip
thingiverse
free
Bowden Oiler by fcheshire
...bowden oiler by fcheshire
thingiverse
inline bowden oiler
thingiverse
free

Bowden adapter by helkaroui
...bowden adapter by helkaroui
thingiverse
this is a fixed bowden adapter
thingiverse
free

Adventure3 Bowden Clip
...adventure3 bowden clip
thingiverse
adventure3 bowden clip
Nema
3d_export
$5
Electric Motor Nema 17
...electric motor nema 17
3dexport
40mm stepper motor nema 17 1.5a (17hs4401) motor 4-wire for 3d printer
turbosquid
$3
Nema 17
...rbosquid
royalty free 3d model nitro engine for download as on turbosquid: 3d models for games, architecture, videos. (1449252)
turbosquid
$1

Nema 17 Stepper motor
... available on turbo squid, the world's leading provider of digital 3d models for visualization, films, television, and games.
turbosquid
$1
Nema 17 Stepper Motor 59Nm
... available on turbo squid, the world's leading provider of digital 3d models for visualization, films, television, and games.
turbosquid
$3
Simple model of Nema 8 stepper motor
...del of nema 8 stepper motor for download as ipt, obj, and stl on turbosquid: 3d models for games, architecture, videos. (1543132)
3d_export
$5

simple model of nema 17 stepper motor
...ort
simple model, useful to prototype robots, 3d printers and other electronic diy projects<br>step and .ipt file included
3d_export
$5
simple model of nema 8 stepper motor
...robots, 3d printers and other electronic diy projects<br>current model: 20bygh33-0604a<br>step and .ipt file included
3ddd
free

Larte Luce
...class="star five "></div></div></li><li><img src="http://b.3ddd.ru/media/cache/sky_user_avatar_comment/avatar/users/117489.jpg" alt="ci-nema" width="35" height="35" class="img"><div class="name"><a href="/users/ci-nemaquot;>ci-nema</a></div><div class="raiting"><div class="star five "></div></div></li></ul><div class="more"><a href="/3dmodels/show/larte_luce/voted">еще</a></div></div><div class="number" rating="30" count="6"...
thingiverse
free

Nema 14 to Nema 17 Adapter by lukepat
...nema 14 to nema 17 adapter by lukepat
thingiverse
created a adapter for nema 14 to nema 17 mount.
thingiverse
free
Distance Nema 17 and Nema 23 by Krzysztof_Handtke
...distance nema 17 and nema 23 by krzysztof_handtke
thingiverse
distance to nema motors to build a cnc milling machine.
J
3d_export
$17

J-7mg
...j-7mg
3dexport
j-7mg
3d_export
$5

j hook
...j hook
3dexport
j hook
3d_export
$17

J-21 jastreb
...j-21 jastreb
3dexport
j-21 jastreb
3d_export
$17

Chengdu J-10
...chengdu j-10
3dexport
chengdu j-10
turbosquid
$96

J-20
...20
turbosquid
royalty free 3d model j-20 for download as max on turbosquid: 3d models for games, architecture, videos. (1658873)
turbosquid
$68

J-10A
...a
turbosquid
royalty free 3d model j-10a for download as max on turbosquid: 3d models for games, architecture, videos. (1658854)
turbosquid
$30

J-7
...j-7
turbosquid
royalty free 3d model j-7 for download as max on turbosquid: 3d models for games, architecture, videos. (1538420)
turbosquid
$14

Fence J
...turbosquid
royalty free 3d model fence j for download as fbx on turbosquid: 3d models for games, architecture, videos. (1313345)
turbosquid
$7

J for Jug
...rbosquid
royalty free 3d model j for jug for download as max on turbosquid: 3d models for games, architecture, videos. (1688347)
turbosquid
$5

Letter J
...urbosquid
royalty free 3d model letter j for download as max on turbosquid: 3d models for games, architecture, videos. (1408483)
17
3d_export
$6

rocks 17
...rocks 17
3dexport
rocks 3d model 17
3ddd
$1

PLANTS 17
...plants 17
3ddd
цветок , горшок
plants 17,, pots in diameter 100,80,60,40cm,,, enjoy
3d_export
$6
tap-17
...tap-17
3dexport
3d_export
$6

set-17
...set-17
3dexport
3d_export
$27

C-17 Globemaster
...c-17 globemaster
3dexport
c-17 globemaster
3ddd
free

Renault FT-17
...renault ft-17
3ddd
ft-17 , renault , танк
turbosquid
$40

cottage 17
...bosquid
royalty free 3d model cottage 17 for download as max on turbosquid: 3d models for games, architecture, videos. (1377003)
turbosquid
$30

Apartment 17
...squid
royalty free 3d model apartment 17 for download as max on turbosquid: 3d models for games, architecture, videos. (1432680)
turbosquid
$10

Surfboard 17
...squid
royalty free 3d model surfboard 17 for download as max on turbosquid: 3d models for games, architecture, videos. (1375686)
turbosquid
$7
Rock 17
...turbosquid
royalty free 3d model rock 17 for download as obj on turbosquid: 3d models for games, architecture, videos. (1486522)
Extruder
3ddd
$1

Extruded Chair
...extruded chair
3ddd
extruded , tom dixon
inspired by tom dixon extruded chair
turbosquid
$15

Extruded Table
... extruded table for download as blend, dae, fbx, obj, and stl on turbosquid: 3d models for games, architecture, videos. (1634137)
turbosquid
$2

3D Printer Extruder
...d
royalty free 3d model 3d printer extruder for download as on turbosquid: 3d models for games, architecture, videos. (1537359)
turbosquid
$1

Zombie extruded text
...oyalty free 3d model zombie extruded text for download as obj on turbosquid: 3d models for games, architecture, videos. (1322198)
turbosquid
$4

Extruder conical screw
...el extruder conical screw for download as sldpr, ige, and stl on turbosquid: 3d models for games, architecture, videos. (1524433)
turbosquid
$50

3d PRINTER - Extruder
... available on turbo squid, the world's leading provider of digital 3d models for visualization, films, television, and games.
turbosquid
$15

Extruded Table 2
...xtruded table 2 for download as blend, dae, fbx, obj, and stl on turbosquid: 3d models for games, architecture, videos. (1621846)
turbosquid
$10

Maya Extrude Tool
... available on turbo squid, the world's leading provider of digital 3d models for visualization, films, television, and games.
3d_export
$5

world earth extrude map
...world earth extrude map
3dexport
3ddd
$1

Simply Elegant Extruded Tree Coffee Table Design
...ble by link studios. the silhouette of a tree is visible at one angle, extruded from the surface to create the support structure.
Motor
archibase_planet
free

Motor
...base planet
motor motor engine engine electric motor
motor wagner n250213 - 3d model (*.gsm+*.3ds) for interior 3d visualization.
archibase_planet
free

Motor
...motor
archibase planet
motor motor engine engine
motor n151112 - 3d model (*.gsm+*.3ds) for interior 3d visualization.
archibase_planet
free

Motor
...motor
archibase planet
motor motor engine engine
motor n150615 - 3d model (*.gsm+*.3ds+*.max) for interior 3d visualization.
turbosquid
$15

Motor
...otor
turbosquid
royalty free 3d model motor for download as on turbosquid: 3d models for games, architecture, videos. (1639404)
3d_ocean
$5

Electric motor
...electric motor
3docean
car electric engine industry motor phase train vehicle
an electric motor enjoy!
3d_ocean
$18

Electric Motor
...electric motor
3docean
electric motor engine machine mover parts
3d model electric motor for hoist crane
turbosquid
$29

Motor
... available on turbo squid, the world's leading provider of digital 3d models for visualization, films, television, and games.
turbosquid
$5

Motor
... available on turbo squid, the world's leading provider of digital 3d models for visualization, films, television, and games.
3d_export
$5

electric motor
...electric motor
3dexport
electric motor use for industrial purposes
3d_export
$5

servo motor
...tor
3dexport
it's a simple part of servo motor 0.75kw for used in machines assembly to show specified motor in own project.
1
turbosquid
$69

armchairs(1)(1)
... available on turbo squid, the world's leading provider of digital 3d models for visualization, films, television, and games.
turbosquid
$15

ring 1+1
... available on turbo squid, the world's leading provider of digital 3d models for visualization, films, television, and games.
turbosquid
$10

chair(1)(1)
... available on turbo squid, the world's leading provider of digital 3d models for visualization, films, television, and games.
turbosquid
$8

Chair(1)(1)
... available on turbo squid, the world's leading provider of digital 3d models for visualization, films, television, and games.
turbosquid
$2

RING 1(1)
... available on turbo squid, the world's leading provider of digital 3d models for visualization, films, television, and games.
turbosquid
$1

house 1(1)
... available on turbo squid, the world's leading provider of digital 3d models for visualization, films, television, and games.
turbosquid
$1

Table 1(1)
... available on turbo squid, the world's leading provider of digital 3d models for visualization, films, television, and games.
turbosquid
$59

Formula 1(1)
...lty free 3d model formula 1 for download as max, fbx, and obj on turbosquid: 3d models for games, architecture, videos. (1567088)
design_connected
$11

No 1
...no 1
designconnected
sibast no 1 computer generated 3d model. designed by sibast, helge.
turbosquid
$2

desert house(1)(1)
...3d model desert house(1)(1) for download as 3ds, max, and obj on turbosquid: 3d models for games, architecture, videos. (1055095)